At least since the Cambridge Analytica data scandal, it should also have become clear to the last Facebook fan that personal data on the network could be in danger at any time. But it is not just concerns about further data leaks that trigger many people to consider separating from Facebook. Annoying algorithms, constant notifications or even the social pressure associated with the platform are probably some good reasons for Facebook fatigue. If you don't feel like it anymore, you can permanently delete your Facebook account. We'll show you how it works - and of course how you can save the accumulated data beforehand. In addition, with the account deactivation we show a veritable alternative to the complete withdrawal from Facebook.
Delete Facebook: First back up your own data
Before you finally do tabula rasa when it comes to Facebook, the most important personal data from the network should be backed up. In fact, Facebook offers the option to request all of the uploaded data . As the world's data octopus, Facebook really saves everything you have done on the network in the course of your career. The good news: you can request the full data and download it to your computer. In addition to all the photos and videos that you have uploaded to Facebook, the network then also provides a lot of other data. For example, you can retrace your entire Facebook history via the HTML database or view a list of your likes. Even rejected friend requests can be found in the personal Facebook archive.
How to download the data from your Facebook account:
In the old Facebook deisgn:
1. Log into Facebook . Here click on the small arrow next to your profile in the upper right corner and select " Settings " in the menu that opens .
2. Switch to the " Your Facebook information " area on the left .
3. Next to the line " Your information Download " on the " reputation ".
4. On this page you can now select in detail which data you want to download and the form in which it should be processed. Usually you can just leave the default settings. Here the complete Facebook data is processed as HTML files..
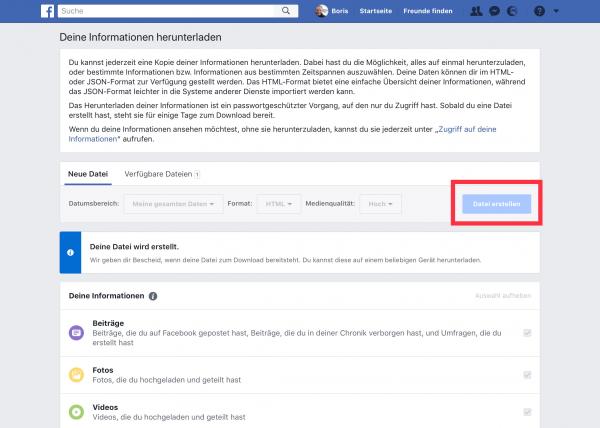 In this menu you can request your personal Facebook archive as a download.
 5. If you are satisfied with the selection, click on " Create file ". The data is not available immediately. Instead, you will receive an email as soon as the download is complete. With our account, the email came after a few minutes, but in practice it can take longer.
6. Click the download link in the mail . After entering your Facebook password , this leads to a ZIP archive with your data . Download the file and extract it to your hard drive.
7. You will find the " Index.html " file in the unzipped folder . Click on this to see an overview of all the activities that you have participated in in your Facebook life.
The data is clearly sorted according to categories. Regardless of this, you can of course also browse the folder directly. This is logically structured so that, for example, all videos are in the subfolder of the same name.
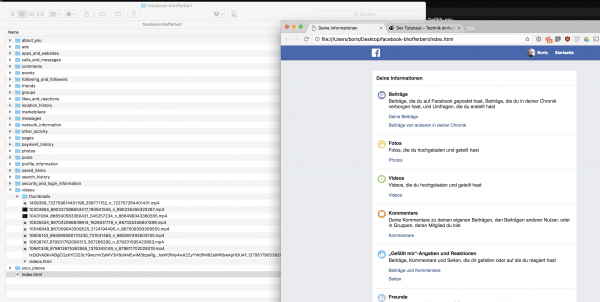 The personal Facebook archive contains all the data that you have left on the network.
 In the new Facebook design:
1. Log in to Facebook . Then click on the small arrow in the upper right corner , select the entry " Settings and privacy " in the menu that opens and then go to " Settings ".
2. Switch to the section " Your Facebook information " on the left.
3. To the right of the " Download your information " line, click " View ".
4. Now you can select in detail which data should be downloaded and in which form it should be processed. Usually you can just keep the default settings,this will prepare all of your Facebook data as HTML files..
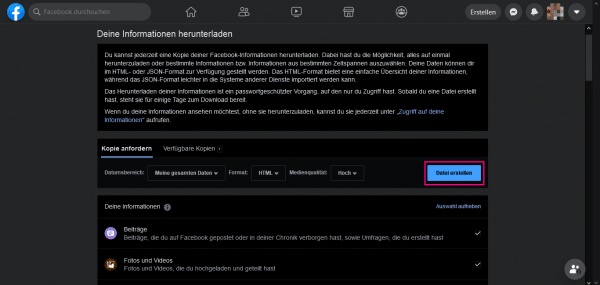 Here you can request all your Facebook data as a download and set which data you would like to have in which form.
 5. When you have made your selection, click on " Create file ". As soon as the data has been compiled and ready to be downloaded, you will receive an email and a Facebook notification. This took a few minutes for our account, but in practice it can take longer.
6. Click the Facebook notification or the link in the email. Then click on " Download ". After entering your Facebook password you will be taken to a ZIP archive with your data . Download the file, extract it to your hard drive.
7. You will find the " Index.html " file in the folder . Click on this to see an overview of all your Facebook activities.
The data is sorted by categories here. Alternatively, you can also browse the folder directly. This is logically structured so that all search queries are in the Search_History subfolder.
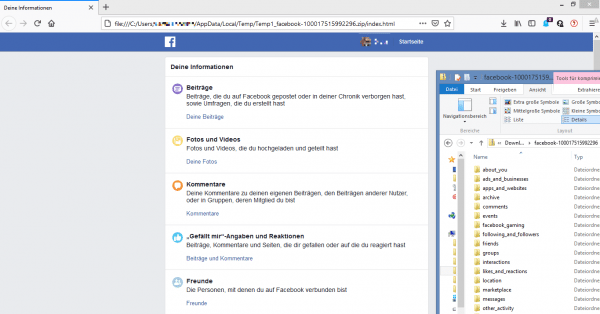 This Facebook archive contains all the data that you have ever left on Facebook.
 Delete Facebook account
If you have decided to delete your Facebook account, we will show you here how to permanently close your Facebook profile.
In the app
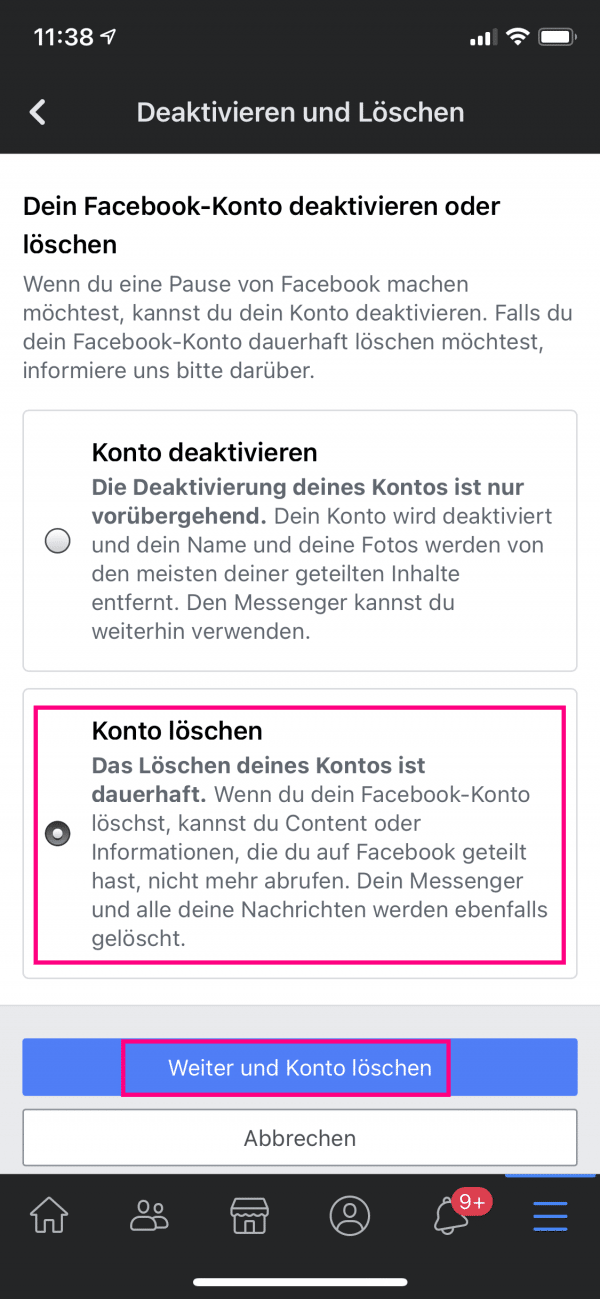 In the Facebook app, first navigate via the three-line menu to "Settings and privacy", "Settings", then to "Personal information and account information" and finally to "Account ownership and settings". Select "Deactivate and delete", then "Delete account" and confirm your entry with "Continue and delete account".
 For the old Facebook design
1st step:
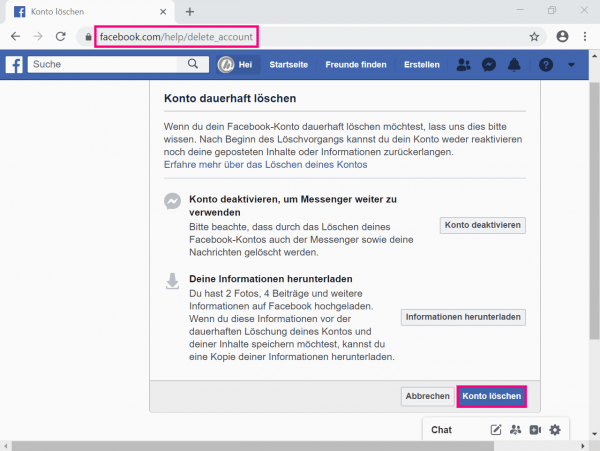 Log in to Facebook. Then click on this link: https://www.facebook.com/help/delete_account . You will now land on the " Permanently delete account " page . Here Facebook summarizes your current status on the network and offers you to download your data. To do this, click on " Download information ". If you want to continue with the deletion, go to " Delete account ".
 2nd step:
 If you are absolutely sure that you want to delete your Facebook account, click the " Delete Account " button . Facebook will now ask you to enter your password . In addition, you have to answer a captcha query for security reasons . Enter both and click " Ok " to initiate the deletion of the account.
In principle, your Facebook account is history. But it's not that simple: If you log into your account again within the next 14 days, the network will automatically cancel the deletion of the profile. Only after you have waited this two-week grace period without logging into Facebook will the deletion of all data be instructed. This can take up to a further 90 days. After that, your Facebook account permanently deleted. Further information on deleting a Facebook account can be found at this link: https://www.facebook.com/help/224562897555674 .
For the new Facebook design
1st step:
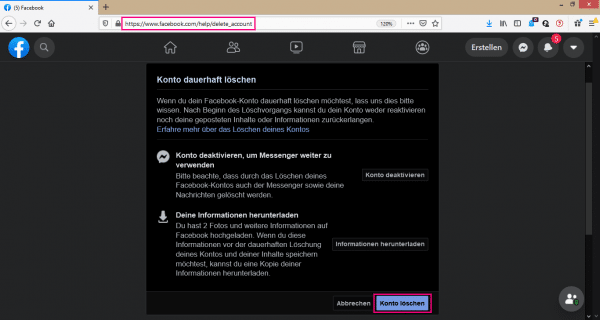 Log into Facebook and then click on this link: https://www.facebook.com/help/delete_account . It will take you to the " Permanently delete account " page . Facebook offers you to deactivate your account instead of deleting it. You can also save your data there by clicking on " Download information ". If you want to continue with the deletion, select " Delete account ".
 2nd step:
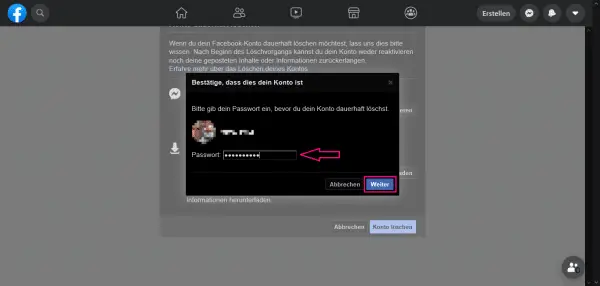 Now Facebook asks you to enter your password . If you are absolutely sure that you want to delete your Facebook account, then click on " Next ".
 3rd step:
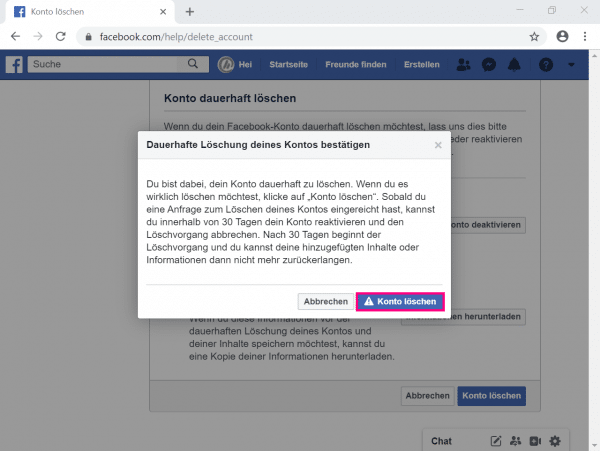
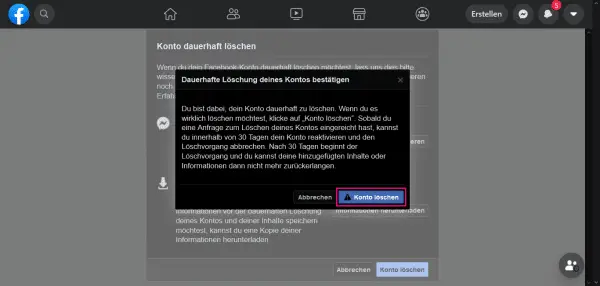 This is followed by a final query as to whether you really want to delete your account. If so, click on " Delete Account ".
 Note: If you log back into your account within the next 30 days, your profile will be automatically restored. Only when you have waited this time without logging into Facebook will the deletion of all your data be instructed. This can then take up to 90 days - after which your Facebook account is irrevocably deleted.
Alternative: deactivate Facebook account
Deleting your own Facebook account is quite a radical step. If you just want to distance yourself from Facebook for a while, the network offers an alternative: just deactivate your Facebook account. In this case, all data including friendship connections, likes, etc. will be retained. In return, you no longer appear in the Facebook search and are no longer visible to people on your friends list. To deactivate your account:
Old Facebook design:
To deactivate your account, follow our step-by-step instructions or take a look at the quick start guide .
1st step:
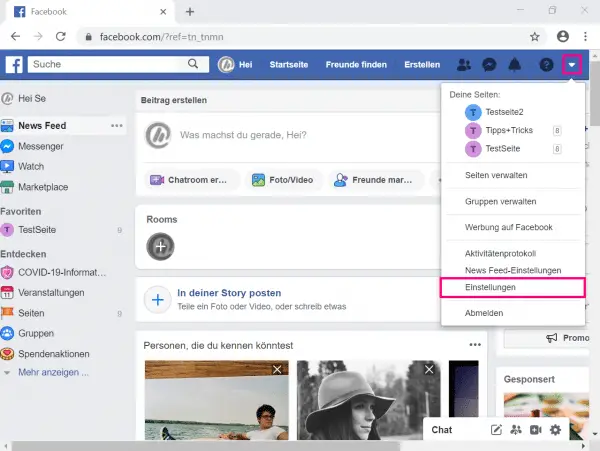 Log into Facebook and click the little triangle next to your name in the top right corner . In the menu that opens, select the “ Settings ” item .
 2nd step:
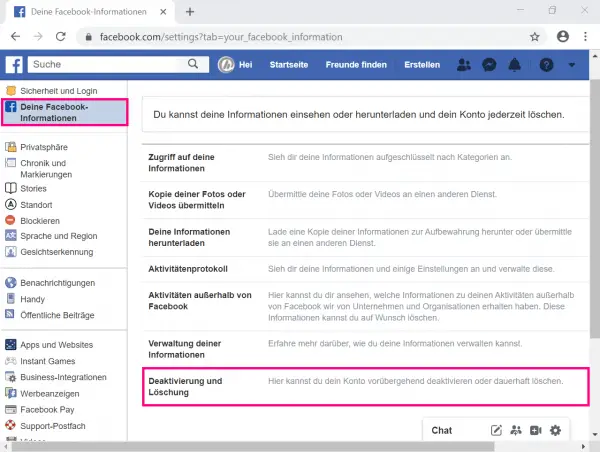 On the start page of the Facebook settings, go to " Your Facebook information " in the left menu . Right click on the lowest point " Deactivation and deletion ".
 3rd step:
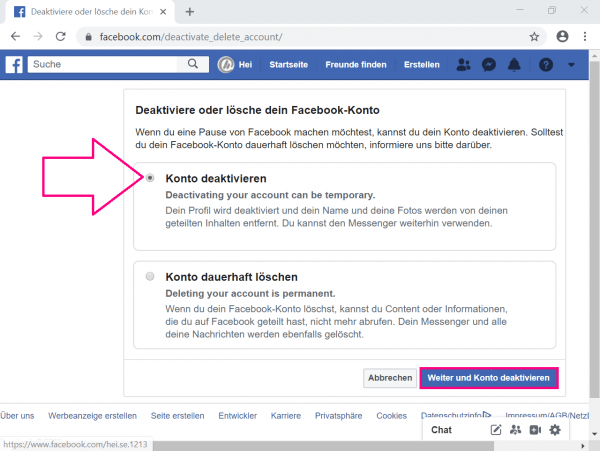 Select " Deactivate Account " and click on " Next and Deactivate Account ".
 4th step:
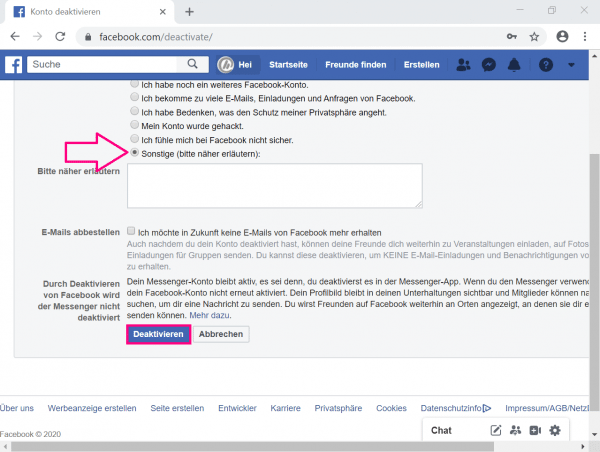 In the last step, Facebook asks for reasons for the deactivation and tries to persuade you to stay. If you are not impressed, click " Deactivate ".
 Facebook will now log you out of your account and deactivate it for other users. This state is theoretically of unlimited duration. To reactivate the account , all you have to do is log into Facebook with your username and password. The network then immediately restores all data.
Quick guide: Deactivate Facebook account
- Go to the small triangle symbol next to your user name in the upper right corner and then to " Settings ".
- Click on " Your Facebook Information " in the left menu .
- Go to " Deactivation and Deletion ".
- Then select " Deactivate account " and click on " Next and deactivate account ".
- Enter a reason for the deletion and complete the process with " Deactivate ".
New Facebook design:
To deactivate your Facebook account, follow the step-by-step instructions or take a look at our quick guide .
1st step:
 Log in to Facebook and click on the small triangle in the upper right corner . In the menu that opens, select " Settings and privacy " and then " Settings ".
 2nd step:
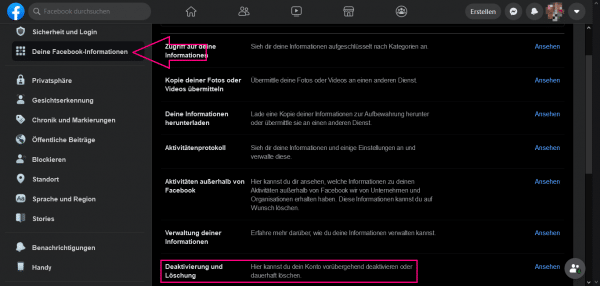 In the settings, go to " Your Facebook information " in the left column . In the area on the right, select the lowest point " Deactivation and deletion ".
 3rd step:
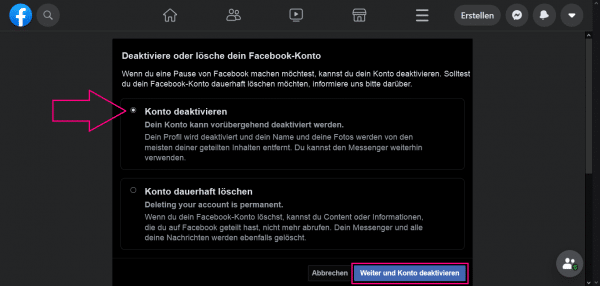 Select " Deactivate Account " and click " Next and Deactivate Account ". You may need to enter your password to continue.
 4th step:
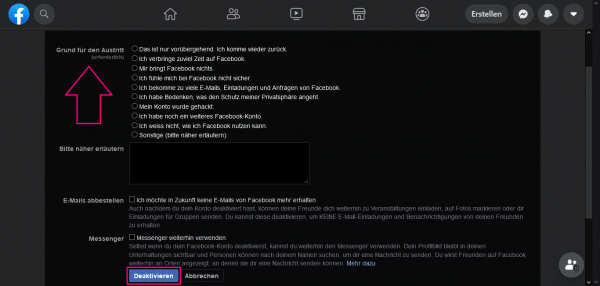 Now Facebook asks you for reasons for the deactivation. You can also unsubscribe from emails from Facebook here and decide that you want to continue using Messenger. To deactivate your account, click " Deactivate ".
 5th step:
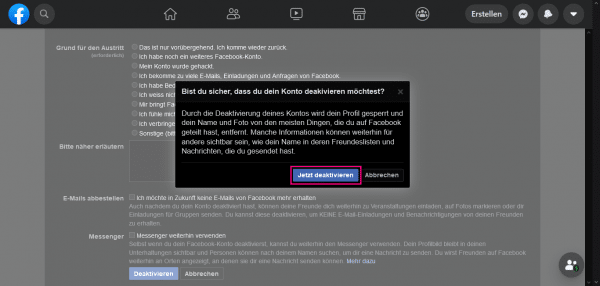 Now Facebook asks one last time whether you are really serious. If so, click " Deactivate Now ".
 You will now be logged out and Facebook will deactivate your account for other users - theoretically for an unlimited period of time. To reactivate your account , log back in to Facebook with your username and password. Your data will then be restored immediately.
Quick guide: Deactivate Facebook account
- Click on the small triangle symbol in the upper right corner , then on " Settings and privacy " and then on " Settings ".
- Select " Your Facebook Information " in the menu on the left .
- Click on " Deactivation and Deletion ".
- Now select " Deactivate account " and click on " Next and deactivate account ".
- If necessary, enter your password .
- Finally, enter a reason for the deletion and end the process with " Deactivate ". Confirm with " Deactivate now ".