Highcharts is a library written in HTML5 and pure Javascript:
Let's see how it works, how it is structured and how to implement it on our website. Directory structure First we download the zip that contains our library, we unzip it and we can see our file directory and how it is structured. 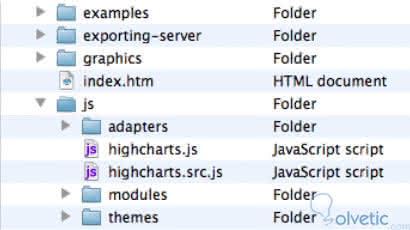
Let's see what each directory contains and for what it is used: - index.html : This the HTML page of test, with this you can make tests and visualize the options by default.
- examples : This folder contains all the source code of the examples.
- graphics : This folder contains the images used in the examples.
- exporting-server : This is a directory that contains the server-side function to export the graphics to an image.
- js : This is the main directory of Highcharts. Each Javascript file has two suffixes, the first .src.js is who contains the source code with comments in it and the other .js is the minimized version of it.
- adapters : Here are the complements to be able to use Mootools or Prototype as frameworks, within this directory is the following:
- exporting.js : this file gives us functions to export and print.
- themes : This folder contains a series of pre-built Javascript files with settings such as background color, styles, among others. We can load one of these files in the graphics for different styles.
Seeing how this library works and how it is organized, let's take a practical example of how to implement Highcharts on our website.
First we included the Highcharts libraries, as well as the jQuery libraries for extra functionality: <html> <head> <meta http-equiv = "Content-Type" content = "text / html; charset = utf-8"> <title> Highcharts First Example </ title> <script src = "// ajax.googleapis.com/ajax/libs/jquery/1.7.1/jquery.min.js"> </ script> <script type = "text / javascript" src = "Highcharts-2.2.2 / js / highcharts.js"> </ script>
The graph of curves is defined in the specification of the object that contains all the properties and the series of the data. var chart = new Highcharts.Chart ({ chart: { ... }, title: '...' ... }); Once this object is created, the graphic is displayed in the browser, within this object there are a series of options that we will explain below. The renderTo statement tells Highcharts to display a graphic in the HTML, specifically in the <div> with the id = "container". The type option defines the type of graphic, the options can be: area, line, spline, etc. In this example we will use spline . chart: { renderTo: 'container', type: 'spline' } Followed by this we set a title and a subtitle, which will appear at the top of the graph. title: { text: 'Web browsers ...' }, subtitle: { text: 'From 2008 to present' }, In the option of the categories in the xAxis property it contains an array with the labels of each data entry and with tickIntervals we separate the way in which these labels are printed. xAxis: { categories: ['Jan 2008', 'Feb', ....], tickInterval: 3 }, The options in the yAxis property allow us to assign the title of that axis and set the minimum and maximum value in which we will limit our graph. yAxis: { title: { text: 'Percentage%' }, min: 0 }, The property of plotOptions is who controls how each data series will be displayed depending on the type of graph. plotOptions: { series: { lineWidth: 2 } }, The series property is the center of the entire configuration object that defines the data that will feed the graph. series: [{ name: 'Internet Explorer', data: [54.7, 54.7, 53.9, 54.8, 54.4, ...] }, { name: 'FireFox', data: [36.4, 36.5, 37.0, 39.1, 39.8, ...] }, { Now with all the parts of the code explained let's see how it would look in our browser. 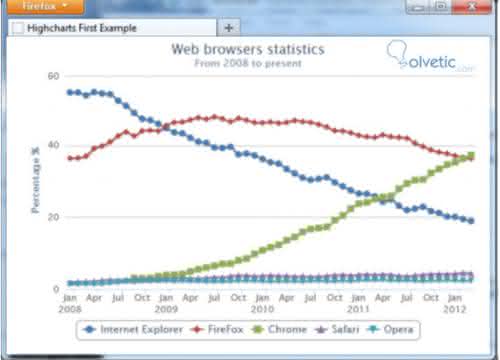
Finally I leave the complete code so you can try it for yourself and without forgetting that you can customize it to adapt it to any need. <! DOCTYPE HTML> <html> <head> <meta http-equiv = "Content-Type" content = "text / html; charset = utf-8"> <title> Highcharts First Example </ title> <script src = "// ajax.googleapis.com/ajax/libs/jquery/1.7.1/jquery. min.js "> </ script> <script type = "text / javascript" src = "Highcharts-2.2.2 / js / highcharts.js"> </ script> <script type = "text / javascript"> $ (document) .ready (function () { var chart = new Highcharts.Chart ({ chart: { renderTo: 'container', type: 'spline' }, title: { text: 'Web browsers statistics' }, subtitle: { text: 'From 2008 to present' }, xAxis: { categories: ['Jan 2008', 'Feb', ....], tickInterval: 3 }, yAxis: { title: { text: 'Percentage%' }, min: 0 }, plotOptions: { series: { lineWidth: 2 } }, series: [{ name: 'Internet Explorer', data: [54.7, 54.7, 53.9, 54.8, 54.4, ...] }, { name: 'FireFox', data: [36.4, 36.5, 37.0, 39.1, 39.8, ...] }, { // Chrome started until late 2008 name: 'Chrome', data: [null, null, null, null, null, null, null, null, 3.1, 3.0, 3.1, 3.6, ...] }, { name: 'Safari', data: [1.9, 2.0, 2.1, 2.2, 2.4, 2.6, ...] }, { name: 'Opera', [i] Chapter 1 [/ i] [25] data: [1.4, 1.4, 1.4, 1.4, 1.5, 1.7, ...] }] }); }); </ script> </ head> <body> <div> <! - Highcharts rendering takes place inside this DIV -> <div id = "container"> </ div> </ div> </ body> </ html>