All the tutorials I have read so far on
how to install vsftpd
start the same way,
warning that the FTP protocol is insecure because it is not encrypted
. This is true, but it is also true that if we want to set up a local FTP server for our own use, using vsftpd is the fastest and easiest solution. For this reason I decided to write this
tutorial on how to install vsftpd on Linux Ubuntu and configure it correctly step by step
.
It is also necessary that you know the alternatives to FTP considered as secure, where we find the
sFTP
and
SCP
protocols as the most used. We can also configure vsftpd to use a secure connection under SSL / TLS.
Although it is relatively simple to configure vsftp with SSL / TLS, I will not include it in this tutorial, since the objective is to make a quick and simple explanation.
I may dedicate a tutorial to that aspect later.
How to install vsftpd on Linux Ubuntu and configure it step by step.
I will try to make this tutorial valid for both recent versions of Ubuntu and older versions. At the time of writing this article I am working with
Ubuntu 16.04
, but the tutorial will also be compatible with Ubuntu 14.04 and it will probably also work for previous versions.
Before entering fully into the
configuration of vsftpd
, remember that in this tutorial
I will not include the configuration of the firewall
, since each user will have the one they like installed. With this I want to remind you to manage the firewall rules to allow connections to the FTP server, which usually use ports 20 and 21 unless we configure it otherwise.
If you don't use any firewall, you won't need to do any of this.
I have chosen vsftpd as an FTP server because it is very easy to install and use.
We also find it in the official Ubuntu repositories, which simplifies the task much more.
Install vsftpd in Ubuntu.
To
install vsftpd in Ubuntu 16.04
we can use the command:
sudo apt install vsftpd
If we use the
Ubuntu
version
14.04
, the command we will use is:
sudo apt-get install vsftpd
Before moving forward, we must know the commands to start, stop and restart the vsftpd daemon.
In Ubuntu 16.04 the commands to start, stop and restart vsftpd are:
sudo systemctl restart vsftpd
sudo systemctl start vsftpd
sudo systemctl stop vsftpd
In Ubuntu 10.04 the commands to start, stop and restart vsftpd are:
sudo service vsftpd restart
sudo service vsftpd start
sudo service vsftpd stop
Configure vsftpd in Ubuntu.
To configure vsftpd I will start from scratch, adding a new user to which to give the appropriate permissions so that I can upload and download files to a specific folder. This user will be locked in your
home
folder, so you will not be able to access any other part of the operating system. In this way, we get a more secure configuration.
To add the user we execute the command:
sudo adduser TechnoWikis
After executing this command you will ask us to enter a password.
I make a small paragraph to remember the tutorial on
how to add and remove users on Linux
that we wrote some time ago.
We will use this
TechnoWikis
user to access the FTP server. We should know that the vsftp chroot cage security system encloses the user in his
home
folder, so in our case the chroot would be
/home/TechnoWikis
. In addition, vsftp handles chroot cages so that two conditions must be met:
-
The owner of the chroot folder and the user who connects via FTP cannot be the same.
-
The chroot folder cannot have write permissions.
So we must change the owner of this folder with the following command:
sudo chown root:root /home/TechnoWikis
If we want the user to upload files to the FTP server, we will need to create a folder:
sudo mkdir /home/TechnoWikis/ftp_subidas
sudo chown TechnoWikis:TechnoWikis /home/TechnoWikis/ftp_subidas
Something very important is to remove access to the
shell
of the
TechnoWikis
user we add.
I insist that it is very important because it can pose a serious security risk.
The problem is that when removing access to the shell, vsftpd does not allow us to access the FTP server because the user does not have a valid shell assigned. To solve this
we will create a custom shell, which we will add to the list of valid shells and finally assign this shell to our user
.
We start by executing the following command:
sudo nano /bin/ftponly
We add the following lines and save the file:
#!/bin/sh
echo "Esta cuenta solo dispone de acceso por FTP."
We give execution permissions to the
ftponly
shell with the command:
sudo chmod a+x /bin/ftponly
Edit the list of valid shells with the command:
sudo nano /etc/shells
We add
/bin/ftponly
to the end of the list:
# /etc/shells: valid login shells
/bin/sh
/bin/dash
/bin/bash
/bin/rbash
/bin/ftponly
We
ftponly
the shell
ftponly
to our user:
sudo usermod TechnoWikis -s /bin/ftponly
Important note:
in some tutorials that I have been able to read do not create this
ftponly
custom shell, but instead use the system shell
/usr/sbin/nologin
or
/sbin/nologin
. As there are several system services that use this
nologin
shell,
we should not use it or we will be creating a serious security problem
.
At this point, we have our user ready. Now we proceed to
edit the vsftpd configuration file
with the command:
sudo nano /etc/vsftpd.conf
The file must be modified by deleting the
#
character in the corresponding parts and making the modifications as shown below:
...

# Allow anonymous FTP? (Disabled by default).
anonymous_enable=NO
#
# Uncomment this to allow local users to log in.
local_enable=YES
#
# Uncomment this to enable any form of FTP write command.
write_enable=YES
#

...

# You may restrict local users to their home directories.  See the FAQ for
# the possible risks in this before using chroot_local_user or
# chroot_list_enable below.
chroot_local_user=YES
#
...
We only have to restart vsftpd with the command that we show you at the beginning of this tutorial and we start to prove that everything works correctly. It's that simple to install vsftpd on Linux Ubuntu.
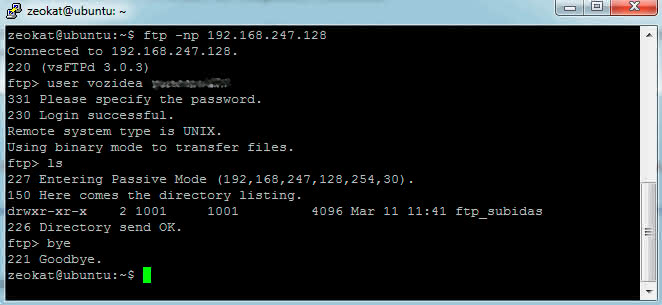
To test the FTP server you can try to connect using an
FTP client such as FileZilla
or you can go through the tutorial we wrote recently about
how to send a file via FTP from the console in Linux
.