To stay up to date, remember to subscribe to our YouTube channel!
SUBSCRIBE ON YOUTUBE
Windows 11 is a system that has been developed with numerous functions and features but as any system is prone to errors, one of the most delicate is the reboot loop, that is, it restarts over and over again without having access to the normal session, there are various reasons that generate this error and range from local system settings to application parameters that have not been configured correctly..
Perhaps you have encountered a practically infinite Windows 11 Reboot Loop and that usually happens when we install or update the operating system. If you see that you have an infinite reboot loop when installing Windows 11, check this tutorial to see different ways to resolve having a Windows 11 startup loop. TechnoWikis offers you a series of solutions that are created to provide a comprehensive solution to this error and thus be able to access Windows 11 without problems, you can try each one to see which one helps you correct this error.
1 Fix Windows 11 Reboot Loop from Advanced Startup
The advanced startup mode gives us the possibility to carry out a series of actions on the system when it fails, it is ideal since it gives us access to the console, safe mode, system restore and more..
Step 1
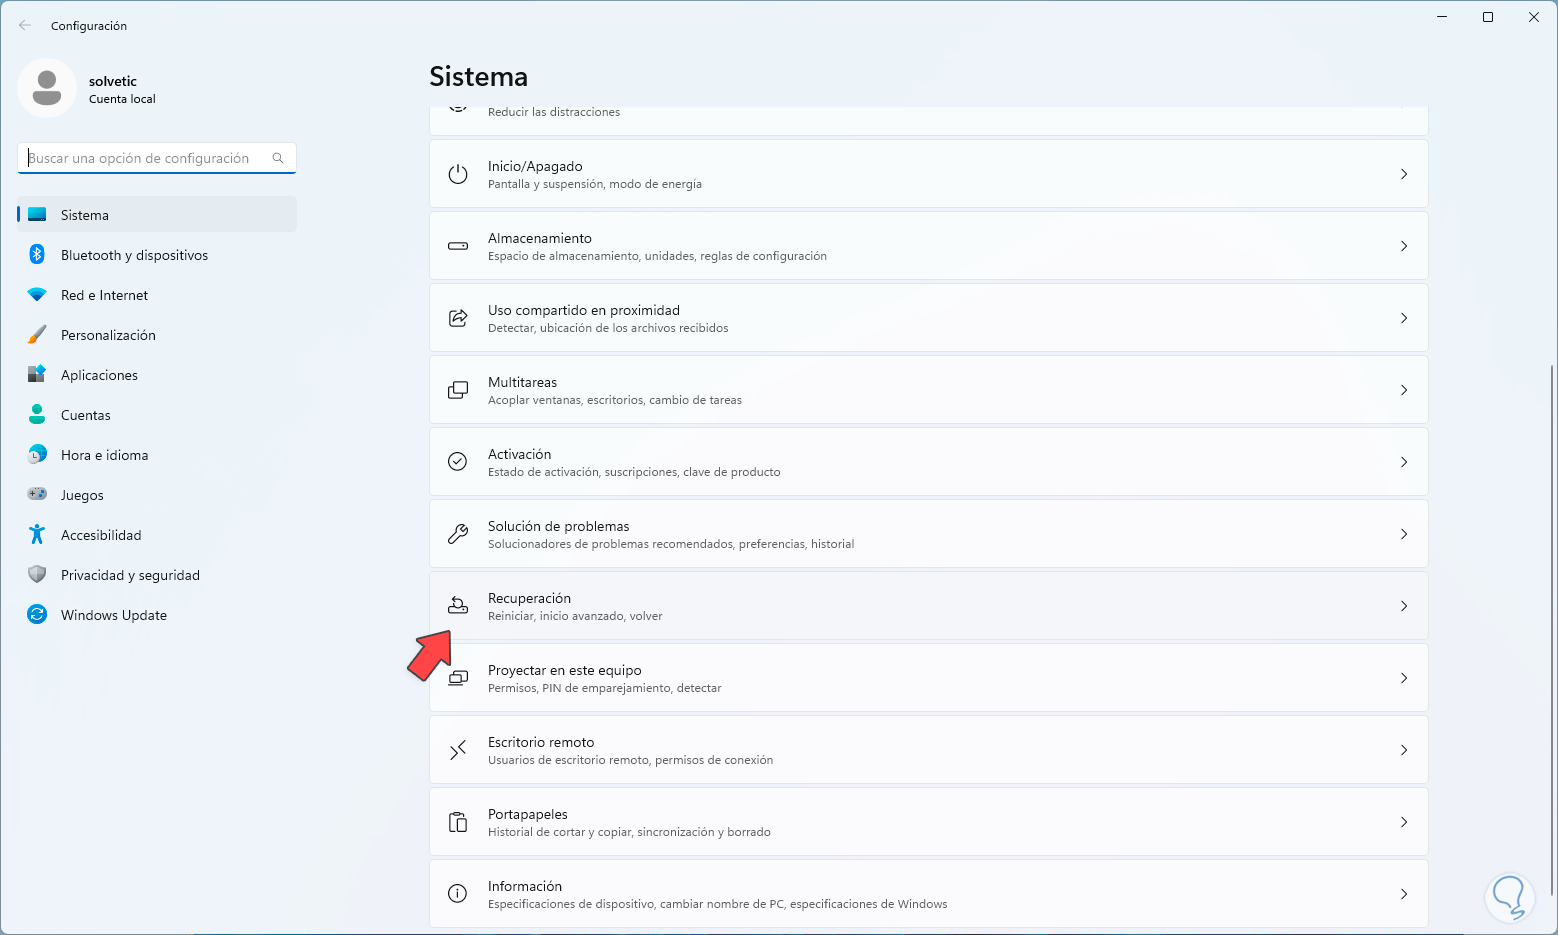
In case of having access to the system we can go to "Start - Settings - System - Recovery":
Step 2
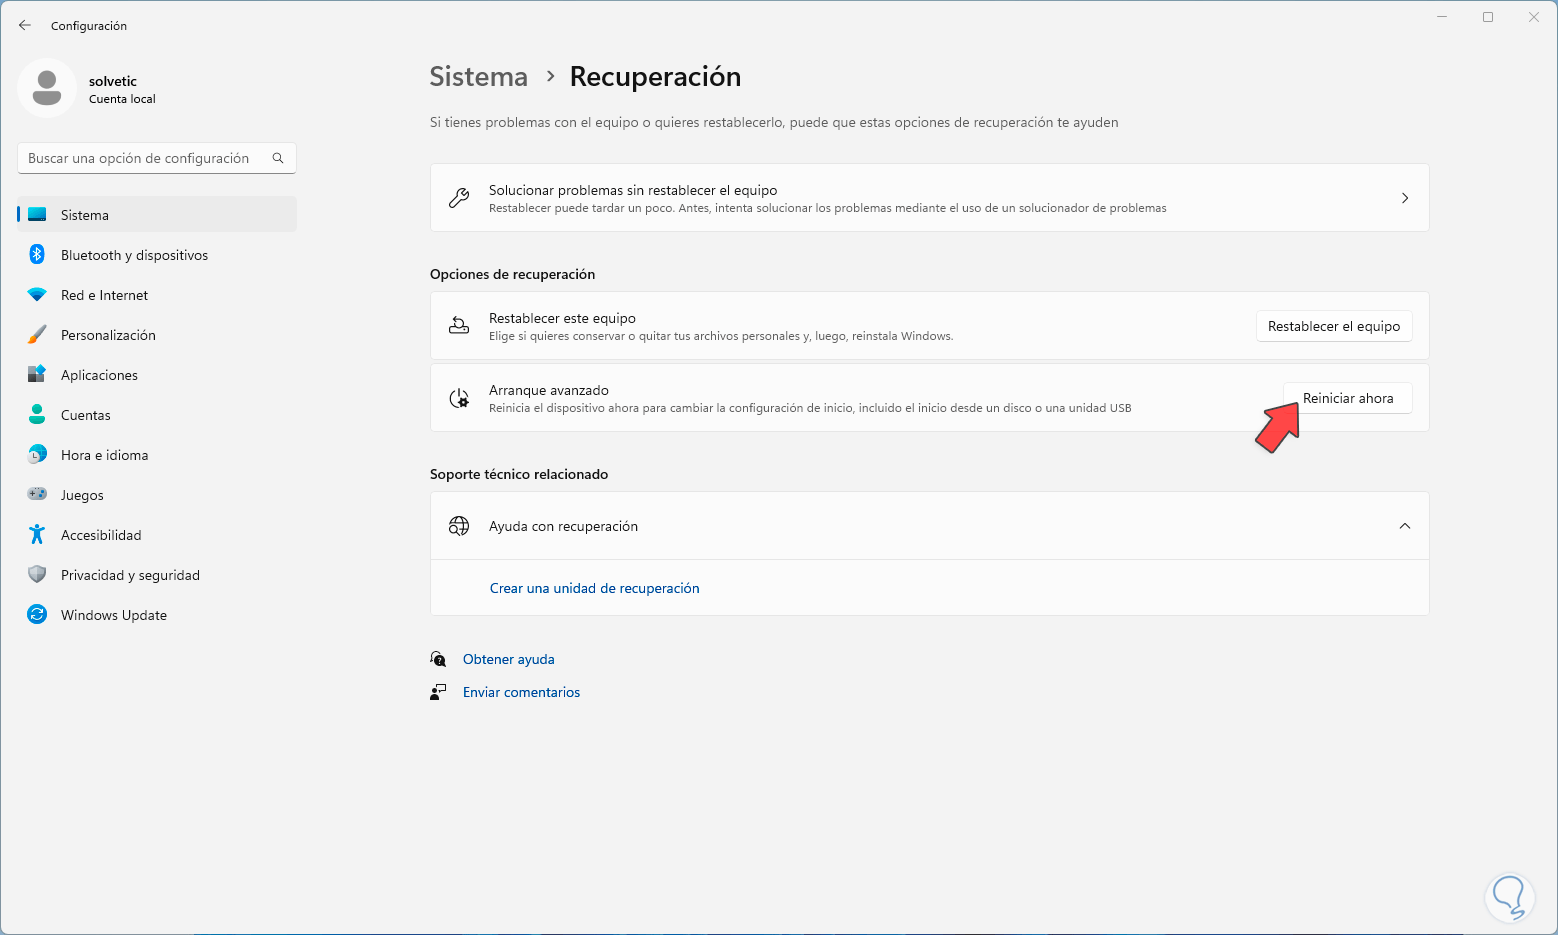
When accessing there we will see the following. There we click on "Restart now" and we will see the following message:
Step 3
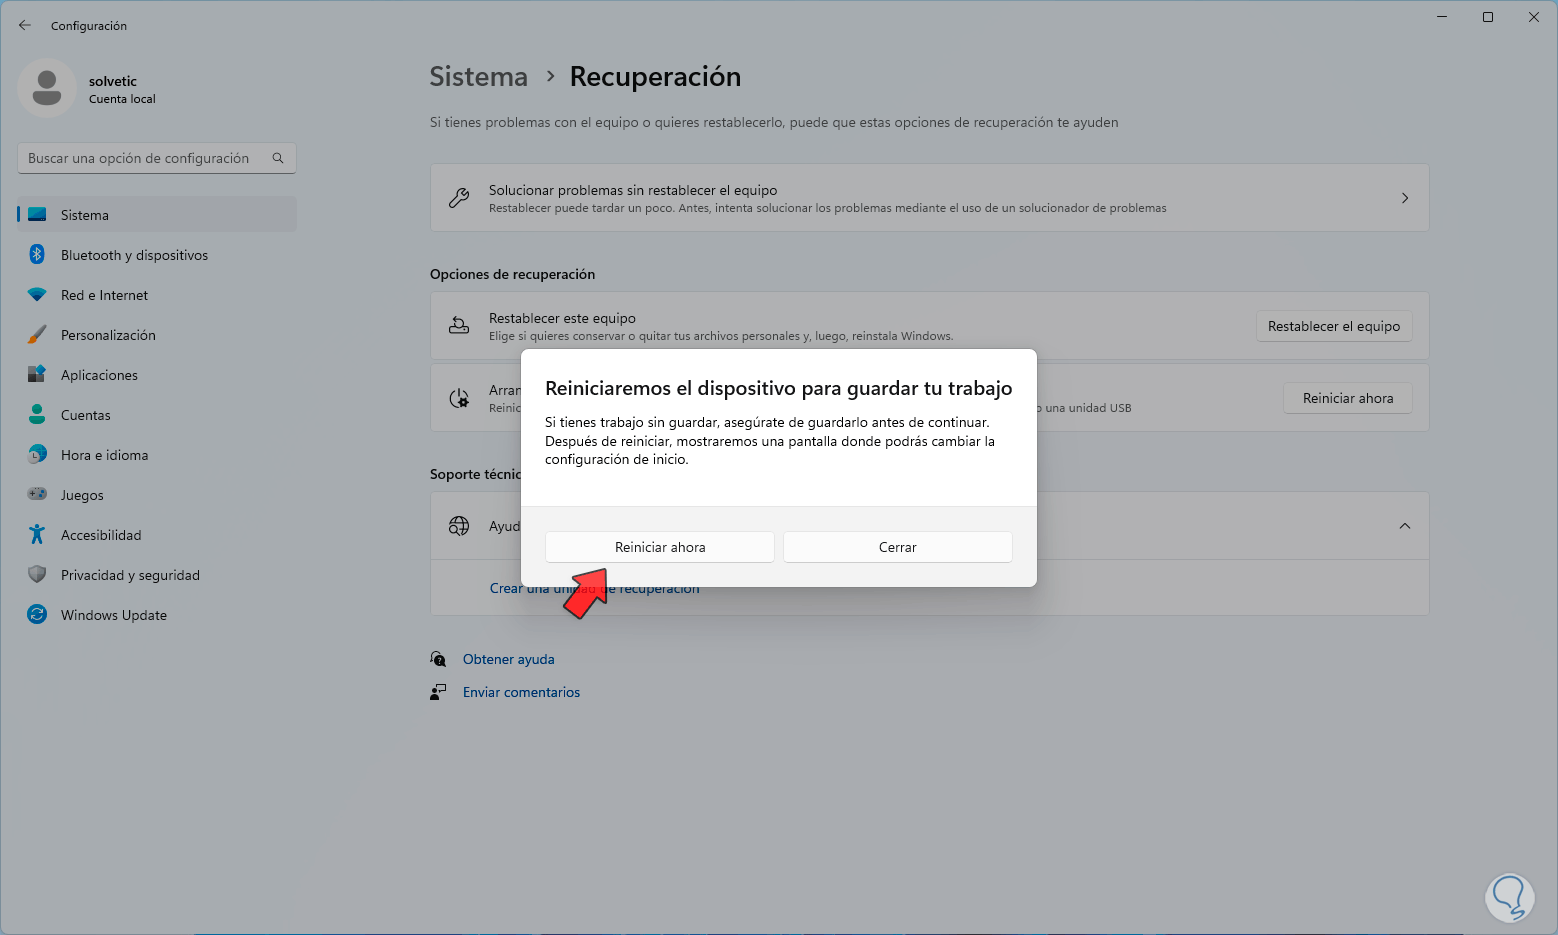
There we click on "Restart now" to start the advanced mode.
Step 4
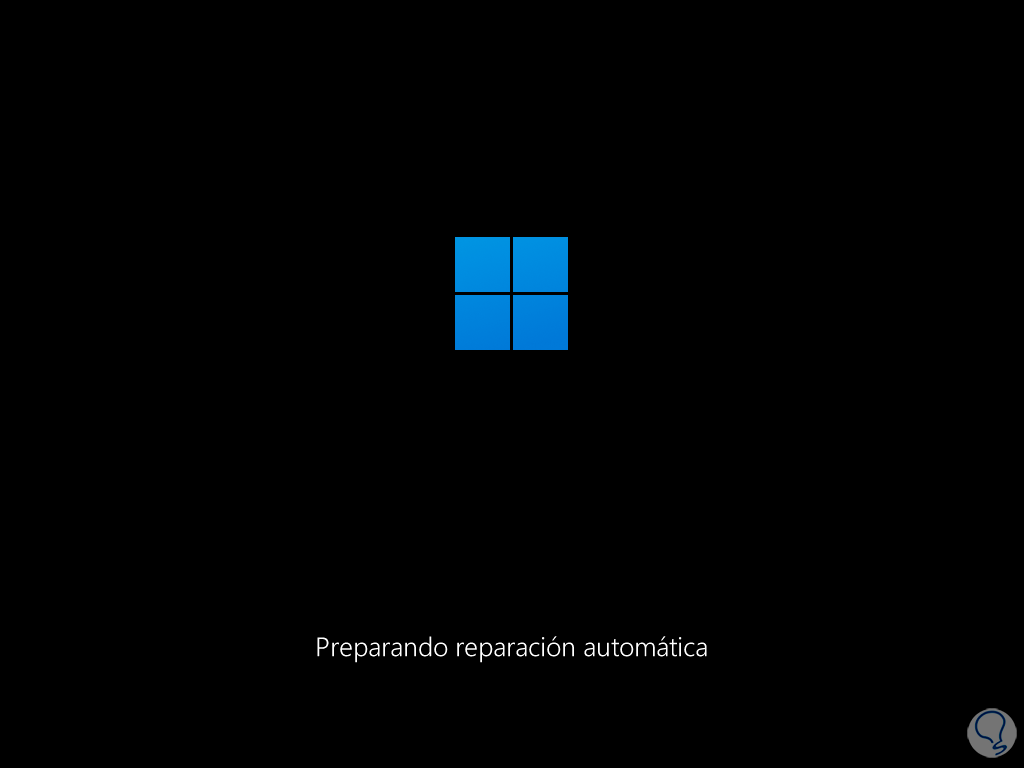
Now, if the error persists and we cannot access the system, we are going to restart Windows from the restart or shutdown button and during the startup process we will press the restart button on the computer three times or turn the computer off and on three times (if the restart button is not available) to access automatic repair:
step 5
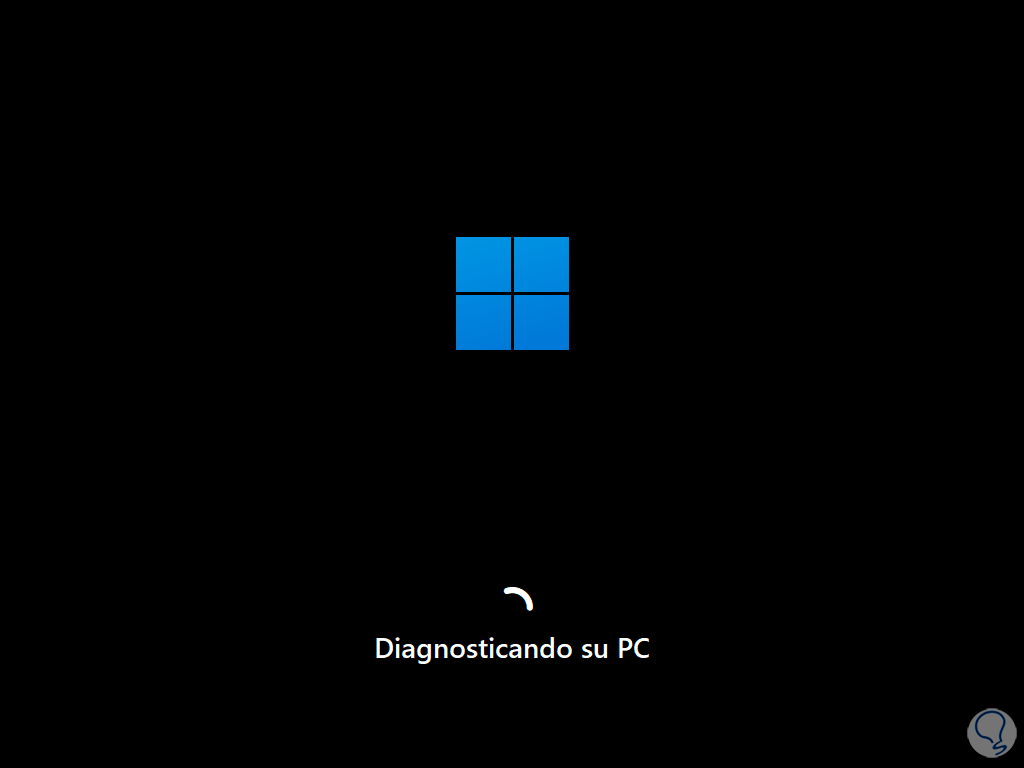
There we will wait for the system to be diagnosed:
step 6
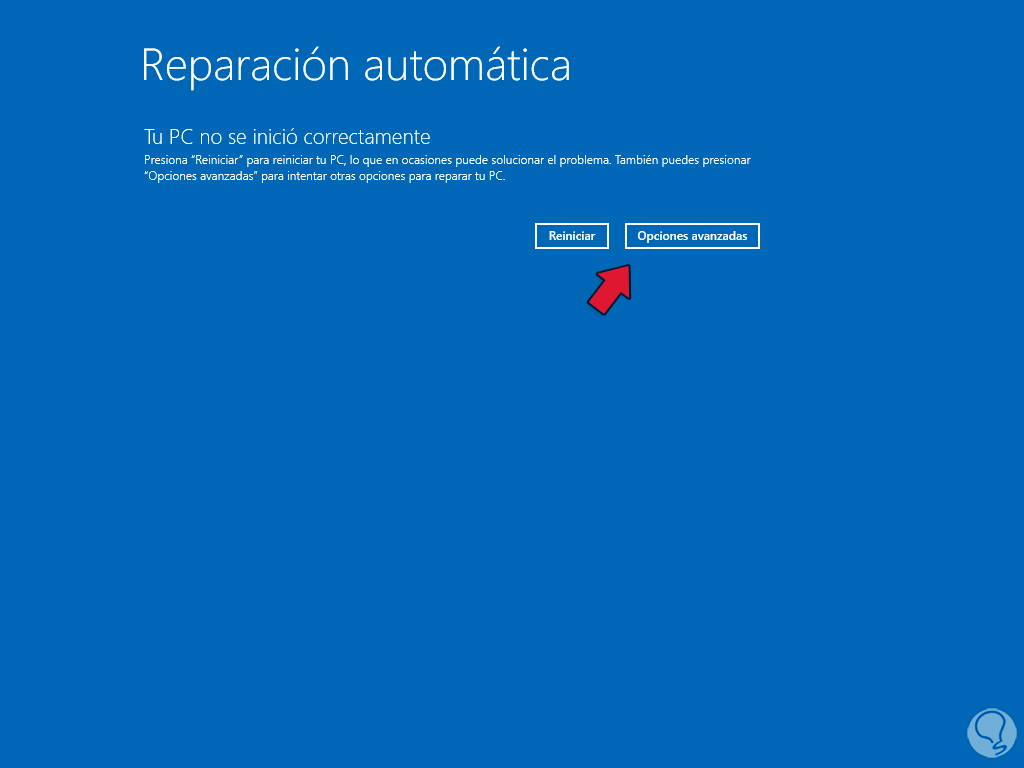
After the analysis we will see the following. There we will click on "Advanced options" to see the following:
step 7
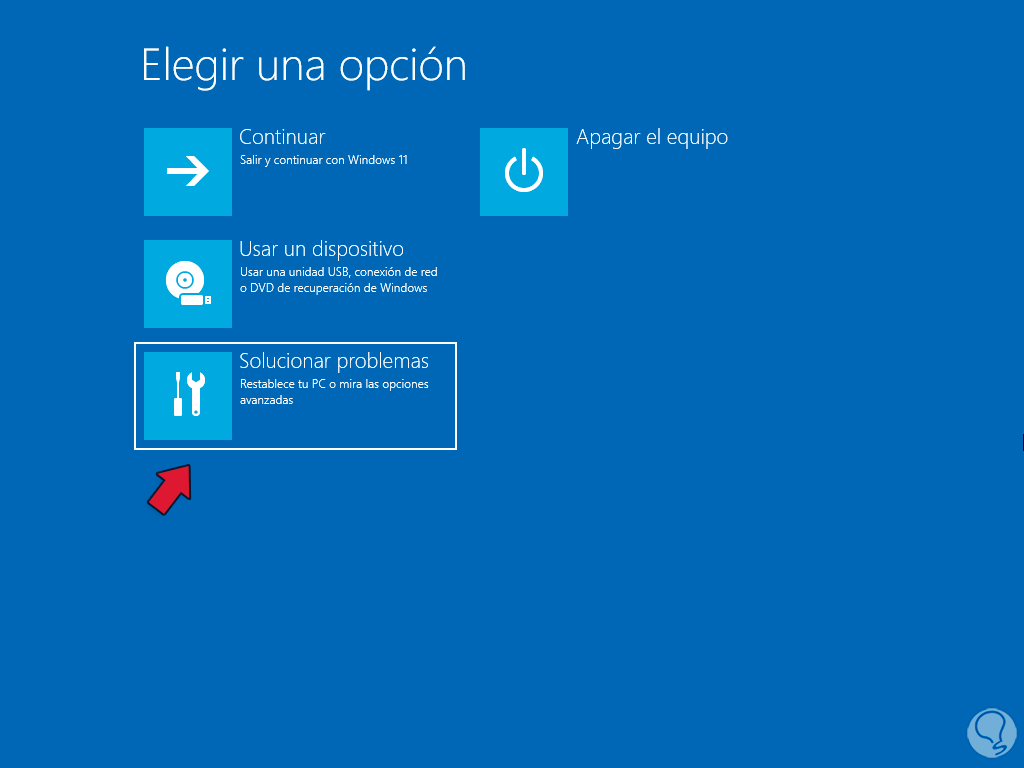
Here we are going to click on “Troubleshoot”
step 8
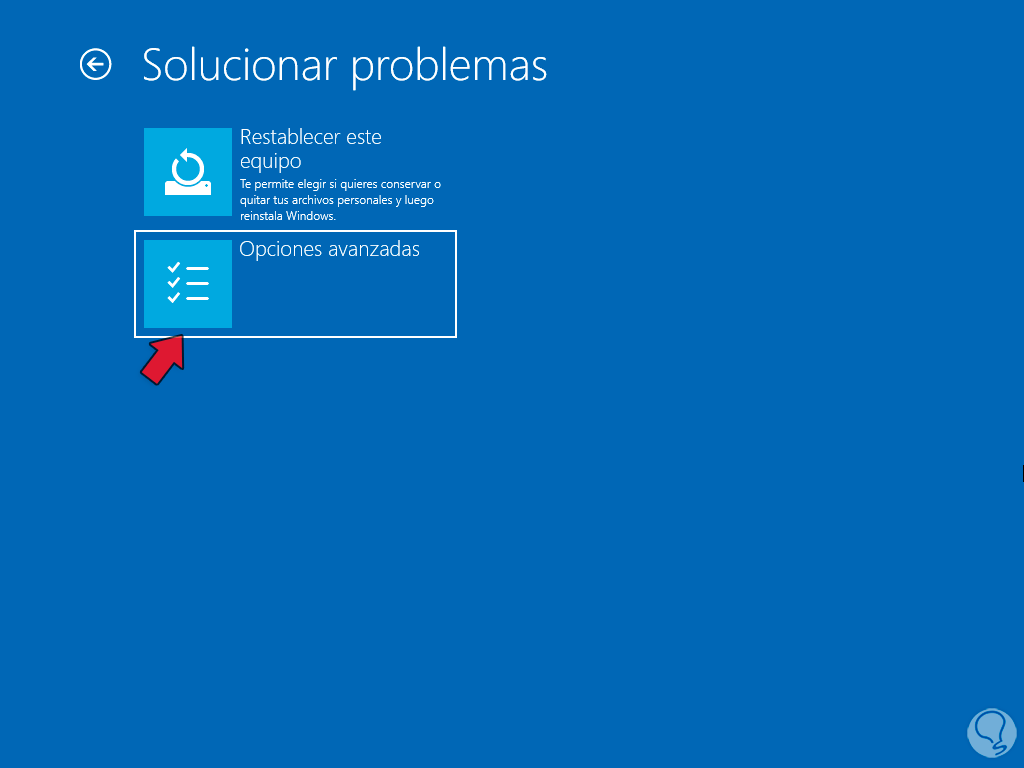
and then we click on "Advanced options":
step 9
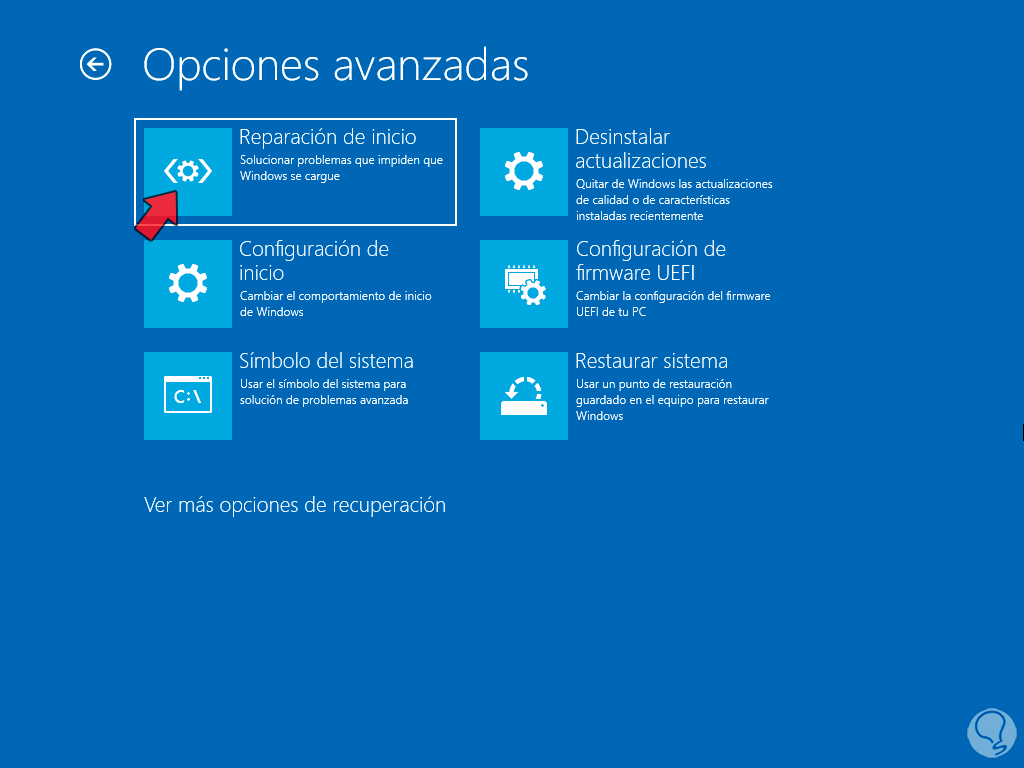
Now we will have access to the various advanced Windows options:
step 10
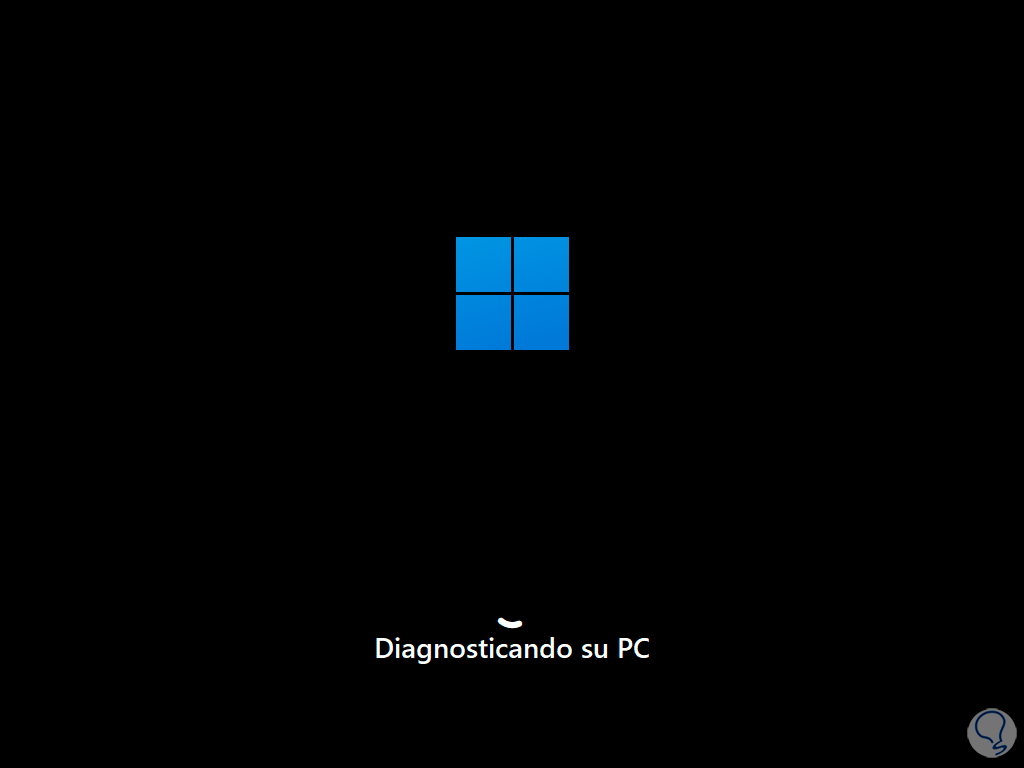
In the options that we see, we will click on "Startup repair" and wait for the system to be analyzed again to find faults:
step 11
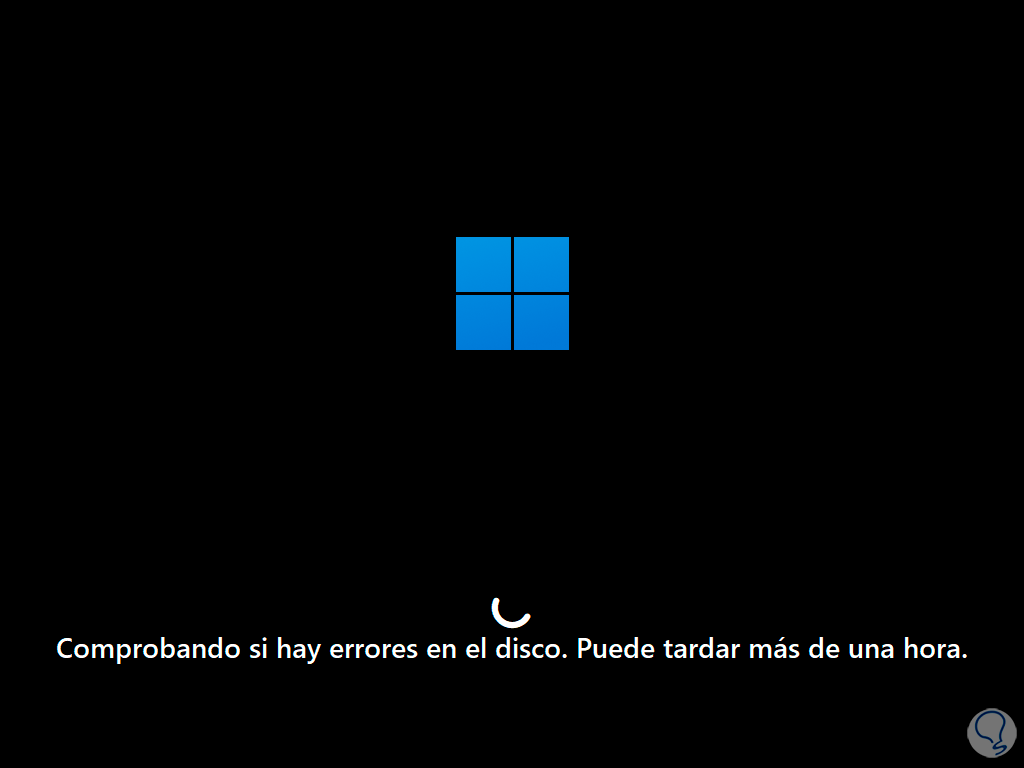
We can see that an analysis of the hard drive will be done in search of an error that generates the reboot loop:
step 12
After a moment Windows 11 will be rebooted:

step 13
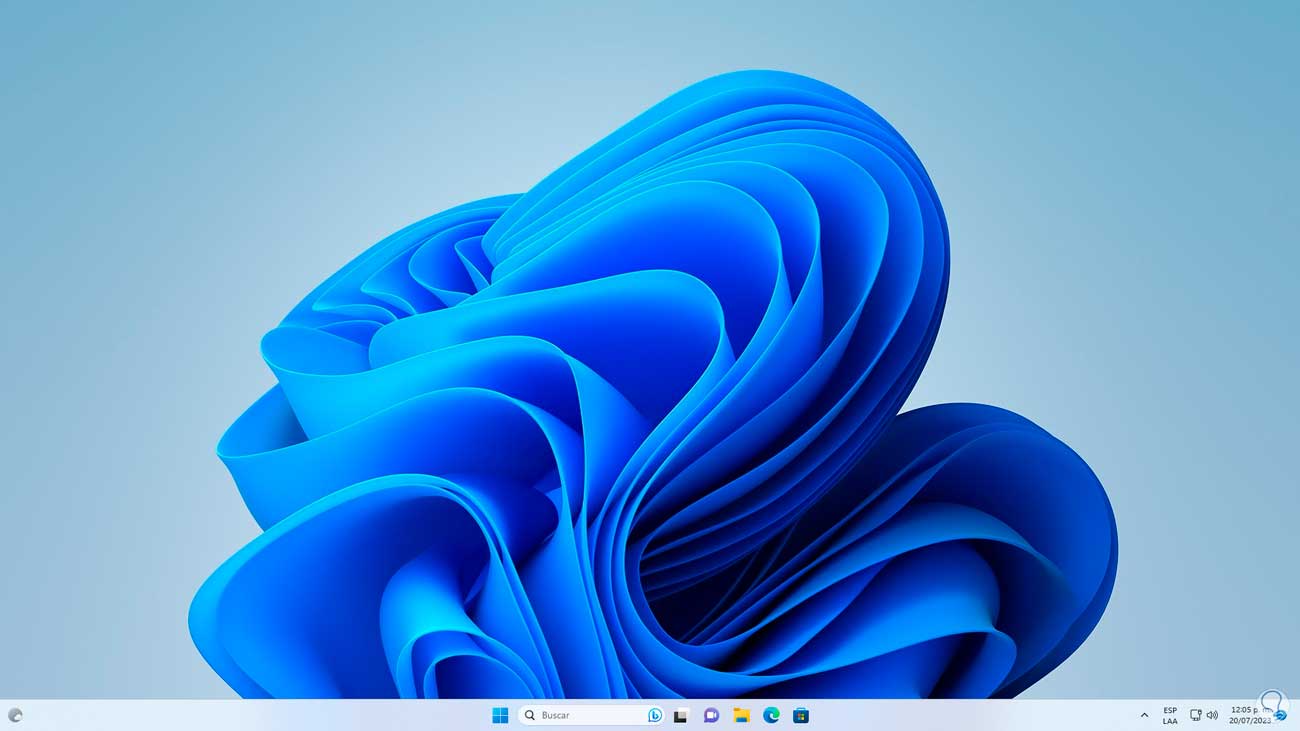
Check if you have normal access:
step 14
In case the system is slow or the error continues, we are going to click on the "Start" menu, then click on the shutdown button, press the Ctrl key and click on "Restart":
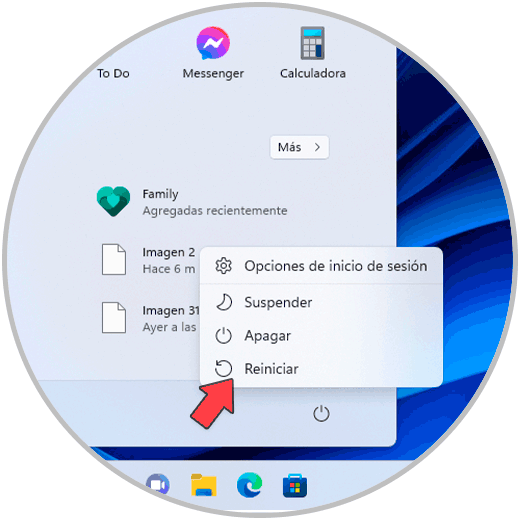
step 15
The system will be rebooted in advanced mode:
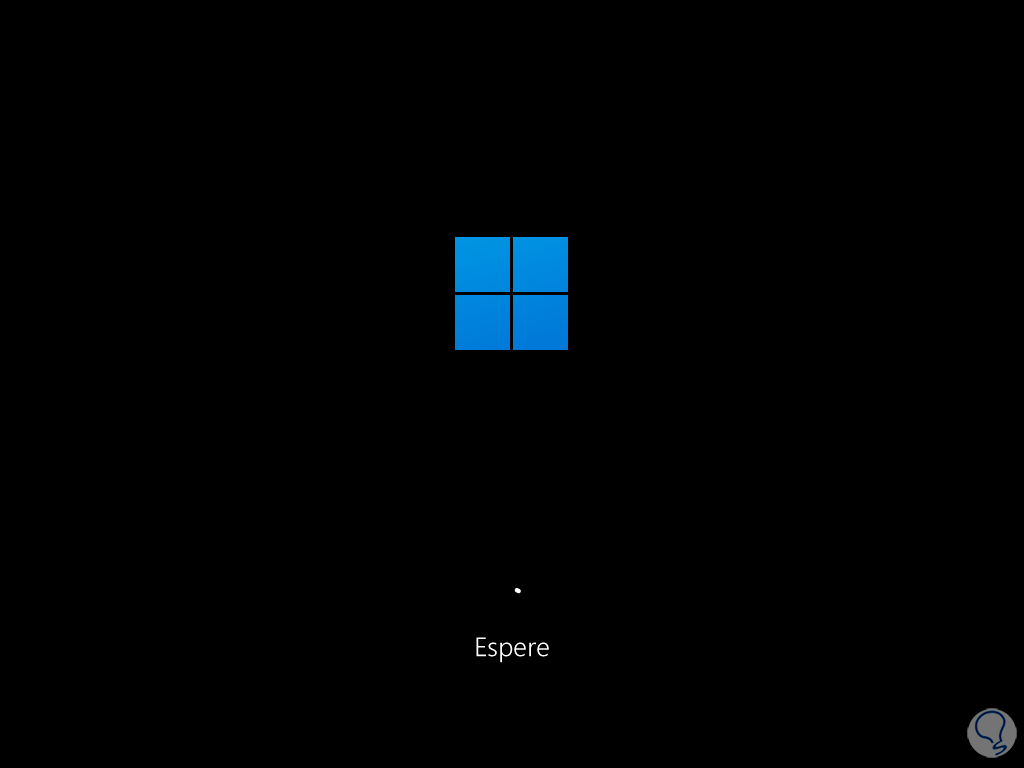
step 16
When it is started in advanced mode we will click on "Solve problems":
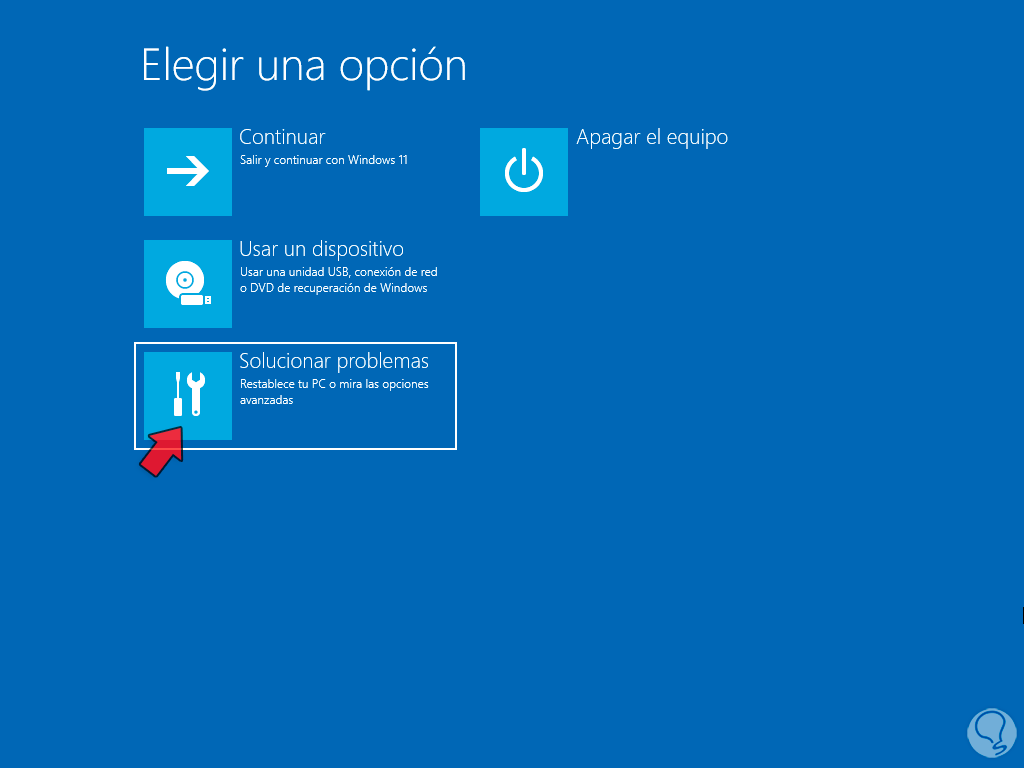
step 17
Then we click on "Advanced options":
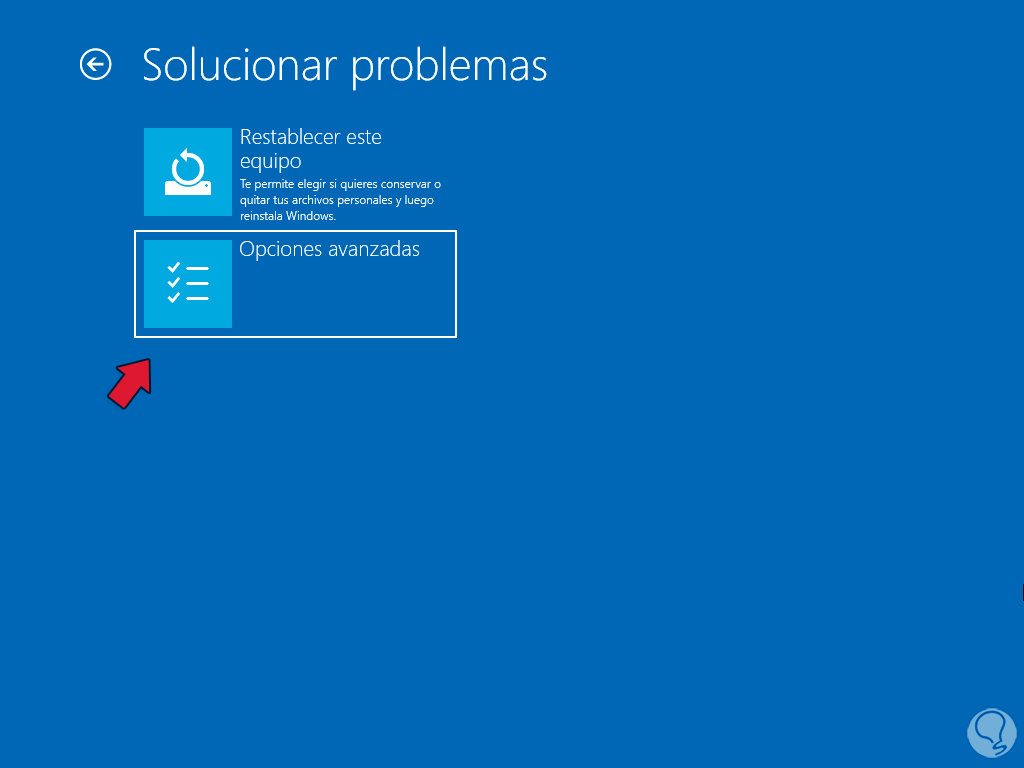
step 18
Now we are going to work on some extra options to correct the error, in this case we are going to click on "Uninstall updates":
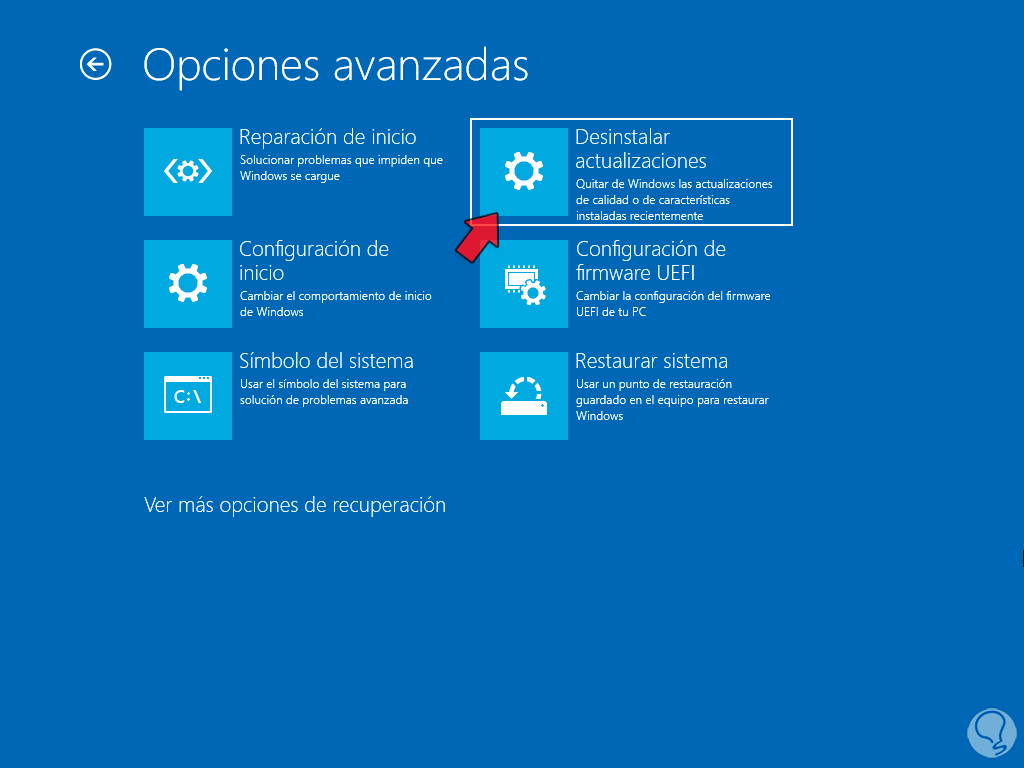
step 19
We are going to select the type of update to uninstall:
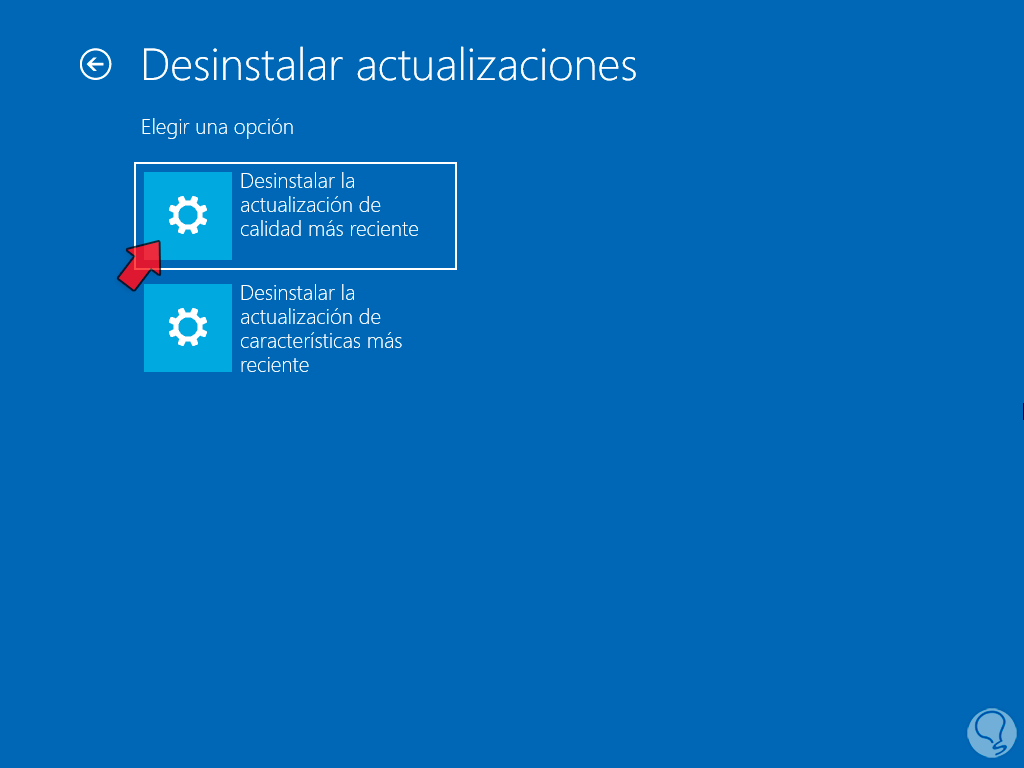
step 20
Once we click on the type of update we must confirm the process:
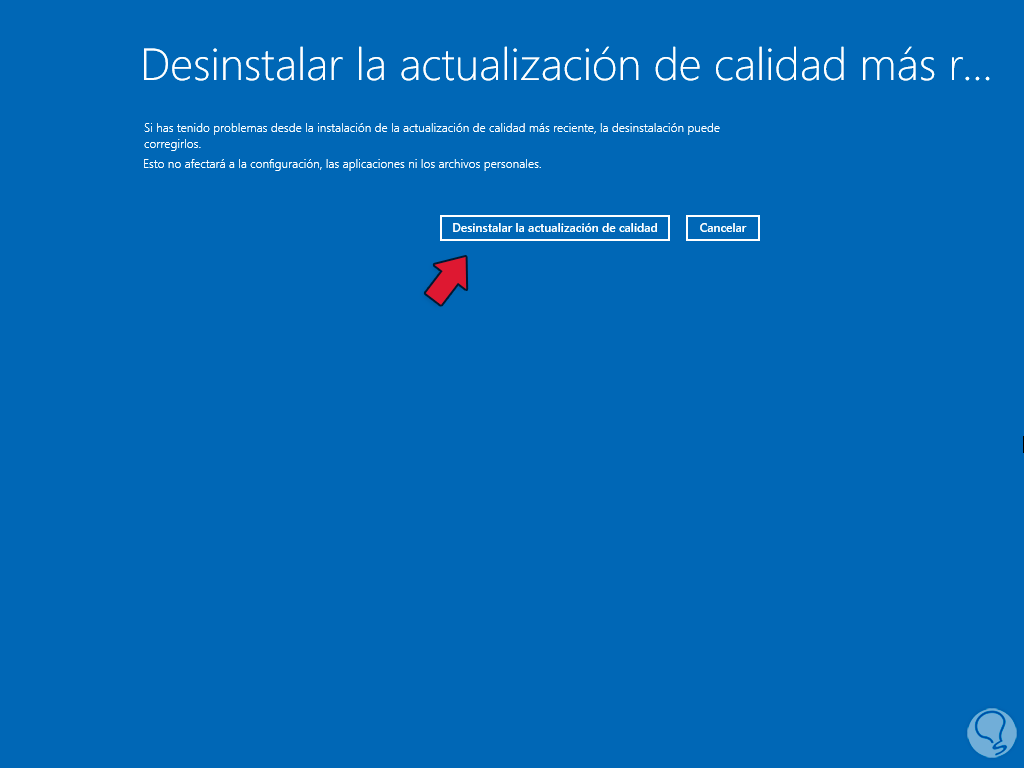
step 21
Another option to use is from the main menu to click on the "System Restore" option:
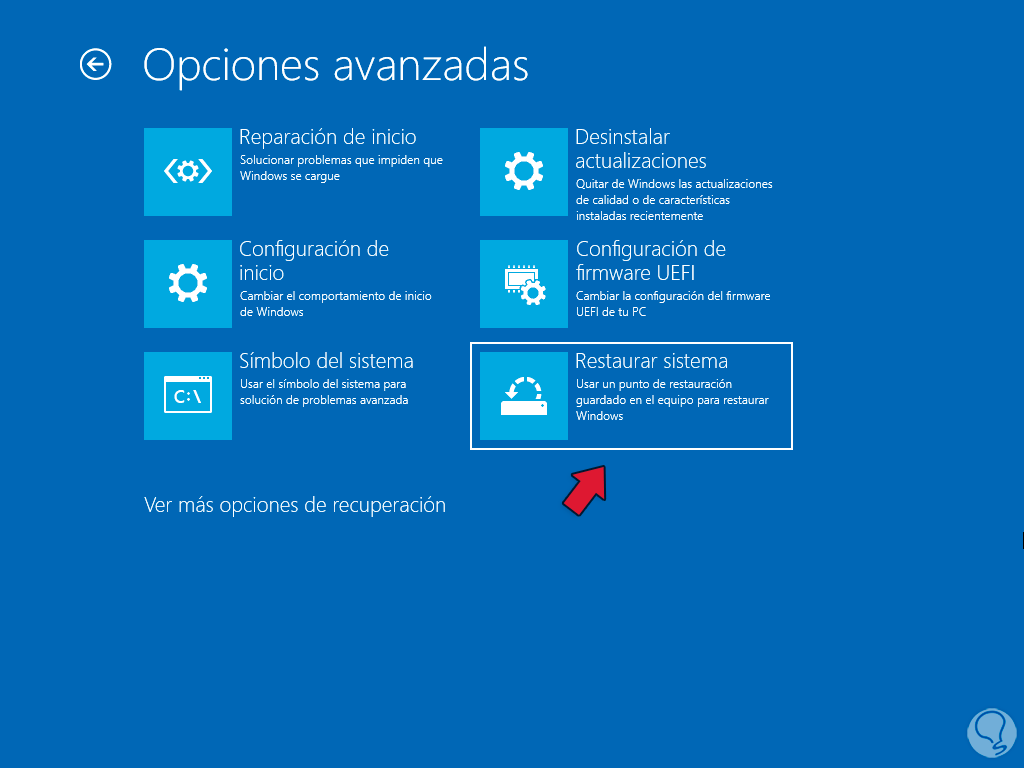
step 22
The wizard will open:
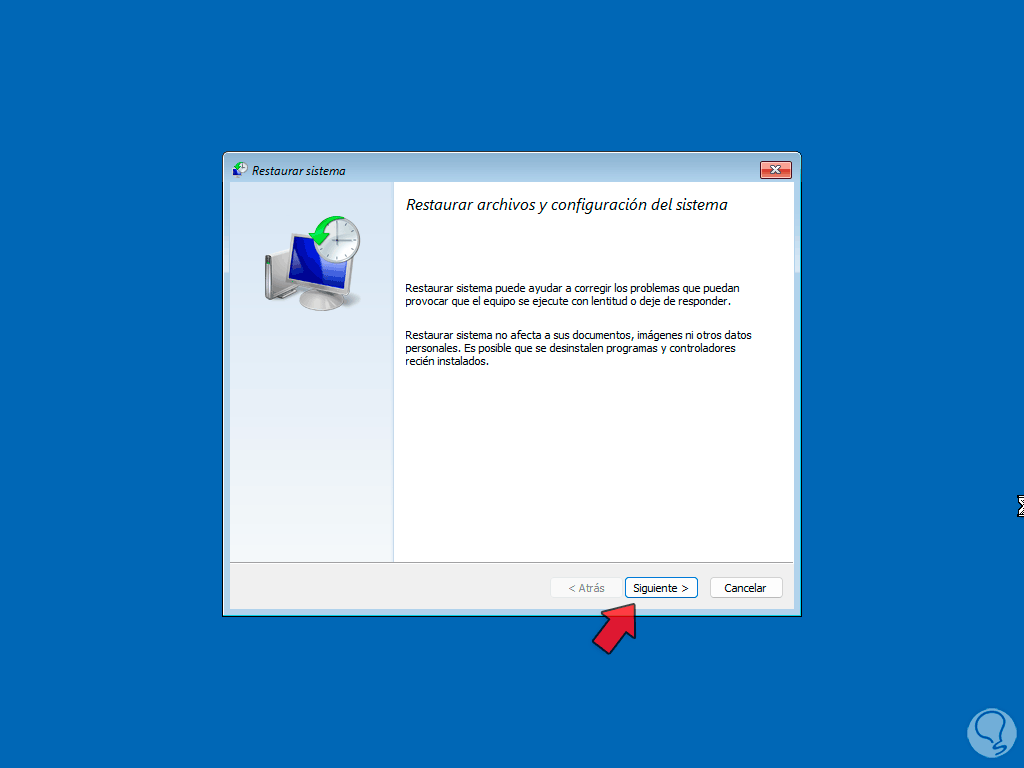
Step 23
Then we will select the desired restore point:
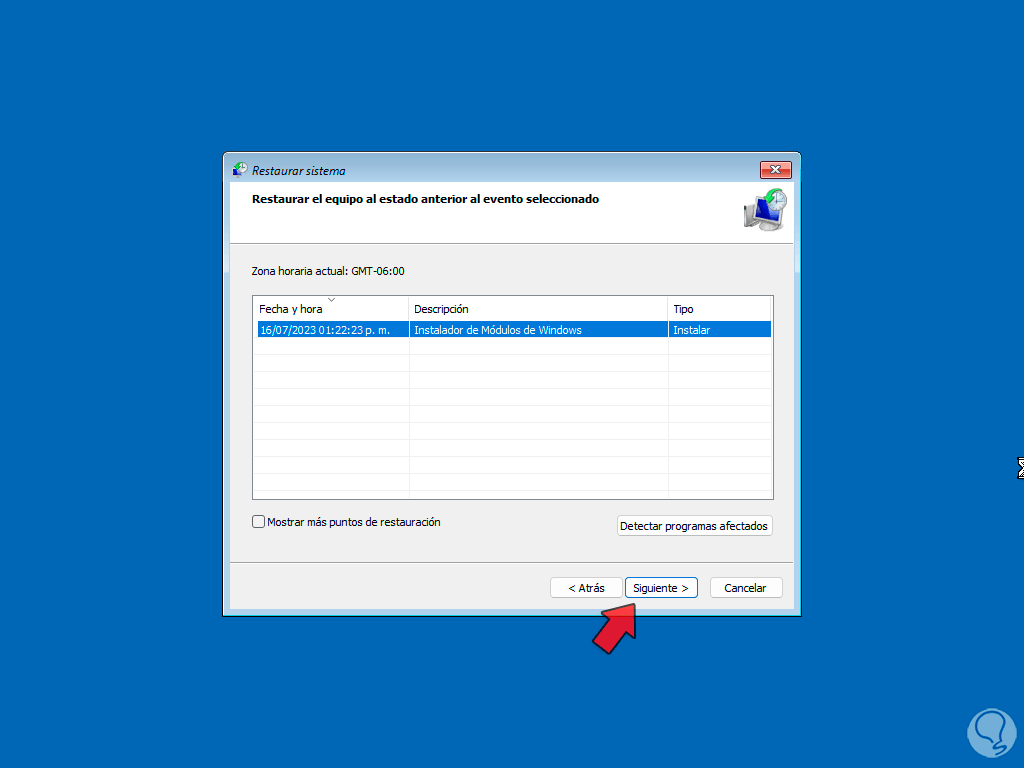
step 24
We will see a summary of the task:
When clicking on "Finish" we will see the following message:
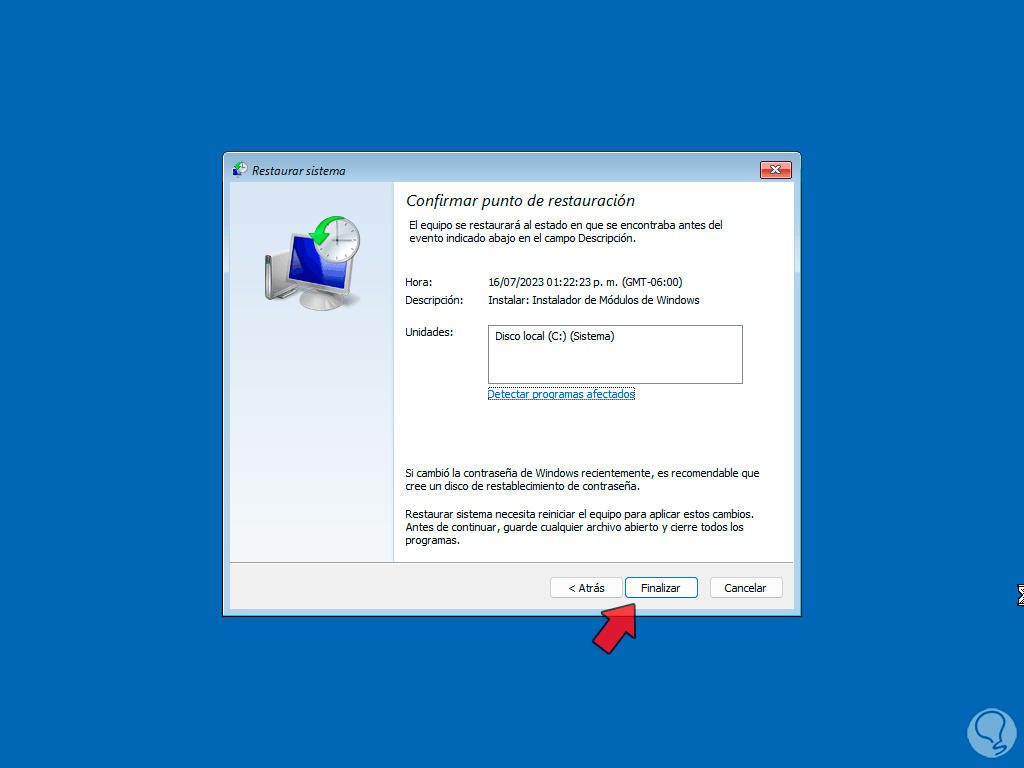
step 25
There we click "Yes" and wait for the entire restoration process to be completed.
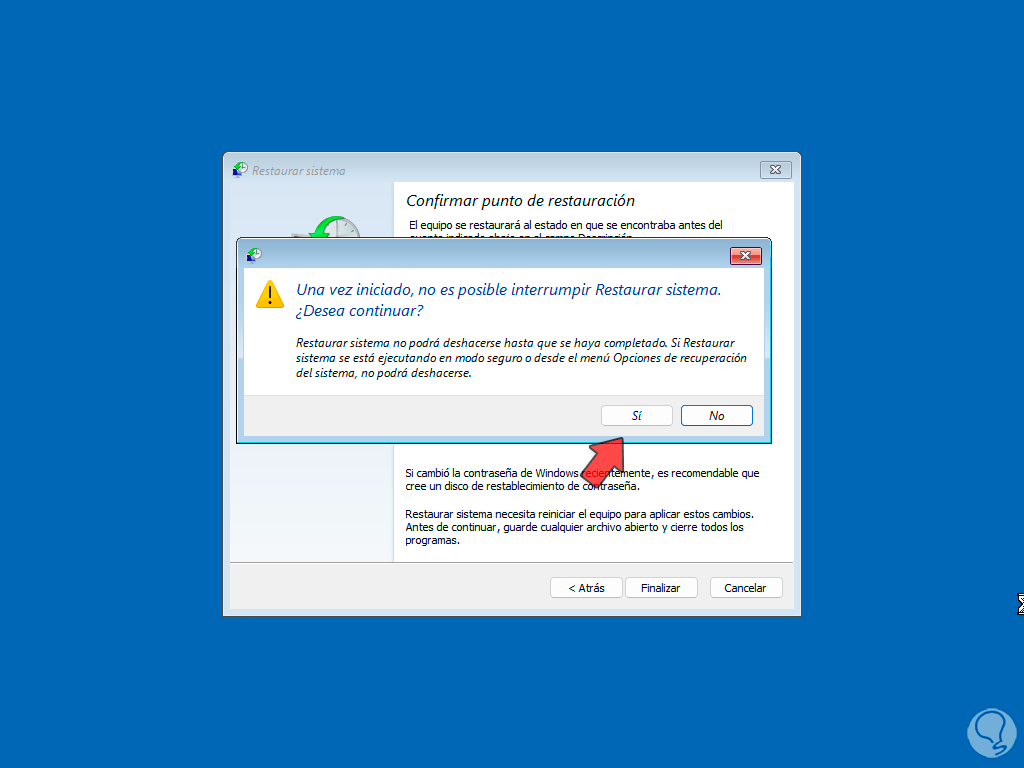
step 26
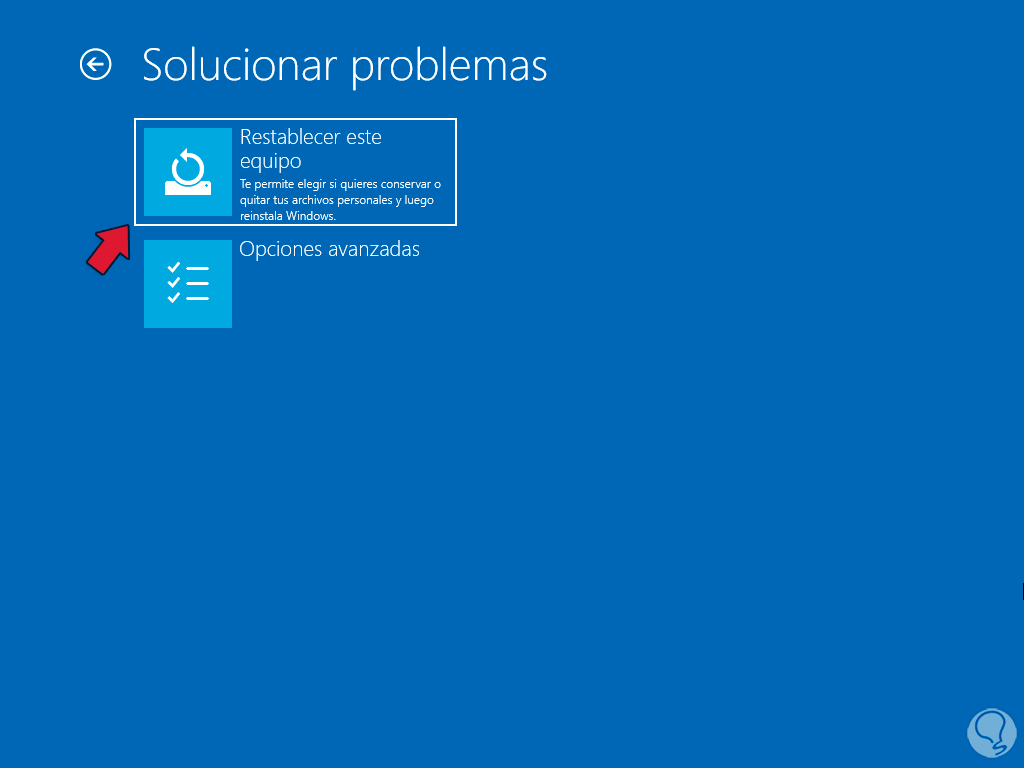
Alternatively, another option is to restore the equipment to its original state, for this we click on "Troubleshoot" and then click on "Reset this equipment":
step 27
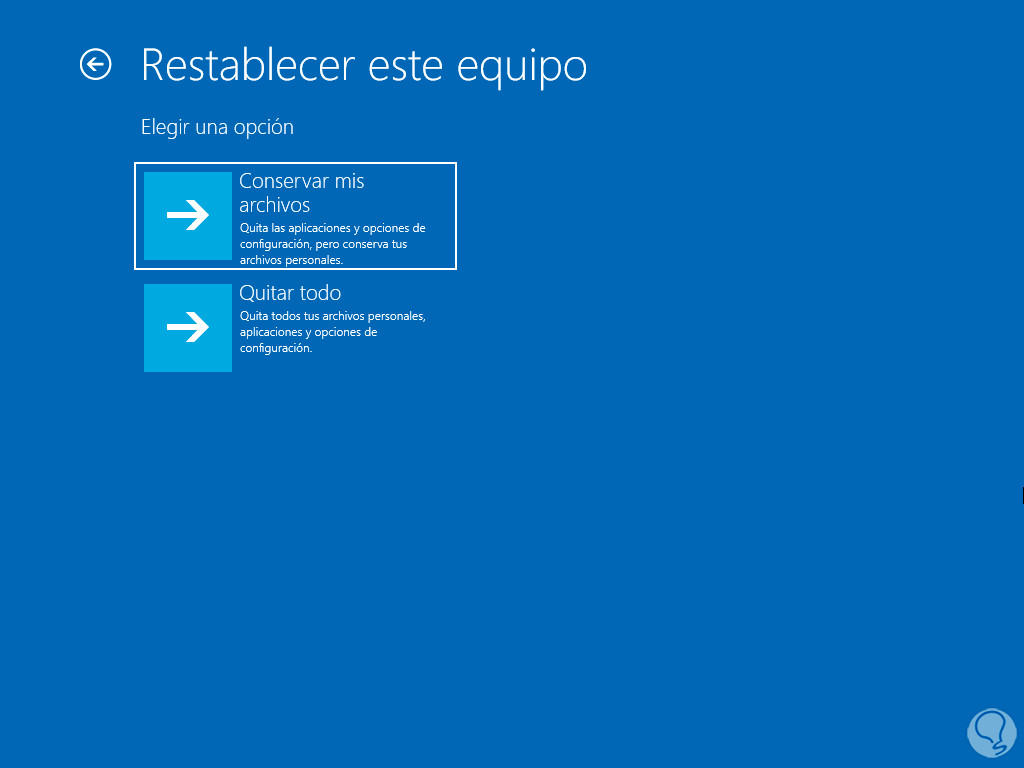
We select if you will keep your files or not:
Step 28
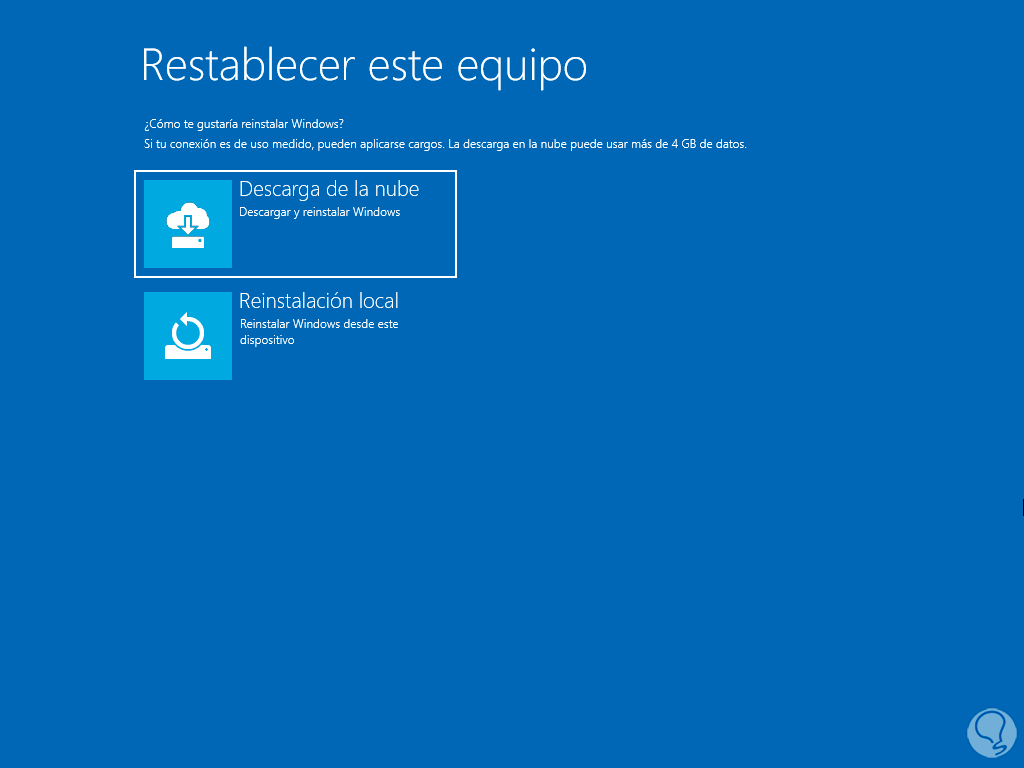
We define which installation will be used, local or in the cloud:
Step 29
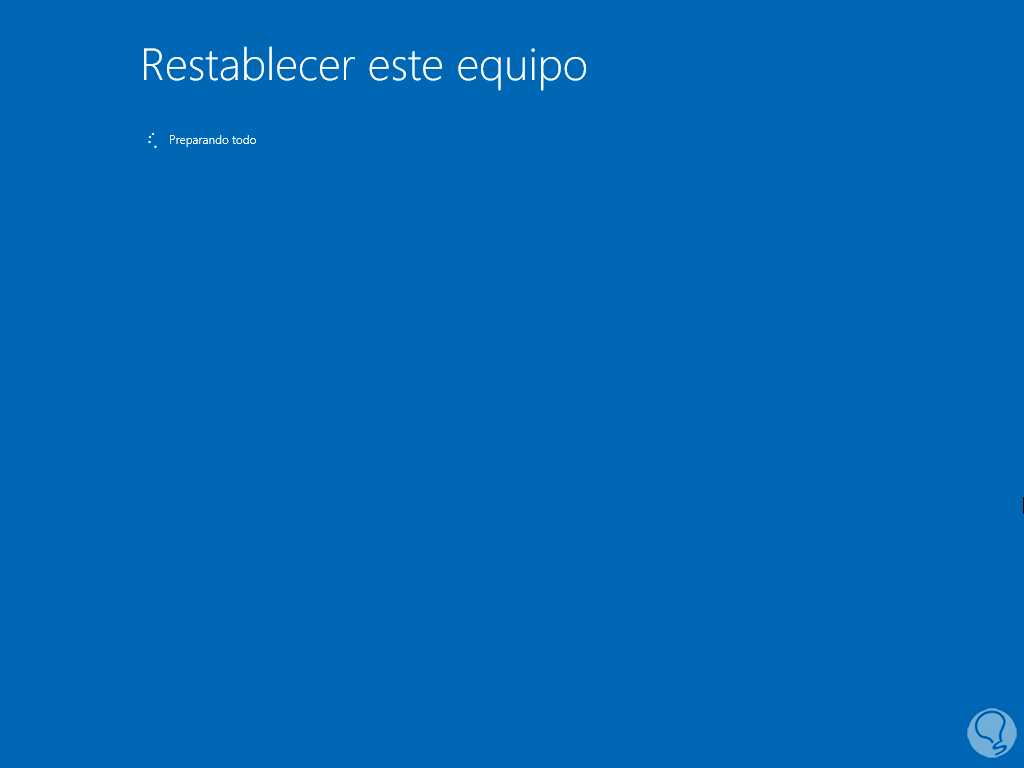
We expect the values to be loaded:
step 30
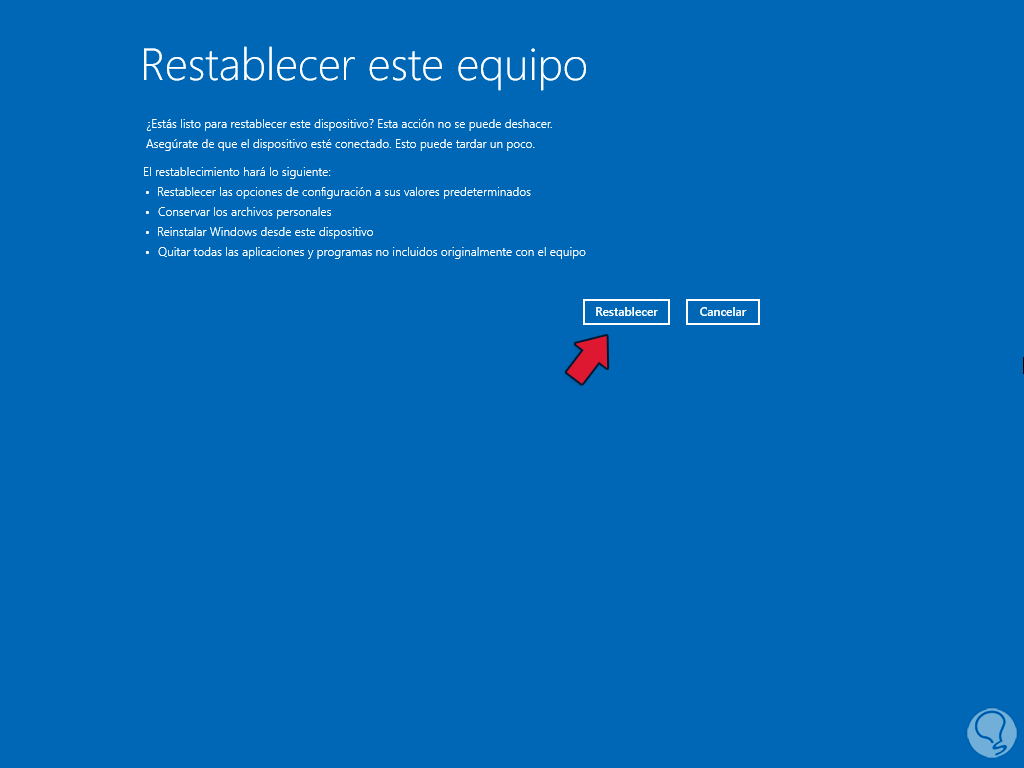
Then we click on "Reset" to start the process:
2 Fix Windows 11 restart loop from startup applications
Another probable cause for the loop error is that some program or application that starts with Windows 11 is the cause of it, in this case we can deactivate it and validate whether or not it is the cause of the error.
Step 1
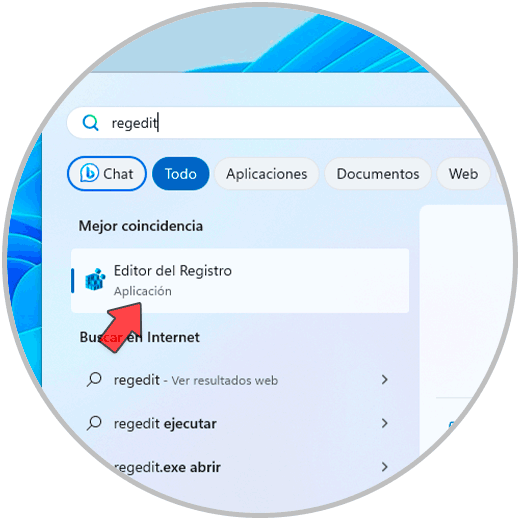
First in the start search engine we enter the word "regedit" and then click on the registry editor:
Step 2
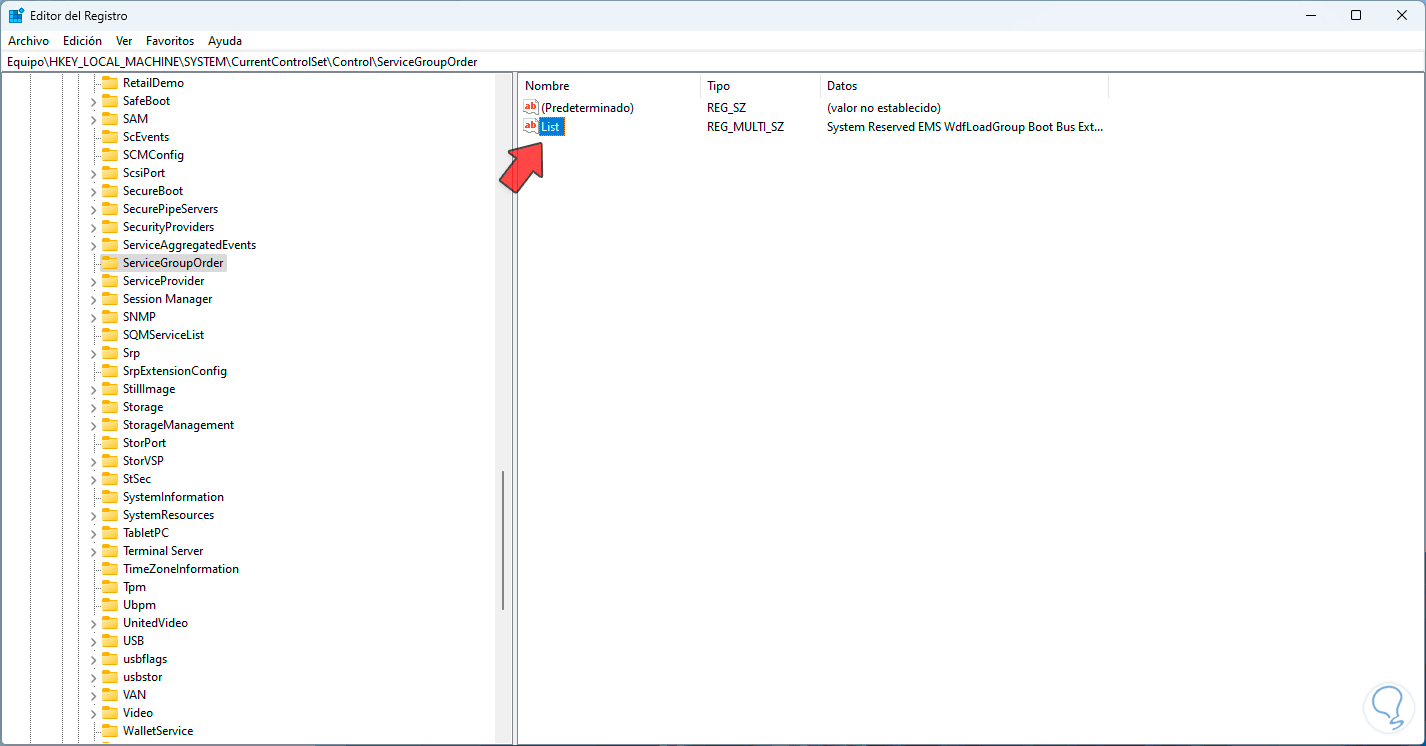
There we will go to the following route:
HKEY_LOCAL_MACHINE\SYSTEM\CurrentControlSet\Control\ServiceGroupOrder
Step 3
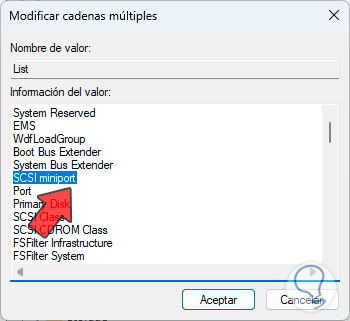
We are going to double click on the “List” record to see the following:
Step 4
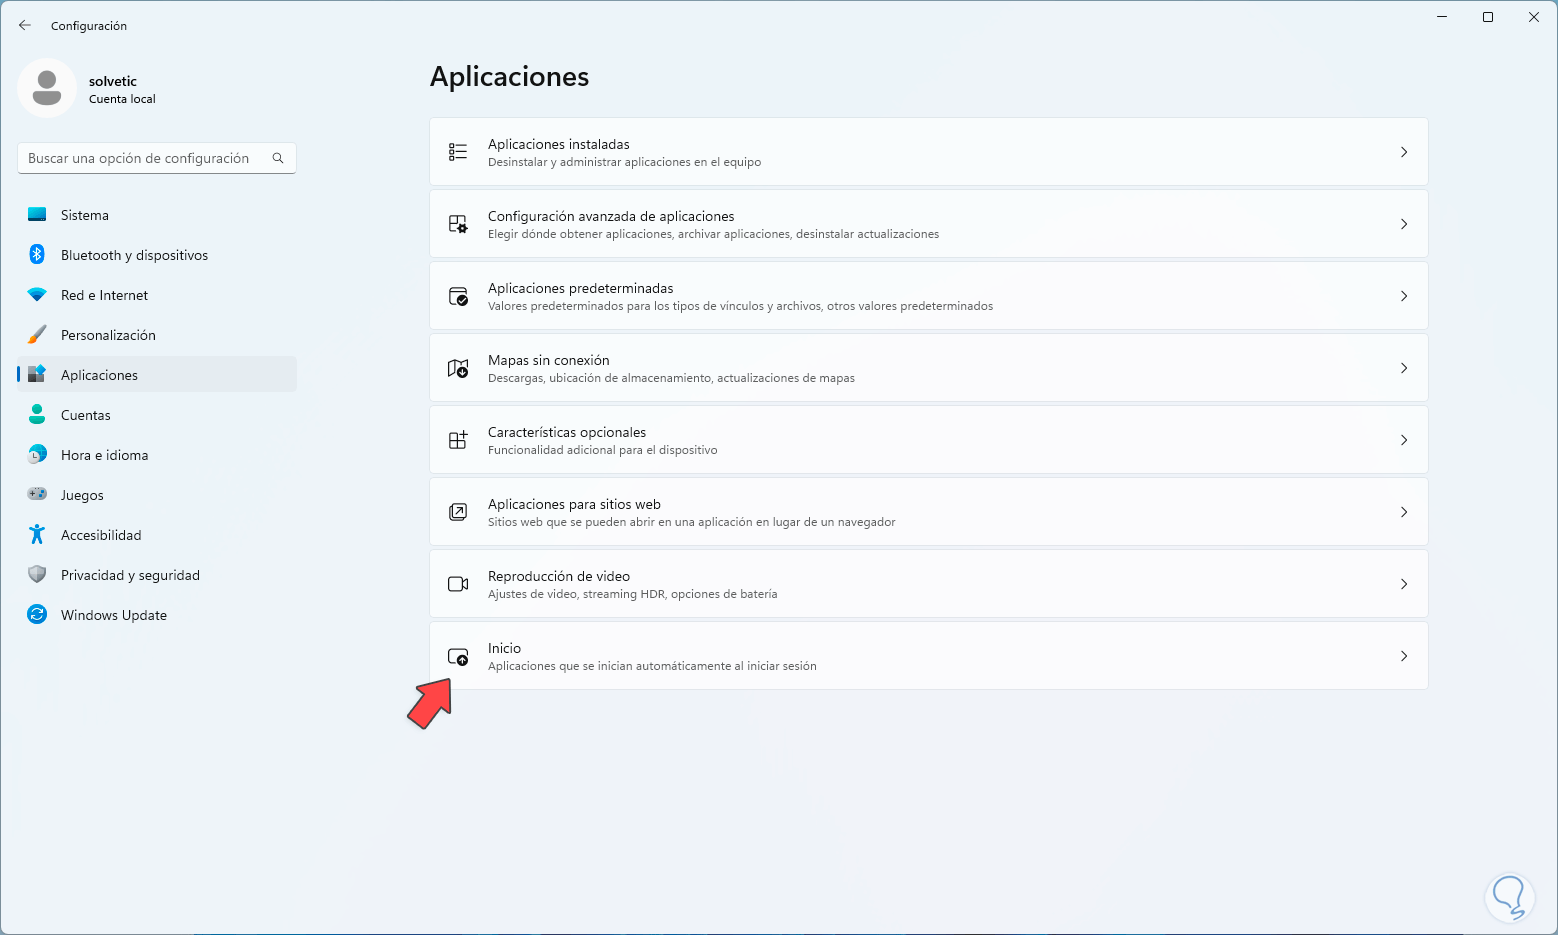
In the displayed window we can see all the services and applications that start with Windows 11, there it is possible to delete some that are not essential and then apply the changes. Now we will go to the route "Start - Settings - Applications - Start":
step 5
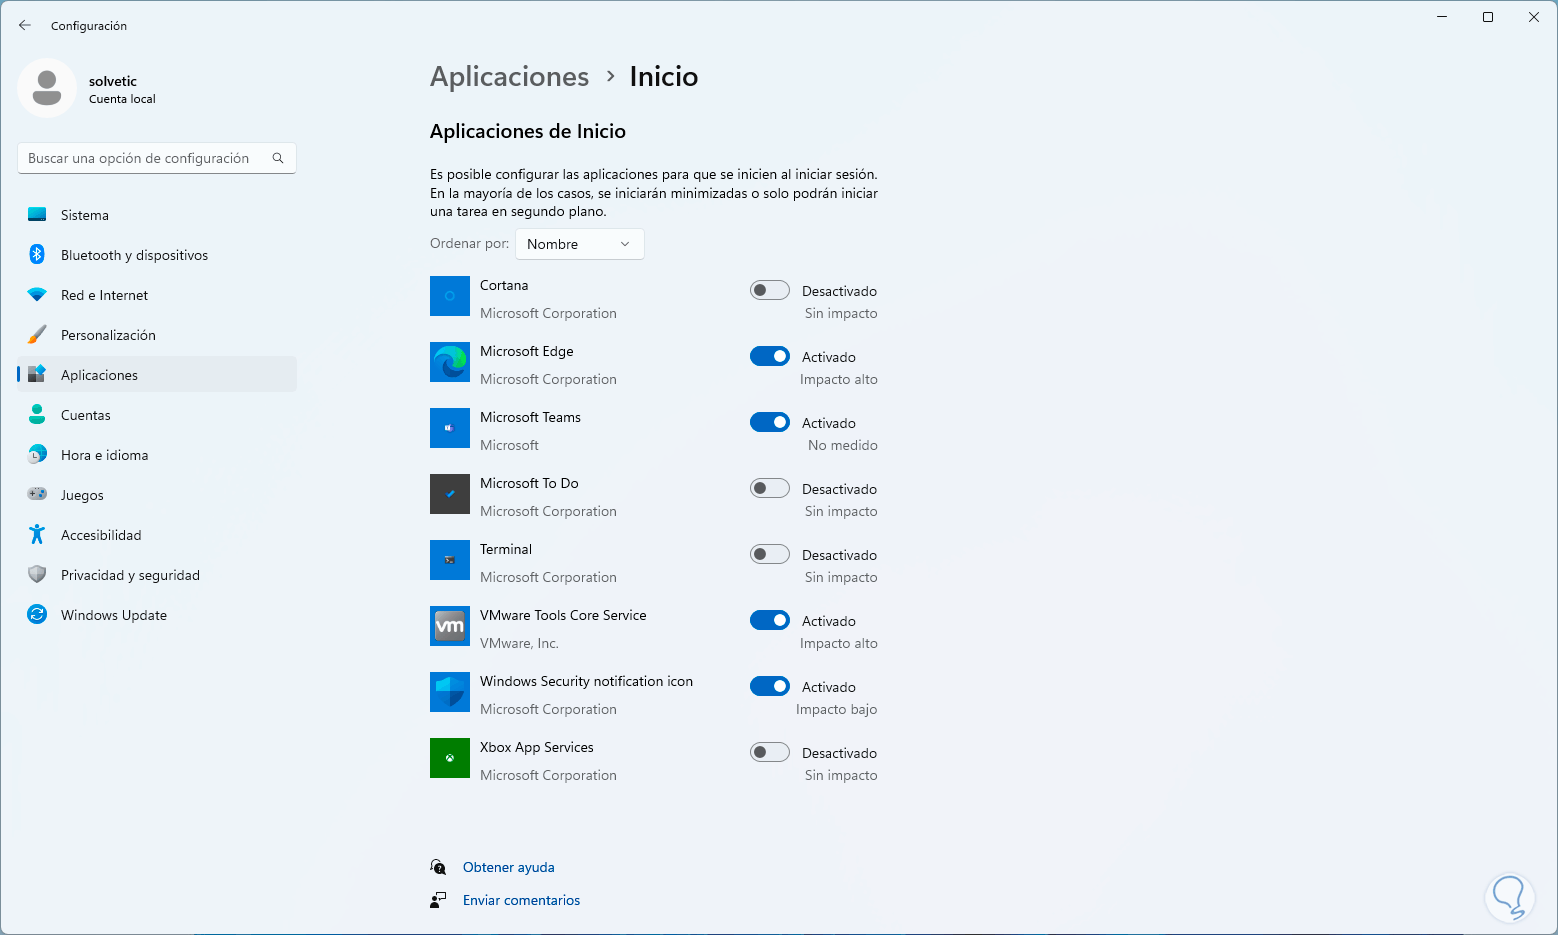
There it will be possible to deactivate the switches of the applications that we do not want to start with Windows 11:
3 Fix Windows 11 reboot loop by checking drivers
A common cause for the reboot loop to be created is due to driver issues, these allow the correct interaction between the computer and the user but these drivers must be signed for the system to recognize them as reliable and allow use of all their functions, so we can check the status of the signatures of these drivers.
step 6
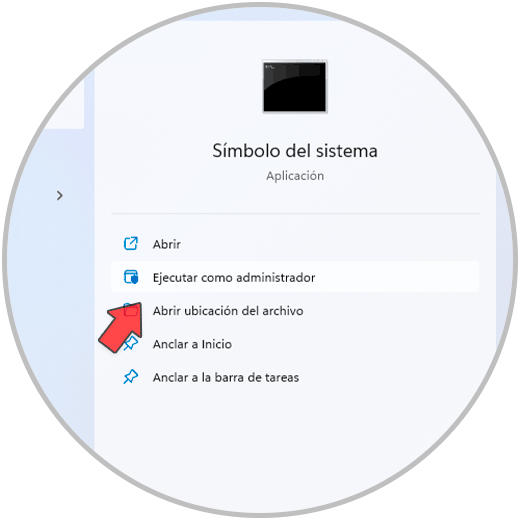
In this case we are going to open the command prompt console as administrator:
step 7
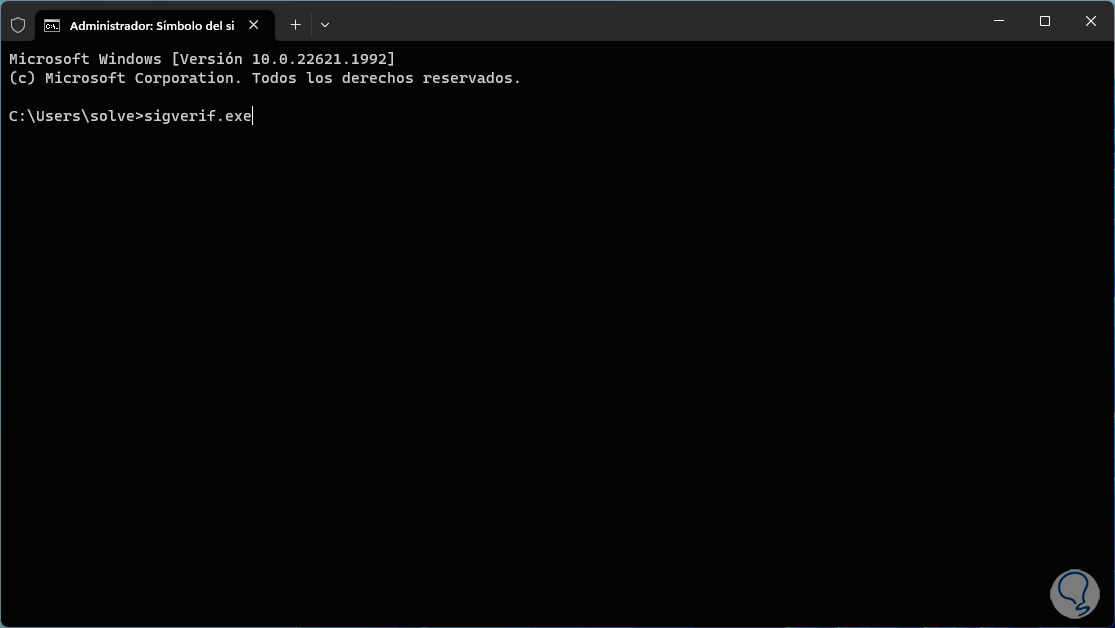
In the console we will execute the following command:
sigverif.exe
step 8
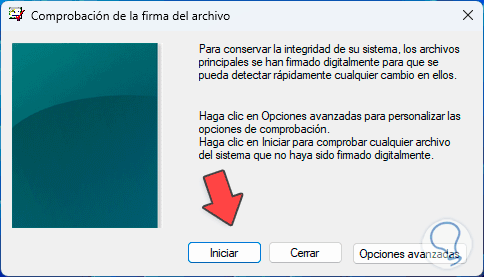
This command allows us to verify the digital signatures of the executable files in Windows 11, this gives us the security that the files have not been modified or tampered with, affecting the security of the system and the data, when executing this file we will see the following wizard:
step 9
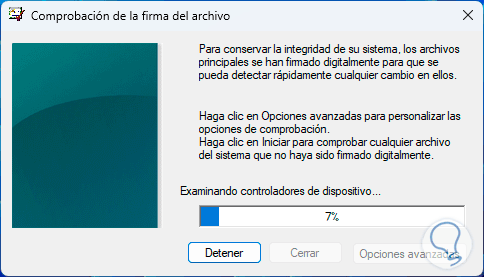
We click on "Start" and wait for the analysis of the driver signatures to be carried out:
step 10
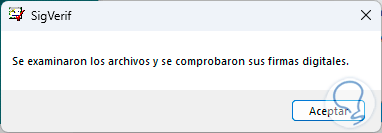
At the end we will see the following. In this case there are no errors in the controllers, if so we would see which controllers are compromised to work on them.
4 Fix Windows 11 reboot loop by uninstalling apps
As we mentioned before, some applications can cause the reboot loop to appear, if we suspect any application we can uninstall it,
Step 1
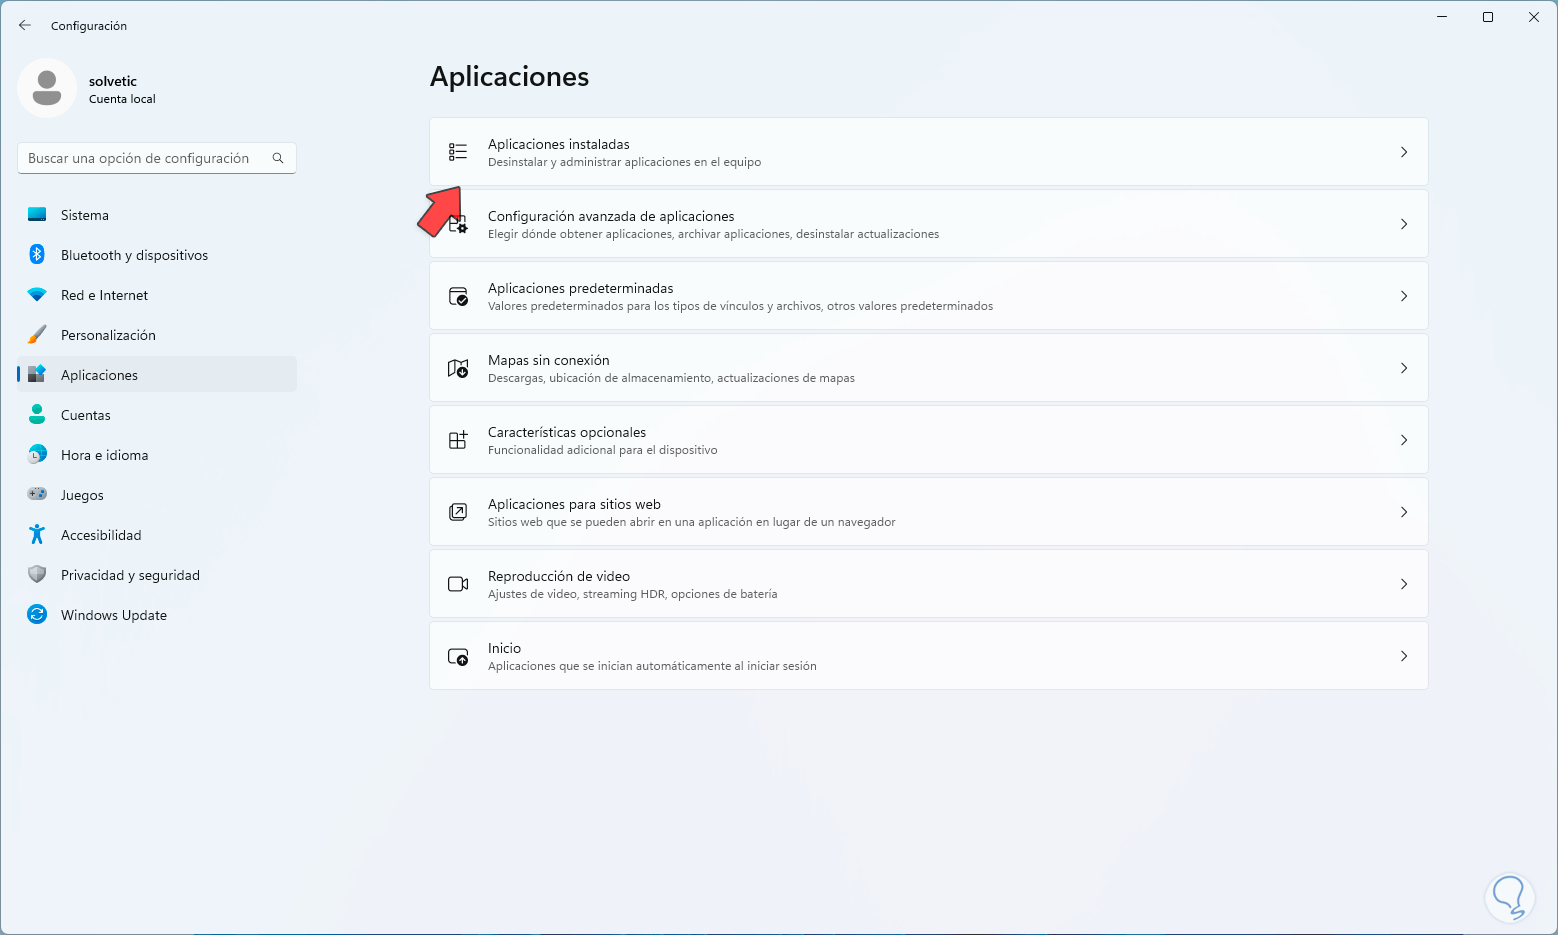
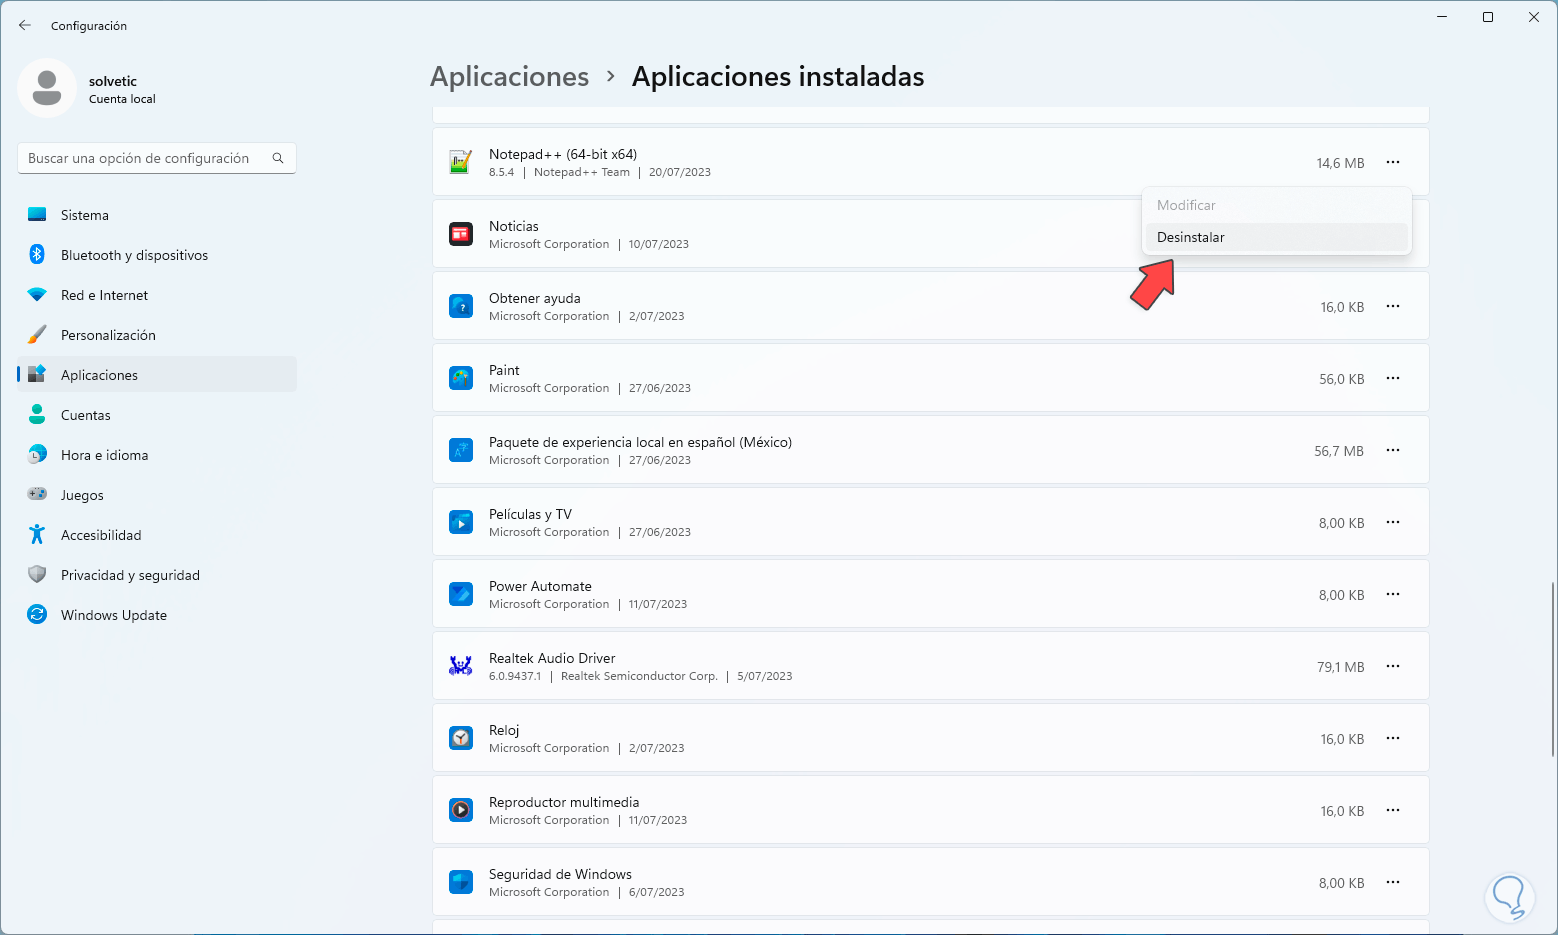
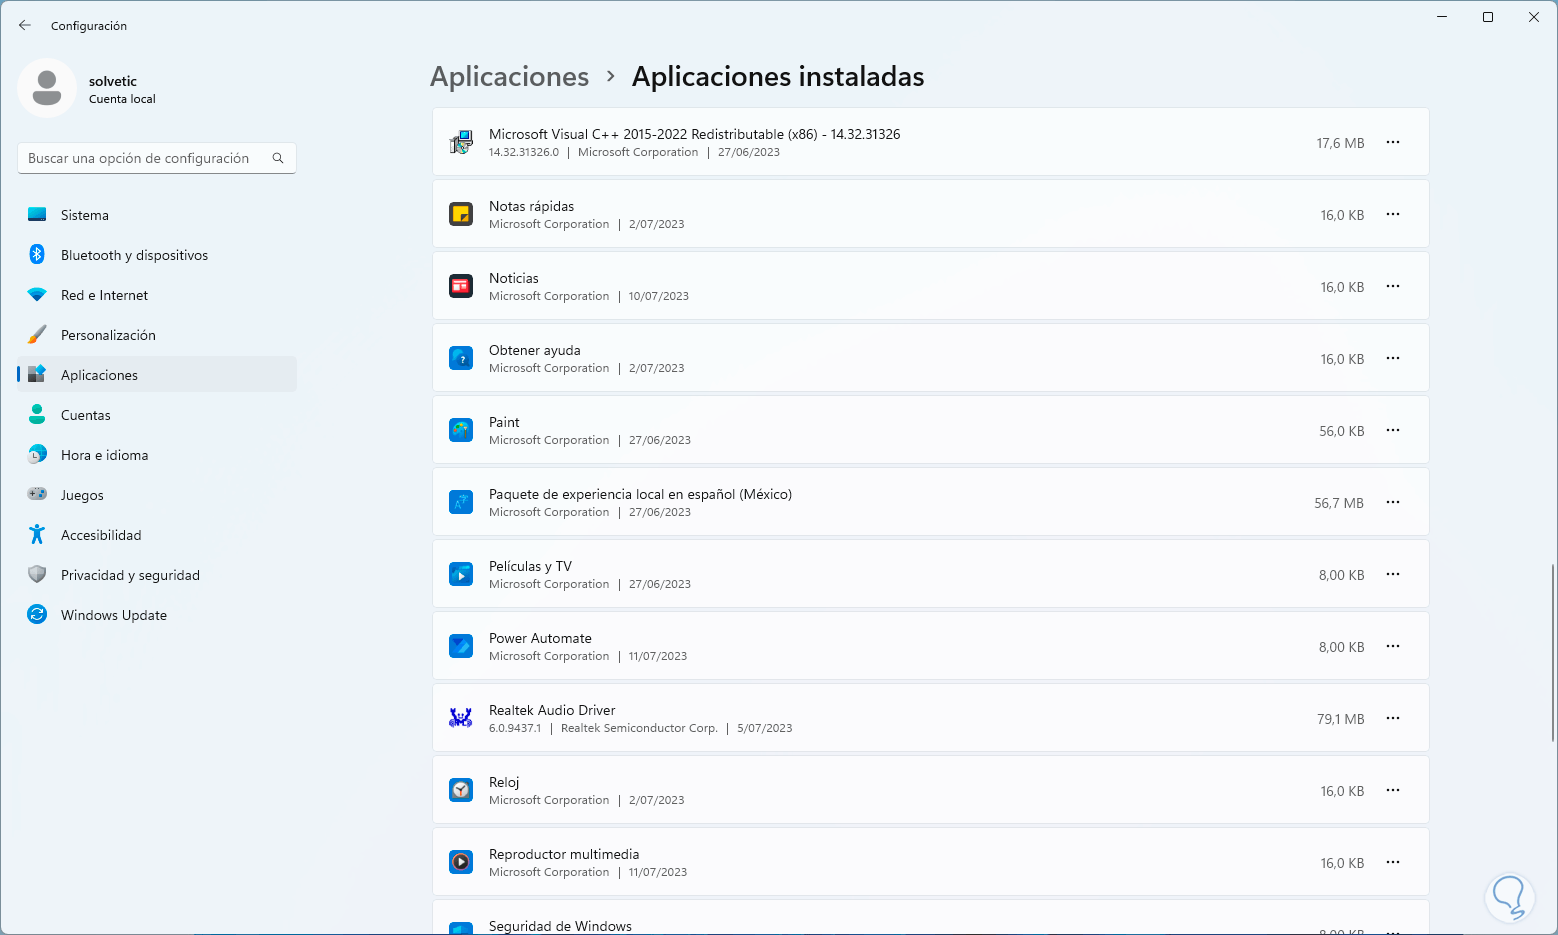
To do this we will go to the route "Start - Settings - Applications - Installed applications":
Step 2
There we are going to click on the context menu of the application to be deleted and click on "Uninstall":
Step 3
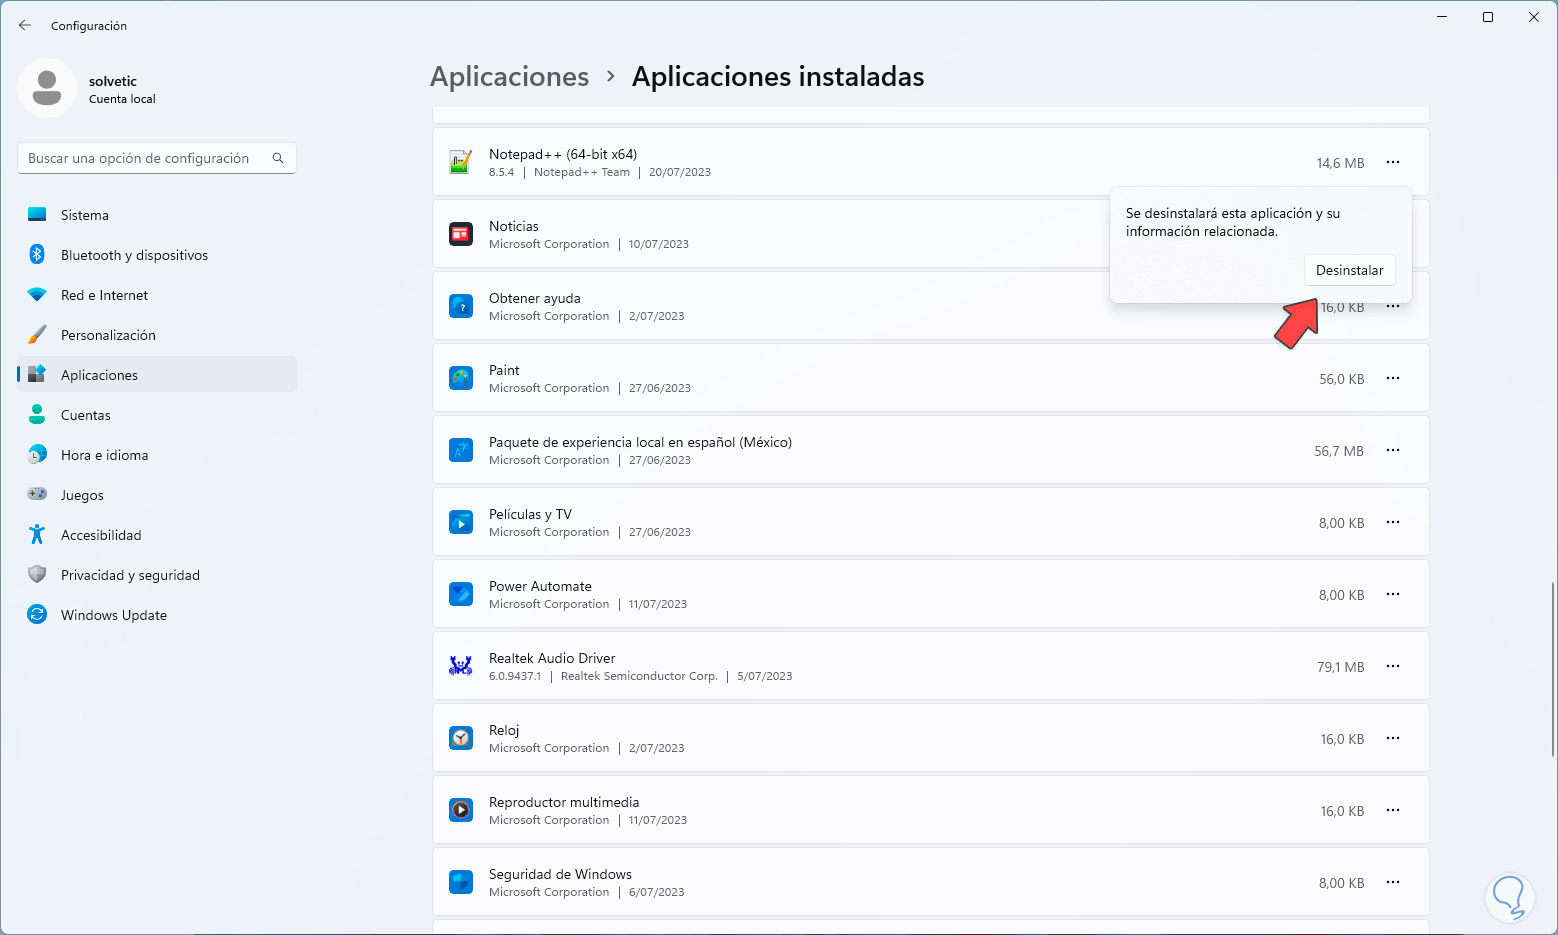
We must confirm the process:
Step 4
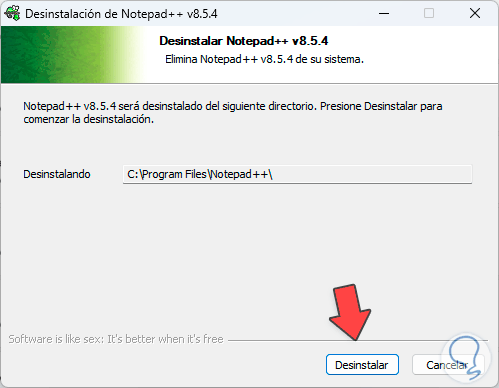
There the application wizard will open:
step 5
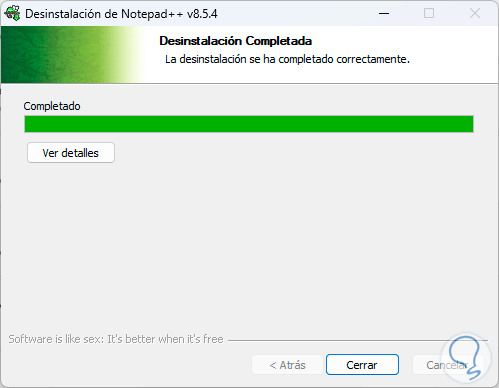
We complete the uninstallation of the program:
step 6
We validate that the application is no longer installed:
5 Fix Restart loop Windows 11 by setting lock screen
The Windows 11 lock screen is characterized by receiving new features in terms of design and dynamic operation, but all these new features can have a negative effect on performance when starting the system, especially if you have limited hardware.
Step 1
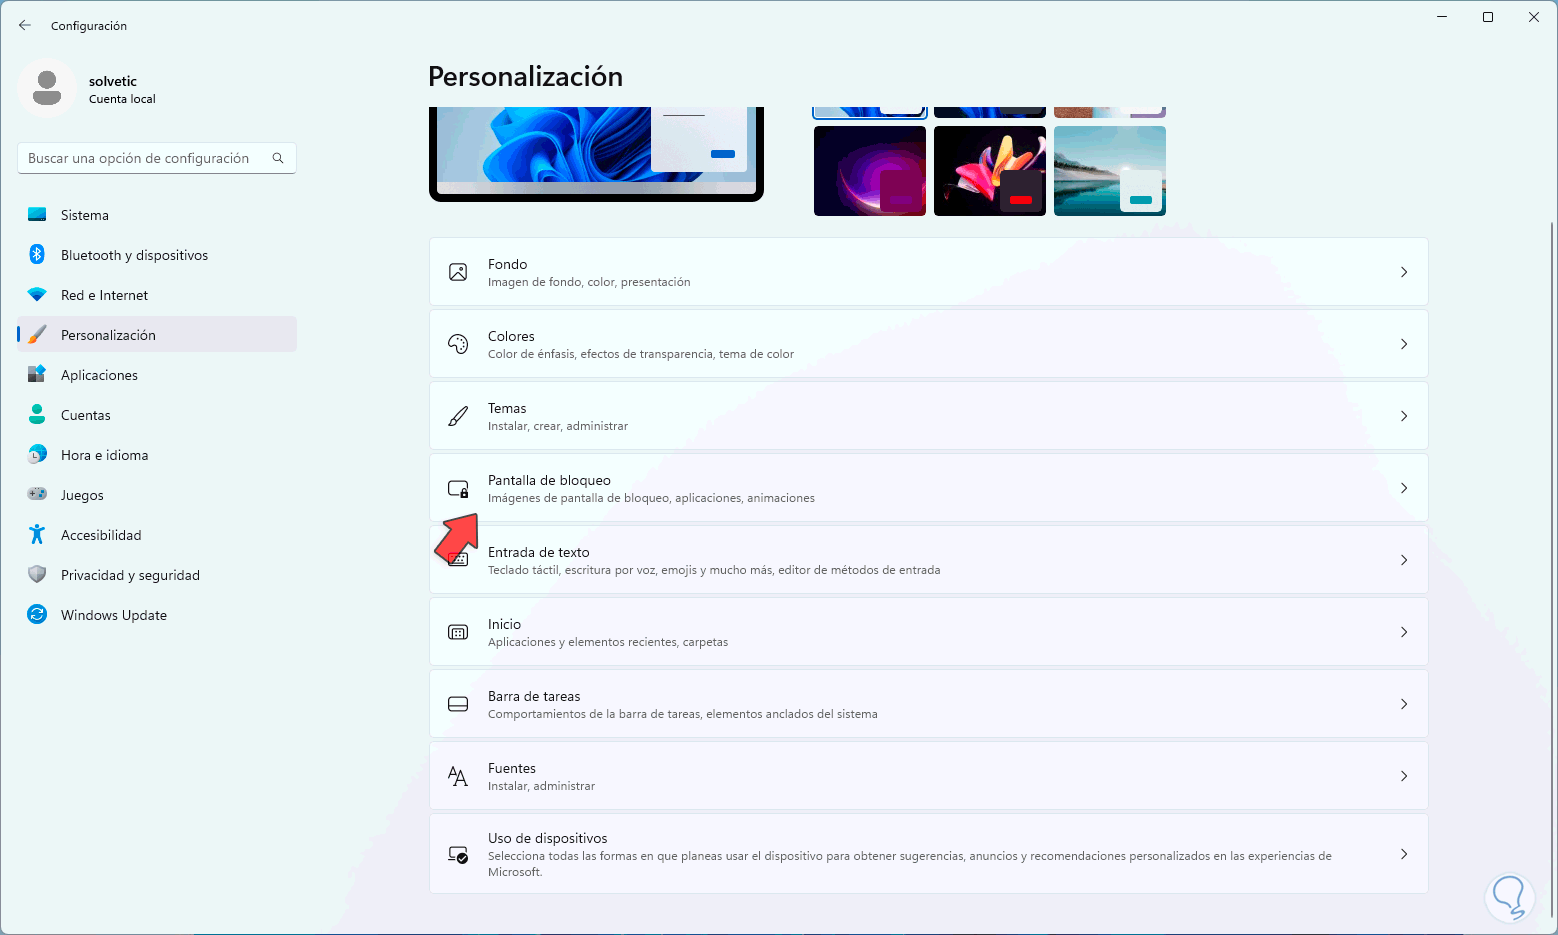
We can reduce these characteristics a bit, let's go to the route:
Step 2
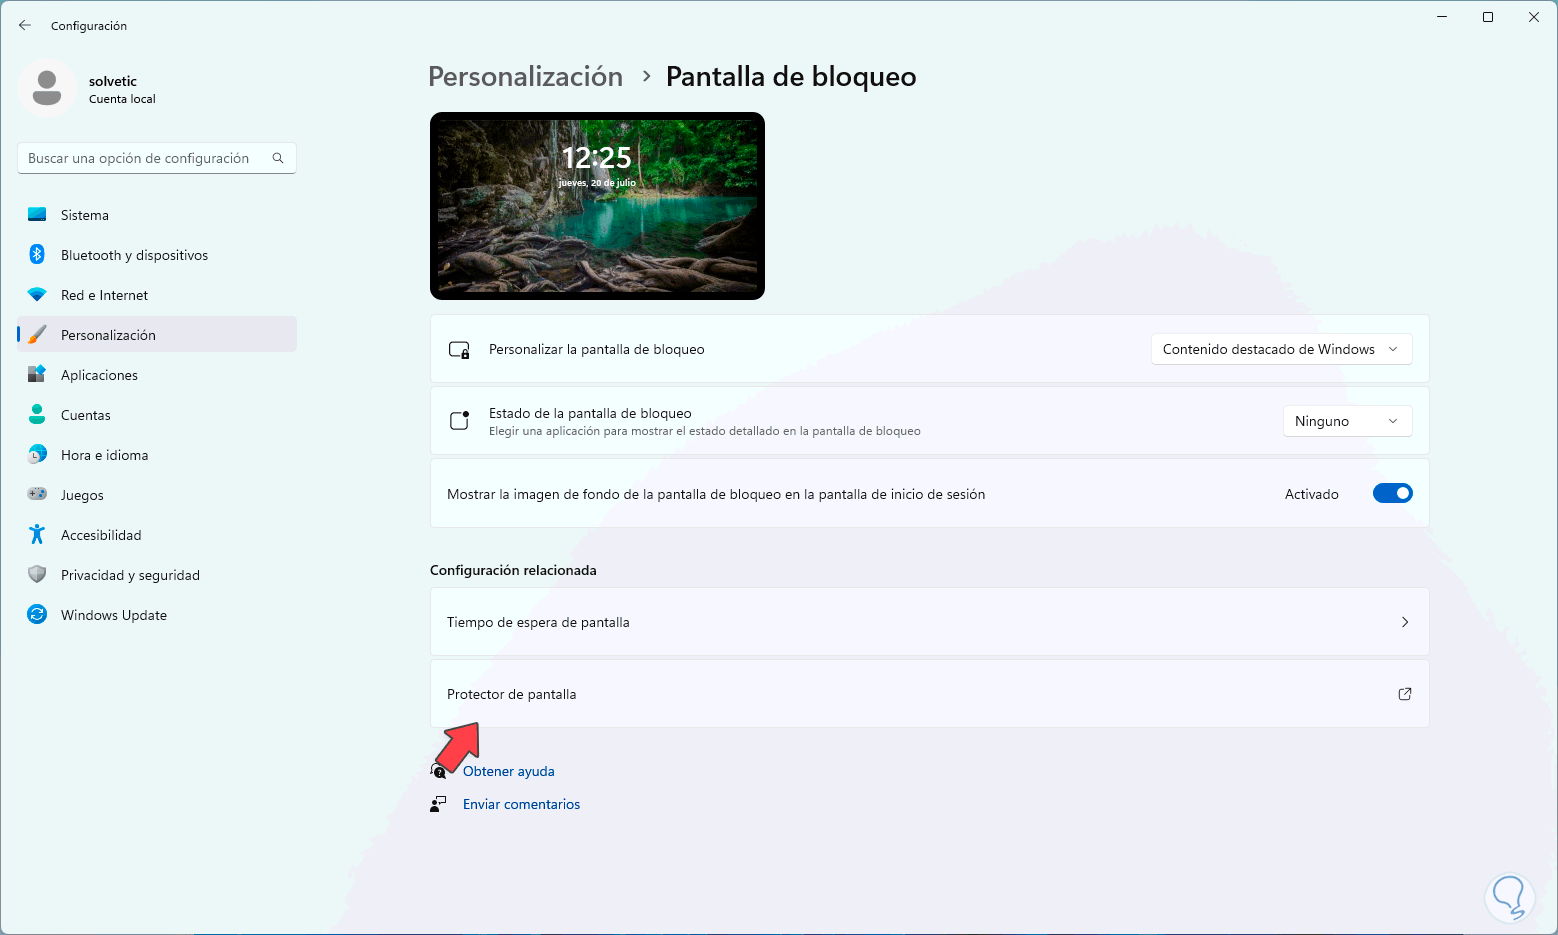
By clicking there we will see the following:
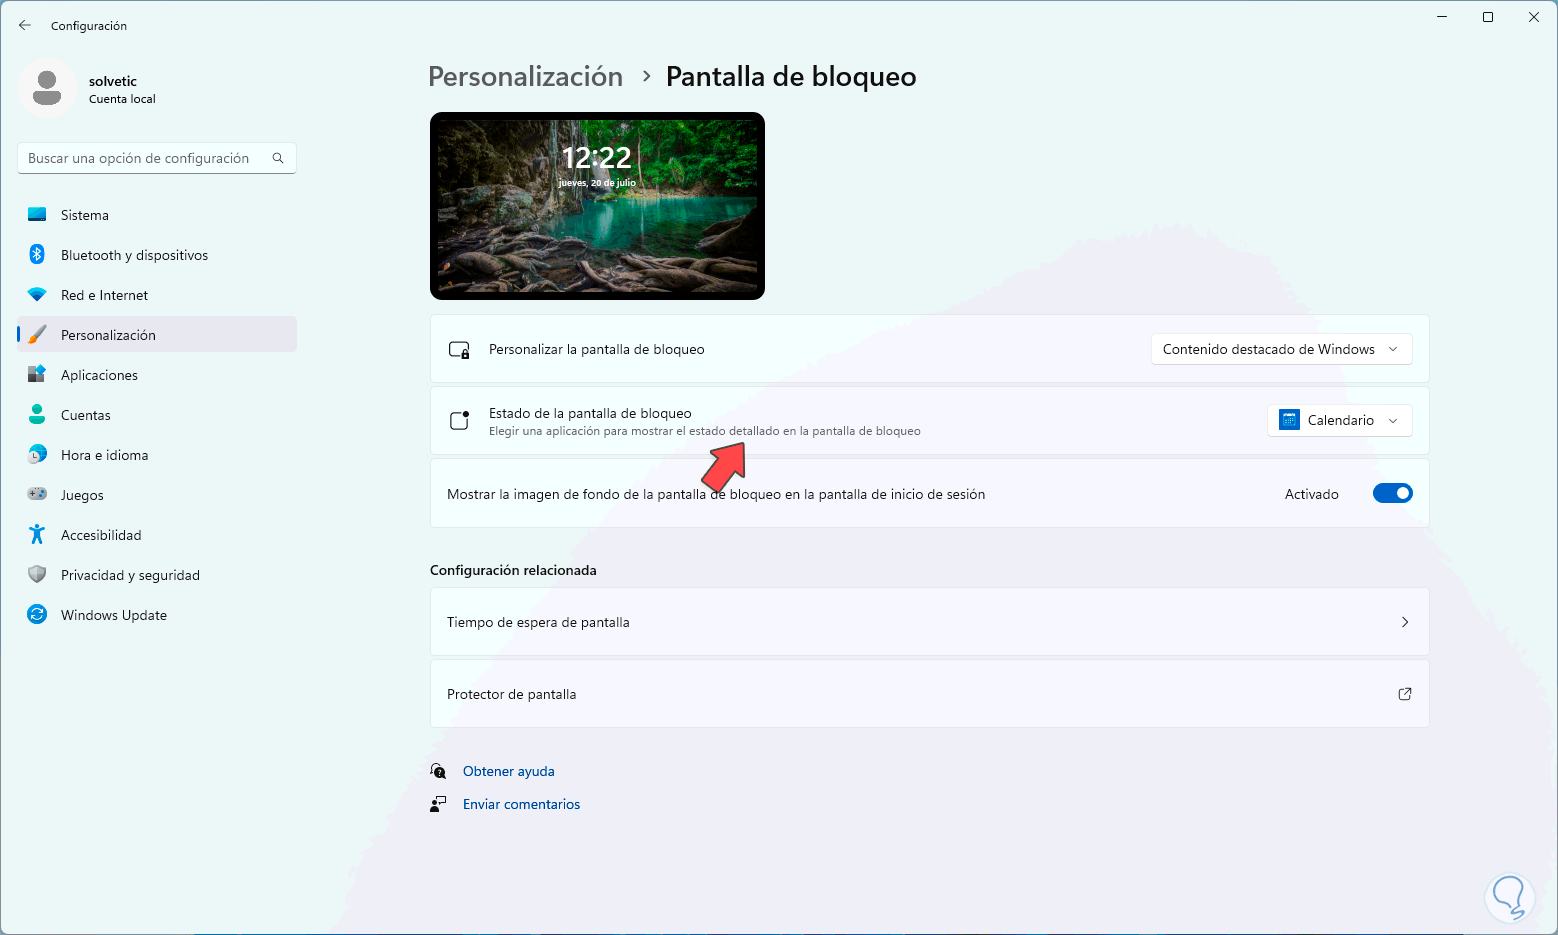
Step 3
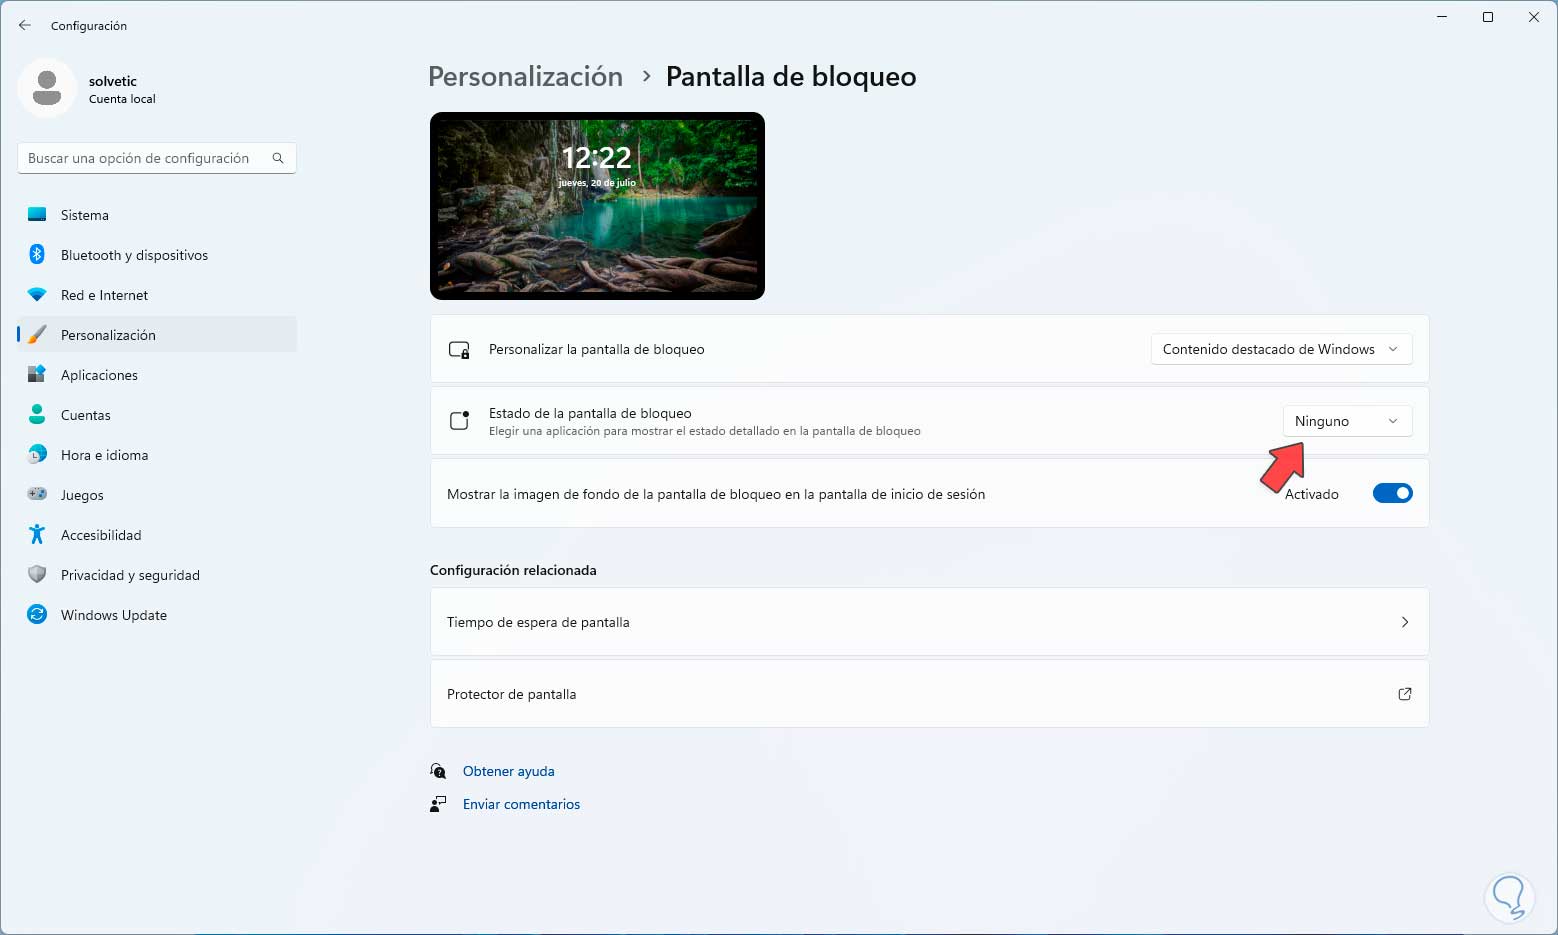
In the "Lock screen status" section we set the value "None":
Step 4
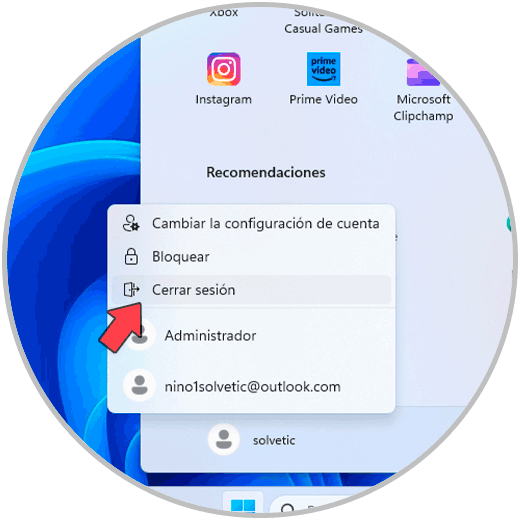
Now we are going to close the current session:
step 5
On the lock screen we can see that there are no extra functions:

step 6
Once the session starts we access the lock screen settings again and this time we click on "Screen saver":
step 7
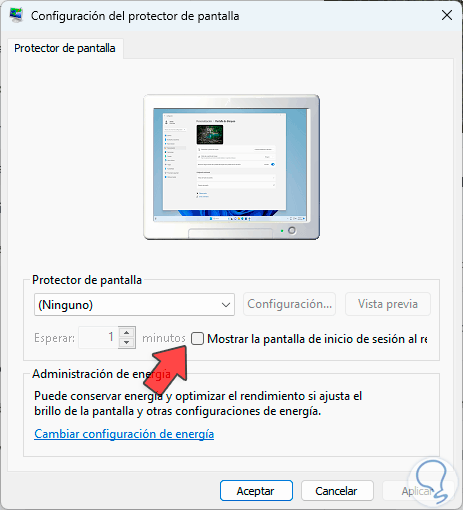
The following will open. We are going to confirm that the "Show the login screen" box is disabled, we apply the changes if necessary.
6 Fix Windows 11 reboot loop by disabling automatic reboot
Windows 11 has a feature that automatically reboots the system when any error is detected to proceed with the repair, but this may cause the loop,
Step 1
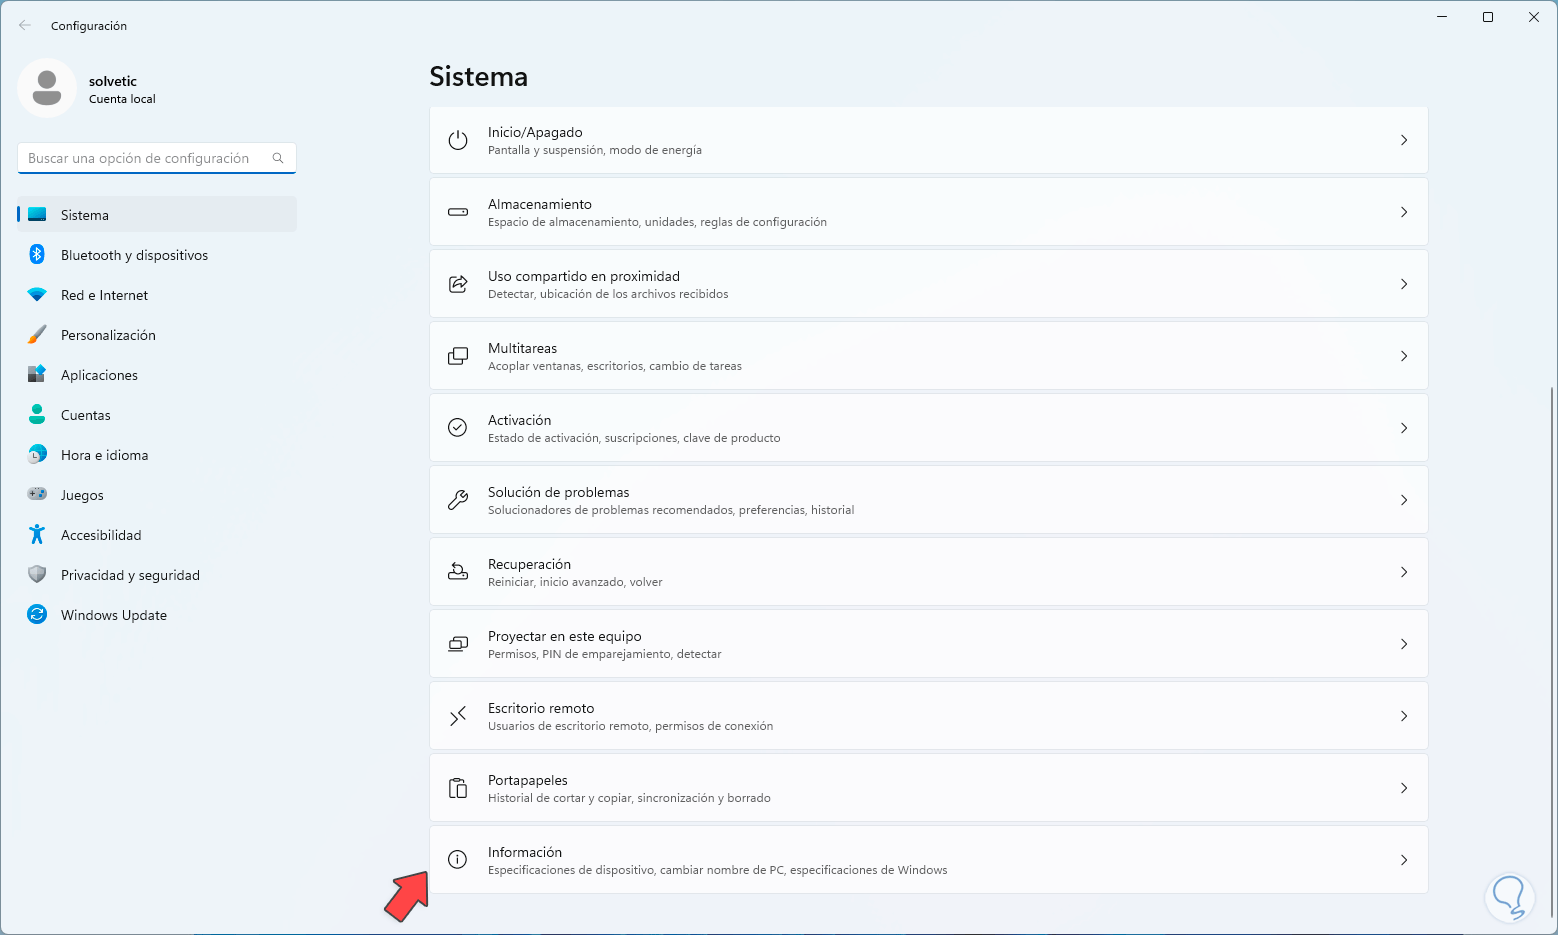
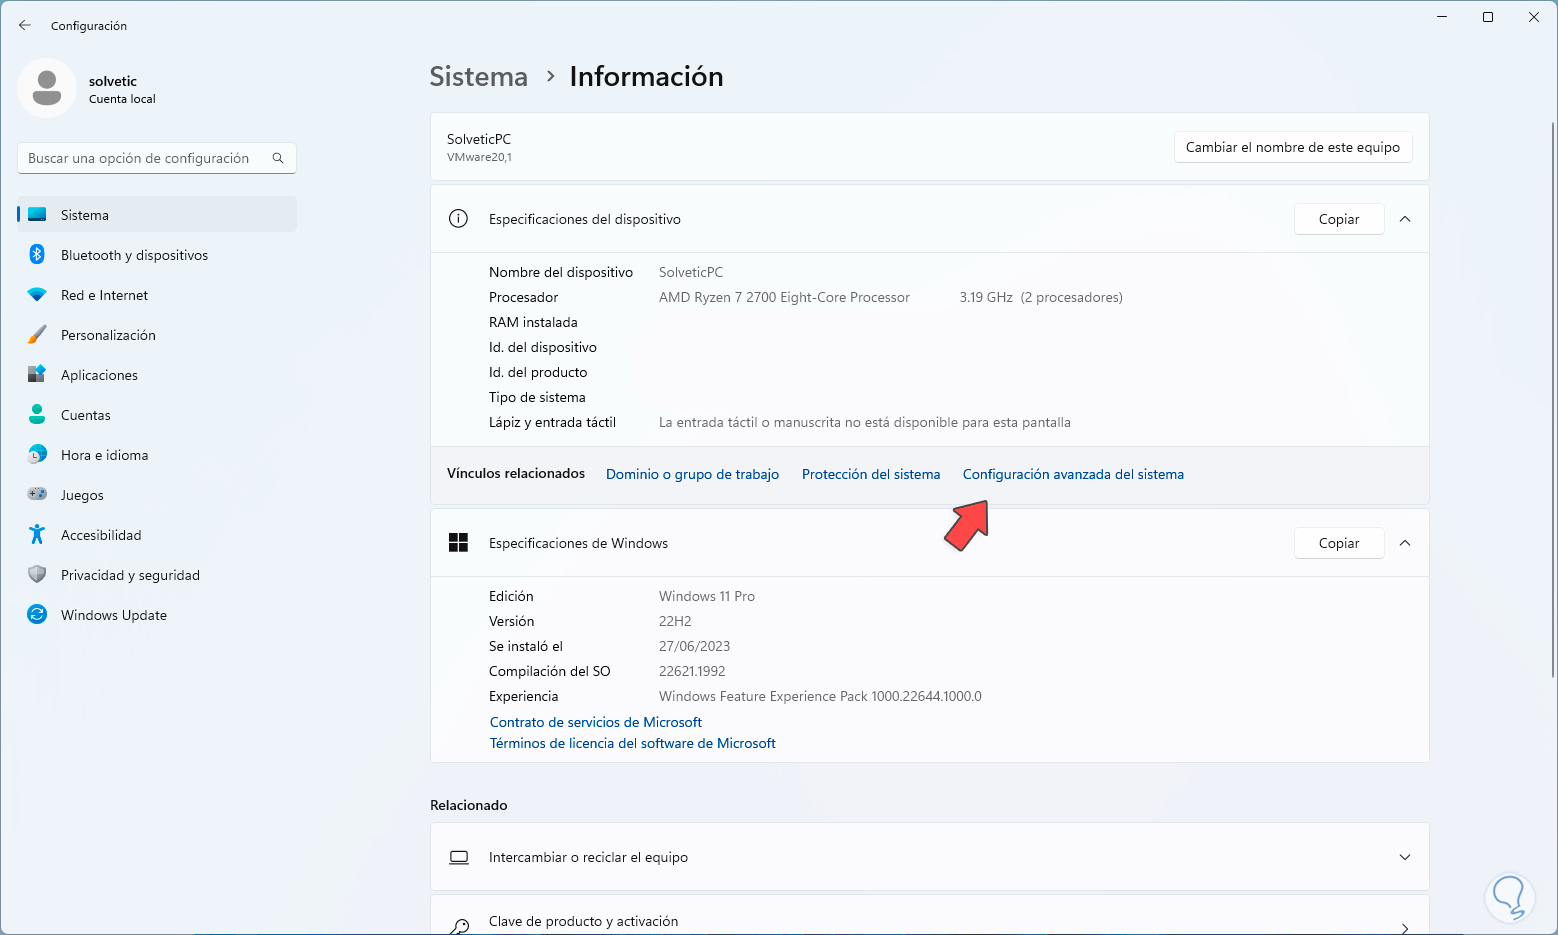
We can deactivate this function by going to the path "Start - Settings - Information":
Step 2
Now we will see the following:
There we click on "Advanced system settings"
Step 3
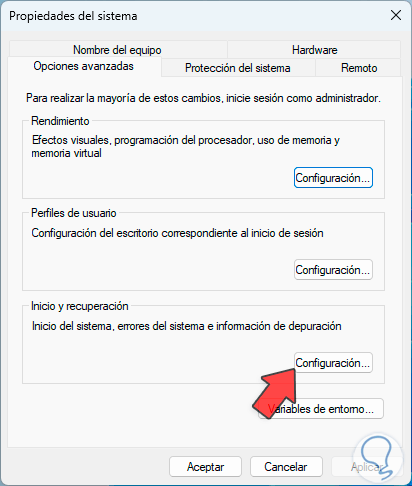
and the following window will open:
Step 4
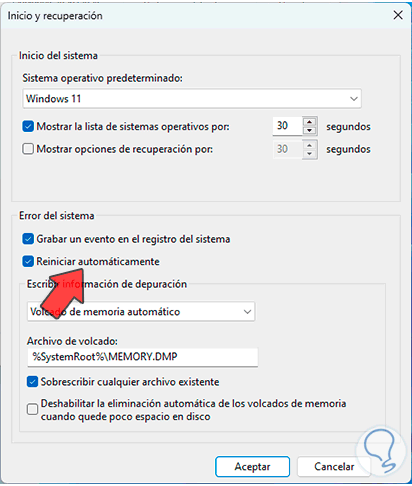
There we will click on "Settings" in the "Startup and recovery" section and this new window will open:
step 5
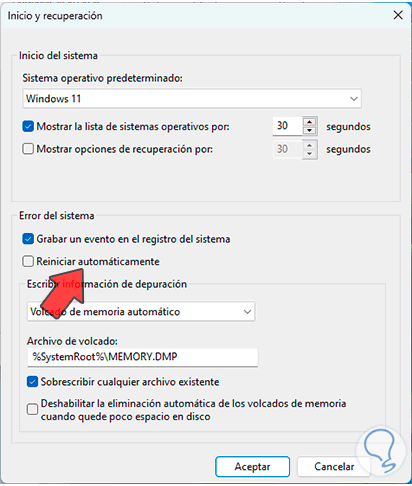
Then we deactivate the "Restart automatically" box:
We apply the changes.
7 Fix Reboot Loop Windows 11 by rolling back a driver
Drivers in Windows 11 are constantly updated to offer better features to the user, but in some cases this update can cause a negative effect on the computer and result in the reboot bug, in this case we can revert to the previous driver and thus fix this error.
Step 1
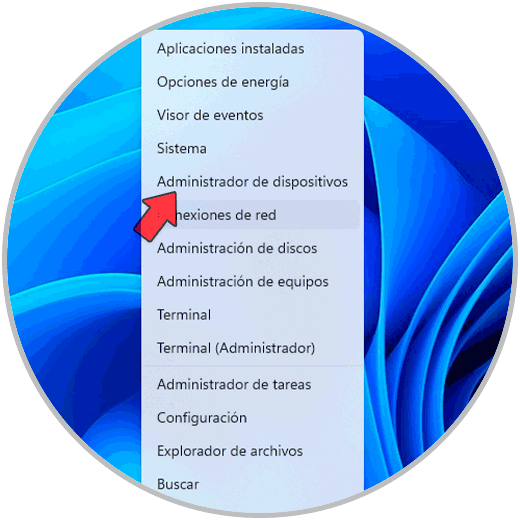
If this is needed we will open the Device Manager from the start:
Step 2
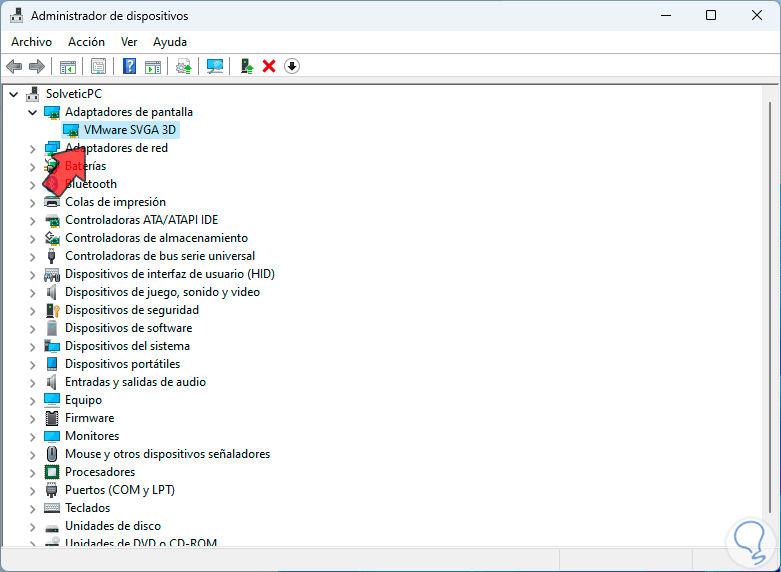
We are going to locate the driver that causes the error, we double click on it:
Step 3
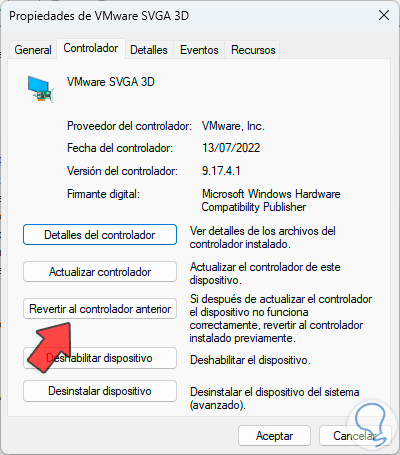
In the pop-up window we are going to go to the "Controller" tab and if it is active there we will click on "Revert to the previous driver":
We follow the steps of the wizard if we need it..
8 Fix Windows 11 reboot loop by reinstalling Windows
Step 1
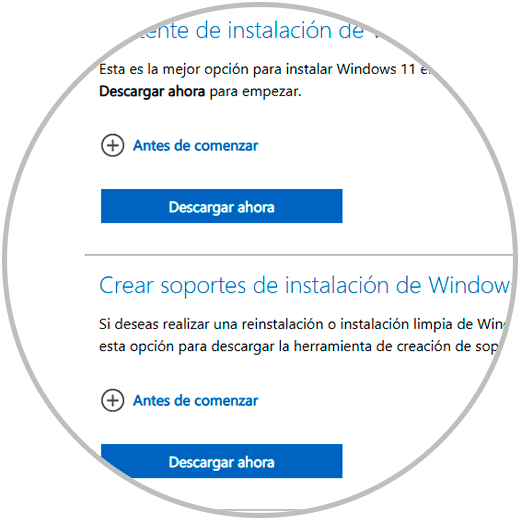
Finally, if the error persists, we can reinstall Windows 11 completely, for this we go to the following web address:
Windows 11
Step 2
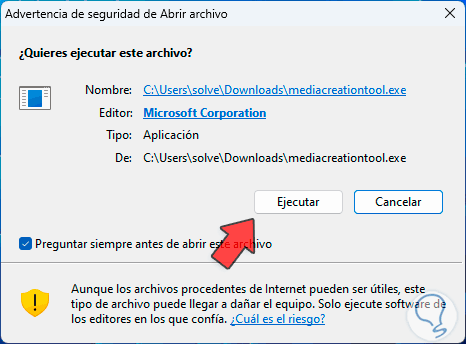
There we download the Windows media creation utility, then run the file and confirm the process:
Step 3
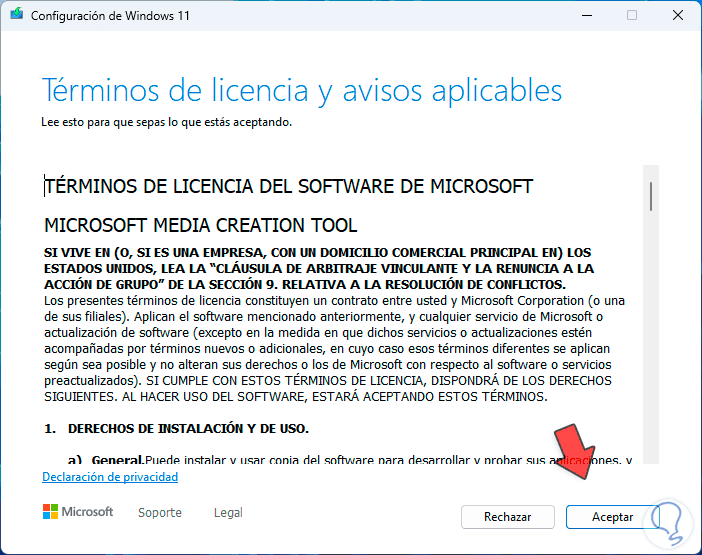
We must accept the license of use:
Step 4
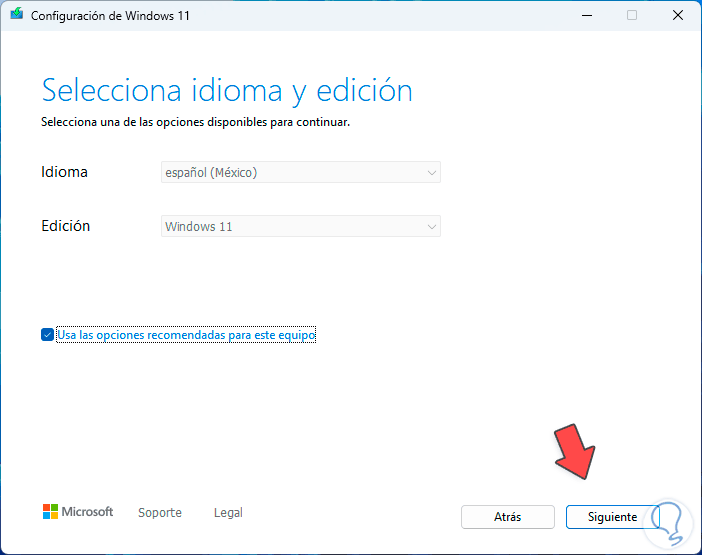
Then we define the way to define the ISO, it can be with the current equipment configuration or use a different one:
step 5
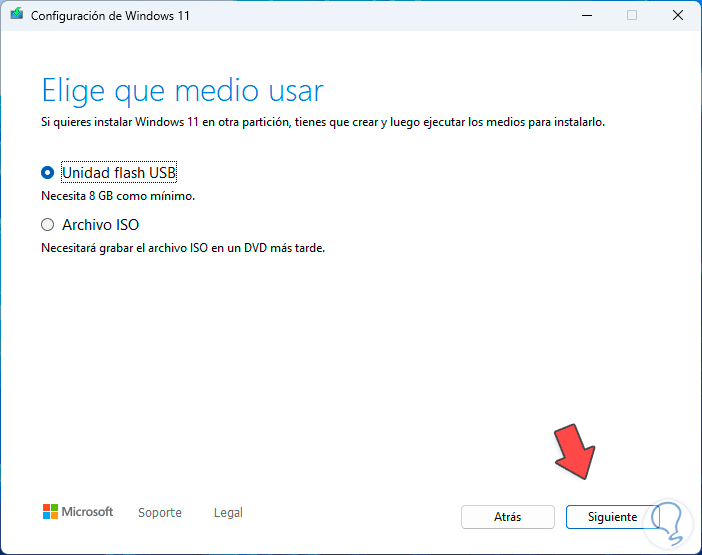
Now we are going to create the USB media directly to reinstall Windows. When the USB medium is ready, we must start the computer from there to continue the entire installation process.
With this TechnoWikis has taught you how to correct the restart loop error and thus have full access to the system.