We will learn how to create SOCKS proxy using PuTTY to create an SSH tunnel . In previous articles we talked about what a SOCKS proxy is and how to configure a SOCKS proxy in FireFox, articles that you should read to get clear ideas. Personally this method seems to me the easiest way to create SOCKS proxy for personal use.
Ingredients to create SOCKS proxy through an SSH tunnel.
To create our proxy we will need a remote server that allows SSH connections, for this it is a good option to get a cheap VPS server that charges for hours of use, since the proxy is usually used on specific occasions. Obviously we will need the IP and the port (22 by default) to connect to the remote server by SSH.
The second ingredient will be PuTTY (with downloading "putty.exe" is enough, the application is portable) that we will use it as an SSH client to create the SOCKS proxy tunnel.
The third ingredient will be a minimally functional brain hehe.
How to configure PuTTY to create an SSH tunnel.
First we run PuTTY and a window appears with a menu on the left side and in which we have to reach the Connection > SSH > Tunnels option as shown in the following image:
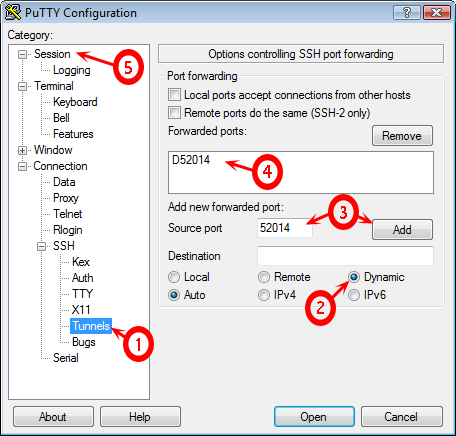
- Select "Tunnels" in the menu.
- In the options shown on the screen we select "Dynamic" .
- We add a source port. It can be any number, but we must bear in mind that this will be after the port of our SOCKS5 proxy. I recommend using a high port number, for example between 50,000 and 60,000, so we ensure that that port is not being used by another application. We will use port 52014. Press the "Add" button.
- We see that the text "D52014" is added to "Forwarded ports " .
- We go to the "Session" menu as seen in the following image.
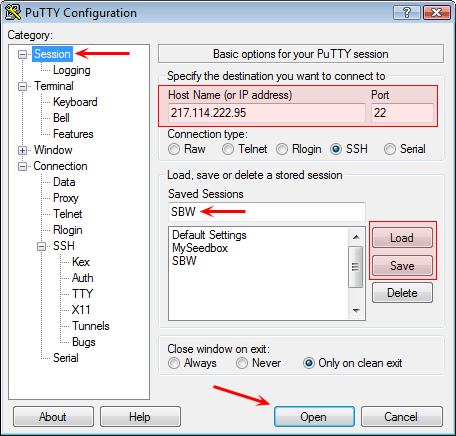
In this window the first thing is to write the Hostname or the server IP (in our case 217.114.222.95) together with the port, which as we said is usually 22 by default.
If we now click on the "Open" button, we would create the SOCKS5 proxy tunnel, but as we will surely want to use the proxy in the future, to avoid making all the configurations we will proceed to give the session a name and save it. Once saved, we click on "Open" and it will ask us for the username and password to connect via SSH (which you should know, if not, contact your hosting).
Other important things to keep in mind when creating the tunnel with PuTTY.
It is very important not to close the PuTTY window , because if we close it we destroy the tunnel.
On some servers when leaving PuTTY with the session open and there is no activity, they auto-disconnect and close the tunnel, I solve this by executing the top command and the session is still active for as long as it takes.
To end.
The last step is to configure the SOCKS5 proxy in FireFox as we showed you in a previous article. Remember that the SOCKS5 proxy IP is localhost or 127.0.0.1 and the port is the one we chose in step 3 described above.