There have been several occasions in which we talked about how to configure a proxy on our VPS server, but this time we will do it with a very light proxy server. Throughout this tutorial we will show
how to install an anonymous HTTP proxy on Ubuntu 16.04 using the tinyproxy server for Linux
.
Before moving forward, I want to show other related tutorials that may be useful and even a better option:
How to install an anonymous HTTP proxy on Ubuntu 16.04
The installation and configuration process will guide us to get an anonymous HTTP proxy, understanding by anonymous that
it will not show our real IP
, but that of the server. We have used a
cheap VPS
to perform all the tests with tinyproxy and make sure that the steps explained here work correctly.
What is tinyproxy?
It is free and open source software that we can use in Linux operating systems, we have chosen Ubuntu for its simplicity. The source code is available on
Github
, where we can also report bugs or problems.
Installing tinyproxy on Ubuntu 16.04.
First of all we verify that we have our updated operating system executing the commands:
apt-get update
apt-get upgrade
To install tinyproxy from the Ubuntu repositories we will use the command:
apt-get install tinyproxy
After executing the previous command, the installation process will begin, in which if everything went well it should not show us any errors.
Configuring tinyproxy as an anonymous proxy.
The configuration process involves editing the configuration file
tinyproxy.conf
with some text editor, as we are going to work through the console we will use
nano
as editor, so we execute the following command:
nano /etc/tinyproxy.conf
In other Linux distributions it may be that tinyproxy is installed in its own folder and the configuration file can be found in
/etc/tinyproxy/tinyproxy.conf
, but this is not the case with Ubuntu.
Now we have the configuration file on the screen and we must make the necessary adjustments to achieve our objective.
Restrict / allow proxy access based on IP.
First, we look for the section of the configuration file where the different IPs that have access to the proxy server are managed. In this example configuration I want to allow access to all IPs, so I delete the default
Allow 127.0.0.1
that only allows local connections.
If we wanted to allow access only to our IP, we would have to use a configuration with our IP,
Allow 10.10.10.10
, where
10.10.10.10
we would replace it with our IP address.
Change the default port.
For security reasons, it is a good practice to change the default port, since someone could use our proxy without permission. To avoid problems, we will choose a port above 1024, it is even advisable to use high values "‹"‹to avoid conflicts with other programs.
In this example I will use 15632 as a port. I proceed to edit the corresponding line of the configuration file that by default brings the configured 8888 port, so after editing the line it would be:
Port 15632
Remove the HTTP VIA header.
Tinyproxy is configured by default to use the HTTP VIA header that compromises our security, since the proxy would no longer be anonymous and would become transparent, that is, it would show our real IP.
Since we do not want our real IP to be displayed, we deactivate the VIA header:
DisableViaHeader Yes
With this we have everything ready, we save our configuration and restart the proxy.
How to start, stop and restart tinyproxy?
-
Restart:
/etc/init.d/tinyproxy restart
-
Start:
/etc/init.d/tinyproxy start
-
Stop:
/etc/init.d/tinyproxy stop
Where is the tinyproxy log file?
It is good to know the default location of the log file where errors are stored, since if something does not work properly, we can find valuable information in this file to try to solve the problem.
/var/log/tinyproxy/tinyproxy.log
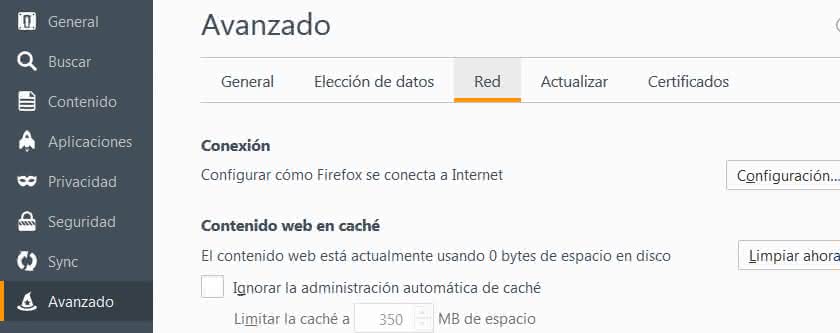
Configure our anonymous proxy in FireFox?
We already have our HTTP proxy ready to work, we just have to configure our browser to use it and thus hide our IP. I have chosen the FireFox browser because the proxy configuration is much simpler.
We access the
Opciones → Avanzado → Red
panel
Opciones → Avanzado → Red
and in the
Conexión
section we give
Configuración
.
In the new window we add the data of our proxy so that it looks like this:
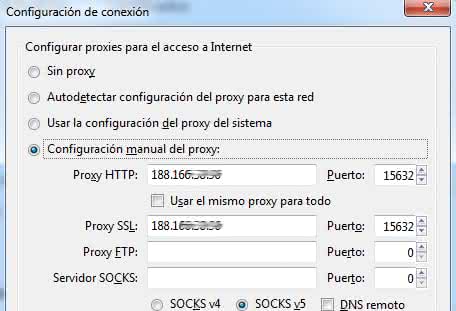
Pay attention to the need to enter the IP and the port of our proxy in the
"HTTP Proxy"
and
"SSL Proxy"
fields.
Last conclusions.
The inconveniences I have encountered are:
-
Longer response times compared to those offered by a tunnel socks.
-
Limited support for the HTTPS protocol, since tinyproxy only redirects HTTPS traffic using the CONNECT method.
-
The version that is in the Ubuntu repositories seems somewhat old
(at the time of writing this tutorial is version 1.8.3)
. We can solve this by compiling the source code of the latest version ourselves, but we leave that for an upcoming article.
We have been able to see that the proxy works correctly and maintains our anonymity when browsing, but if you still want to review some alternative to tinyproxy I leave you the following options:
-
Polipo
is free and open source.
-
Privproxy
similar to the previous one and even capable of filtering web advertising.
-
Squid
the most complete of all, but also the most complex.