In this tutorial I will try to explain as clearly and as easily as possible
how to create a seedbox on a server with Ubuntu 16.04 x64
. I have chosen a server with Linux operating system since they are the cheapest and a VPS can serve us perfectly to configure our own seedbox and download torrent files.

Before entering the subject I must warn you that some hosting companies, either on VPS or dedicated servers, do not allow the use of P2P programs, which include torrent downloads.
So the first step will be to review the terms and conditions of use of the service we have contracted. Another factor to review is the bandwidth available to our server, since this is usually limited and you can get some unpleasant surprise.
What is Deluge?
Deluge
is a free and open source program that allows us to manage torrent files, both for downloading files and for sharing them.
Put simply, Deluge is a very complete and fully configurable BitTorrent client.
It is based on the
libtorrent
open source libraries, which efficiently implement the bittorrent protocol. These libraries have years of development behind them, which is why they have made Deluge one of the most stable bittorrent clients.
The word seedbox is used to define a machine that allows us to share torrent files continuously.
Our goal is to create a seedbox using a server with Ubuntu operating system in which we install Deluge with its web interface.
What are we going to need to install Deluge on our server?
For the installation of Deluge on an Ubuntu server we will use
PuTTY
to connect to the server. As additional tools I like to have
FileZilla
and
WinSCP
on hand, but they are optional. Obviously we are going to need a server, I have used a small
Digital Ocean VPS
that besides offering a good price is very stable.
How to create a seedbox on a server with Ubuntu 16.04 from scratch.
To start I
recommend having a server with at least 512MB of RAM
. The first positive point of this tutorial is that
the installation we are going to make of Deluge is one of the lightest and does not need many resources
. This is because we are not going to install a graphical desktop interface, but we are
going to use the web interface to control Deluge directly from the browser
.
1) Add the official PPA repository of Deluge.
First of all we will execute the command that allows us to
add the official Deluge PPA repository and thus directly install the program without the need to compile anything manually
. The commands to execute are:
sudo add-apt-repository ppa:deluge-team/ppa
sudo apt-get update
If for some reason the error
"add-apt-repository: command not found" appears
on the screen, we must first execute the following command:
sudo apt-get install python-software-properties
2) Know the different modules available to Deluge.
This section is not mandatory to know to perform the installation, but personally I prefer to know minimally the programs that I install on the servers. When we talk about Deluge, we talk about a bittorrent client formed by different modules, which allows it to adapt to almost any environment and operating system.
Deluge consists of the following modules:
-
deluged
: it is the main demon, the core of the program and is necessary for its proper functioning.
-
deluge-webui
: is the web interface that allows Deluge to be controlled directly from the web browser.
-
deluge-console
: allows access to the daemon through the console, that is, control Deluge with commands from the console
(we will not use it in this tutorial)
.
3) Configuration and installation of Deluge in Ubuntu.
We quickly go to the
installation of Deluge in Ubuntu to create our seedbox
. The command to execute is:
sudo apt-get install deluged deluge-webui
As we can see, we are installing the daemon and the web interface, since the rest of the components will not be used in our case.
The version of Ubuntu 16.04 or
Ubuntu 16.04.01
uses the SystemD service manager, so we will have to create the compatible scripts to start, stop or restart Deluge as a system service. This process is detailed in
this link
but since it is in English and can be confusing, I will detail all the steps below.
First of all we verify that the daemon and the web interface are installed correctly, for this we use the following commands that will return their corresponding routes:
sudo which deluged
sudo which deluge-web
As a security measure it is highly recommended to run the Deluge service with a user with limited permissions, this is achieved by executing the following command:
sudo adduser --system --gecos "Deluge Service" --disabled-password --group --home /var/lib/deluge deluge
Now we create the scripts compatible with SystemD.
For this we will need a text editor in console mode, I will use
nano
for its simplicity. I create a file with the command:
sudo nano /etc/systemd/system/deluged.service
And as pego content:
[Unit]
Description=Deluge Bittorrent Client Daemon
After=network-online.target

[Service]
Type=simple
User=deluge
Group=deluge
UMask=007

ExecStart=/usr/bin/deluged -d

Restart=on-failure

# Configures the time to wait before service is stopped forcefully.
TimeoutStopSec=300

[Install]
WantedBy=multi-user.target
In the next step we must
activate the service so that it runs automatically when the system starts
, for this we execute the following command:
sudo systemctl enable /etc/systemd/system/deluged.service
We can start the demon with the command:
sudo systemctl start deluged
We can see the execution status of the service with the command:
sudo systemctl status deluged
We follow a process similar to the previous one, but this time for the web interface service.
We create the boot script file with the command:
sudo nano /etc/systemd/system/deluge-web.service
As pego content:
[Unit]
Description=Deluge Bittorrent Client Web Interface
After=network-online.target

[Service]
Type=simple

User=deluge
Group=deluge
UMask=027

ExecStart=/usr/bin/deluge-web

Restart=on-failure

[Install]
WantedBy=multi-user.target
I activate the service to start when the operating system starts up:
sudo systemctl enable /etc/systemd/system/deluge-web.service
Command to start the web interface:
sudo systemctl start deluge-web
Command to check the execution status of the web interface service:
sudo systemctl status deluge-web
These services can also be stopped or restarted with the commands:
systemctl restart deluged
systemctl restart deluge-web
systemctl stop deluged
systemctl stop deluge-web
At this point, the installation process can already be completed and although it is not necessary, I personally like to restart the system to verify that the service startup scripts work correctly. To restart the system we execute the command:
systemctl reboot
How to access the Deluge web interface from the browser.
Now we will show you how to access the Deluge web interface from the browser. For this we must know the IP of our server and access it through the browser as follows:
http://IP_servidor:8112
A web page will open in the browser requesting the access password, which is by default "deluge" without quotes and in lowercase letters.
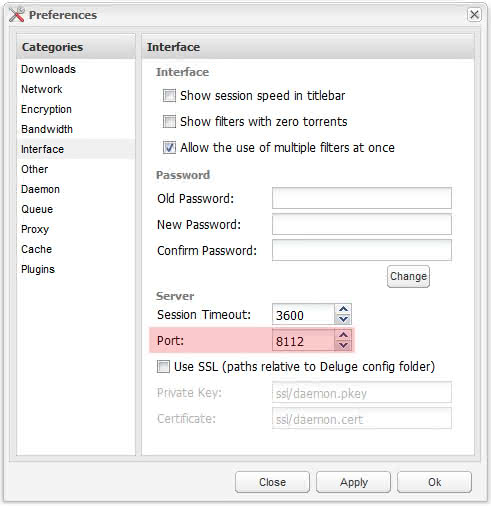
It is very important to change the default password from the preferences.
For the correct operation of the interface the browser has to support Flash.
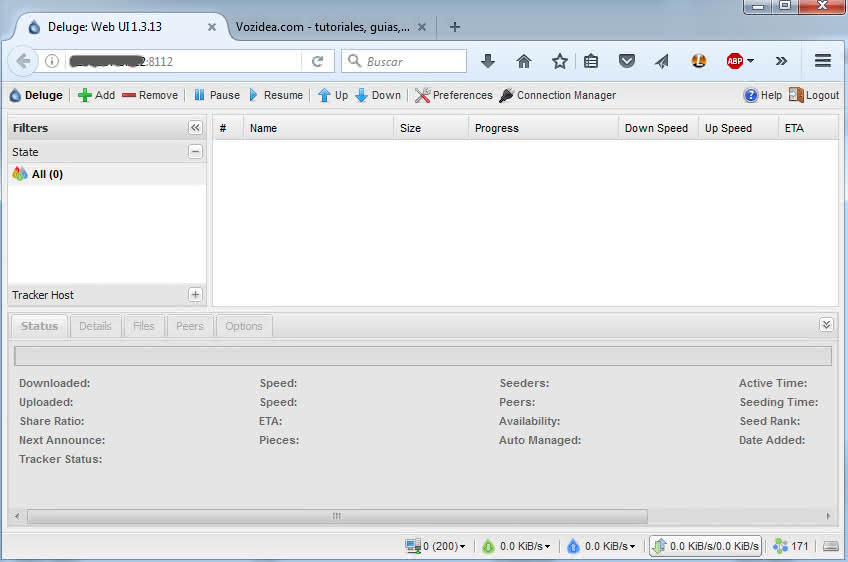
Another important safety recommendation is to change the default port
(8112) to a different one (preferably use a high value to avoid conflicts with other ports).
So far the tutorial of how to create a seedbox on a server with Linux Ubuntu 16.04, if you have any questions do not hesitate to ask through the comments.