Well here we are with this new tutorial after explaining
how to install Varnish
the time has come to explain
how to configure Varnish in Ubuntu
, although there will be some generic parts about Varnish that will be applicable in any Linux distribution.
Varnish configuration guide in Ubuntu.
As we said, this guide to configure Varnish is based on Ubuntu but it will be totally valid for other Linux distributions such as Debian or CentOS, taking into account that the location of the configuration files and some command can change from one Linux distribution to another, but saving those differences, the concept is the same.
Before we start we have to be clear about
how we are going to configure our server
, for this I will show the original server configuration and the configuration after installing and configuring Varnish. I will show this with some schemes in the following images:
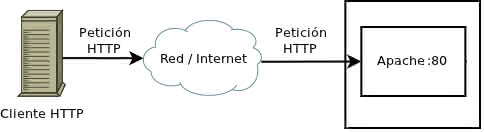
Standard Apache server listening on port 80
Apache server listening on port 8080 and Varnish handling HTTP requests on port 80
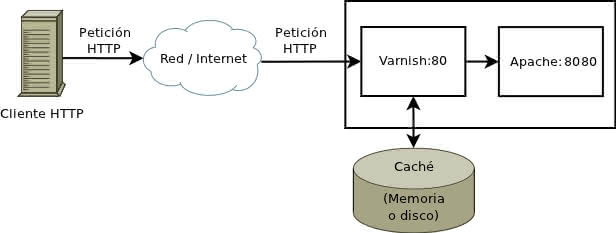
Of these schemes, we are going to comment on the second one, we can see how we have placed the Varnish program between the user and Apache. Now Varnish listens on port 80 all the requests that users make through their browsers and Varnish will be in charge of processing these requests. At the same time,
Varnish will be in charge of requesting the resources requested by the user from Apache through port 8080
.
Well, all the previous text is summarized in that we have to configure Apache first to work under port 8080, since by default it works in port 80.
We have to locate the Apahe configuration file with the name
ports.conf
, in Ubuntu located at
/etc/apache2/ports.conf
We edit this file so that the
"Listen"
parameter listens on port 8080. There are two options that can be shown to you:
"Listen 80"
or
"Listen 127.0.0.1:80"
, depending on the Ubuntu version, but what We are clear that we will change port 80 to 8080, leaving those parameters like this:
"Listen 8080"
or
"Listen 127.0.0.1:8080"
.
The difference is that if we do not put the IP 127.0.01 then Apache will still be accessible from any IP through port 8080.
It may also be the case that you have the following line in the
ports.conf
file:
"NameVirtualHost 127.0.0.1:80"
that you will also have to change it to
"NameVirtualHost 127.0.0.1:8080"
.
Then you have to modify the configuration files of the VirtualHosts.
The location of the configuration files of the different Virtualhosts are in the directory
/etc/apache2/sites-available/
We will have to edit all the files of our VirtualHosts, so that if we have
"VirtualHost 127.0.0.1:80"
go to
"VirtualHost 127.0.0.1:8080"
and if we have
"VirtualHost *: 80"
go to
"VirtualHost *: 8080"
.
The difference is that if we put an asterisk, any IP can be accessed and if we specify an IP (in this case 127.0.0.1) it can only be accessed.
Restart apache with the command:
service apache2 restart
We already have Apache running on port 8080, now we have the Varnish configuration and remember that Varnish will now work on port 80.
Configure Varnish boot parameters.
To configure Varnish you must first set the boot parameters, for this we are going to talk carefully about each one and then propose several settings of boot parameters and we can choose the one that best suits our needs.
The boot parameters are modified with the
DAEMON_OPTS
option, which can receive the following parameters
(
be
DAEMON_OPTS
to distinguish upper and lower case in the parameter names)
:
-
Parameter
-a
: the format of this parameter is
IP_DONDE_PUCHAR: PUERTO
, we can omit the
IP_DONDE_ESCUCHAR
parameter so that it listens on all IPs.
-
-T
parameter
: the format is
IP_WERE_LISTEN: PUERTO
, this parameter indicates the IP and the port on which you will listen to the Varnish Cache administration interface.
-
-T parameter
: Specifies the TTL (
Time To Live
) by default.
-
Parameter
-p
: it is not necessary to use it unless we are advanced users. With it we can specify a series of values "‹"‹such as:
thread_pool_min, thread_pool_max, thread_pools, listen_depth, session_linger, lru_interval
.
-
Parameter
-w
: allows us to set three comma-related values "‹"‹separated by commas using Varnish
minimum_thread_number, maximum_number_threads, timeout_of_threads
. Nor do we need to adjust these values "‹"‹by default.
-
Parameter
-s
: this parameter is important since it allows us to establish where we want to store the cache (memory or hard disk) and its size. Let's look at the following examples to understand it better:
-
-s malloc,1G
: with this parameter we are indicating that the cache is stored in memory and of size 1Gb.
-
-s file,/var/lib/varnish/sathost/varnish_storage.bin,1G
: with this parameter we are indicating that a file be used to store the 1GB size cache. We can also specify the size with a percentage, for example we would change the 1Gb of the previous examples by 50%
-s file,/var/lib/varnish/sathost/varnish_storage.bin,50%
and this would indicate that
-s file,/var/lib/varnish/sathost/varnish_storage.bin,50%
was used % of disk size for cache.
-
Parameter
-f
: This parameter indicates the location of the Varnish configuration file. For example
-f /etc/varnish/default.vcl
indicates the location of the configuration vcl file.
-
Parameter
-S
: indicates the location of the secret file that is used for the authentication of the Varnish console.
Let's look at some
examples of boot parameter settings
:
DAEMON_OPTS="-a :80 \
-f /etc/varnish/default.vcl \
-S /etc/varnish/secret \
-s malloc,256m"
This example is very common and establishes the use of 256MB of RAM for cache and the rest of the options are the already mentioned configuration file location, secret file and the port on which Varnish listens.
DAEMON_OPTS="-a :80 \
-f /etc/varnish/default.vcl \
-S /etc/varnish/secret \
-s file,/var/lib/varnish/sathost/varnish_storage.bin,1G"
An example that establishes the use of a 1GB file as a cache along with the other options mentioned above.
The Varnish configuration file is very important and we will discuss it in depth later as we have to talk about VCL (Varnish Configuration Language).
As for the port I am giving examples with port 80 since my goal is to configure Varnish as an accelerator of a web page, it can be the case of using other ports together with internal IPs, especially when used as a load balancer but That is not the purpose of this guide.
Use memory to cache or use a file.
Some of you may be wondering what is better, use cache memory or use a file. The theory says that
caching in memory serves the contents of web pages faster
, but we already know that memory in VPS is quite limited and expensive, so it is sometimes better to leave free memory for the proper functioning of the operating system.
Another factor to take into account when making the decision of which cache method to use is the size of the elements that we are going to cache, for example if we are only going to cache 20 articles of a wordpress blog, with 64MB for the cache we are going to left over, but if we are going to cache a blog with more than 20,000 articles and PDF attachments and high-resolution images, the best option is to use disk cache if we do not have enough RAM.
In summary, the available resources must be evaluated to decide which method to use.
In several articles of analysis on Varnish that I have been able to read in English, they affirm that Varnish using disk cache is more effective in the long term, when the ratio of hits in the cache increases, this breaks my theories but it may be true since today in day with SSD disks you have access to data at very high speeds.
When we use a partition to use Varnish cache it is highly recommended to mount that partition with the noatime and nodiratime options.
VCL: Varnish Configuration Language
Varnish uses this VCL language to allow the user to manage requests with some kind of logic. This part is especially extensive and we will discuss it in a second part of this Varnish configuration guide.
Useful commands to start, stop, restart and reload Varnish.
We can perform all these functions when we need to interact with Varnish through the console and so we can stop it, restart it or reload Varnish. The commands are:
-
Start Varnish
:
service varnish start
-
Stop Varnish
:
service varnish stop
-
Restart Varnish
:
service varnish restart
-
Reload Varnish
:
service varnish reload
Some of you may be wondering what is the difference between restarting and reloading Varnish.
When we restart Varnish we restart the entire program by turning off and back on Varnish, while if we reload it, we are only reloading the configuration without turning off Varnish
.
I hope you liked it and I hope to have the second part of the Varnish configuration guide as soon as possible. Any comments or questions do not hesitate to use the comments.