Surely more than once you were sitting on your sofa with the popcorn ready for an afternoon of cinema, when all of a sudden everything is flat when you see that the audio of the movie is out of sync and it is uncomfortable to watch the movie and follow it may be an impossible mission. In this simple tutorial we will see a way to
synchronize the audio of a movie
.

There are many options when it comes to synchronizing an audio and sometimes it can be a very complicated task, but here we will learn a simple and easy way.
How to synchronize the audio of a movie.
Types of desynchronization:
First we must know the types of desynchronization that can occur in multimedia containers (mp4 files, mkv, avi, mov, etc ...):
-
Constant synchronization:
the audio is advanced or delayed a number of constant milliseconds throughout the entire video.
-
Progressive synchronization:
audio is advanced or delayed as video playback progresses.
-
Total
desynchronization
: it
is a combination of the two previous desynchronizations and that occurs in different segments. Trying to solve in this case the problems of synchrony is really complex and usually requires treating the audio / video in segments.
Possibilities to perform audio synchronization:
-
Temporarily in real time:
the readjustments in time to achieve synchronization are made in real time at the time of playing the video, so it
does not require editing or recoding the audio / video
. It is the simplest solution and the one I will show you in this article.
-
Permanently:
the readjustments in time to achieve synchronization between audio and video are carried out permanently, these being stored in the multimedia container.
It is a more complex solution in which it is usually necessary to recode the video or audio.
How to synchronize the audio of a movie with VLC.
For those who do not know,
VLC
(developed by the VideoLAN company)
is a simple, powerful and free multimedia player. VLC includes by default a series of tools and filters that allow us to adjust the synchronization between video and audio.
The first step is to know if we are facing a
positive desynchronization
(the sound is more advanced than the image, for example if we first hear the sound of a blow but we do not see it until after a few seconds)
or a
negative desynchronization
(the sound goes more delayed than the image, that is, first we see something happening and a few seconds later we hear it)
.
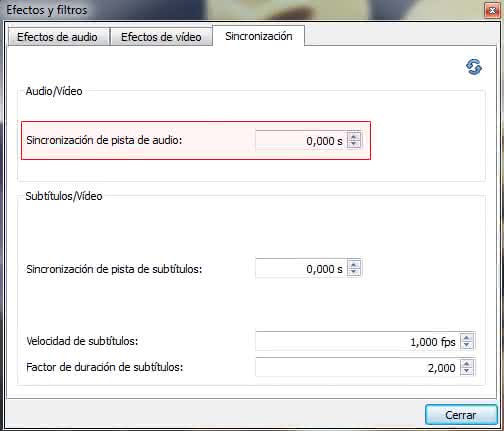
We open the movie with VLC and go to the
Herramientas → Sincronización de pista
menu.

If we are facing a positive desynchronization, we have to enter a negative value of seconds.
In case of a negative desynchronization, we have to enter a positive value of seconds.
Changes in audio / video synchronization are made in real time, so we will have to try different values "‹"‹until we find the exact value. To find out the gap I recommend going from 500 to 500 milliseconds in a few first tests until you get a point very close to the correct synchronization and finally fine tune from 100 to 100 milliseconds to get the perfect synchronization.
For the changes to be permanent, the above method does not work and you would have to reprocess the audio / video tracks of the multimedia container with a program such as Avidemux, MKVToolNix, VirtualDub, Final Cut Pro or similar. There are many free programs to perform this task, but in this tutorial we will not cover that part, since it is more complex and requires certain advanced knowledge.