Surely if you have come here it is because you need to
free up space on your hard drive
, something very common with the arrival of SSDs, since they have a more limited capacity than the old mechanical hard drives. This article aims to be a collection of
tricks to free up space in Windows
and at the same time act as a practical guide in which all the mechanisms to free up space are compiled.

Today we will become authentic
megabytes of the hard disk
and for this task we will resort to our ingenuity, we will implement several tricks and we will use different tools
(all of them free)
.
This tutorial is designed so that all users can follow it and in it we will not only learn to free up space, but we will have a deeper knowledge of the Windows operating system. I encourage you to read it, because
I am almost certain that you will learn something new
.
How to free hard disk space: tricks, tips and tools.
We will start by considering the situation in which a user needs to free up space quickly and without installing any additional software, so the best option is the
Windows free space
.
Meet the Windows space liberator, a simple and fast program.
This program is integrated into the operating system itself,
you do not need to install anything
and it is accessible from the properties of the disk drive. Once we access the properties window, we will see on the screen a button that says
«Free space»
. By pressing this button, an analysis of the files on the hard disk will be performed to calculate the space that can be released.
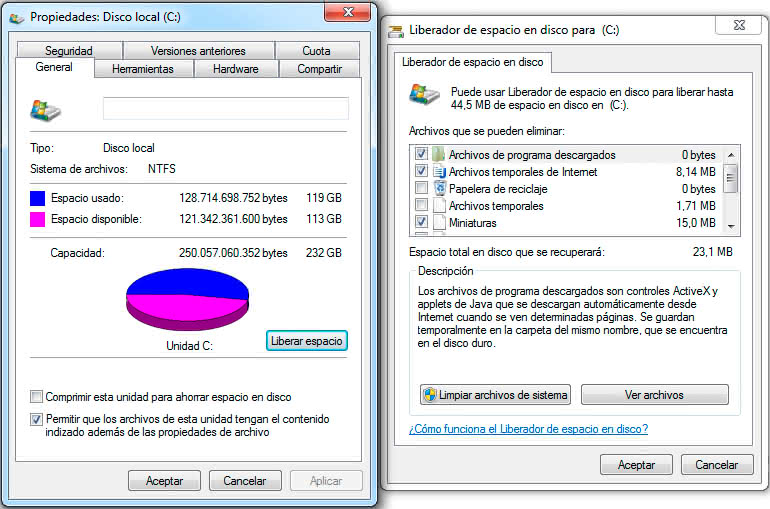
This analysis may take a while, we have to be patient, but once finished it will give us the option to clean the following files:
-
Downloaded program files
: these are ActiveX or Java components that are downloaded automatically when viewing certain pages.
-
Temporary internet files
: as the name implies, they are files that are stored locally temporarily to speed up the loading of the web page.
-
Recycle bin
: checking this option will empty the recycle bin.
-
Installation log
files: these are files created by Windows itself during the installation process.
-
Error memory dump files
: When the operating system suffers a serious error from which it cannot be recovered, it dumps all memory into a file. These files can help diagnose the cause of the error, but when they are no longer necessary they can be safely deleted.
-
Temporary
files: files saved by other programs in the
«Temp»
folder of the system. As a general rule, all files in this folder can be deleted if there are no programs running.
-
Thumbnails
: these are preview files of images, video or documents displayed by the Windows file explorer. These thumbnails can be eliminated without any risk since they are generated automatically when necessary.
-
Error report
files: files that are created to record errors that occur in the operating system.
In the version of Windows 10, some extra options will appear to free up space if we click on the button
"Clean system files"
(requires administrator permissions)
.
This system allows us to free up space with hardly any complications, but
its effectiveness has certain limitations
, so we will explore other possibilities.
CCleaner, the best auxiliary tool to clean our hard drive and free up extra space.
CCleaner
is one of the most recognized tools by users to carry out
cleaning
tasks
on the hard disk
, as well as other maintenance tasks in the operating system. For this article we will point out its virtues when it comes to cleaning files, something that manages to execute perfectly with your cleaner.
The CCleaner
«Cleaner»
tool will analyze the files of the installed programs, to find all those that we can delete. Scan browsers, Windows Explorer, system files, third-party programs, etc.
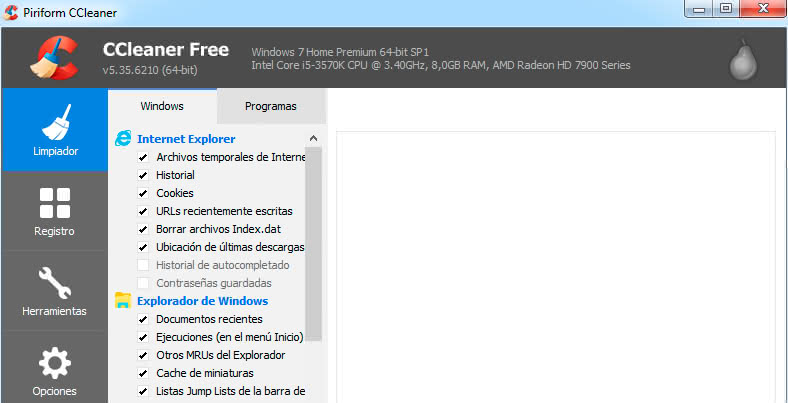
The result after executing an analysis of the cleaner, can end in the release of several Gigabytes. You better try it yourself and tell me.
Tools to find and delete duplicate files on the hard drive.
Another of the fundamental pillars in the process of cleaning a hard disk is to search and delete duplicate files.
Many times we copy and paste files into different folders, so we end up filling the hard drive with duplicate files.
The first tool that we will name is CCleaner, which we already named in the previous section and again we will use it. In this case, we will go to the
Herramientas → Buscador de duplicados
section, where we will be able to configure several options
(file types, include / exclude folders, etc ...)
.
When removing duplicate files, we must be especially careful, since
sometimes the files are duplicated in different folders for some reason
. This happens especially with DLL libraries, program files, etc. To ensure that we do not delete anything important, in this section the safest option is to limit yourself to
searching for duplicate multimedia files
(audio, video, images, etc.)
.
Although CCleaner perfectly fulfills its mission, I want to take the opportunity to recommend two additional free programs. One is
Auslogics Duplicate File Finder, a tool that for its simplicity, is perfect for novice users.
In addition, it allows you to
preview
duplicate
files
before deleting them permanently.
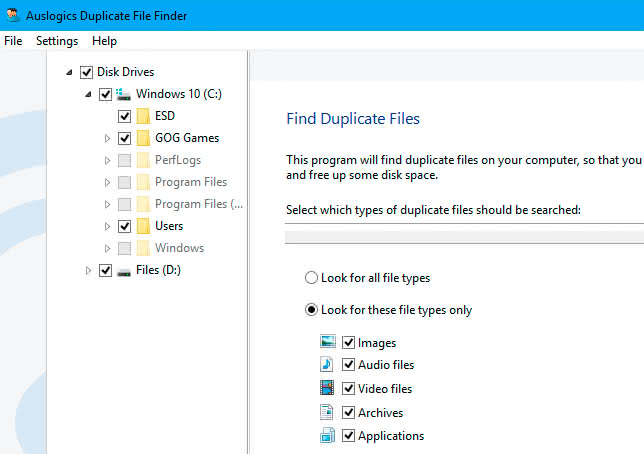
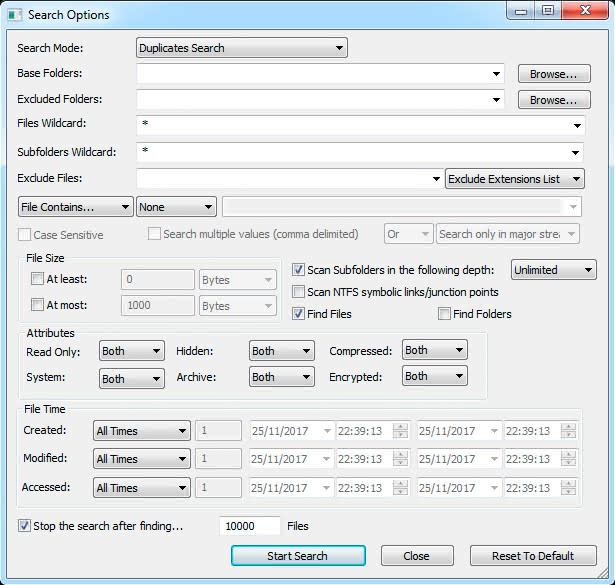
The second program is a tool specially designed to perform all kinds of searches and within its functionalities is the possibility of searching for duplicate files, it is
SearchMyFiles
(developed by the company
NirSoft
)
. This tool can be considered more complex than the previous ones, but it allows us more flexibility when configuring the search options.
Tools to visualize in a graphic way what the files occupy.
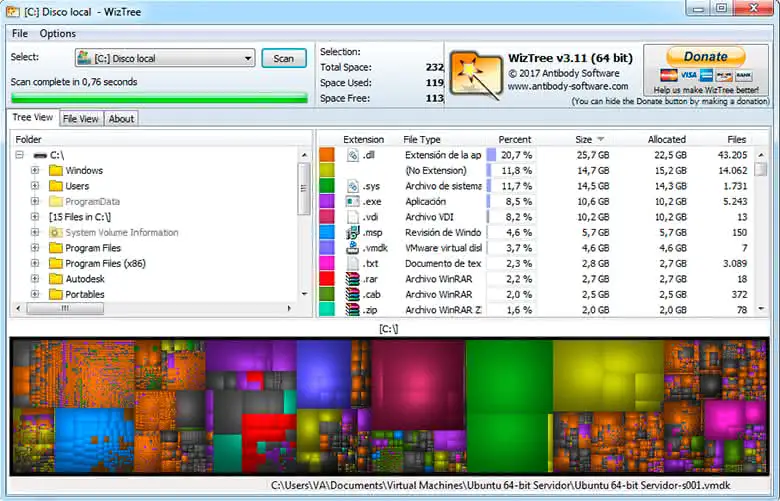
Next, we will see two tools that are especially useful when looking for large files and thus try to free up space by deleting them or moving them to another storage unit. These two tools are
WizTree
and WinDirStat.
Personally
I like WizTree more because of its speed in the analysis phase
, but both applications are very similar and offer similar options. Its purpose is to
show us in a visual way what each file occupies on the hard disk
, so we can detect those files and folders that take up more space at a glance.
With these programs we can not only get an idea of "‹"‹the space occupied by the different folders in the directory structure, but also find out what file extensions are the ones that occupy the most space.
If you have CCleaner installed, it also has similar functionality in the
Herramientas → Analizador de disco
section, but it is much poorer than WizTree or WinDirStat.
If you perform an analysis on your computer, you will realize that there are two system files that take up a lot of space, which are
hiberfil.sys
and
pagefile.sys
. We will talk about these two files below.
Saving space with the pagefile.sys paging file.
When we need to optimize the available hard disk space to the maximum, we can use
advanced settings with the pagefile.sys paging file
. In this section we will indicate how to free up space with the
pagefile.sys
system
pagefile.sys
, but we will also detail what consequences it may have on the operating system's performance.
The size of the paging file is automatically assigned by the operating system itself.
This file is responsible for reserving and allocating an area of "‹"‹the hard disk for use as a virtual memory when the system runs out of free RAM.
On many occasions we can reduce the size of this file
or even delete it when we are sure that our equipment has more than enough RAM to not be depleted with the use we give it. Personally I do not like to dispense with the paging file, but I do like to reduce its size.
To customize the size of the paging file or delete it, go to the
"Control Panel"
and click on the
"System and security" section
and then on the
"System" section
. Now in the left side menu we access the option
«Advanced system configuration → Tab: Advanced Options → Performance Section: Configuration → Tab: Advanced Options → Virtual Memory Section: Change»
.
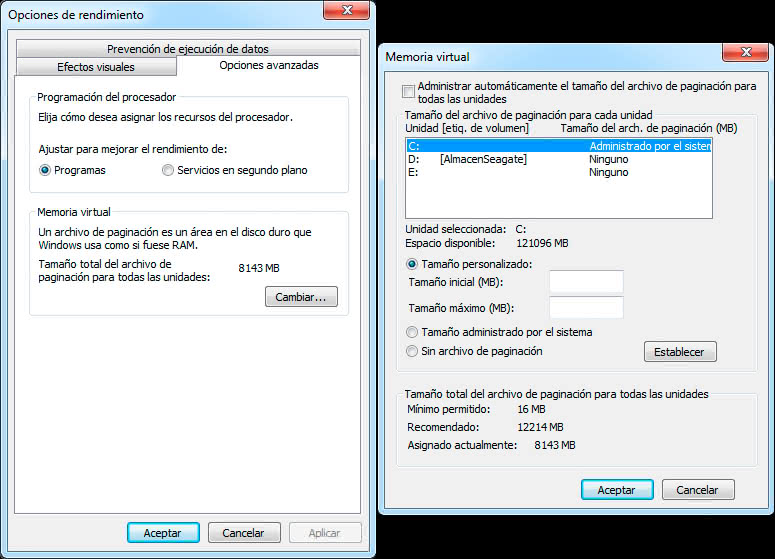
Now we deactivate the option
"Automatically manage the size of the paging file for all units"
and mark the option
"Custom size"
. Depending on the characteristics of each system we can reduce the size of the paging file more or less.
As an example, on a PC with 4GB of RAM, Windows has assigned a paging file size of 4GB, but I usually change it to an initial size of 2GB
(2048MB)
and a maximum size of 3GB
(3072MB)
and I've never had problems If the system does not have a minimum of 4GB of RAM, I recommend leaving the option to automatically manage the paging file size activated.
How to remove hibernation file hiberfil.sys to free up space.
The Windows hibernation system is designed to save energy when we are not using the PC. This system allows us to move the computer into a state of hibernation during which it remains inactive, but with the advantage that when we resume the activity, the system starts in the same state in which we leave it.
When deleting the hiberfil.sys file it is true that we will free up space, but we must also consider that deleting it will give up the functionality of hibernation.
If we do not use it, we can delete this file without major problem.
To delete the
hiberfil.sys
file
hiberfil.sys
have to resort to the console, for this we will follow the tutorial in which we show you
how to run the command console in Windows with administrator permissions
. Next we will execute the
powercfg.exe -h off
command and then restart the computer so that the
hiberfil.sys
file
disappears
.
If for some reason we want to recover the hibernation functionality and therefore restore the
hiberfil.sys
file, we will have to execute the
powercfg.exe -h on
command.
Remove system restore points.
Windows includes a protection system that allows us to restore the system to an earlier state in case problems arise after installing a program or modifying a configuration file. This system uses so-called
restore points, which store a backup copy of the original files
.
As changes are made to the operating system and time passes, more restore points are created, which can take up a considerable amount of hard disk space. In this section we are going to show you
how to configure the restore points to occupy less space and how to eliminate them
.
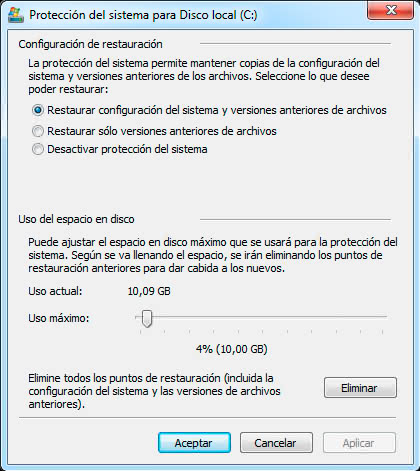
First we go to the control panel and select the option
«System and security → System → System protection»
. In the system protection tab click on the button that says
"Configure"
and we can set the following options:
-
Disable automatic restore points.
-
Set the maximum size that restore points will occupy.
-
Remove all restore points.
Again the CCleaner program simplifies the previous task, since in the section
"Tools → System Restore"
, we can eliminate the system restore points.
Delete programs that we do not use.
I know that this section is the most obvious of all, but on many occasions we have installed programs that we use very punctually and that perhaps we can eliminate.
If deleting the program is not an option, we can try to locate a portable version of the program and thus use it from another storage device
(USB flash drive, external hard drive, etc)
.
To see a list of all the programs installed in the operating system and uninstall them safely, it is best to use the
"Uninstall a program"
option on the control panel.
We must pay special attention to the programs that we uninstall and if we do not recognize any program by name, try to find information before uninstalling it, since
sometimes driver packages or libraries necessary for the operation of other programs are listed
.
Finally, for those who do not like the program uninstaller included in Windows, they can use more complete tools such as
Revo Uninstaller
.
Trick to free up space in Windows 10 with Compact OS.
The new version of Windows 10 has included the Compact OS tool
(compact.exe)
that allows us to
compress the operating system files to reduce their size
. This can have a small impact on the performance of the operating system
(in systems with modern hardware the impact will be almost negligible)
, but if we need to free up space it is worth it.
Compressing only the files that are part of the operating system we can free an average of 2GB of space, sometimes it may be something else. First of all we must verify that compression is not already activated, for this we open a console with administrator permissions and execute the command:
compact.exe /q
In the output of the previous command, if the relationship has a value of 1 or a value very close to one, it means that the system files are uncompressed.
To proceed to compression, we must execute the command:
compact.exe /CompactOS:always
This process can take several minutes, if we have a slow hard drive it may take more than 20 minutes. Once the process is finished, we can execute the
compact.exe /q
command again to verify that the compression ratio has a value greater than one.
It may also be the case that we want to disable Compact OS compression, for this we execute the command:
compact.exe /CompactOS:never
How to compress any folder with compact.exe in Windows 10.
The good news is that we can also apply this compression to folders of programs or games that we have installed. For this process we have a free tool with graphical interface called
CompactGUI
.
The use of CompactGUI is very simple, just select the folder you want to compress and wait for the compression process to finish. The results can be surprising, for example it
is able to reduce Adobe Photoshop to half its space and has reduced the installation of the Fornite game by 8GB
.
The application allows us to select between four different compression algorithms:
-
XPRESS4K
: it is the one that offers the least compression, but it is the fastest algorithm and the one that will have the least impact on performance.
-
XPRESS8K
: it is the algorithm used by default and the one that offers the best balance between compression speed and compression ratio.
-
XPRESS16K
: it is slower than the two previous algorithms, but in return it will give us better compression ratios.
-
LZX
: this algorithm is the one that achieves greater data compression, but it is also the slowest of all, so it is only recommended for use with current hardware and with programs or games that do not need many resources.
You can
download CompactGUI for Windows 10
from its GitHub page in the
releases section
(it is a portable program)
.
Here ends this
practical guide on how to free up space on the hard drive
, I hope it has been helpful and if you know any other tricks, please ask me to let me know through the comments, thanks.