The disk space is one of the elements that we have to know how to manage when we operate a Windows 10 computer. The fact of installing applications and programs or downloading content without control can mean the collapse of our system by not having a correct space to work optimally. The problem comes when we have so many elements in our team that we do not know what we can erase and what not or what is occupying us the most space . That is why it is useful to know the different ways we have to find the heaviest in our team..
Windows 10 integrates several new features that facilitate the ability to manage its various parameters and one of the most delicate is the use of hard disk storage since a full disk causes errors such as:
- Failures accessing applications and programs
- Slow writing and reading of data and more
It is natural that as users we occupy the space of the hard disk with objects that are not essential and little by little this causes a negative impact on the behavior of this and even more if we use solid state hard drives (SDD) which have less capacity to storage and therefore Microsoft has decided to implement in its Windows 10 operating system the storage sensor to take adequate control of the space on the hard disk.
To keep up, remember to subscribe to our YouTube channel! SUBSCRIBE
1. How to see what takes up space on my hard drive in Windows 10 with the storage sensor
This is a function present in the latest editions of Windows 10 which is responsible for executing an analysis automatically of the storage units and with this it proceeds to delete the temporary files, and the files of the trash bin which, combined, can reach Weigh several GB thus affecting disk space.
Step 1
To access this functionality we will go to the Start menu and there we will go to the Configuration utility where we will see the following:
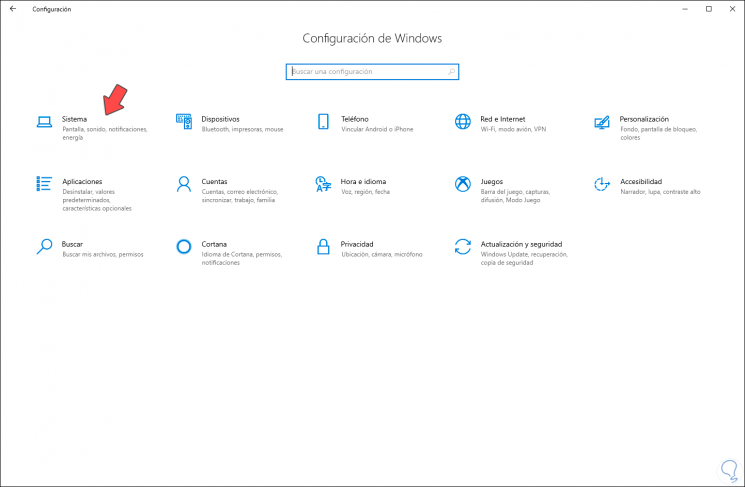
Step 2
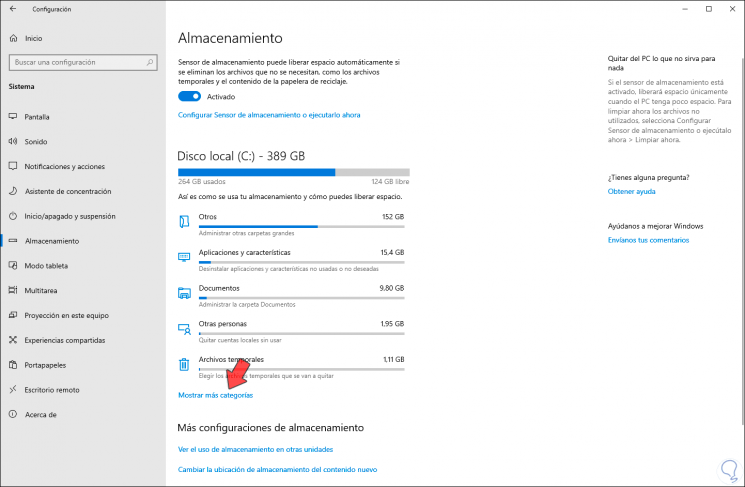
There we select the “System†category and in the next window we go to the “Storage†section where we will observe details such as:
- Total space and space used
- Categories where the space of each one is indicated
Step 3
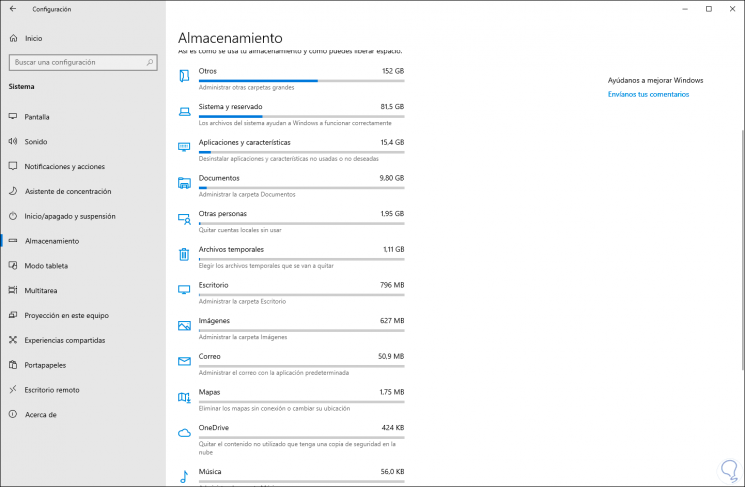
There we can click on the “Show more categories†line to access a complete administration of them:
Note
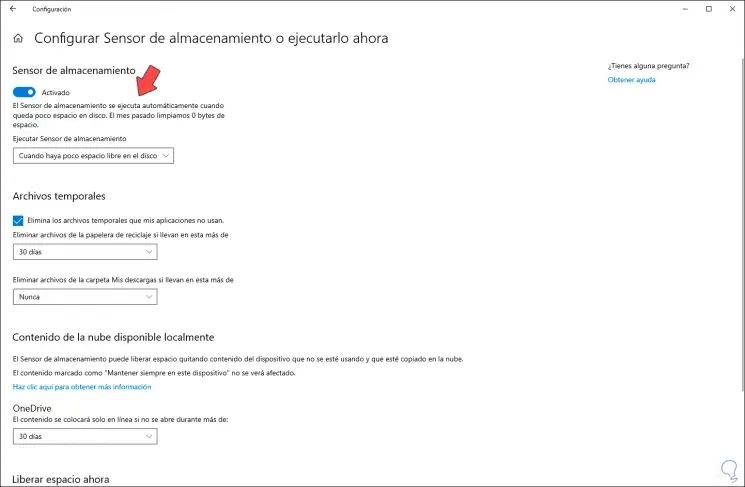
The first step to take will be to enable this function by pressing the switch so that its status is activated.
Step 4
With the storage sensor, all unused files in the last 30 days will be ideal for deletion.
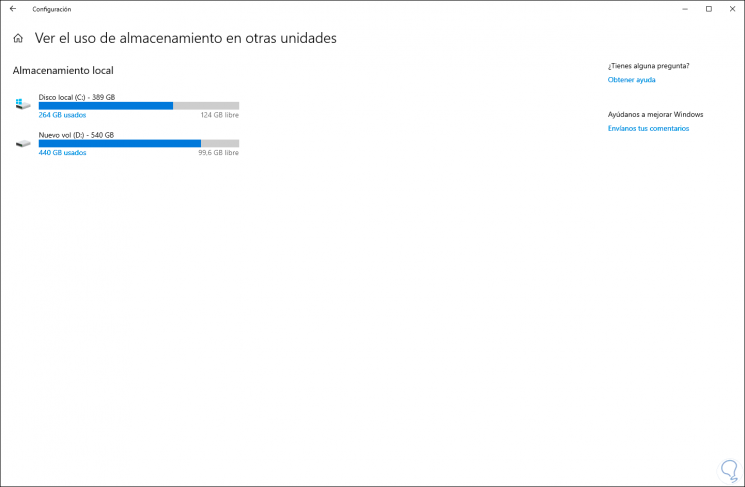
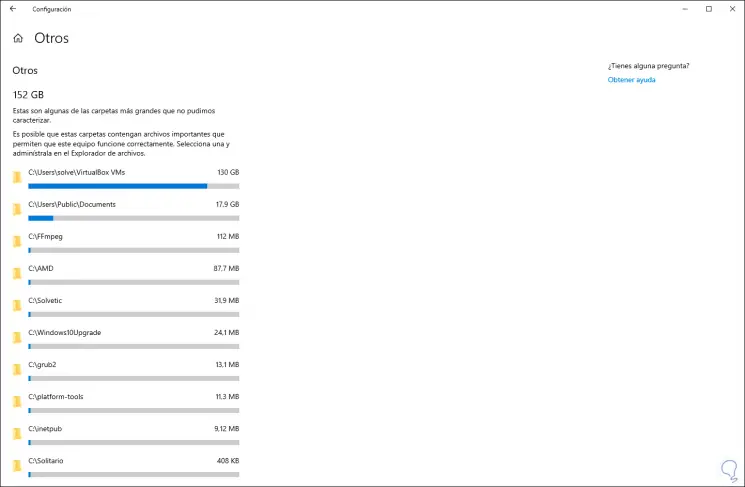
In case of having more storage units we can click on the line “See the use of storage in other units†to access these values:
Step 5
We can access each of the categories displayed on the sensor to obtain more specific details of its current use. By clicking on any of these objects, we will be redirected to your location on the hard drive to manage which items have to be deleted.
Step 6
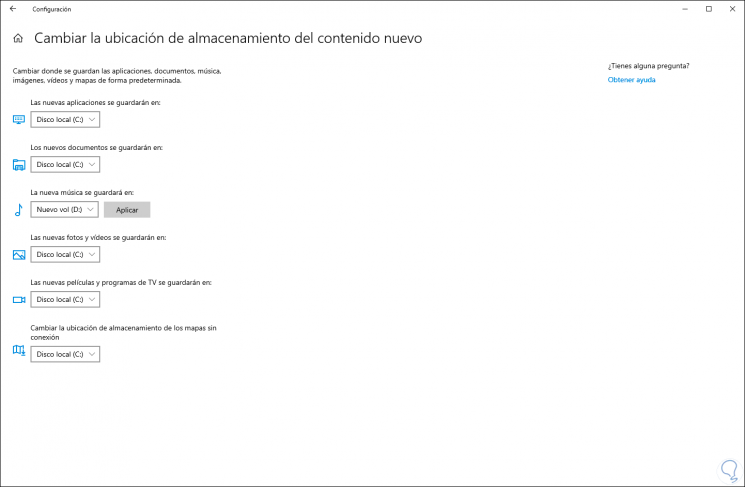
To more efficiently manage the space in the C drive, where the operating system is, we can establish that the new information or elements are stored in a new location, for this we click on the line “Change the location of new content storage â€And after that define in which unit it will be stored, these are defined by categories:
Step 7
Back to the main window of the sensor, we can use the function Storage spaces â€with which we seek to create this type of groups in two or more units in order to free up space on the main disk.
At the top we find the line "Configure storage sensor or run it now" where we will be able to:
- Run the sensor when there is little space, daily, weekly or monthly.
- Delete temporary files or downloads every day or every 14, 30 or 60 days or never do it.
- Define the accommodation time in OneDrive.
- Execute the cleaning of the units.
What can we erase with the storage sensor
Thanks to the storage sensor, we will be able to erase:
- Temporary Configuration Files
- Program files downloaded from the system
- System log files with date
- System error memory dump files
- System error minidump files
- Temporary Windows update files with date
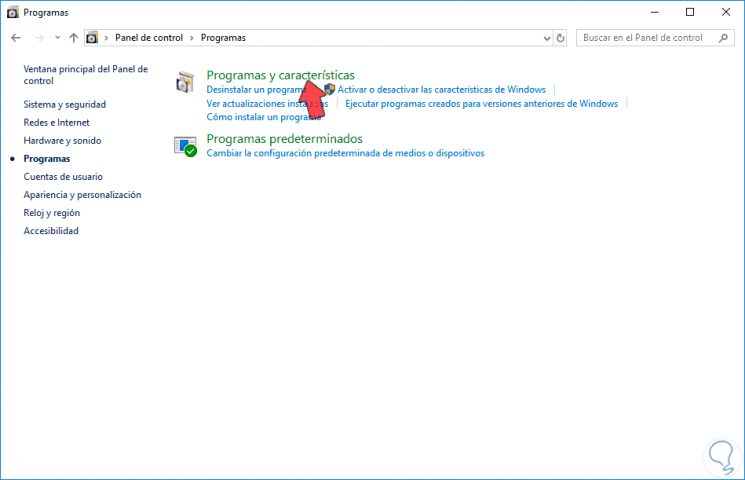
2. How to see what takes up space on my hard drive in Windows 10 with Control Panel
Step 1
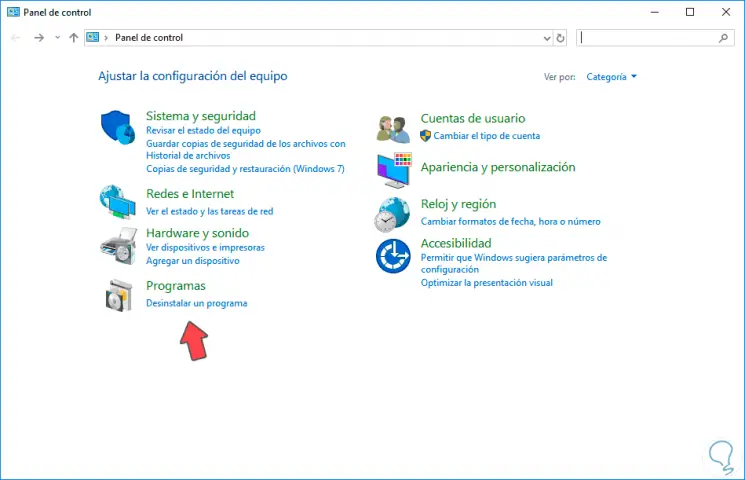
The first thing we will do is open the Control Panel from here:
Step 2
Here we will click on the "Programs" option
Step 3
Here we will click on the "Programs and features" section.
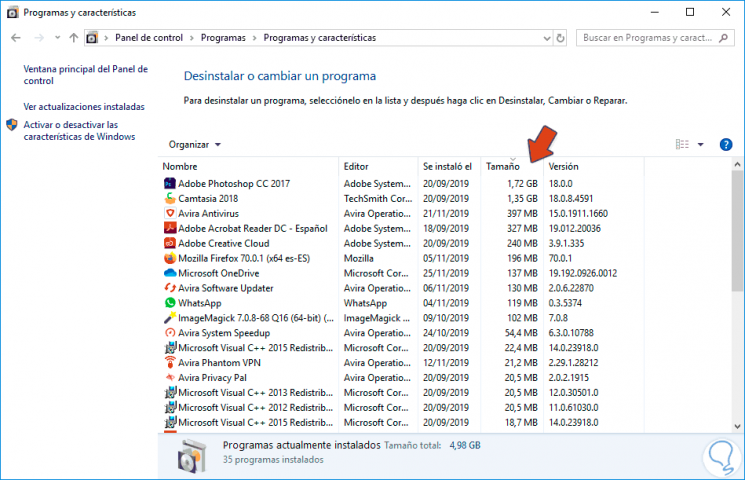
Step 4
Now we will see the list of our installed programs. If we click on the size tab, they will be sorted according to size. For example, let's see from the ones that weigh the most to the least.
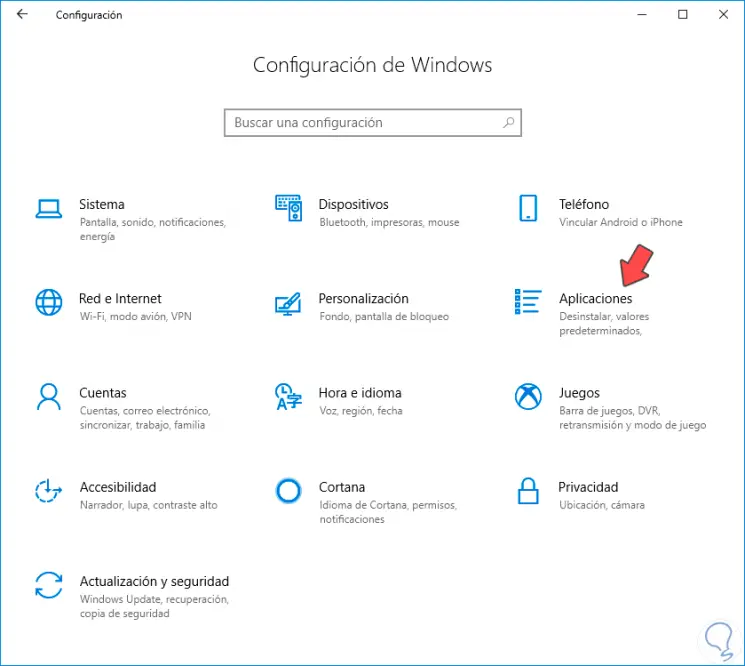
3. How to see what takes up space on my hard drive in Windows 10 with Settings
Step 1
We right click on the Windows symbol in Start and click on Settings. Here we enter the "Applications" section.
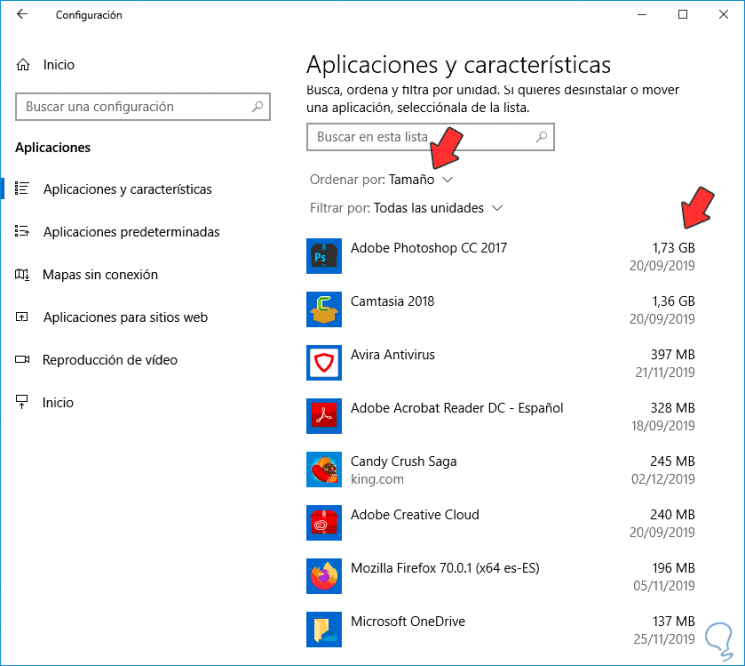
Step 2
Here we will locate the left side menu and enter "Applications and features". On the right side we can see the different programs according to the filtering we want and their disk size.
You can choose which disk to search for and whether to sort them by name or by other elements.
4. How to see what takes up space on my hard drive in Windows 10 with File Explorer
Another very useful option is to be able to perform a search for an entire disk or a specific folder depending on the size of your files. So we can do a search of very heavy , medium or light files .
Step 1
The first thing we will do is open the File Explorer from here:
Step 2
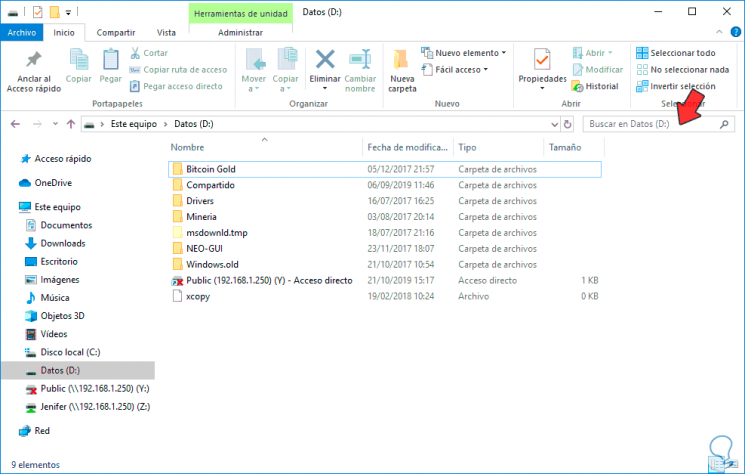
Now we go to the place where we want to do the search, for example, on our disk D. Once here we click on the search bar.
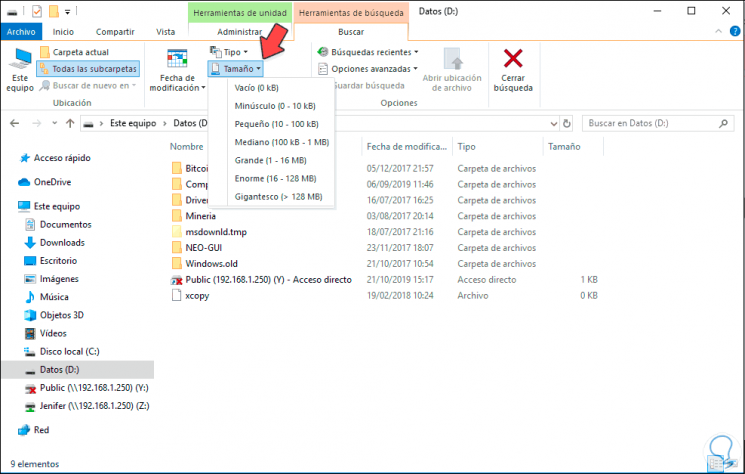
Step 3
Now a filter panel will appear. In this case we will click on "Size" and choose how you filter the data. In this case we will choose gigantic to see what it occupies most in our album.
Step 4
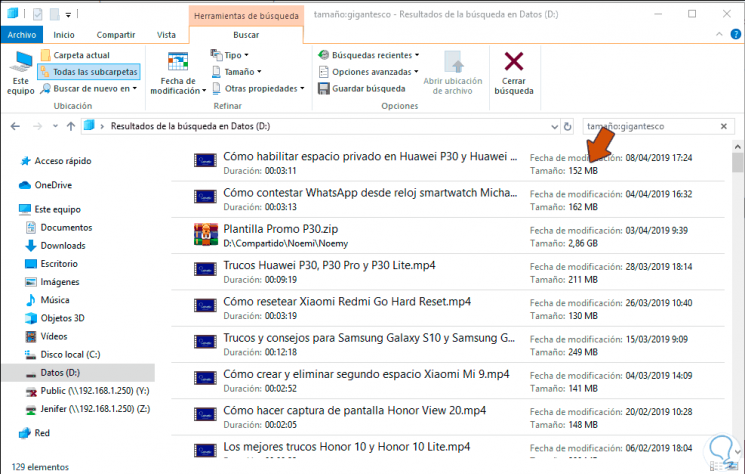
We will see how gigantic size files of all kinds are listed. If you want to filter your results further then use the type filter or "other properties".
With this, the control over the space of the hard disk will be adequate without being affected in it..