The iPhone is used more and more often as a camera. Due to the very good image quality, many images end up in the memory. Of course, you will then also want to transfer pictures from your old device to your new iPhone. There are four easy ways to do this :
Transfer photos via iCloud
Follow our step-by-step instructions or take a look at the quick start guide ..
1st step:
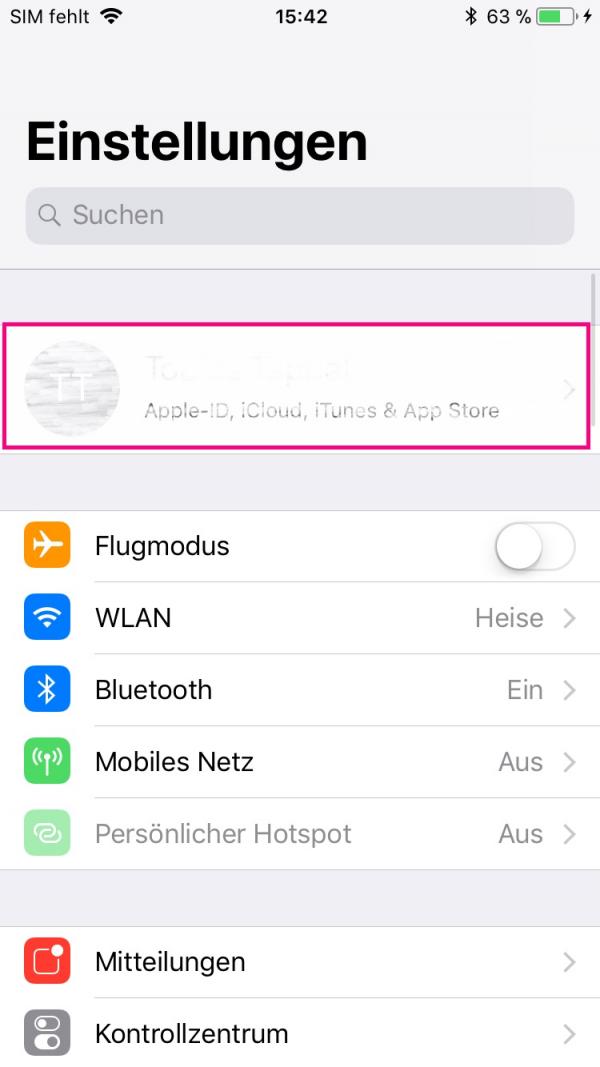 In Settings, tap your iCloud account .
 2nd step:
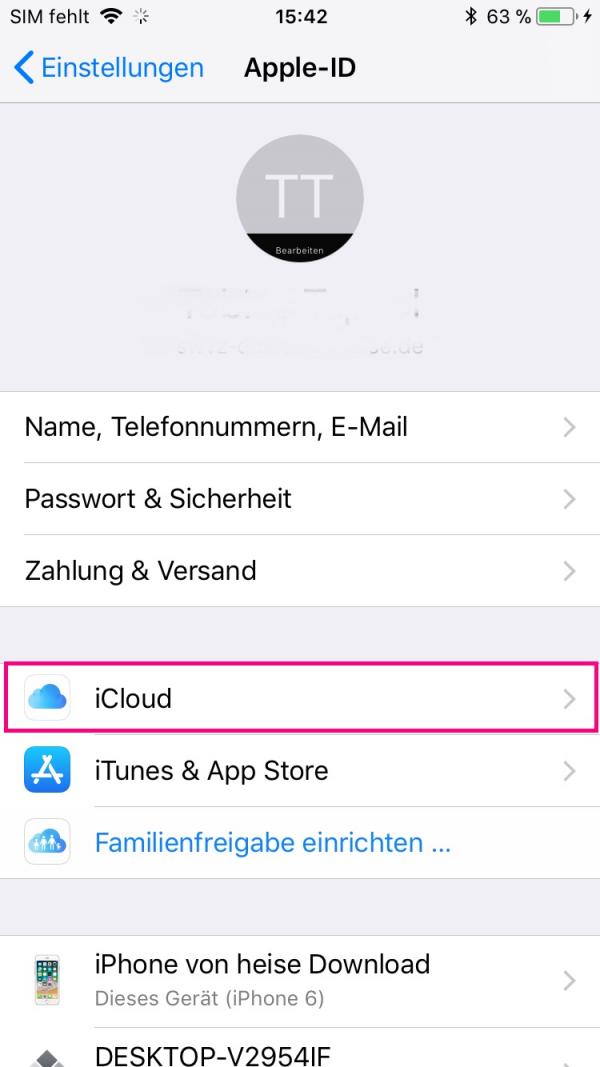 Now tap on " iCloud ".
 3rd step:
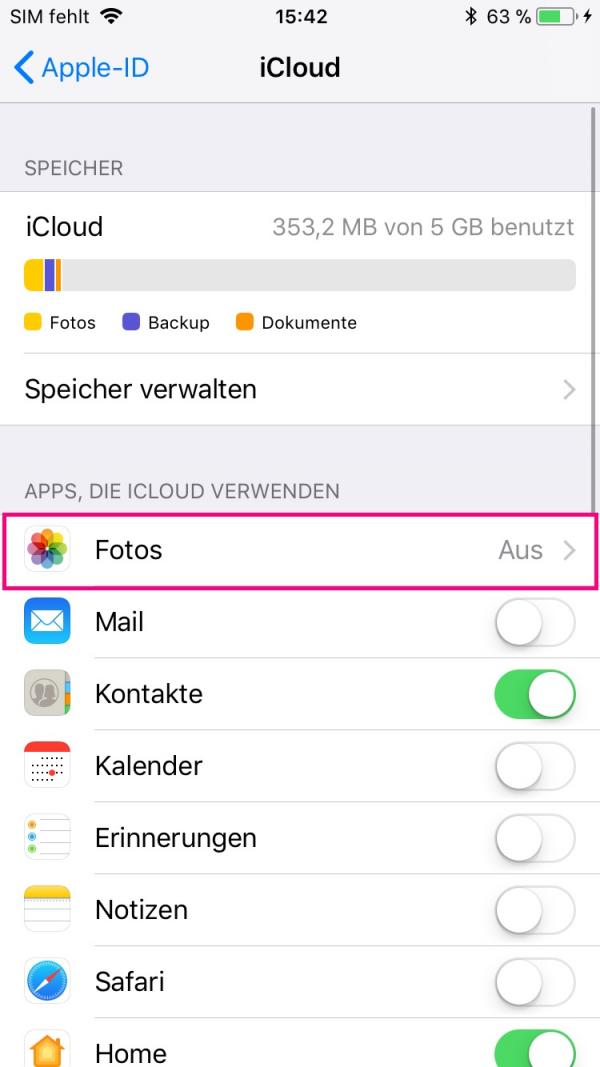 In the next step, tap on " Photos ".
 4th step
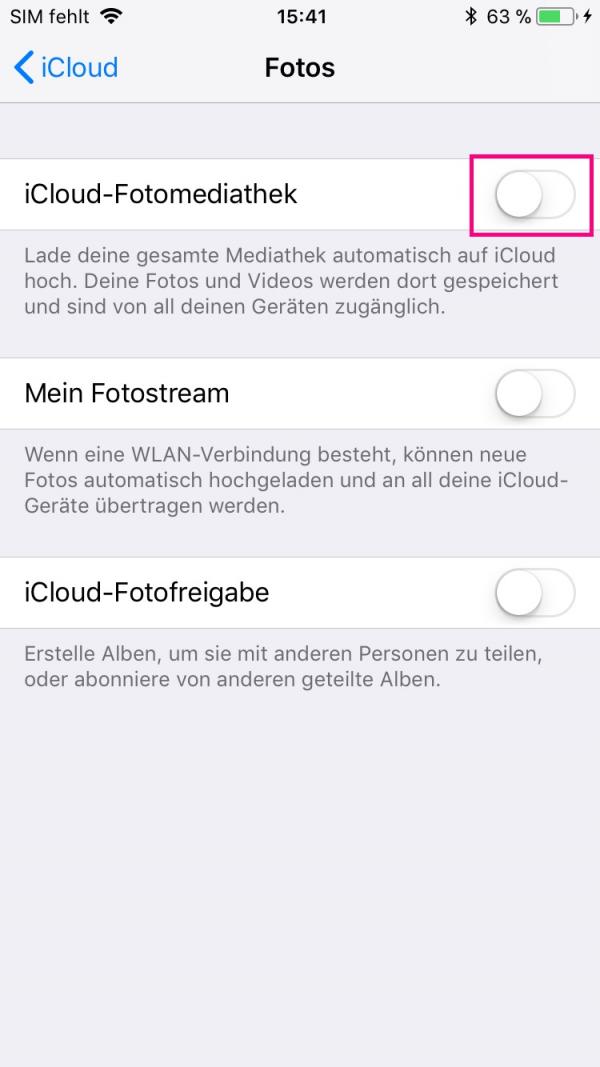 Now tap on the button on the right to activate the iCloud Photo Library . This will upload all the photos from your old iPhone to iCloud and can be accessed from the new iPhone (this button must also be activated there). In the " Photos " app , the images can now be found in the " Photos " folder .
 Transfer photos with iTunes
You can also transfer your photos from iPhone to iPhone through iTunes. Instructions for Mac and Windows are as follows:
Mac
Follow our step-by-step instructions or take a look at the quick start guide .
1st step:
 Connect your old iPhone to your Mac and open the Photos app . Your iPhone will now be displayed on the left. Click on the entry and your pictures will be displayed. Now mark the pictures that you want to transfer to your new device and then click on " Import selection ". Alternatively, you can also import all images directly . Your iPhone pictures will then appear under " Last Import ".
 2nd step:
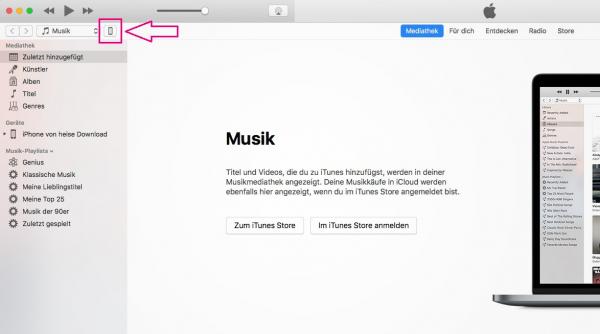 Now connect your new iPhone to the Mac and open iTunes . Then click on the little iPhone icon in the upper left corner .
 3rd step:
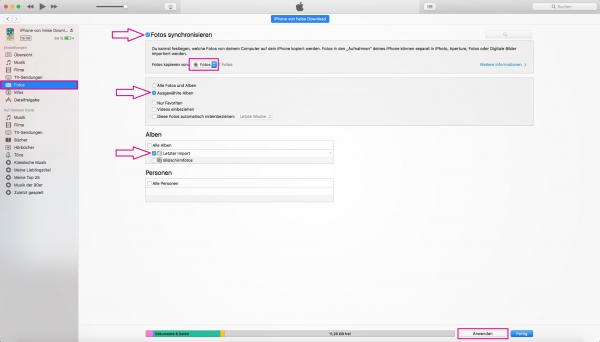 Now click on " Photos " in the left bar and then put a check mark in front of " Synchronize photos " at the top . Under " Copy photos from: " select the Photos app and mark " Selected albums ". Then, under Albums, check " Last import " and confirm with " Apply ". This will transfer the pictures you just imported to your new iPhone.
 Windows
Follow our step-by-step instructions or take a look at the quick start guide ..
1st step:
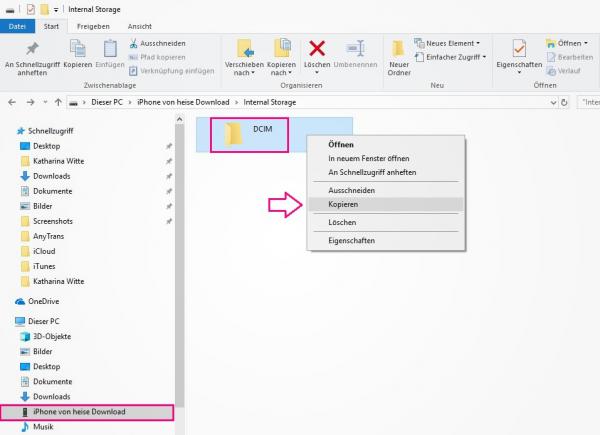 Connect your old iPhone to your computer and open Explorer . Click your iPhone under This PC on the left . With a double click on " Internal Storage " the folder " DCIM " is displayed. Copy this and save it anywhere on your computer (e.g. on the desktop). After that, disconnect your old iPhone from the computer.
 2nd step:
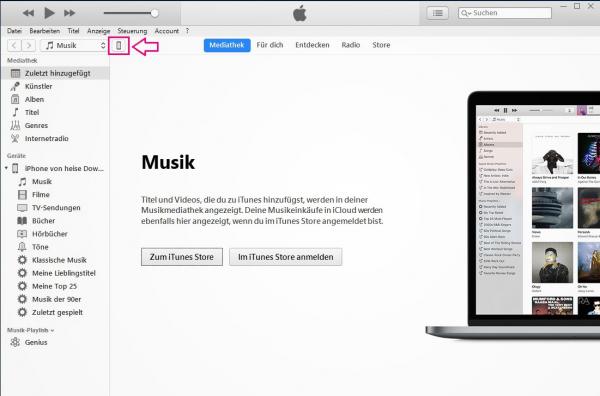 Connect your new iPhone to your computer and open iTunes. Click the iPhone icon in the bar at the top of the program.
 3rd step:
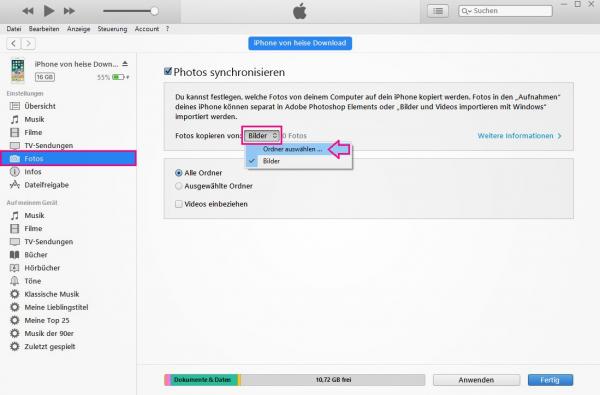 Click on " Photos " in the settings on the left . There you check the box next to " Synchronize photos " and choose " Select folder " instead of " Pictures ".
 4th step:
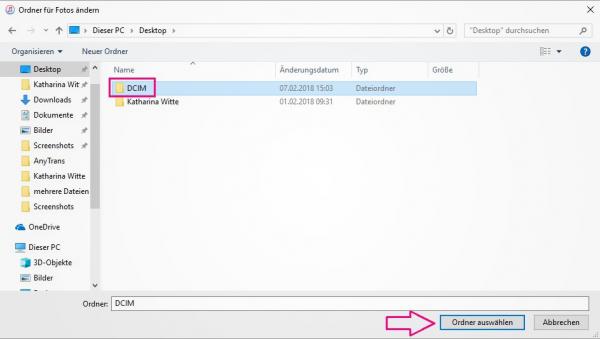 A new window opens in which you can now select the DCIM folder of the old iPhone . This should be where you put it before.
 5th step:
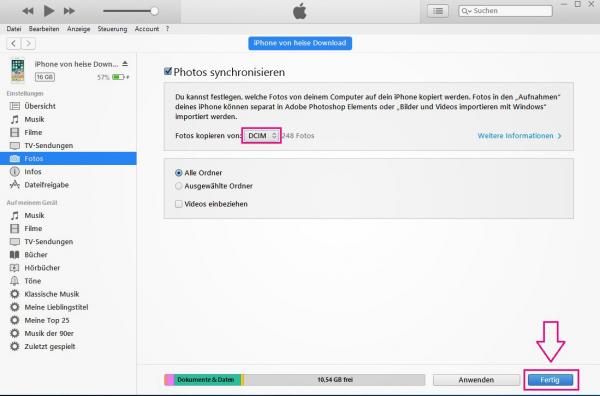 The folder has been selected and you can click the " Done " button at the bottom right to finally synchronize the images on your new iPhone .
 Transfer photos with AirDrop
This method is particularly suitable for quickly transferring individual images. So perfect if you only want to load a few pictures from your old device onto the new one or are currently on the move.
Note: While there is no limit to the amount of images you can select. But the more files you send at the same time, the longer the transfer will take. In addition, the device may not be able to process a large number of images and the transfer may be aborted..
Follow our step-by-step instructions or take a look at the quick start guide .
1st step:
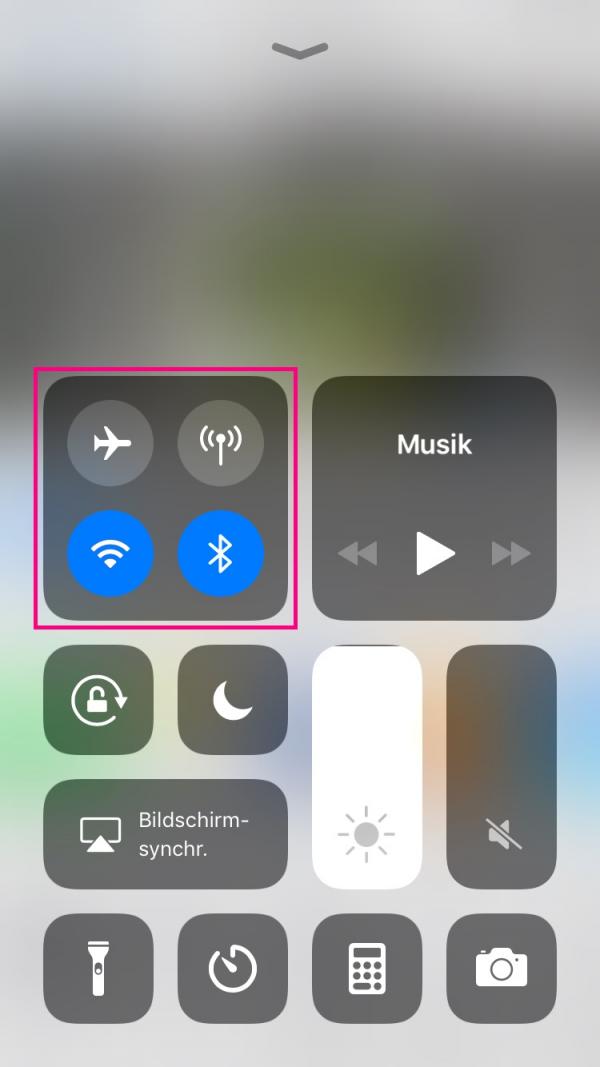 Swipe up on the main screen of your old iPhone to get into the control center . Press and hold the box in the top left until more options appear.
 2nd step:
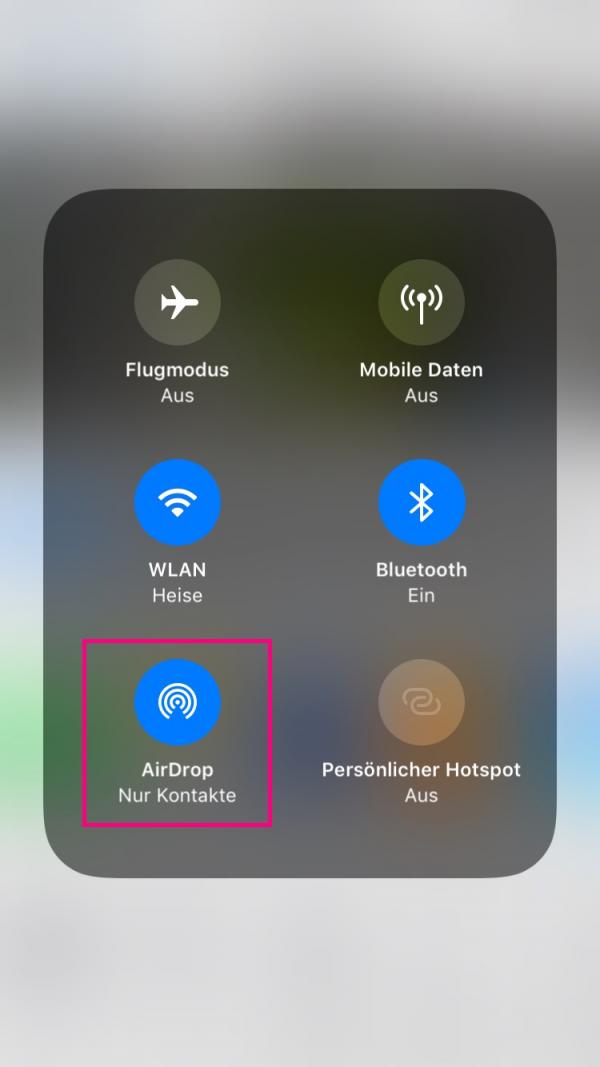 The AirDrop symbol appears at the bottom left . Tap this to go to the next step.
 3rd step:
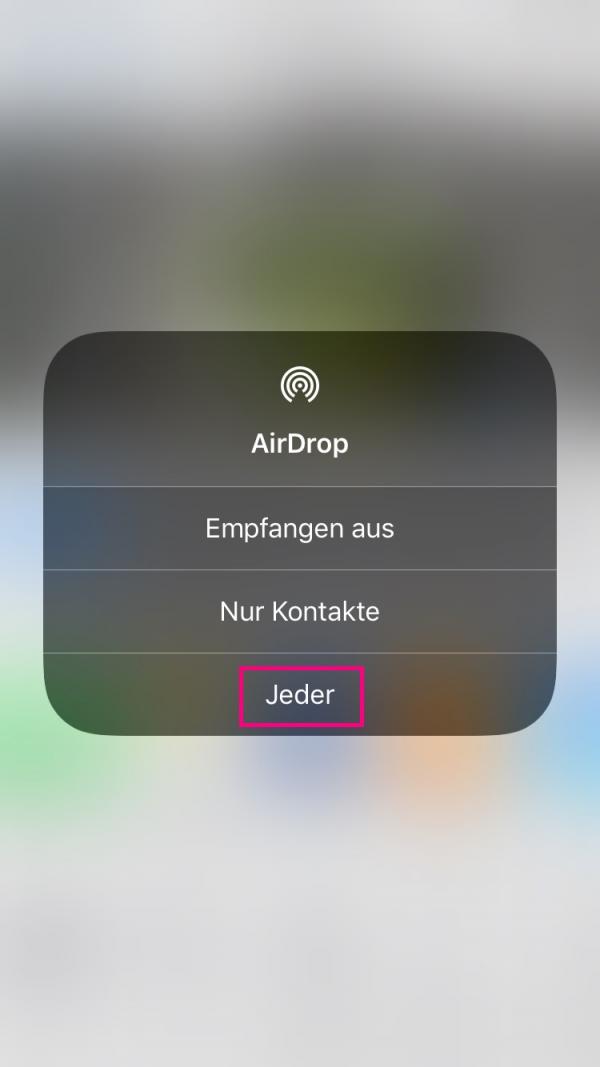 A new window will open again . Here you can now select who is allowed to receive files from you via AirDrop. For a short data transfer, the best thing to do is to tap " Everyone ". After this step, close the control center .
 4th step:
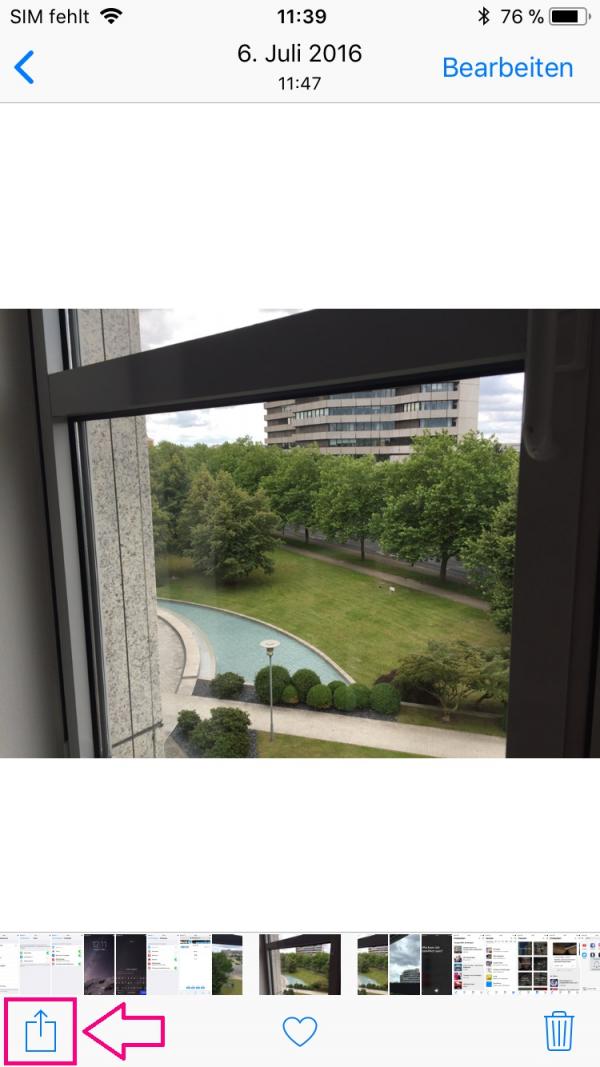 Open the " Photos " app and select the images that you want to transfer to your new device. You can select multiple photos or send the photos individually. After selecting, tap the share icon in the lower left.
 5th step:
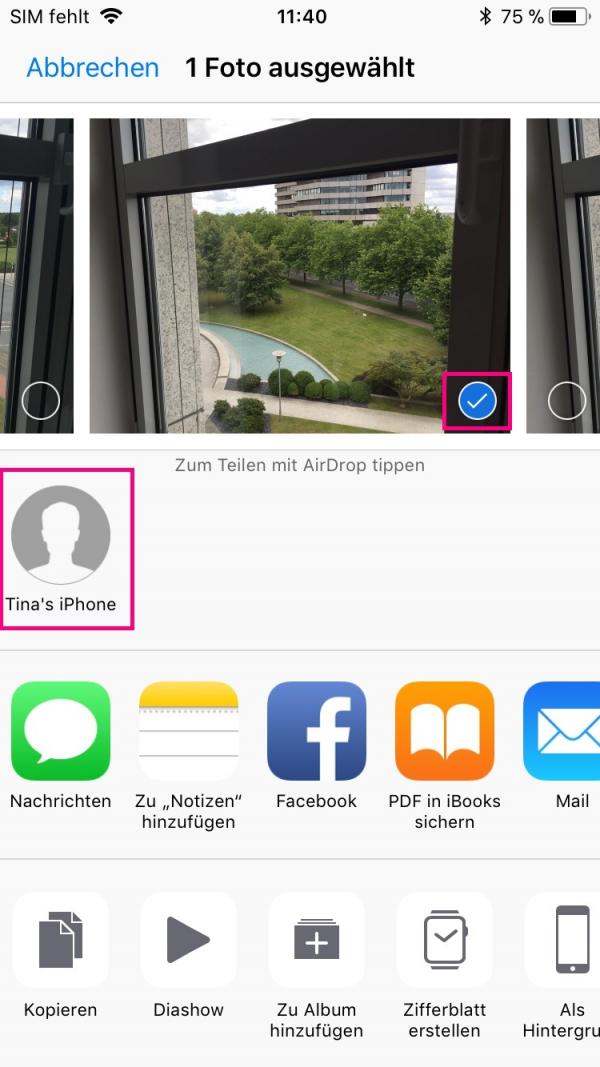 Now tap in the AirDrop area on your new device to which you want to send your pictures.
 6th step:
 On your new device , this message will appear on the main screen. Tap on " Accept " and your pictures will be sent from the old device to the new one.
 Transfer photos using a program
There are various programs that you can use to manage media on your iPhone and send them back and forth between your devices. We used AnyTrans . (Alternatively you can also use FoneTrans or Syncios )
Follow our step-by-step instructions or take a look at the quick start guide .
1st step:
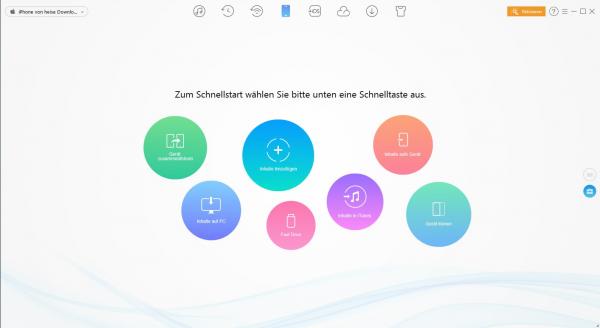 Download AnyTrans to your computer and open it. Connect your old and new iPhone to your computer. Both devices must be unlocked once the first time the program is used. You must also allow access to the computer .
 2nd step:
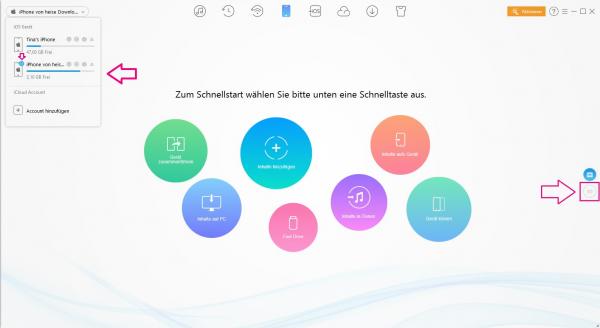 At the top left, select your older device (which has the photos on it) by clicking on it. The active device has a small blue tick on the iPhone icon. Now click on the marked symbol on the right edge of the program (circle with six points).
 3rd step:
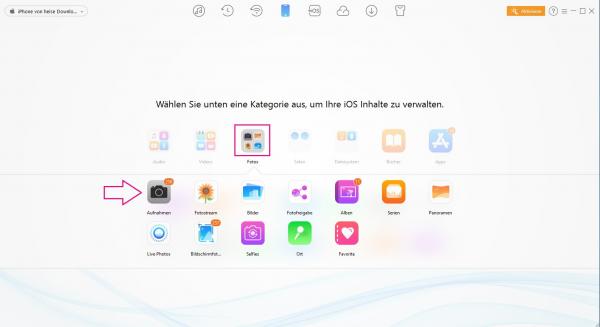 Several folders appear to choose from. Here click on the " Photos " folder . A subfolder opens where you click on " Recordings ". Other folders that contain photos (such as albums you have created yourself) can also be selected here.
 4th step:
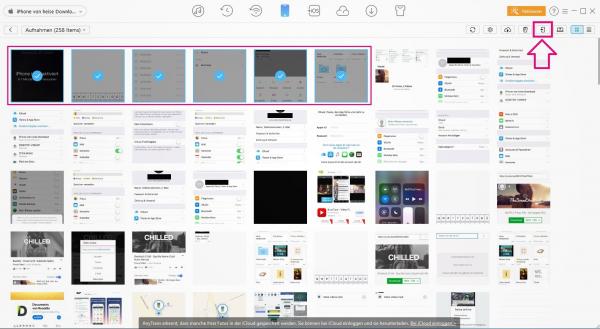 This takes you to the " Recordings " folder on your iPhone. Here, select the photos that you want to transfer to your new device. These are then marked with a blue tick . Then click on the marked " Send to device " icon at the top right.
 5th step:
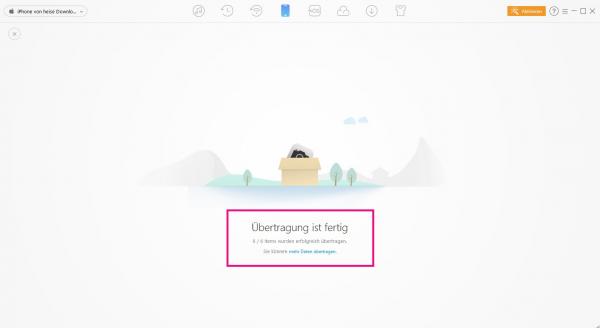 When your data has been transferred, this screen appears. You can now find the photos under " Recordings " on your new device .
 Quick Start Guide: Transfer Photos Using iCloud
- In your iPhone's settings, tap your iCloud account , then tap iCloud > Photos .
- Activate the iCloud Photo Library by tapping the button on the right. It is important that this button is activated on both devices .
- In the " Photos " app , the images in the " Photos " folder are shared with all of your iOS devices and can be accessed there.
Quick Start Guide: Transfer Photos Using iTunes - Windows
- Connect your old iPhone to your computer.
- Open Explorer and click on " This PC "> " Your iPhone "> " Internal Storage " and copy the " DCIM " folder there . Save the folder anywhere on your computer.
- Disconnect your old iPhone from computer and connect your new device .
- Open iTunes and click the iPhone icon on the bar at the top.
- In the settings, click on " Photos ". Check the box next to " Synchronize photos ". Under " Copy photos from " select the previously saved DCIM folder .
- Click on " Done " in the lower right corner and your pictures will be transferred.
Quick Start Guide: Transfer Photos Using iTunes - Mac
- Connect your old iPhone to your Mac and open the Photos app .
- Highlight the iPhone pictures you want to transfer and click " Import Selected ". You can also directly import all images at once .
- Now connect your new iPhone and open iTunes . Then click on the iPhone icon in the top left.
- Now click on " Photos " on the left and put a tick in front of " Sync photos ".
- Select " Photos " at " Copy photos from: " and mark " Selected albums " and " Last import ".
- Now transfer the images by clicking on " Apply ".
Quick guide: Transfer photos with AirDrop
- Open the Control Center on your old iPhone.
- Press and hold the Bluetooth icon to open a wider range of options.
- Tap the AirDrop icon in the lower left. A new window will open where you tap on " Everyone ".
- Open the " Photos " app and mark the pictures that you want to send. Then tap on the share icon in the lower left.
- Your new iPhone will appear under " Tap to share with AirDrop " . Tap this to start the transfer.
- To make the transfer possible, you have to confirm the transfer on your new device. To do this, unlock the iPhone and tap " Accept " on the AirDrop notification .
Quick guide: Transfer photos using a program
- Download AnyTrans on your computer and connect both iPhones to your computer.
- Unlock both devices and allow the computer to access them.
- Open the program and select the older iPhone in the top left . Then click on the symbol on the right ( circle with six small dots ).
- Click the Photos folder, then click the Recordings folder .
- Now select the images that you want to transfer. Marked images are indicated by a blue tick .
- Click on the door symbol at the top right labeled " Send to device ".
- The transfer is completed and you can find the photos on your new device under " Recordings ".