The BIOS / UEFI ensures that your operating system can access the processor, the RAM and the other hardware at all. And since this firmware runs under Windows, for example, an update is a little more time-consuming than, for example, with driver or program updates.
How does the BIOS update work?
First of all, it must be clear to you what a BIOS / UEFI is and why both are mentioned all the time. BIOS stands for Basic Input Output System and UEFI for Unified Extensible Firmware Interface . In each case, it concerns the firmware of the computer , i.e. the most basic software that enables access to the hardware in the first place . Without BIOS / UEFI there would simply be no connection between hardware and, for example, Windows. Every device, from a printer to a reflex camera to a GPS logger, has such firmware. With the camera you operate the device directly via this firmware, with computers it works rather invisibly in the background and you work with Windows, Linux or macOS.
The BIOS is from the 70s, consists only of text and is operated with the keyboard. The successor UEFI offers a graphical user interface and can be operated with the mouse, otherwise the differences in operation are not that great. And since the BIOS has so established itself as a term, you often see the designation UEFI-BIOS or simply BIOS, even when UEFI is meant - and that's how we keep it here.
The important point is now: The BIOS runs under Windows , so you can't just double-click an exe file on Windows to load a new BIOS. Just as the Firefox browser cannot update Windows, Windows cannot update the BIOS. The BIOS has to do that itself. Of course, the firmware does not run on the hard drive or in the main memory, but on a flash memory on the mainboard - this is why it is also referred to as flashing. An MSI mainboard is used as an example, but the procedure also works for other manufacturers.
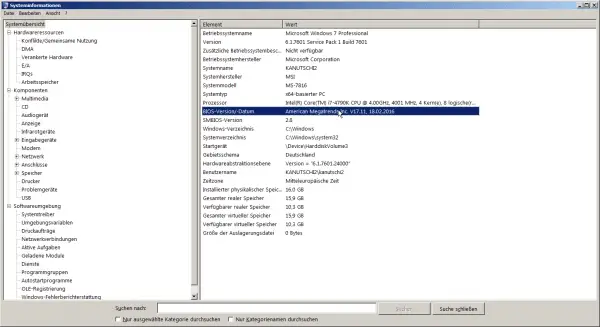 Windows itself outputs the model name on request.
 Important: Find out the motherboard model
Flashing a new BIOS is pretty easy and very reliable these days - but it can also block entire systems! The good thing about it: Even if something goes wrong while flashing, it will not affect the operating system or your data and you can simply reflash. Therefore, you have to do some preliminary work: On the one hand, you should make a backup of the system or the most important data again beforehand. On the other hand, you have to find out the exact name of your mainboard .
If you have bought the computer complete with Windows, the chances are good that there is already a firmware tool from the mainboard manufacturer on the computer that spits out the exact name - and maybe even offers BIOS updates, but more on that later. Alternatively, you can get the free CPU-Z, start it and switch to the " Mainboard " tab . There you will find all the necessary information about the board and the installed BIOS version. In this post we explain step by step how you can get information about your mainboard with CPU-Z.
If you have an invoice where the model is noted, don't trust it! It does happen that an ordered mainboard is upgraded with compiled computers without reference to a better / newer model. Alternatively, you can simply use the command " msinfo32.exe "run - that's enough for the BIOS version..
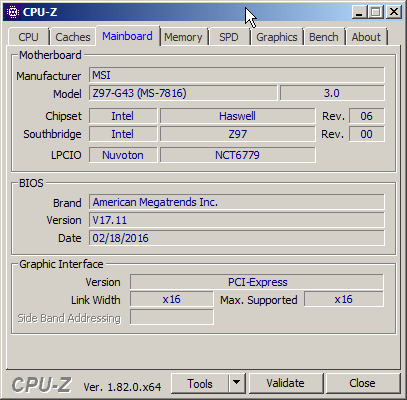 CPU-Z provides all the necessary information.
 Find the BIOS file for the update
Go to the motherboard or laptop manufacturer's website and look for a support link. You should be able to search for your motherboard model and see a list of available downloads, which may include manuals, drivers, and BIOS / UEFI files. This is exactly why it is important that you first find out the model of your mainboard. Incorrect BIOS files can wreak havoc on your system.
Now, whenever you find a BIOS update on the manufacturer's site, you should check the numbers. Is the update newer than your current version? If so, it's time to download the update. Older BIOS downloads used to contain a flash program that started from the USB drive after you entered a command at the command prompt. However, modern boards usually have a utility built into the BIOS, so the downloaded .zip file only contains the BIOS update file and a text file with the release notes.
At this point, it is worth reading the instructions on the manufacturer's website about the exact process of updating your BIOS. They vary, and you may need to configure a few things before starting the update process, such as: B. the deactivation of the safe boot modes and the quick start modes. In most cases, all you need to do is extract the files from the zip file and copy them to a USB drive.
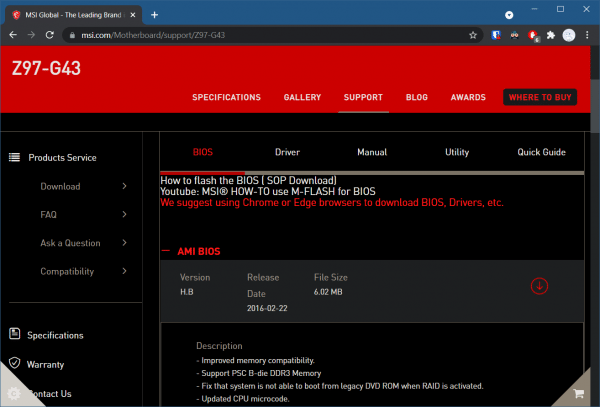 MSI offers the different BIOS versions in the support category on the website of the mainboard model.
 BIOS update directly in the BIOS
With this information you can now search for the correct BIOS version. All manufacturers offer corresponding downloads on their homepages . Mainboard names often consist of endless, confused collections of letters and numbers - the name should be exactly the right one! Usually you will find a ZIP archive, often with just a read-me text file and a file with a strange name and no file extension.
The contents of the ZIP Now copy them to a USB storage device , whether stick or entire hard drive. Then restart the computer and enter the BIOS . To do this, you have to press a certain key shortly after the computer comes on again. You can read here which key you use to get into the BIOS of your computer - because there are differences from manufacturer to manufacturer. Often, however, a corresponding message is also displayed on the screen. Unfortunately, it doesn't always go straight from here: In the case of MSI, you will find the update option in the lower left corner under " M-Flash "; with other manufacturers you have to look for a suitable menu item .
The rest of the process is again super simple: when prompted by the update tool, select your USB data carrier and then the unzipped firmware file . After that, all you have to do is wait - after a few minutes the computer should start up normally again. Very important: In this phase you should not switch off or restart the computer , it is guaranteed to backfire !
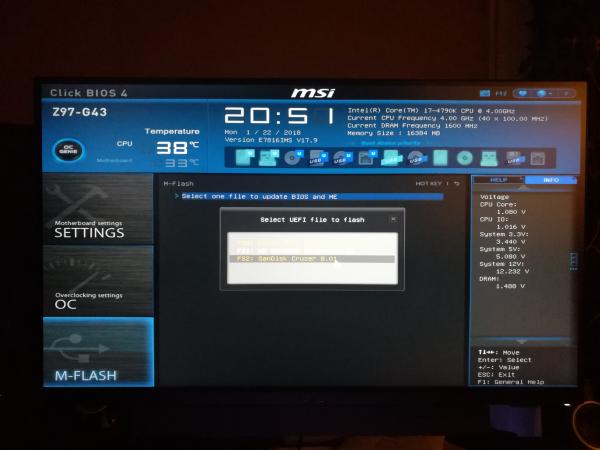 In the UEFI, the work is pretty easy.
 Update via Windows helper
Some manufacturers, such as Asus, also offer Windows tools for updating the BIOS . At Asus, the software is called WinFlash and basically has only one advantage: You can copy the currently installed BIOS to the stick; however, there are usually downloads of older BIOS versions in case you want to downgrade for some reason. WinFlash also downloads the BIOS image, but you have to find the WinFlash version that matches the mainboard, so that doesn't save any work.
Then all you have to do is start the tool and let it do its job : The computer is restarted, the new BIOS is flashed, the computer reboots with Windows. The way via such a Windows tool may seem a bit easier, but ultimately it only relieves you of entering the BIOS and three or four clicks in it. The advantage of the manual method: it pretty much always works and you learn to enter a BIOS. And there are all kinds of useful things to discover!
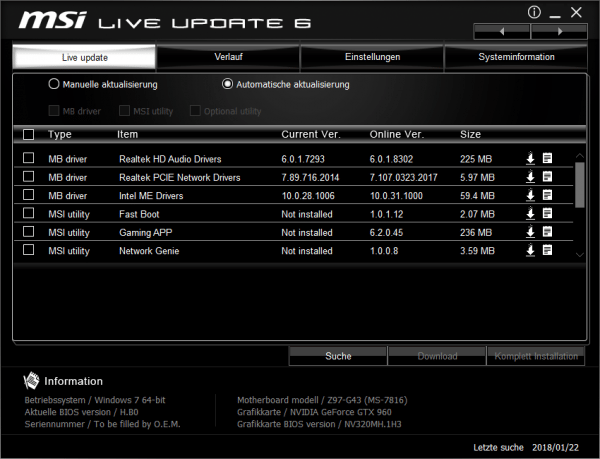 MSI helps at least with finding updates.
 Flash the BIOS with a USB
To update your BIOS via DOS, you need a bootable USB stick . Creating one is easy. We use Rufus , but you can also use other options like HP USB Disk Storage Format Tool, MSI DOS Tool, or UNetbootin. Rufus, by default, formats your USB in a FAT32 file format, which is geared towards UEFI or DOS system types. It creates a bootable USB stick with MS-DOS or FreeDOS, depending on your preference. You can also create an ISO image if you wish.
Take the updated BIOS version and BIOS update utility that you downloaded from the manufacturer's website and copy it to the rebootable USB stick. Leave the USB stick plugged into the computer. Then restart the system. When the system reboots, press or hold the F11 key. This will take you to the boot selection, where you can specify a boot device. Make sure you 've set your bootable USB stick as the boot device , then hit Enter.
As soon as the command prompt appears, you will need to enter the exact name of your BIOS update program or flash tool such as "bupdater" or "afudos" or "awdflash". If your files and the update tool are in a different folder, you must first access this folder with the "cd" command. Each flash utility is a little different, but simple enough to understand. In addition, they all provide information about what to do when the application has been started in DOS. Review the information provided or follow the on-screen instructions to save the current BIOS and / or select the new BIOS file to update.
After a compatibility check, the update should be ready. Then use the [Y] key to confirm and begin. Once the update is complete, you can use the above method to check the BIOS version number to make sure the update was successful..