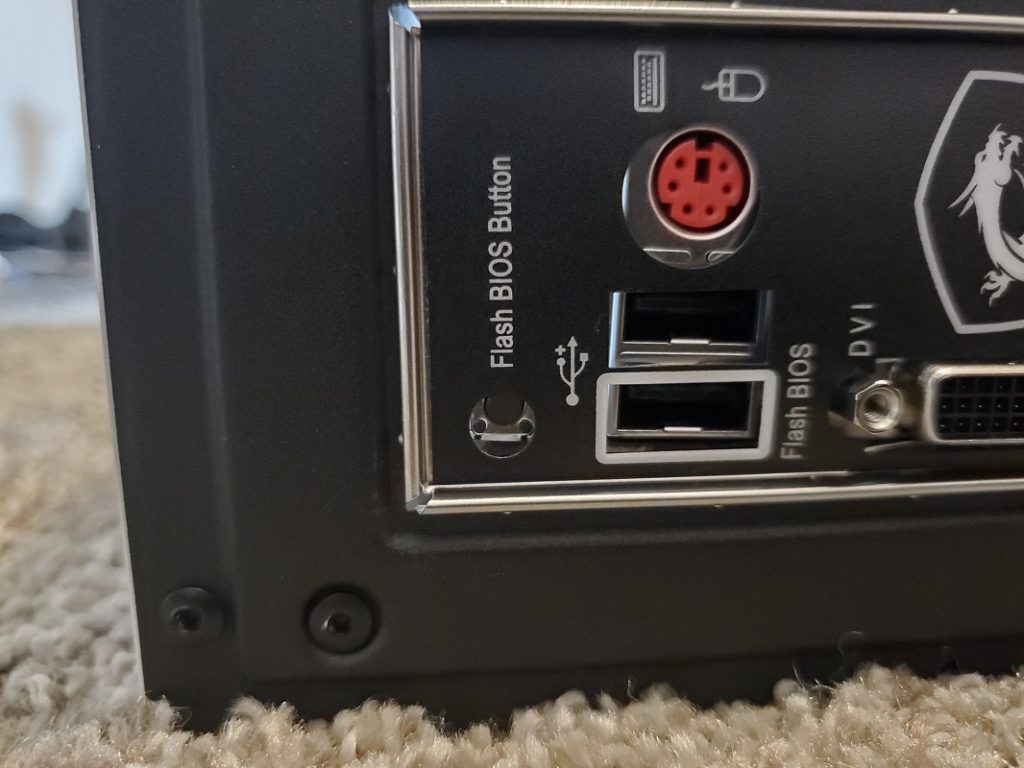
- The BIOS Flash button on the motherboard is an interesting novelty of modern motherboards
- Thanks to this, the entire firmware update process becomes much easier, and we can make sure to check compatibility in less time, without so much knowledge
If in recent times you have bought a new motherboard, you may have noticed the presence, unpublished until then, of a new edition to the input / output area, which corresponds to the BIOS Quick Flash button. Many users have noticed this item, but they don't have much information about it. Therefore, if you do not know what the BIOS Flash button on the motherboard is and how this element works , we advise you to continue reading, since in this article we review all the details about it, clearing up any doubts you may have..
The first thing to say, is that generally this button is located together with the dedicated USB Flash BIOS port, and it is there to allow you to update the BIOS or UEFI of your motherboard without installing any hardware. Eventually it can be very useful, especially if a server does not support a certain CPU .
Anyway, we are sure that you still have several unanswered questions, and we will try to retrace them little by little, so as to give you an idea about all these matters..
So what is the BIOS button on the motherboard?
As we said, on the back of the motherboard you will find the different inputs and outputs necessary to connect monitors, USB devices, audio hardware and any other peripheral.
But some modern motherboards have a special USB port and a button included thanks to which you will be able to update the system BIOS before starting the rest of the machine, completing the compilation of the PC..
What do we need it for on a day-to-day basis?
Typically, the BIOS Flash button is used to update the motherboard with a new CPU-enabled BIOS that was not previously supported. AMD's Ryzen 5000 CPUs are a good example of this .
That is, this button makes sure to check compatibility with both software and hardware, and it will even solve things for you if you want to update the BIOS without installing the CPU.
In fact, on newer motherboards, you no longer even need to install a CPU to downgrade to a newer version of BIOS, making updates easier.
Using the BIOS Flash button is fairly straightforward, as it is usually clearly demarcated within the motherboard. Also, many manufacturers indicate a specific USB port to use in updating the BIOS.

How to use the BIOS Flash button step by step?
The procedure for using the BIOS Flash button is slightly different from one manufacturer to another, but it tends to keep its essence in all of them. In any case, follow these steps so as not to get lost:
- Go to the manufacturer's site and download the correct BIOS file for your motherboard
- Once the download is complete, extract all the files from it
- Rename the file to the manufacturer's, as noted
- Look for a USB 2.0 of at least 32GB, as noted
- Insert the USB into the PC, right click and go to Format
- Select FAT32, a quick format, and hit Start
- You can now copy the BIOS file by renaming the root directory of the USB
- This means that only the BIOS file, and no other folders, will be copied to USB.
- Before inserting the USB BIOS, you need to connect the 24-pin and 8-pin power connector to the motherboard
- Once the power supply is connected, you can connect the USB to the USB Flash BIOS port
- Once this is done, press the BIOS Flash button
You have to know that this BIOS update can take up to ten minutes , and in some cases even a little longer, depending on the size of the new installation in question.
On the other hand, the good news is that many motherboards have a BIOS Flash button that integrates an always useful progress indicator , be it a flashing LED light or a visual display on the motherboard.
Once the process is complete, the motherboard will reboot or shut down depending on the manufacturer.