Ever since the iPhone has been around, the question of great new ringtones has arisen. Unlike many other smartphone manufacturers, who simply allow the use of an MP3 file, Apple has put a stop to this hustle and bustle - as is so often the case. According to Apple's request, ringtones must be purchased in the so-called "Tone Store", a special sub-category of the iTunes store. The prices are exorbitant: For example, 99 cents are due for one second of R2D2 beeps - just like for all other ring tones. That doesn't have to be the case: if you don't shy away from a little work, you can easily create iPhone ringtones from your own music and sound collection. You can do this using iTunes or directly on the iPhone with Garage Band.
Create ringtone from your own music on the iPhone
Ringtones for the iPhone can now also be created very conveniently on the iPhone itself. However, Apple's protected operating system prevents them from being used as ringtone directly on the iPhone. Instead, iTunes on the PC or Mac has to serve as a stopover. Fortunately, that's not as complicated as it initially seems:
2nd step
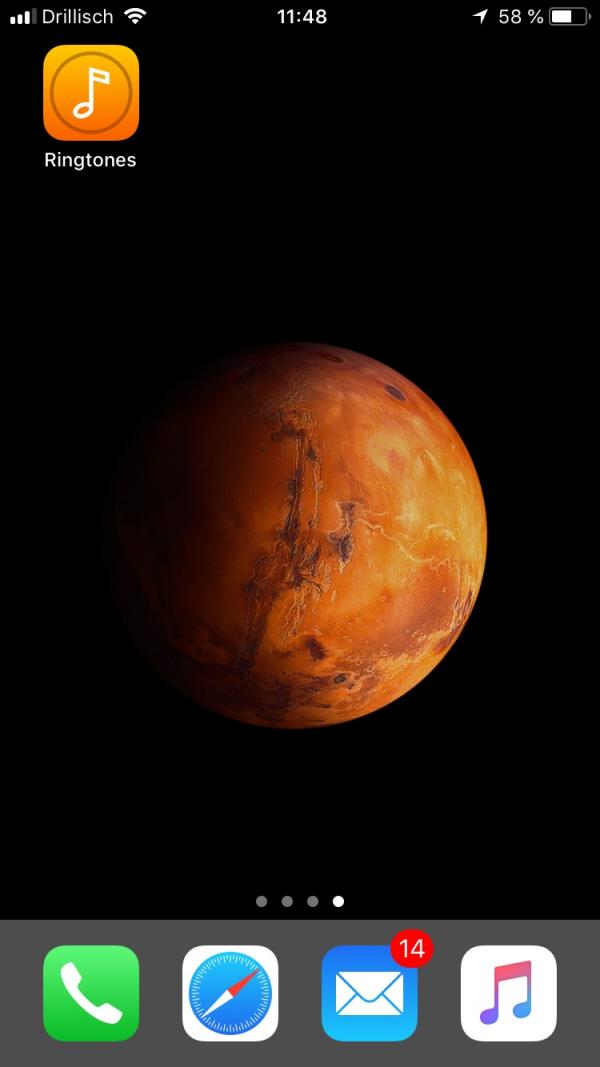 Start the app. The free version is limited to songs in the media library, the sounds can be a maximum of 30 seconds long. Otherwise there are no restrictions. If you need more, you can use the paid pro version ( https://itunes.apple.com/de/app/klingelton-designer-pro/id383819300?mt=8 ), which also offers longer tones and tones for e-mails, SMS and calendar allowed.
 3rd step:
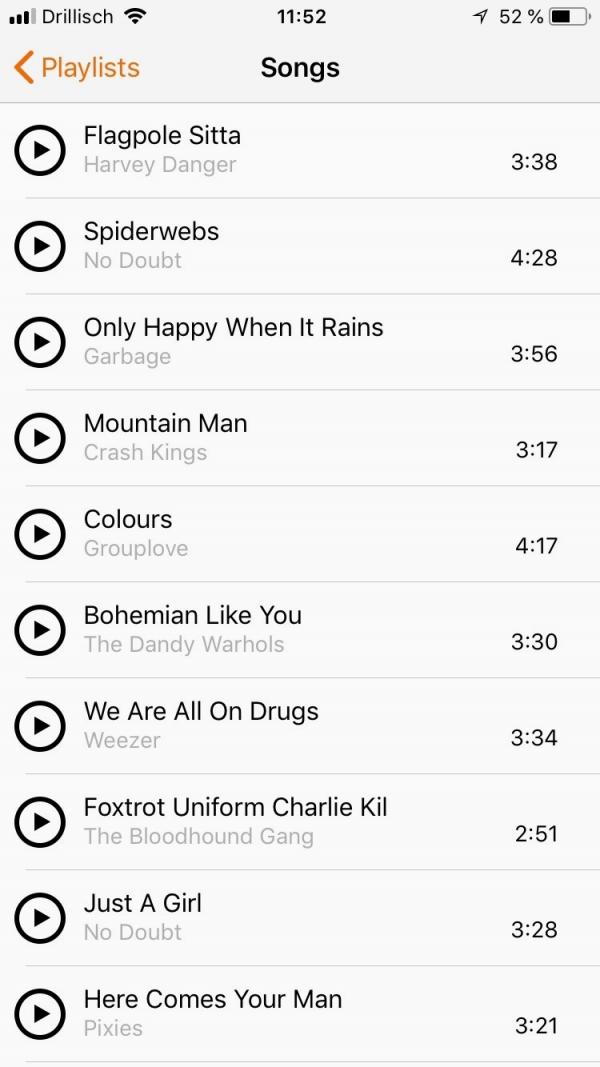 To use the app you need to have music on your iPhone. Not via Apple Music or Spotify, but classic songs from your iTunes library . Use the music overview to navigate to the song that you want to use as a ringtone.
 4th step:
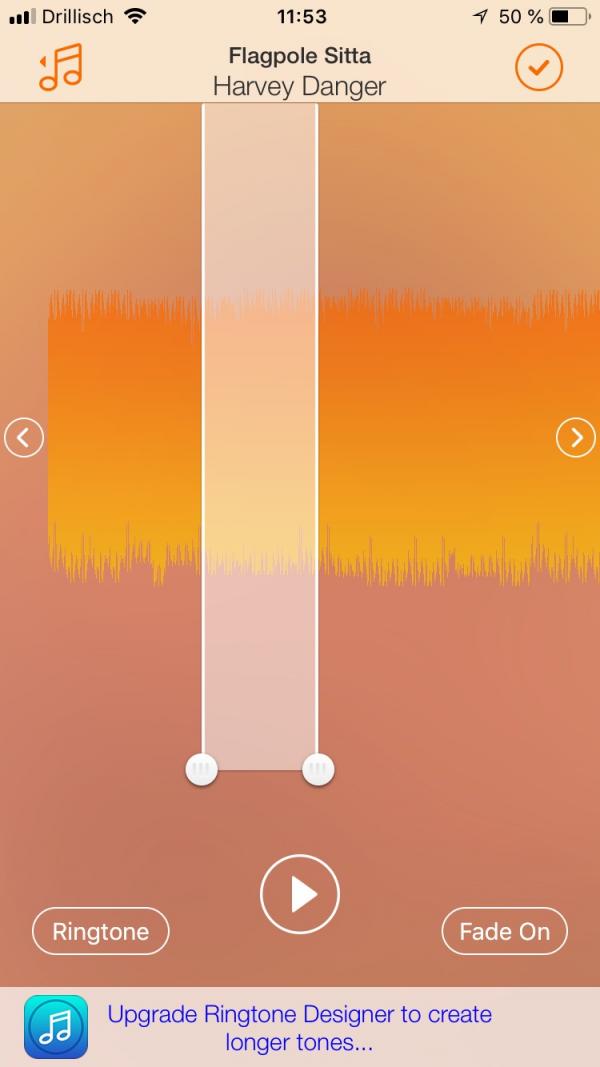 Tap the song you want to use. The " Ringtone Designer " app now shows you a waveform view of the song and a selection field.
 5th step:
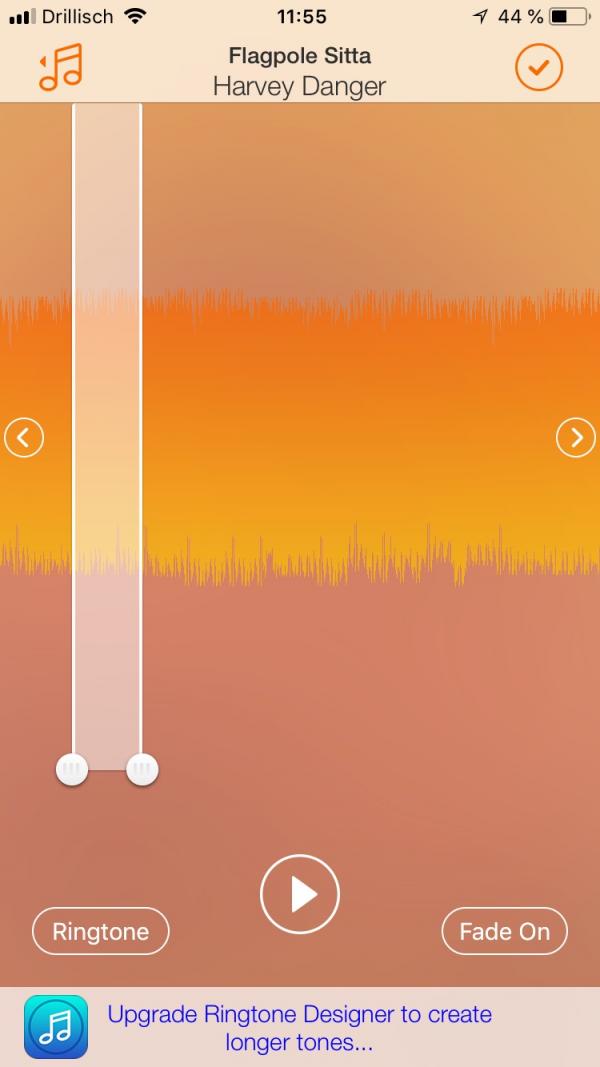 Slide the part of the song that you want to use as the ringtone into the white field. With the white dots you can set the length between 8.8 and 30 seconds .
 6th step:
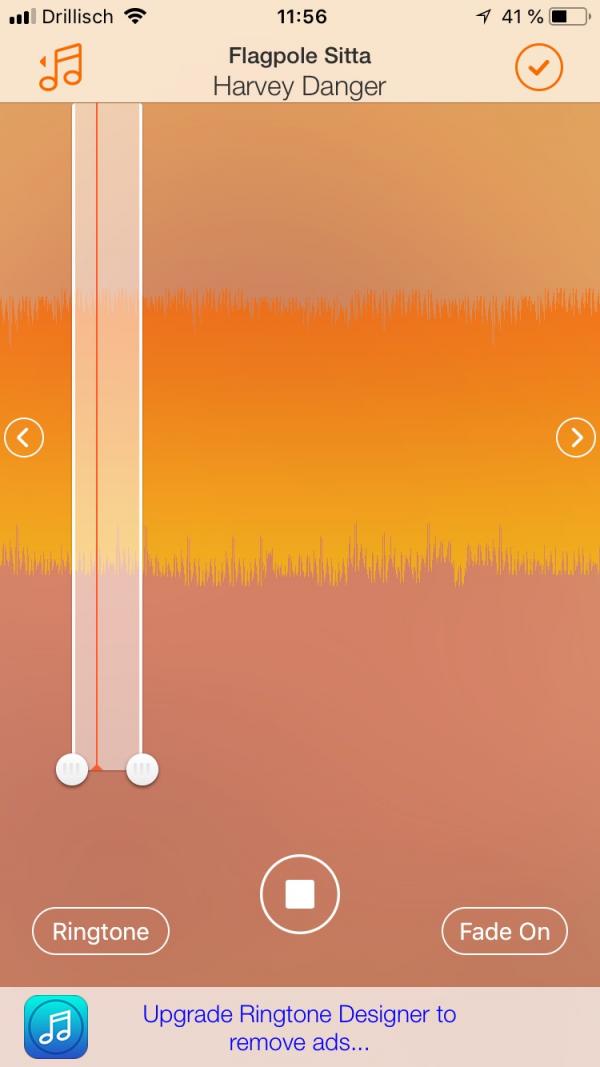 Hear the song excerpt by pressing the Play button . If necessary, adjust the beginning and end by moving the song or the white buttons again.
 7th step:
 The " Fade on " switch ensures that the song excerpt is automatically faded in and out at the beginning and end . If this is not what you want, you should select “ Fade off ”. With the button " Ringtone " or " Texttone " you can choose whether it should be a call ringtone (longer) or a text message sound (shorter).
 8th step:
 When you are happy with the result, you can save the ringtone. To do this, press the tick at the top right.
 9th step:
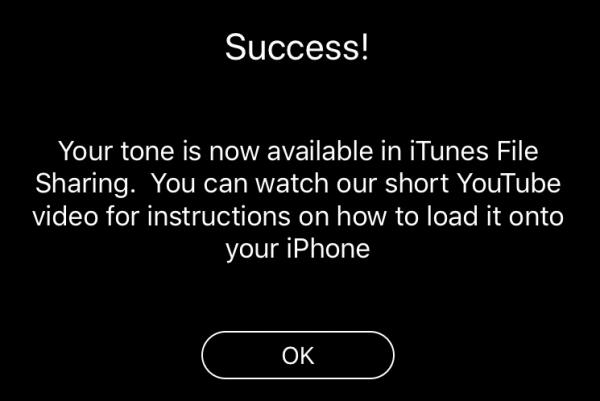 The app now reports " Success ". The finished ringtone file is saved, but can not be used directly due to the iPhone system limitations . This is where the PC or Mac with iTunes comes into play.
 Transfer ringtones to iPhone
The further procedure is now a bit cumbersome: You first have to get the song from the ringtone designer app onto the computer and then copy it back to the iPhone. Unfortunately, there is no other way, as Apple continues to treat the ringtone function very negatively and with reference to its own tone store. By the way, you can also transfer sounds from another source to the iPhone in this way (from step 3)..
1st step:
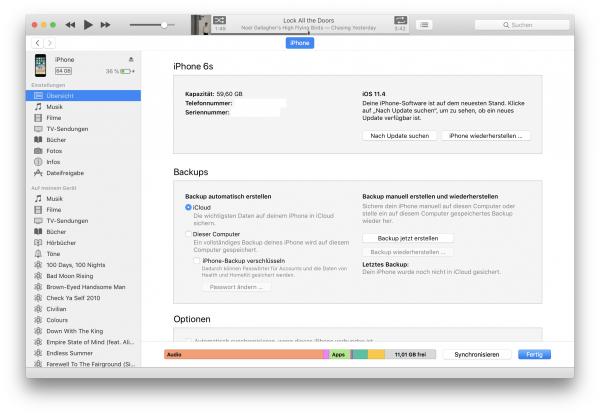 Connect your iPhone to the PC or Mac and launch iTunes. Select the iPhone here.
 2nd step:
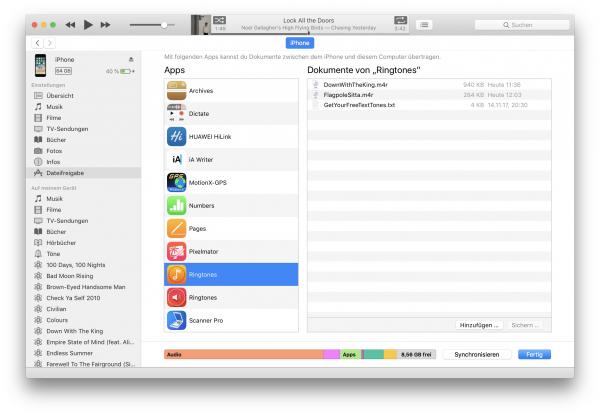 Click on “ File Sharing ” in the sidebar and select “ Ringtones ” as the app. Here you will find ringtones you have already created with the ringtone designer.
 3rd step:
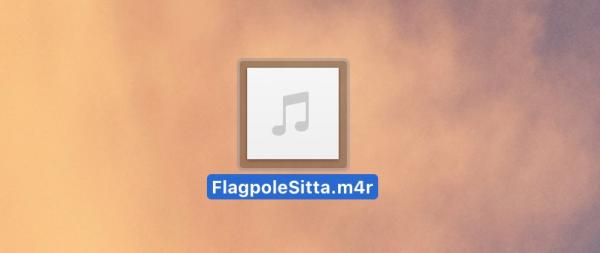 Drag the m4r file with the title of the song you used to create the ringtone onto the desktop .
 4th step:
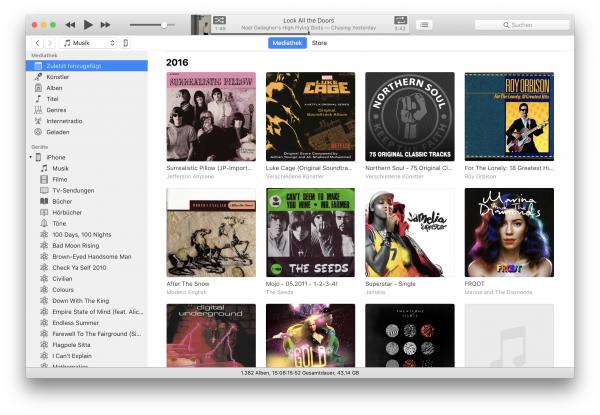 Then switch to the title view of your iTunes library in iTunes . Click on the iPhone here.
 5th step:
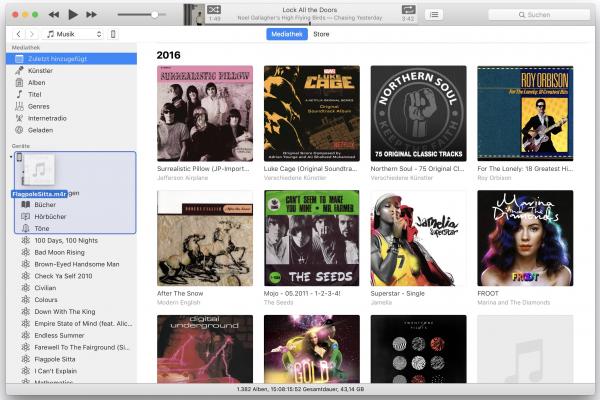 Now slide the ringtone from the desktop to the iPhone to transfer it back to the device. Due to the “m4r” file extension, iTunes assigns the song as a ringtone and stores it in the right place on the iPhone.
 6th step:
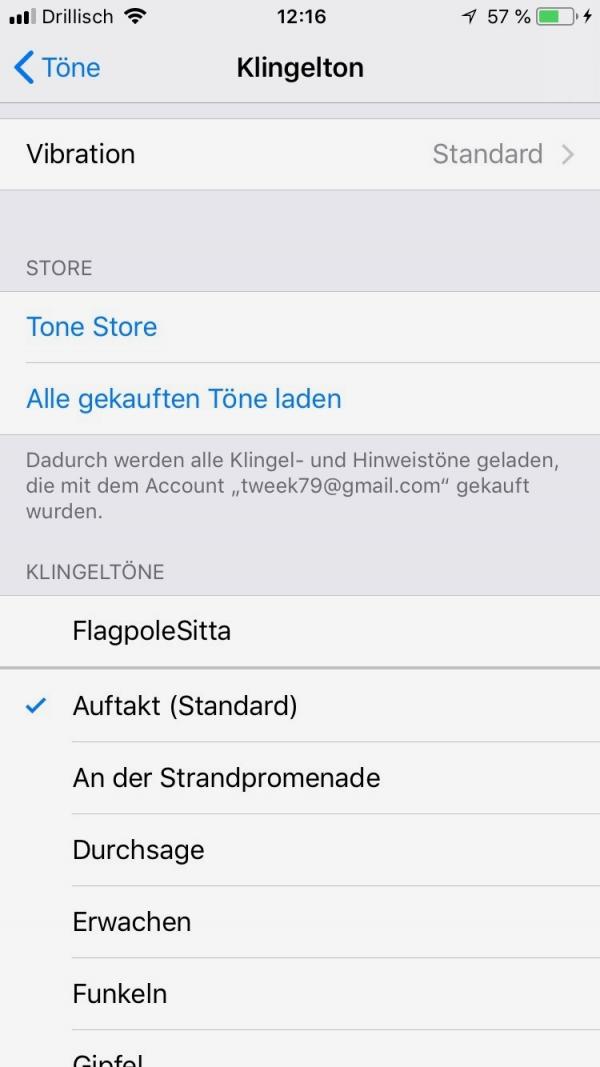 That's it: The ringtone is saved on the iPhone and can be selected in the settings under " Tones ".
 Create ringtones through iTunes
Of course, you can also create ringtones conveniently on your Mac or PC. All you need is iTunes. Then you can transfer the ringtone to the iPhone. To do this, follow our step-by-step instructions or take a look at the brief instructions .
1st step:
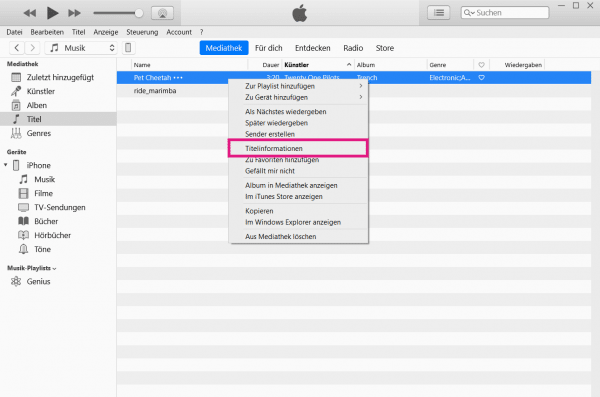 First you have to choose a ringtone or a song. You can download numerous ringtones from the Internet that have already been cut to a maximum length of 39 seconds . In this case you can skip the first two steps and continue reading at step 3 . If you have a longer title, you have to shorten it first . So open iTunes on your computer and right click on the song you want . Then select " Title Information ".
 2nd step:
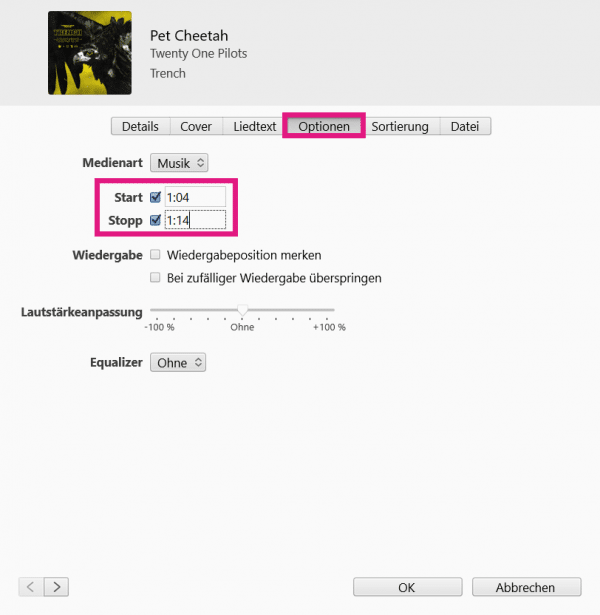 In the " Options " category, check " Start " and " Stop ". Then enter at " Start " at which point the track should begin to play and at " Stop " enter when the track should end. Then click OK .
 3rd step:
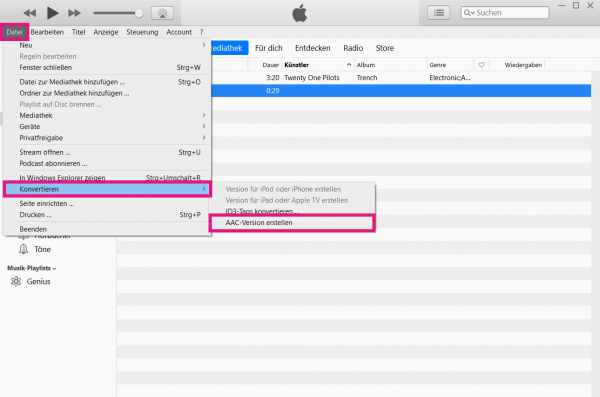 Now mark the title you want in iTunes. Then click on " File " in the upper left corner and select " Convert " from the menu . Then go to " Create AAC version ".
 4th step:
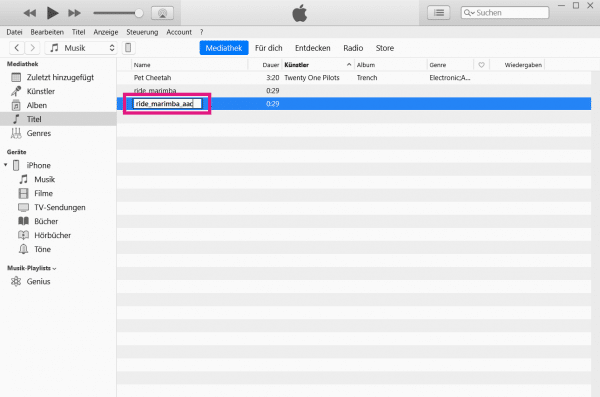 A new title will now appear in iTunes. For better differentiation, rename it so that you can distinguish it from the original.
 5th step:
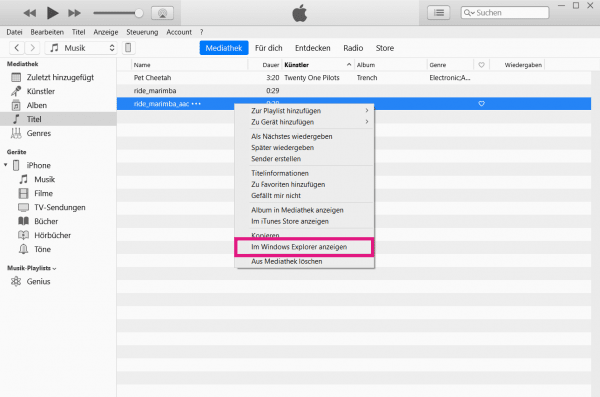 Then right-click on the AAC version of the title and select " Show in Windows Explorer " or " Show in Finder " from the menu - depending on which operating system you are using.
 6th step:
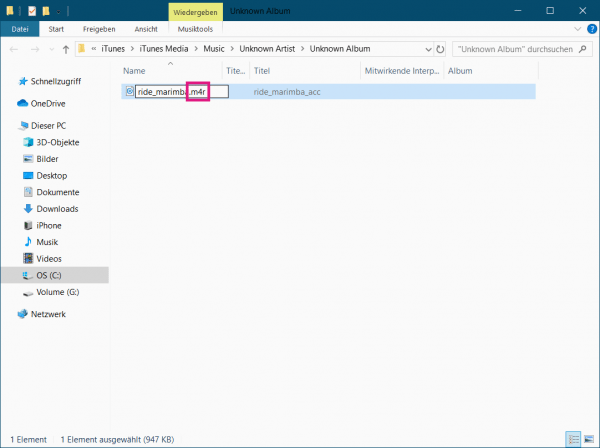 Now change the file extension from .m4a to .m4r to make the file a ringtone.
 7th step:
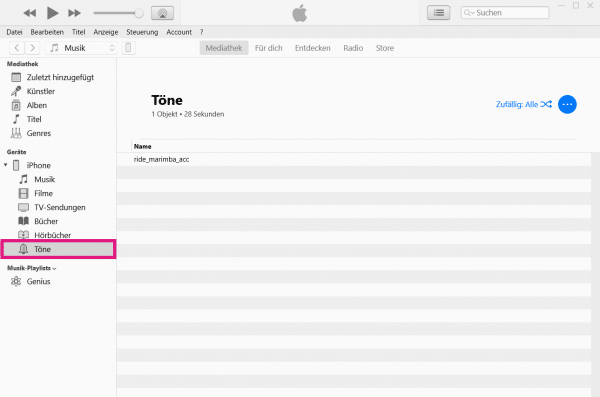 Now open iTunes again and connect your iPhone to the computer. Then select " Sounds " on the left. Copy the ringtone you just created in Explorer or Finder using the key combination [Ctrl] + [C] / [Cmd] + [C] and [Ctrl] + [V] / [Cmd] + [V] to iTunes.
 8th step:
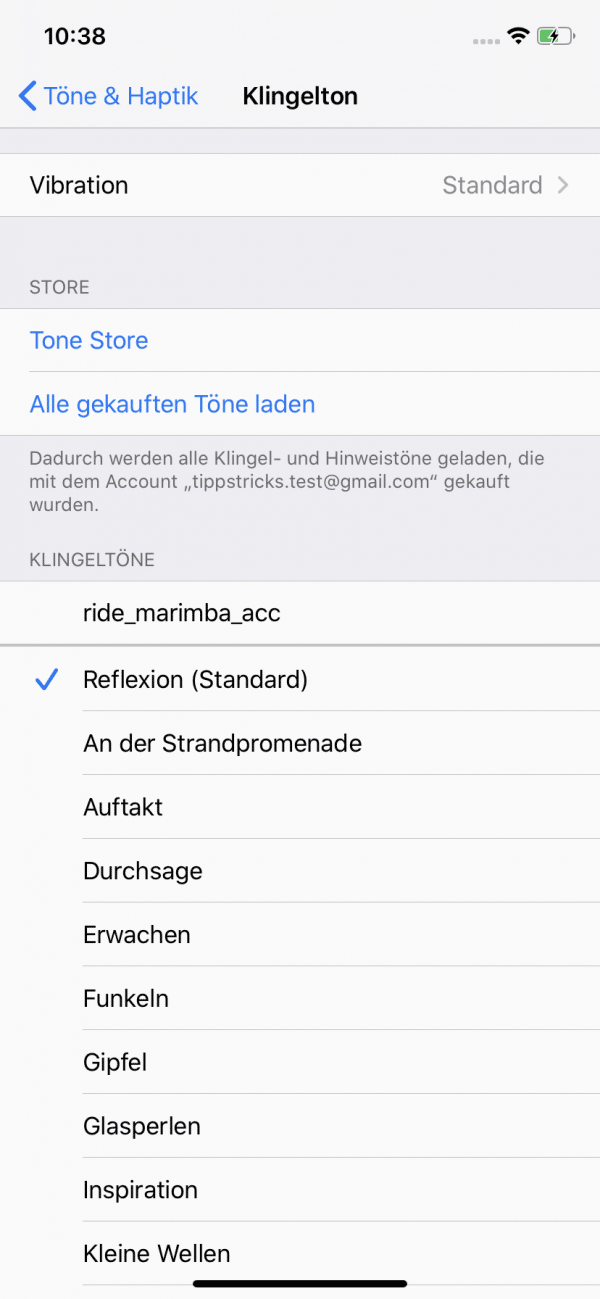 The ringtone should now be ready to use on your iPhone.
 Create ringtones directly on your iPhone with Garage Band without iTunes
If you don't have a computer with iTunes available, you can also create a ringtone directly on the iPhone. You can do this with the free Garage Band app from Apple. If you would like to have a song as a ringtone, you must either have copied it to your personal music library beforehand - unfortunately you cannot use Apple Music or Spotify for this. Alternatively, it is enough if you have saved the song as a file in the iPhone's files app.
Follow the step-by-step instructions or take a look at the quick start guide ..
2nd step:
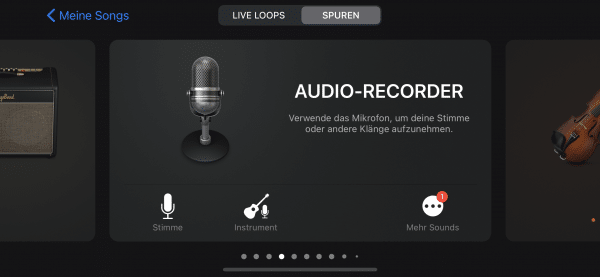 Now you can freely design the ringtone according to your needs. If you want to create the sound yourself, various instruments are available on this overview page. If you just want to create a ringtone from a piece of music, just tap on any instrument.
 3rd step:
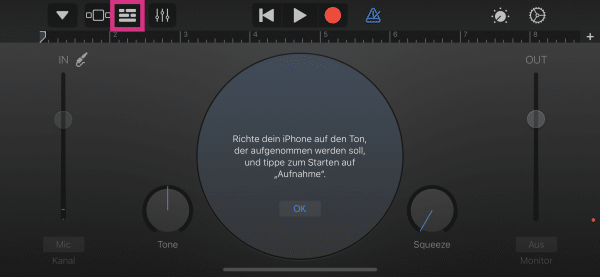 To add a downloaded song, tap the tracks icon in the top left . This will switch you from Instrument View to an overview of all the tracks in your Garage Band song.
 4th step:
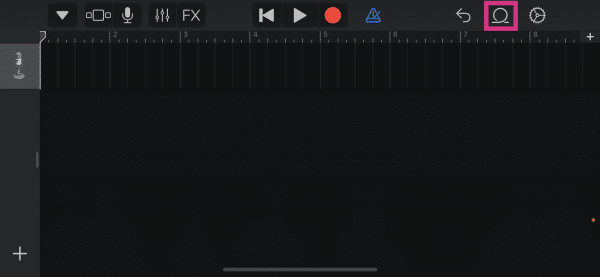 Tap on the loop symbol in the upper right corner .
 5th step:
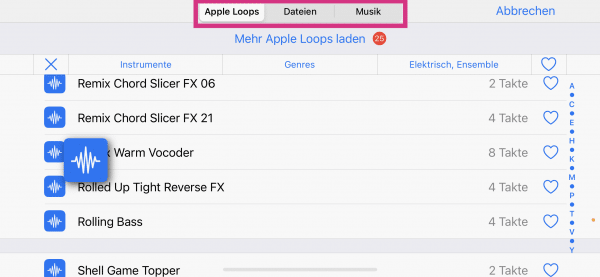 Now you can either use a pre-made loop from Apple. Loops are short pieces of music that are repeated over and over and are therefore good for ringtones. Alternatively, you can add your desired song here . Depending on where you have saved it, tap either on " Files " or " Music " at the top and switch to the folder or album in which the song is stored. To add a loop or a song to the ringtone, hold it down and drag it to the very beginning in the track overview.
 6th step:
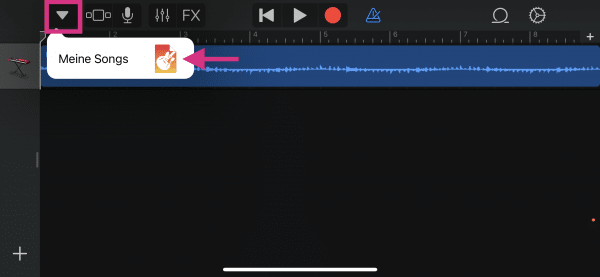 If you want, you can still edit the song or loop at this point. Once you're done, tap the top left of the down arrow and then " My songs ". This will automatically save the song.
 7th step:
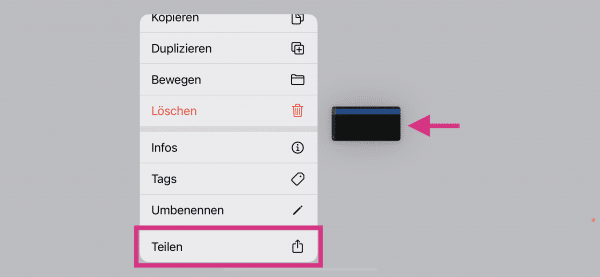 This brings you back to the overview of all the songs you have created in Garage Band so far. Hold the song you want to use as a ringtone, hold until a menu appears. In it, tap on " Share ".
 8th step:
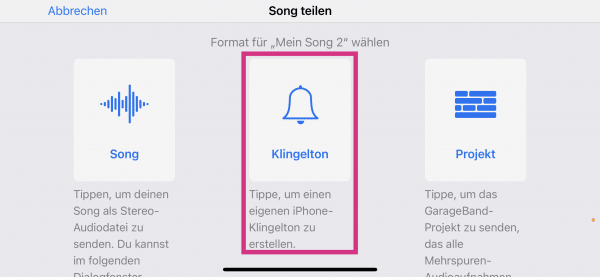 Tap Ringtone .
 9th step:
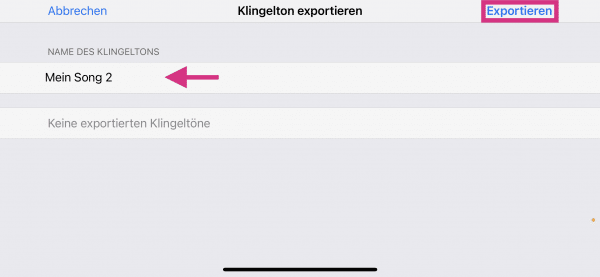 Finally, give the ringtone a name and then tap on " Export ".
 10th step:
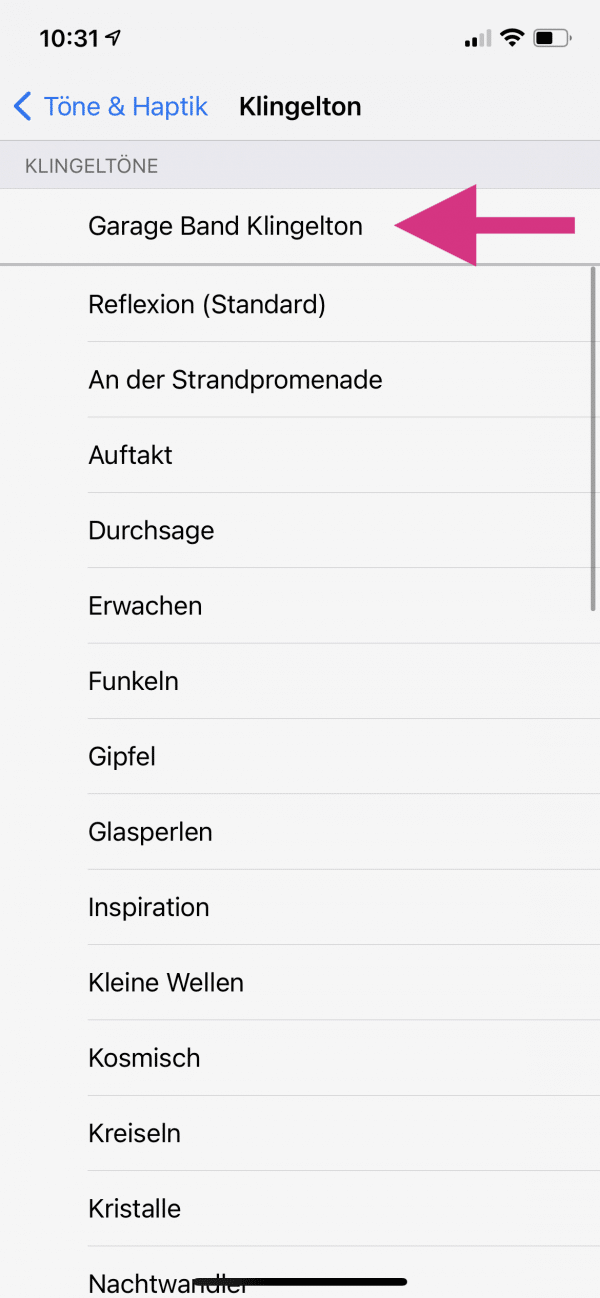 Finally, you can switch to the settings under “ Sounds & Haptics ”> “ Ringtone ”. You will then find your new ringtone at the top of the list to choose from.
 Delete ringtones from the iPhone again
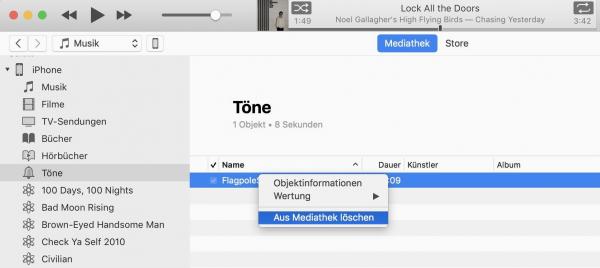
If you want to delete a ringtone again, that's no problem either. However, you need to re iTunes use and connect the iPhone: From the Library View, the iPhone and click on " Tön e". All ringtones you have added yourself are visible here. Delete the tone that you no longer want to use by right-clicking on it and selecting " Delete ".
Quick guide: Create ringtones using iTunes
- Select a ringtone or song you want. If this is less than 39 seconds , continue reading from step 3. If this is longer, however, you have to shorten it first. To do this, open iTunes and right click on the song. Then select " Title Information ".
- Under " Options " you specify the beginning and the end of the song for " Start " and " Stop ". Then click OK .
- Now select the title you want in iTunes and click on " File " in the top left . Then select " Convert " and " Create AAC Version ".
- iTunes will now create a new file. Rename these so you don't confuse them with the original. Then right click on it and choose " Show in Windows Explorer " or " Show in Finder ".
- Now change the file extension from .m4a to .m4r .
- Open iTunes again and connect your iPhone . Then open " Sounds " on the left . Copy the ringtone you just created with [Ctrl] + [C] or [Cmd] + [C] and then paste it into iTunes with [Ctrl] + [V] or [Cmd] + [V] . The ringtone is then on your iPhone.
Quick guide: Create ringtones without iTunes directly on your iPhone with Garage Band
- Download the free Apple app Garage Band from the App Store and open it. On the start page, tap the "+" symbol in the upper right corner to create a new song.
- Now you can either create your own ringtone using the various instruments . Alternatively, you can use a specific song - then you can simply tap on any instrument in the instrument overview .
- Tap the track symbol in the top left to go to the track overview.
- Tap the loop symbol in the upper right corner .
- Now you can choose a loop or a music file from the files on your iPhone or music library . Keep it pressed and drag it to the beginning of the song. You can add more elements if you want.
- When the ringtone is ready, tap the down arrow in the upper left corner and then tap " My Songs ".
- Hold the song you just created, pressed until a menu appears. In it, tap on “ Share ”.
- Select " Ringtone ".
- Assign a name for the ringtone and tap on " Export ". From now on you can select the ringtone in the settings.