- Finding out how to mark all emails as read on iPhone and iPad is one of the things you have to do immediately when you join iOS, preventing emails from piling up unnecessarily
- This trick can also be applied to MacOS, so you don't have to go to your mobile or tablet to do it, but it is possible to clean and organize your Inbox whenever you want
On many occasions, when we receive an email that does not seem important to us, we may leave it there pending to read it later. The problem is that, eventually, they will add up and add up until a cataract of unchecked communications forms. Therefore, if you have accumulated too many emails, then you can start by marking all emails as read on iPhone and iPad. It takes only a second ..
This function is designed so that we do not have to bear the notification of unread emails if we are not interested. You may have been checking all the emails that interested you but those that mean nothing have been left as unread. If so, better mark them as read at once so you don't worry anymore.
And while most of these solutions are usually intuitive on devices made by Apple, in some cases we come across others that cause problems. This is what happens with the marking of emails as "read"..
Precisely, based on these difficulties expressed by users, we are going to teach you how to mark all your emails as read on iPhone, iPad and Mac, always talking about the iOS and MacOS Mail application .
Mark emails as read on iOS
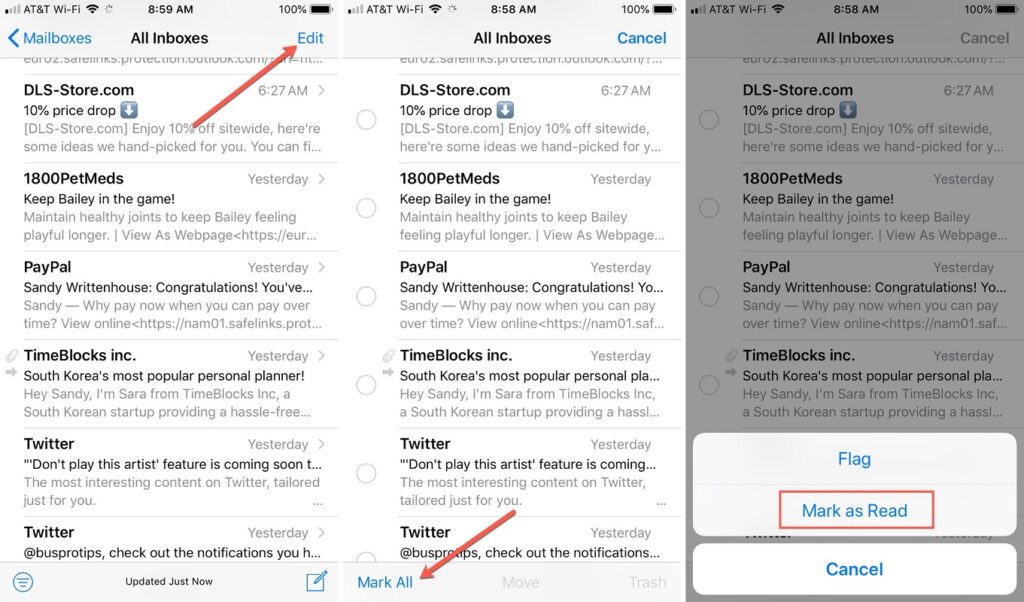
Starting with iOS, the following tutorial will let you mark all your emails as read on iPhone and iPad . you only need to follow the steps that we show you below, and in an instant they will disappear from your sight. Or, at least, they'll stop bothering you with that bold tone that warns you haven't read them yet..
- Open the mailbox in the Mail app on your iPhone or iPad, and select All Inboxes
- Tap Edit at the top right of the screen and Select All at the top left
- Then click on Mark, and finally on Mark as read, indicating all the emails that should be marked
Note that if you prefer, you can work on just one Inbox instead of all . It will depend on how many Correos accounts you want to affect, so that is up to you.
Also, you can use the Search features to mark a particular email that you want to move to the already read, or slide your finger on the panel to mark several in a single movement .

Mark emails as read on MacOS
Marking all emails as read in MacOS is not very different from doing it in iOS , and it may even seem simpler to you from your Apple laptop, so let's see how the procedure is.
- Open the mailbox in the Mail app on your iPhone or iPad, and select All Inboxes
- Right-click, Control-click, and select Mark all messages as read
- Indicate which are the messages that should be read from then on and, when everything is OK, confirm
Just like in iOS, you can select nonadjacent messages by holding Control while clicking each one, leaving others to remain unread so you can read them later.
You can also use the Search box to mark a specific email as read. Likewise, you will decide whether to stay in a single Mail account, or work with all of them simultaneously.