Both light and color are elements present in current photography and their use will determine different results even for the same image. If you look around you, everything is made up of light and color, light being the key component of all this. When we have a greater amount of light, we will see brighter and more saturated colors, while the lower the amount of light, we will have darker, even less saturated colors..
The use of light in photography
When we talk about photography we are also talking about the importance that light will have here and that is that in the end any image will be made up of a balance between light and shadow. This interplay between illuminated areas and darker areas will be the result that the viewer perceives later, and for this reason it is important to work the interplay between both elements depending on the objective we want to achieve. Finding the perfect balance between light and dark will be essential, but it will also be essential to know how to enhance each of them in the best possible way.
Although let's say that a balance is the ideal concept when taking a photograph, it is true that playing between both concepts can give us a greater horizon of results. Thus, we could find an image with the shadow as the protagonist where we want to give a more dramatic and dark aspect to our composition. In the end, playing with each of these elements will mean artistically justifying its moment and its use, taking into account that it is possible that for each viewer it evokes a different emotion. Hence, the ideal is to seek a conscious balance between light and darkness in our photographs, since in general this is visually attractive, we would not have very burned areas of light or very underexposed areas of darkness.
If we also talk about specific types of photographs such as the portrait image, light is an essential element that will distinguish a flat image from a possibly exceptional image. We are not only going to need good devices or a good model, but the work of light can achieve excellent results. In the end, the use of lighting can create a special bond between the viewer and the element that appears in our photography, which is why working with light is important if we want good results..
The use of color in photography
the first photographs were based on a monochrome profile where black and white was the only thing known at the time. Despite the fact that it seems like a limited resource, the use of black and white promoted a conscientious search for possible uses of light and shadow. In addition, he worked and experimented a lot with other concepts such as texture and composition, giving rise to truly fascinating works. Nowadays the search is for the photograph that has a resemblance as close as possible to reality and for this reason a lot of work is done with the full color spectrum.
After the appearance of color in photography, it has not stopped being the protagonist and today its use as an artistic resource is more than justified. And it is that color can be a great ally when taking our photographs and its strategic use can turn our images into authentic visual claims. Trying not to saturate our image with too many colors in general can be a concept to apply to your photographs on a regular basis.
We will also see that playing with color can be key in our compositions and changing the hue, intensity or saturation can be editions that drastically change the result and therefore the perception of the end user. That is why we will encourage you during this chapter to work on color editing your images on mobile devices by even creating different versions of the same file, but with different color work.
As you can see, taking light and color into account when composing is essential, but we will also have to take it into account if we want our editions to be complete and unique. If you want to make your images on your mobile devices more visually meaningful, don't miss how to correct light and improve color in Lightroom Mobile..
1 Automatically enhance light and color Lightroom Mobile
We work on photo editing, there are multiple parameters or elements that we must take into account if we want nothing to be overlooked. When it comes to editing, we don't always need to go through each of these settings and modify them, because in each photograph it will be a world and it will need one or other settings. There are images that need a framing change, but have perfect exposure or images where they have perfectly balanced color, but lack saturation a bit.
The best thing to do in these cases is that we go manually to the specific setting we need and modify it, thus avoiding making changes that will globally affect the entire photograph. But many times, due to the speed of life and the need to upload the content as soon as possible, it is possible that we do not have time to make these modifications and that is why we have to find automatic formulas that make it easier for us. This is where we will see that the automatic light and color adjustments Lightroom Mobile offers us.
Use Lightroom Mobile presets
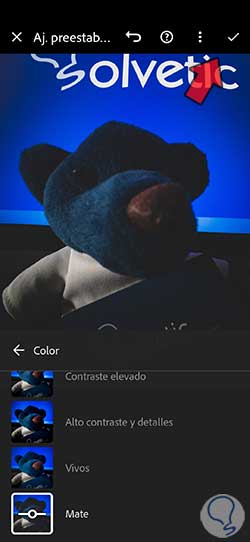
This option is very useful if we still don't have much control when it comes to manual editing in Lightroom Mobile, since we can choose an already preset profile that edits the color and light of our photo. Lightroom Mobile provides a list of preset adjustments that we can choose and with which we will see a profile applied to our photography. Among the profiles that we will be able to use will be:
To find these presets we will first open our image and check that we are in “Edit” mode.

Now we go to the lower panel with different options and we will click on the option called “Preest settings.”

Here we can find different categories, although we will focus on "Yours":

We choose a pre-established profile and to apply it we will only have to click on it and we will see its application live.
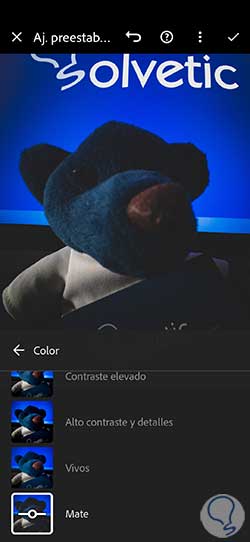
To apply the changes use the upper right checkbox in the corner.
Automatically adjust light and color Lightroom Mobile
We are already seeing the importance of a good editing of light and color in our photographs. Even a short edition of a few elements can give totally different results to what we initially had and this can mean that our image acquires a visual power that we had not imagined until then. That is why working with the different variables that applications such as Lightroom Mobile allow us will get us familiar with the different components that we will find in a photograph, thus learning to work with them and to know the range of possibilities that it offers us.
It is normal that if you have just begun to have contact with The World of publishing, there are some concepts and processes that are unknown to you, the best thing to do is always practice as much as possible. If you need a quick edit that manages to adjust light and enhance color without going too far, we're going to show you how you can automatically adjust light and color in a photo in Lightroom Mobile.
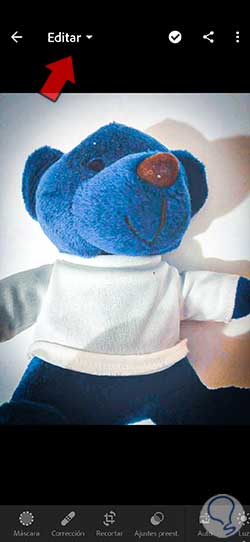
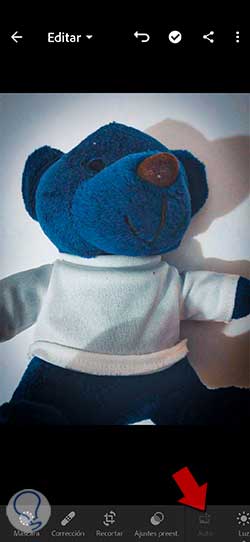
The first thing we will do is open our image in “Edit” mode after clicking on it.
The next thing will be to go to the lower panel of options and here we will find the one called "Auto". By clicking on this option, the Lightroom Mobile program itself will make an automatic light and color correction based on its analysis.
It can be a starting point to continue editing your photo after this automatic retouching.
2 Edit Light Lightroom Mobile
When taking a photograph we will have to take into account if we want our light to be natural or artificial and based on this, play with the arrangement of the elements in our composition so that this light has the best possible effect, always favoring the result. For example, in the light of the portrait that we were talking about, a very hard natural light on a person can produce an exaltation of facial features that usually do not help much in this type of photography. In these cases, softer or diffused lights are recommended that disperse that amount of light on the subject and avoid very marked shadows.
If after taking our photographs we see that there is still some light component that can be improved or rectified, we will resort to applications such as Lightroom Mobile that will allow us to make touch-ups and light adjustments from our mobile devices in a complete and fast way. Although we always have the possibility of later editing, we recommend that you always try to find a good exposure by playing with the different parameters of your Camera.
We are going to see how we can adjust the light in Lightroom Mobile for your photos in a simple and complete way with the different options that Lightroom Mobile provides us.
Step 1
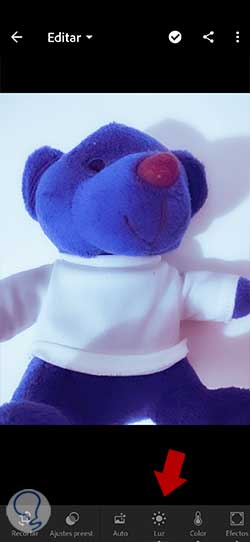
To be able to adjust the light of our composition, the first thing to do is open our image by clicking on it. We will make sure that we are in “Edit” mode.

Step 2
Now we will click on the lower section under the name "Light" to see the different options.
Step 3
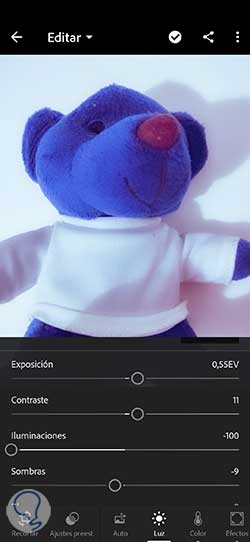
A panel will open with the different options that we can modify for the light of our image:
Dimmers Lightroom Mobile
Within Lightroom Mobile we are going to see that we can correct different parameters through the sliders of:
- Exposition. It will determine the brightness that we have in a general way within our photograph and that we can regulate until we see a good balance.
- Contrast. The adjustments that we make in the contrast of our photography will directly accept the mid tones. If we increase the contrast value we will have dark areas that will be enhanced and the parts that are lighter will become even clearer.
- illuminations. This will make an adjustment in the brightest areas of our image, being able to move the slider to the left if we want the lighting to darken and thereby recover parts that have been duller in the lighting.
- Shades. This adjustment will be focused on retouching the dark areas of the image and if we move it to the left we will make the shadow part darker while moving it to the right will illuminate the shadows more, recovering dark areas that we have lost in this part.
- Whites. This adjustment modifies the White clipping of our photograph thus reducing the clipping in highlights or increasing it.
- Blacks. It allows the adjustment of the black clipping, being able to increase the black clipping giving more shadows to the pure black or reducing that clipping in the shadow.
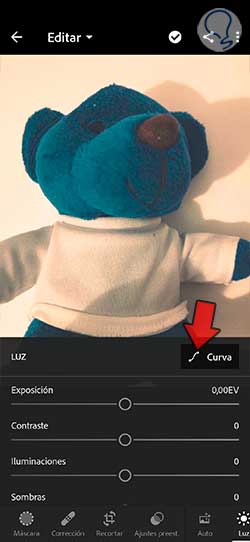
Step 4
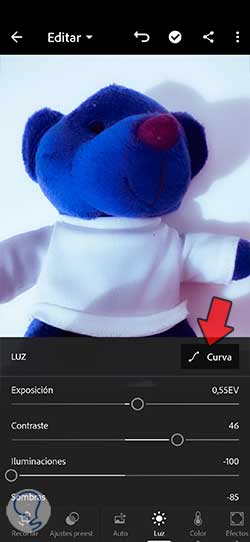
If we want to modify the light at a general level or at the level of color components, we will click on the “Curve” icon.
step 5
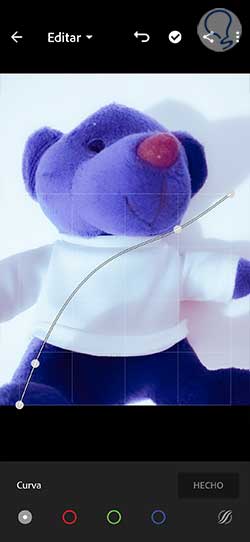
Here we will have the icon to make a global adjustment of the light or make a modification of tones by the RGB components.
Click on the curve line to create new modification points, or hold down one that has already been created to move it around the graph.
3 How to improve color in Lightroom Mobile
Color is something that constantly surrounds us in our day to day and many times we are not aware of the role it plays in our reality. So much so that color is a powerful information tool and many times, although we do not realize it, we are receiving data through color without being fully aware. In advertising and marketing, color is a key visual resource and excellent in terms of the influence it can have on the viewer in a passive way. A brand that is associated with a certain color can be a determining point so that that brand can be instantly recognized when we see that color again.
Surely you have heard that colors are associated with different emotions or feelings and even if you think of a color you can associate it with a specific situation. For example, yellow and orange colors could be associated with a sunset or a warm environment, while white and blue could be associated more with colder situations such as winter. Thus, we will also see colors associated with the message such as red when prohibited or green when allowed.
All this makes color key and does not go unnoticed whatever its purpose. In photography, therefore, it will not be less and color together with light will be essential for our composition to make sense. Many times we even want to enhance the absence of color and give more relevance to other aspects of photography. If, for example, we have a close-up image of a face where a look is very powerful, perhaps leaving that image in black and white will make the viewer pay more attention to that message that the look wants to give, preventing them from being distracted by those colors that there are around The idea that sometimes less is more here makes real sense and that is why it is useful to do tests in color work.
If you are into it in The World of social networks, you will have also seen that color is of great importance and that even to create your own profile in networks you need a color style that distinguishes you from the rest. Creating a harmonious feed with a certain color palette can also be a plus to identify yourself from the rest. That is why we are going to see how you can improve the color in your photographs from Lightroom Mobile so that its final appearance is much more professional and authentic.
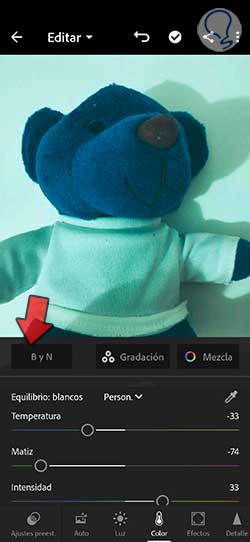
Adjust White Balance
The white balance is one of the adjustments that must be taken into account when we take our photographs. Depending on the predominant light source in our scene, the white balance will be one or the other. For example, it will not be the same if our light source is a fluorescent lamp or if it is direct sunlight. That is why when we are editing the color of our photography, one of the elements that we must keep in mind to configure is the White balance that will allow us to adjust the color that is generated in our image according to the color temperature of the main light source. .
That is why we can find that an image taken in the morning at a sunset generates a scene with a more orange or yellow color, while an indoor photograph taken with some types of light bulbs can lead to images with colder and bluer colors. .
To find the white balance adjustment we are going to go to the color section from the main "Edit" screen when we click on an image.
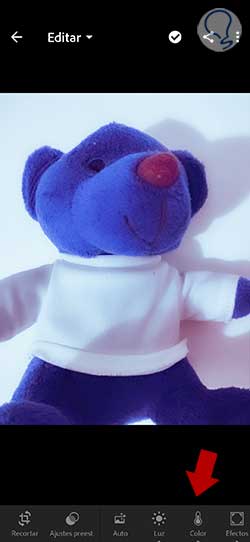
There we will find the option of white balances. If we click on the drop-down that appears we will see different automatic options to adjust the white balance of the image.
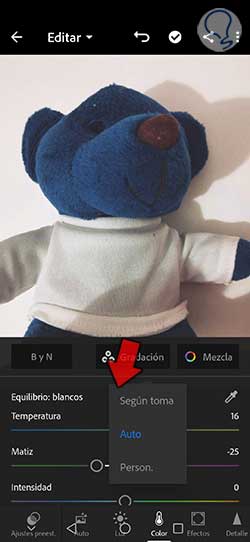
If we want to take a color as a reference to manually adjust the white balance of our photograph, how do we have an eyedropper icon that will allow us to click on a part of the image and thus manually configure the white balance of our photograph.
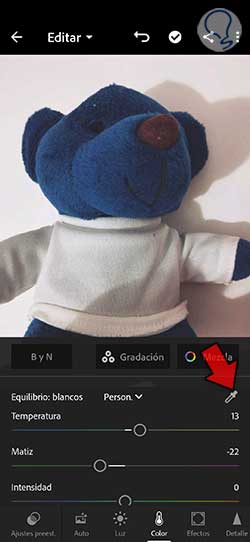
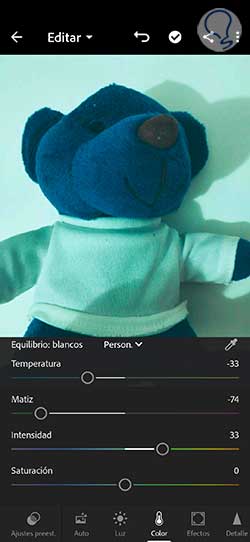
We are also going to find different regulators that will allow us to change that dominant color in the photograph in a general way manually. These adjustable parameters are:
- Temperature. It will adjust the level of warmth or coldness in general that the color of our photo will have and that can vary in more yellow or blue tones. It is based on a Kelvin color temperature scale and we can modify it by moving the slider to the right (warmer) and left (colder).
- Hue. It determines the amount of green or magenta that would exist in our photograph and will serve to compensate for the green and magenta hues, thus adjusting the white balance.
- Intensity. It will adjust saturation by reducing a clipping of those colors that are close to saturation so it will influence less saturated colors and affect more saturated colors less. This will allow, for example, that when we have skin tones they do not appear too saturated.
- Saturation. It will adjust the saturation level of all the colors in the photograph and it will go from -100 or monochrome to +100 or double saturation.
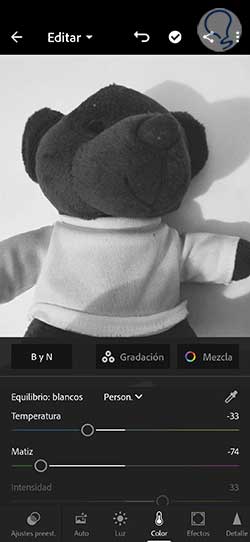
Use Black and White profile
The use of black and white in photography is one of the profiles that artists like the most, since it gives the image a different meaning from what we can experience when we have the image completely in color. By suppressing this chromatic range and reducing it to black and white, we will be emphasizing more the details of our photography and telling the viewer that our message is much more powerful if they are not distracted by the range of colors.
Although we ourselves, with the different options that Lightroom Mobile brings, can reach a state of color in black and white, even using presets within the tool, color management we will be able to find an option that applies this profile of White and black quickly and easily.
To find this option we will have to open the color panel and there we will find the BYN option in the upper left part.
By clicking on it our image will change its color profile to a black and white image.
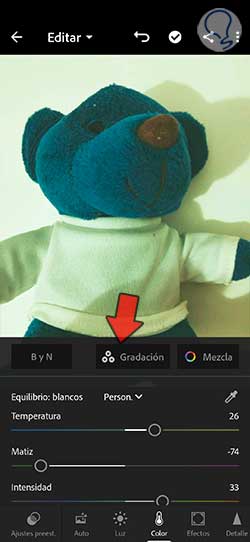
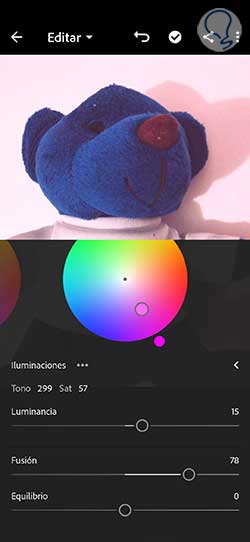
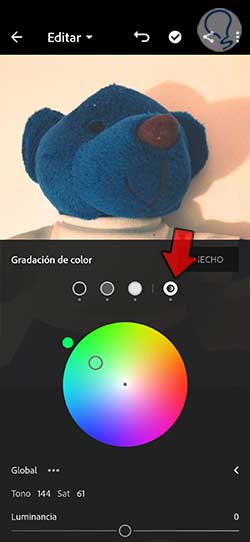
Enhance color with Color Grading
behind the color colors that you see in a photograph there are different parameters that are not conforming and the modification of these will vary the partial or total color of our final image. Lightroom Mobile allows us a complete edition of the elements of light and color in our photographs and that is really appreciated since it is allowing us the possibilities of changing the result of our photography and improving its aesthetic quality to be experiential. We are looking at different options that we can find within the color panel and another very useful tool with which we will be able to vary and improve the color of our photographs is color grading.
With color grading we are going to modify the mid tones, shadows and highlights, thus working on color in a specific and professional way. Within the "Color" panel we will find this option under the name of "Gradation".
We can click on the color wheel and hold down while we move inside to select one of the colors.
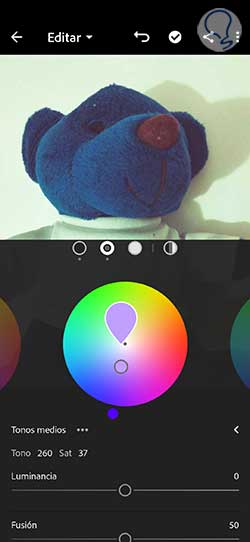
Here we will see that both in Shadows, Midtones and Highlights we will find three individual sliders:
- luminance. It will adjust the brightness of the selected color.
- Fusion. Determines how the function will be performed between different tints for each of the brightness ranges. If, for example, we have three different colors for Shadows, Midtones and Highlights, with "Fusion" you can configure how rough the transition between one or the other will be. It will therefore define the amount of overlap that there will be between shadows and highlights, being able to increase or decrease it.
- Balance. You'll adjust a balance between the three elements of Shadows, Midtones, and Highlights. With a value greater than 0 we will be enhancing the highlights while if we have a value below 0 we will enhance the shadows.

We will be able to move each one of the regulators to obtain different results depending on what we are looking for.
You also have the option of clicking on the "Global" icon and from here modifying the general colors of the image without actually affecting the shadows, highlights or midtones.
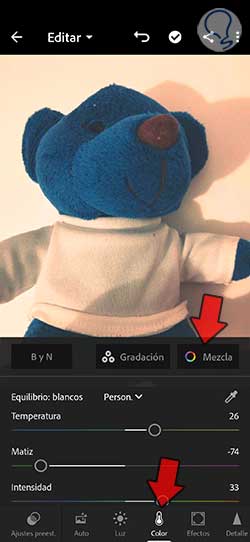
Enhance color with blend
This option will allow us to perfect the color of the photograph by adjusting the colors individually through the use of sliders. With this we will be able to work each color present in the image in a more complete way. Imagine that you only want to modify the blue of the sky, because by working on the blue colors and their complementary colors you will be able to modify only these. To see this option we will have to click on "Mix" once we are in the main "Color" panel.
We will see that in each color we will have an adjustment panel with regulators based on:
- Tone. It will adjust the hue of each individualized color.
- Saturation. It will adjust the amount of gray component a color has to make it look brighter or duller.
- luminance. It will adjust the amount of white we have in a color individually to see it brighter or darker.
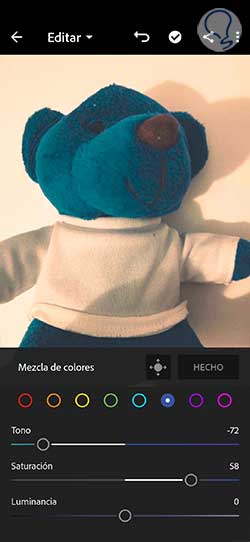
In this way we will be able to modify the color in a complete way, segregating the adjustment by colors and associated components.
Enhance color with tone curve
As we have seen, light is a fundamental component in our photographs and a companion that is closely linked to color. The light will directly influence the latter and we will see how the tones can drastically change depending on the main light source that we have or on the light editing that we do later. That is why we will also be able to change the color and its main components by varying and adjusting the light, in this case the tone curve.
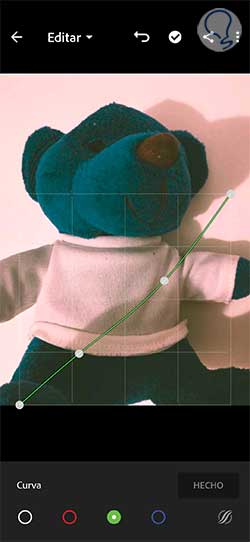
To find this tone curve we will have to go to the light panel and then click on the option that appears with the name "Curve".
Inside here we are going to see a horizontal axis that represents the original hue values or the input values that we have with a distribution that raises the color black to the left and the lighter values with a tendency to white to the right. For its part, we will also have a vertical axis that is the representation of those tonal values that have been changed or output values where black will be located at the bottom, progressively advancing towards lighter colors or whites at the top. or higher. With this tone curve we will be able to make editions and readjustments of tone that we deem necessary within our photography.
We can click on the line drawn on this graph and add a new modification point or I'm going to hold down an existing point and move it around the graph as far as we want.
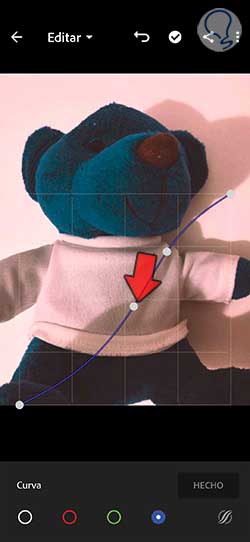
In addition, we will see that in the lower part we have a segregation based on the 3 fundamental color or RGB components and a white color component that represents a global modification.
In this way we will be able to configure a color and light profile in our photography in a personalized way using Lightroom Mobile and thus improve the results.