When we want to apply a vintage effect to our photographs, what we are looking for is that they have a retro appearance, which is to say that they have a style closer to an ancient era. With the evolution of photographic devices there has been a clear change in the results of the photographs that are taken and that is why a photograph taken with one device or another is quite evident. The big leap happened when we went from analog photography to digital since the process and treatment were totally different. Analog photography comprises a much slower and more complex process that we could define as more traditional..
In order to make traditional photography, a physical or chemical process was needed that resulted in the processing of the photos and for which a photographic film was used that would later be revealed in dark rooms. On the other hand, digital photography works through sensors that are inside the cameras and that allows these photographs to be captured by the electronic sensor that stores light through its photosensitive units, converting it into electrical signals. These will be digitized and stored in a memory.
vintage effects
Some retro styles that we can use when we edit our photos are:
- Glitch and grunge effects
This traditional analog photography has some obvious representative elements when we see a photograph taken with an analog camera. One of these characteristic aspects is the grain, an effect that was generated due to the fact that the reels were made up of silver halides and that the greater their size, the greater the sensitivity that the films had. This grain that would be generated would be determined by the size of the halides and hence that effect that we can quickly differentiate in analog photography or with a traditional effect..
If, in addition to the grain defect, we include a saturated color aspect, it will help us to recognize much more easily that a photograph is logical or that it is treated to have a vintage or retro effect. This type of style is still quite in demand and that is why today we want to show you how Lightroom Mobile allows us to create presets with a vintage effect and analog camera from our own phone.
1 How to Edit Vintage Photo Lightroom Mobile
When we talk about a vintage or retro effect, we have to take into account the characteristics that most represent them to achieve the most successful result. Color is one of the fastest components to identify when we are talking about retro or sales photography and that is that in old photos the color disappears over time and that is why we find those saturated color effects in this type of images. We can achieve this type of effect in our current digital photographs by working on components such as tone, saturation or color balance, point.
You have to keep in mind that not all photographs are the same and although here we are going to see how to create a preset to later be able to apply it to other images quickly, you will surely have to make some kind of adjustment to adapt it to the type of photography. Unless it is a photograph taken in the same conditions as another, we usually need to customize some of the components, but it is very useful to have a base to start from when creating these vintage effects..
Noise or grain is another of the elements that we will also be able to find in this type of image and that, since we have the advantage of being personalized, we can add or not to our photographs that we edit. Next we are going to see how to edit a vintage photo in Lightroom Mobile in a complete way and thus create our own presets or presets to use them whenever we want.

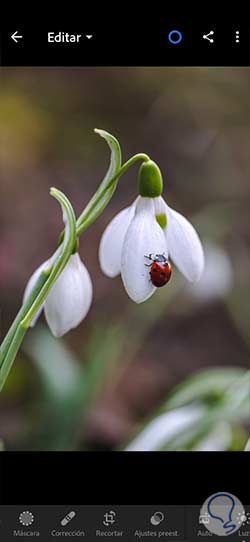
Step 1
We open our photo in Lightroom Mobile from a folder or album or by importing it for the first time.
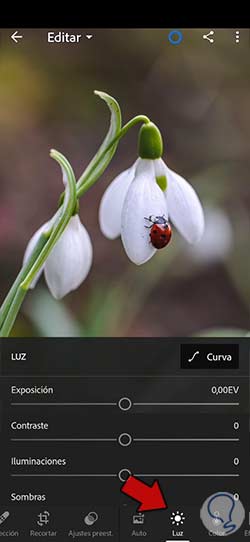
Step 2
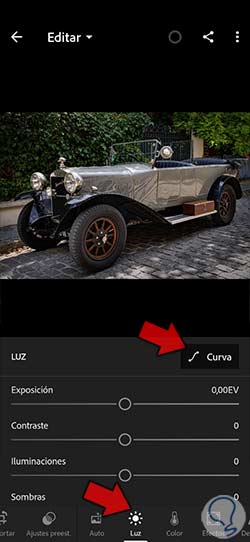
Let's start by making a global light adjustment. To do this, click on the "Light" section from the bottom panel.
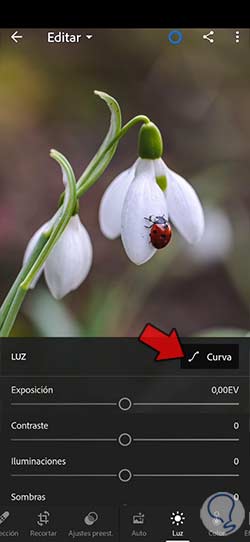
Step 3
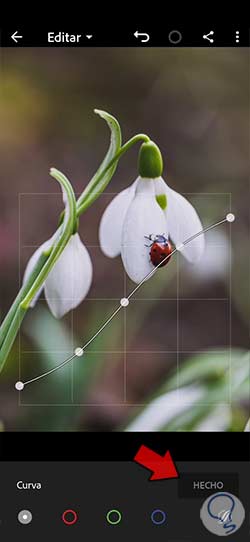
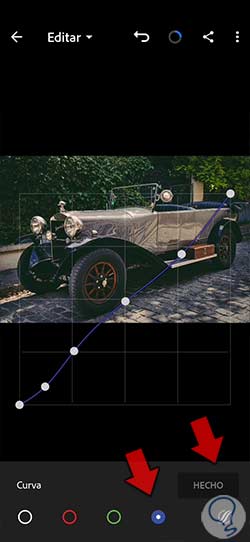
Now we will click on the “Curve” option that appears to edit it manually.
Step 4
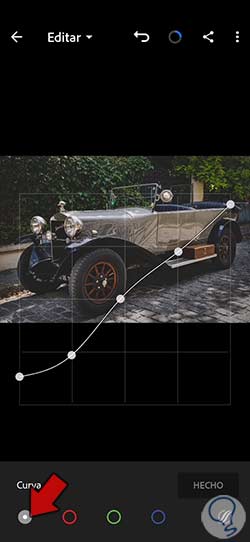
Here you can click on the curve line to create individual points and move them to generate a shape similar to this. Confirm the changes with “Done” when you are done.
step 5
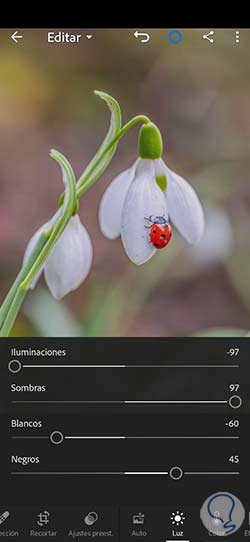
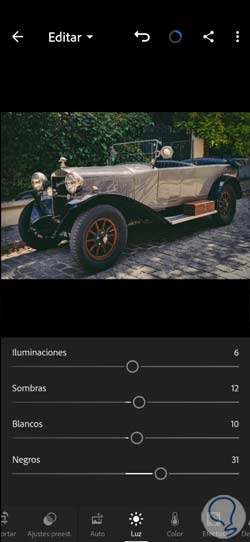
For the lighting section we will configure some parameters similar to the following:
step 6
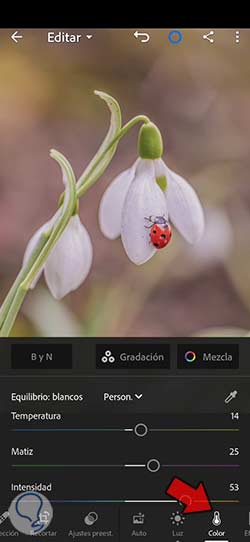
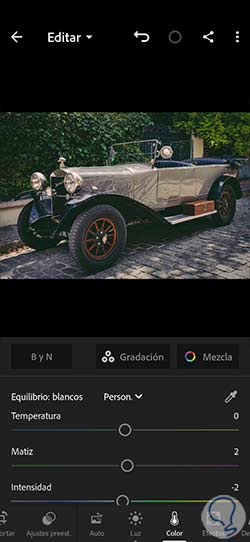
Now we will click on the color option. If we enter this option to configure the "Color" we will put values similar to the following:
step 7
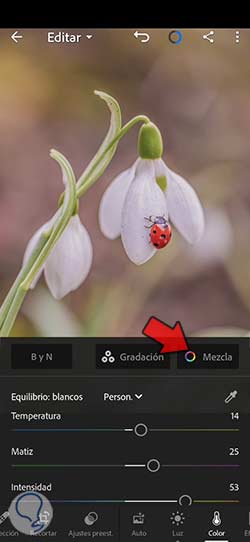
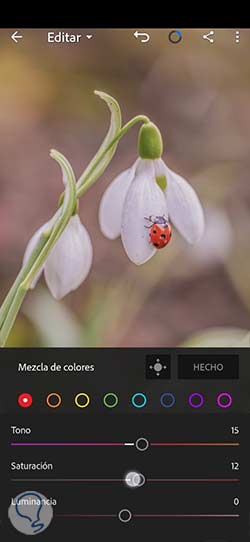
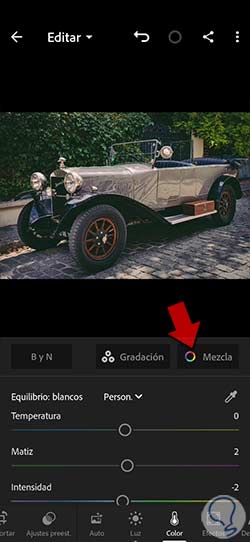
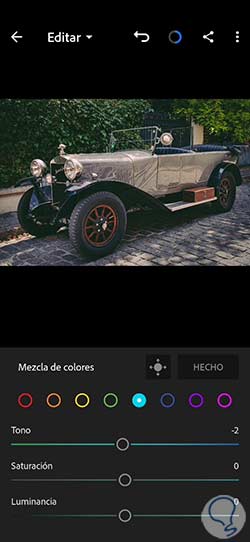
Now we are going to click on the "Mix" option that we will see in this color panel:
step 8
Here we are going to go individually for each color giving the following values:
step 9
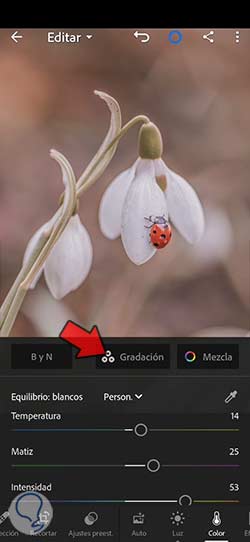
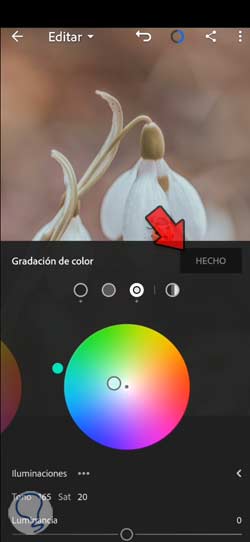
We are going to continue configuring the color of our photograph and for this we are going to work on the lighting and shadows. That is why within "Color" we will click on "Color gradation".
step 10
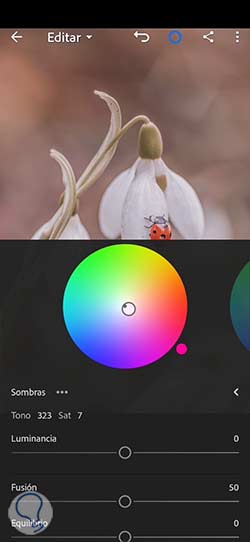
Here we will be able to work the shadows and lighting. You will have some icons on top of the color wheel to choose what to work on. In this case we will start with "Shadows" and we will move around the wheel until we get values similar to:
step 11
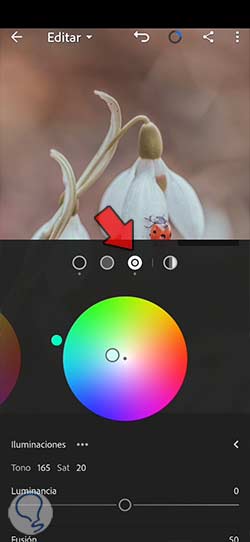
Now click on the "Illuminations" icon and with the color roulette we will move or touch an area whose values are close to:
step 12
We return to the main screen by first applying the changes with the "Done" button.
step 13
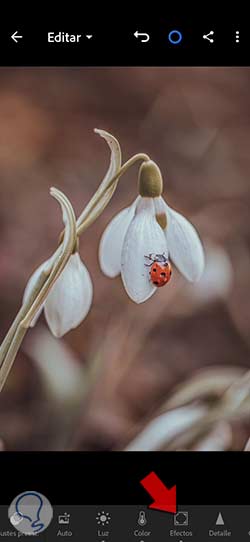
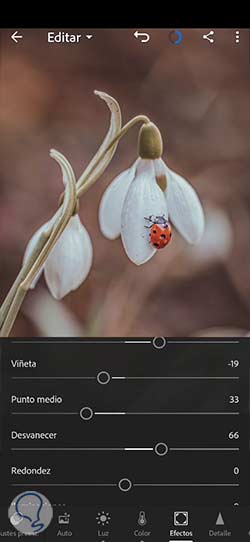
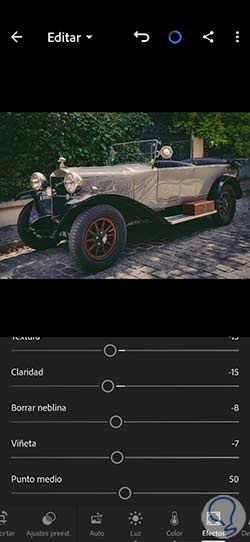
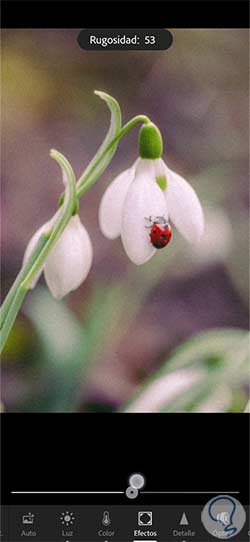
Now we will click on the "Effects" option to continue configuring the vintage aspect of our photograph:
step 14
Here we are going to set values similar to the following:
Note
We have not added a “Grain” effect here but you can increase it if you want to give that analog effect to your vintage image.
step 15
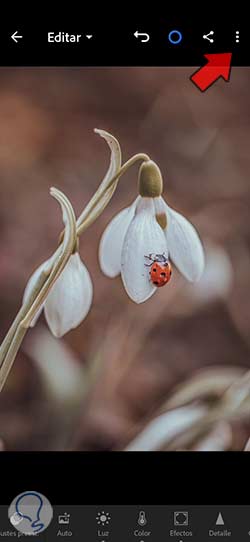
You can correct any adjustment when you need it by going back to the section you want since each photo will need more specific adjustments. Once you're done, let's go before saving the image to save these settings as a reusable preset.
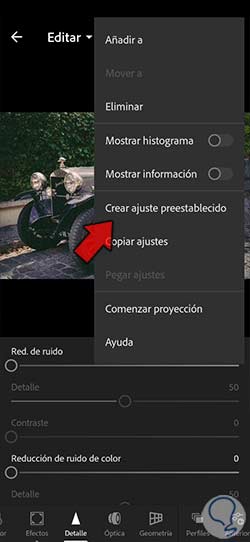
To do this, we are going to click on the three upper points that appear.
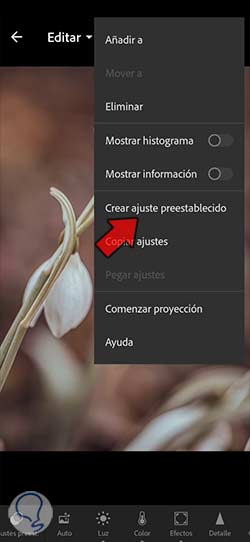
step 16
Here we will choose the option "Create preset" to store it.
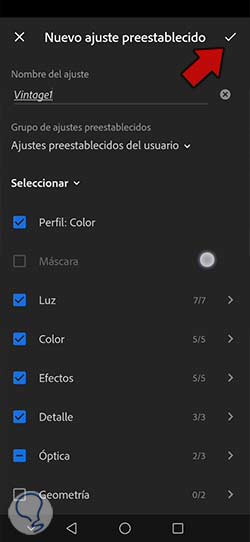
step 17
We will select all the options where we have made changes and we will give our preset a name. We will apply changes by clicking on the check icon that you see.
step 18
Once you have your preset saved, you will be able to use it in other photographs of yours and avoid having to make all these configurations from scratch. When you want to apply it, you will only have to search for it within your preset settings and apply it to another image that you want.
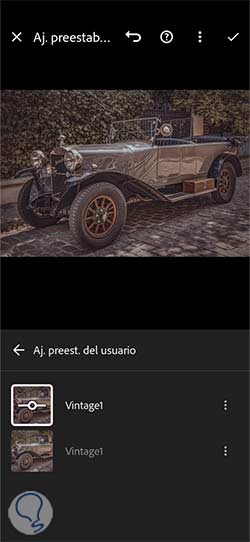
We will already have our image with a vintage effect that we can automatically apply to other images and that we can also customize and change at any time.
To stay up to date, remember to subscribe to our YouTube channel!
SUBSCRIBE ON YOUTUBE
2 Lightroom Mobile analog camera effect
As we have previously mentioned, the use of the analog camera marked an era and today it continues to be a benchmark in the field of photography that does not lose its interest. Although developing photographic laboratories, as well as their devices, are already somewhat difficult to find, the truth is that there are still possibilities to continue enjoying their use. One of the most affordable options that we have to simulate the use of an analog Camera is to opt for Camera devices that allow instant development or use filters or effects that simulate traditional photography.
The nostalgia of having an image with this retro effect has led to the existence of applications that focus on the possibility of applying vintage or analog-style effects and filters. Within Lightroom Mobile we will be able to find filters or presets that allow us to apply these styles, but we recommend that you create this type of effect yourself and save it in your library to use it whenever you want. In this way you will be able to have the presets you want in a personalized way, being able to edit them at any time and applying unique styles to your photographs.
That is why we are going to see how we can give that analog camera effect in Lightroom Mobile giving that grain effect and those characteristic colors in a personalized way and making a specific adjustment of each of the parameters the application gives us.

Step 1
We open our photo in Lightroom Mobile to edit it.
We will start by configuring the “Light” section of our photograph. To do this, click on the lower section of "Light".
Here we will enter the “Curves” section.
Step 2
Here we will click on the main curve to generate a drawing like the one we see below. Let's try moving the shadows to green and the highlights to bluish.
Step 3
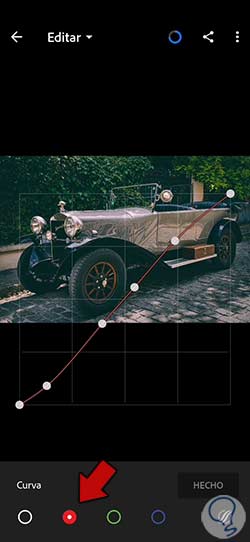
Click on the red color to move its editing points depending on the style we want to find, but in this case we are going to try to configure a curve style similar to this:
Step 4
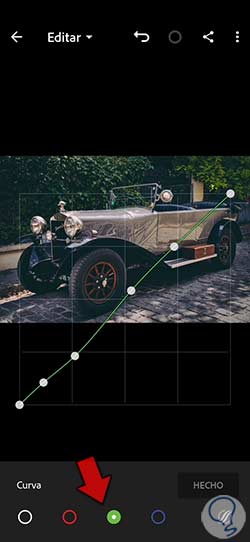
We are also going to configure the green color with the graph in a similar way to this:
step 5
We are also going to modify the blue color to edit the light in bluish tones. Click on “Done” to confirm the edition.
step 6
In the general light configuration we will establish values similar to the one that we put below:
step 7
Now we are going to configure the color section from the bottom of management under the name of "Color".
Then we will put the following configuration or similar, although you can always modify it to your liking:
- Temperature: Here you can leave it as it is or choose a specific color if you prefer.
step 8
Let's now individually configure our colors for the photograph. To do this, click on the "Mix" option.
step 9
Here we are going to go individually for each color giving the following values only in the blue ones:
step 10
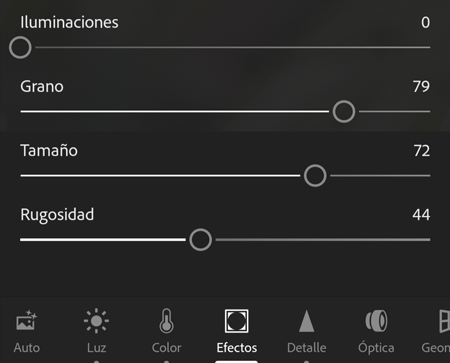
We will continue editing our photography working on the "Effects" section. Here we will apply a configuration similar to this. Power up the “Grain” effect more if you want the analog camera effect to be more noticeable.
step 11
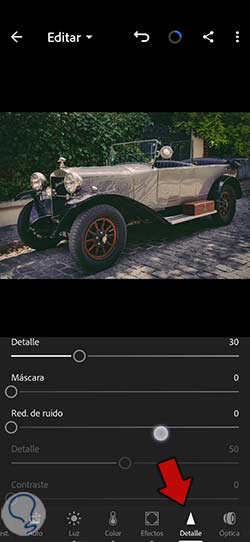
In the "Detail" panel we are going to move the sliders until we get an edition similar to this:
step 12
Once we have our vintage effect ready, we are going to generate a preset to be able to apply it whenever we want. To do this we are going to click on the three upper points:

step 13
Now we will choose the option "Create preset" to be able to generate it:
step 14
We will mark the boxes of everything that has been modified, we will give a name and we will save it using the upper check.
step 15
Since we already have our analog camera effect created, we can apply it whenever we want to other photographs and we can modify the values if we need to.
We also leave you the video to be able to do the necessary steps for this analog camera effect:
To stay up to date, remember to subscribe to our YouTube channel!
SUBSCRIBE ON YOUTUBE
In this way we will already have our photographs with a vintage and retro effect and we will even have edited photographs so that they have an analog camera style in Lightroom Mobile.