Windows 10 is a dynamic system that has added numerous functionalities but can present various types of errors..
One of these errors, which causes a relatively high impact on users, is the excessive delay in shutting down or restarting the system which fills the patience of many users, no matter if we have more than 10 GB of RAM or we have the Last 8-core processor, Windows 10 rebels and takes longer than normal to perform a process that normally takes a few seconds.
Today in TechnoWikis we will analyze in detail some solutions to correct this type of problems in Windows 10..
1. Force equipment shutdown
When the operating system carries out the restart or shutdown process, you must close numerous services, processes and other system values ​​to carry out this action, the problem is that many times these services or processes can cause some type of error at the level internal which affects the speed of execution of the aforementioned task.
This step, although it may be the most extreme, is to forcefully turn off the system, that is, if we see that more than two minutes pass and we are still viewing the Windows 10 screen, just press the shutdown button for 5 or 6 seconds. and this will automatically turn off the device.

In this way the system will be shut down and, if we wish, we can turn it on again in order to check if it turns off or restart again takes the same in case of presenting the fault, we must take other measures..
2. Restart the Operating System without connecting the hardware peripherals
The hardware devices have been designed with the purpose of offering a specific functionality in the system, call it keyboard, mouse, headphones, etc., each one fulfills a specific role, but in some situations, the drivers of these devices may conflict with the system which sometimes internal communication errors affecting the system shutdown speed.
A practical option to validate if any of these drivers is creating a conflict is to disconnect external hardware, SD cards, hard drives or USB sticks, etc., leaving only the keyboard and mouse which are basic for the execution of administration tasks in Windows 10.
With these disconnected devices we proceed to start the system and if it loads in the correct way and, and we can check its shutdown or restart, we can connect the devices again.
Additional at this point of the drivers, another option especially recommended when updating a new edition of Windows 10, is to update or reinstall the drivers with the latest version available, the reason is that, when the operating system is updated, the driver may become obsolete and generate these types of errors.
Step 1
To perform this task we must go to the device manager using one of the following options:
- Use the following key combination and execute the "devmgmt.msc" command and press Enter or OK.
+ R
devmgmt.msc
- Right click on the Start menu and select Device Manager.
- Use the Windows 10 search box and enter the term device and select the Administrator there.
Step 2
Then, in the window displayed, we will locate the controller to manage and we will have two options:
- Update the selected driver either automatically or manually
- Uninstall the driver and then allow Windows 10 to automatically search for the latest version of this
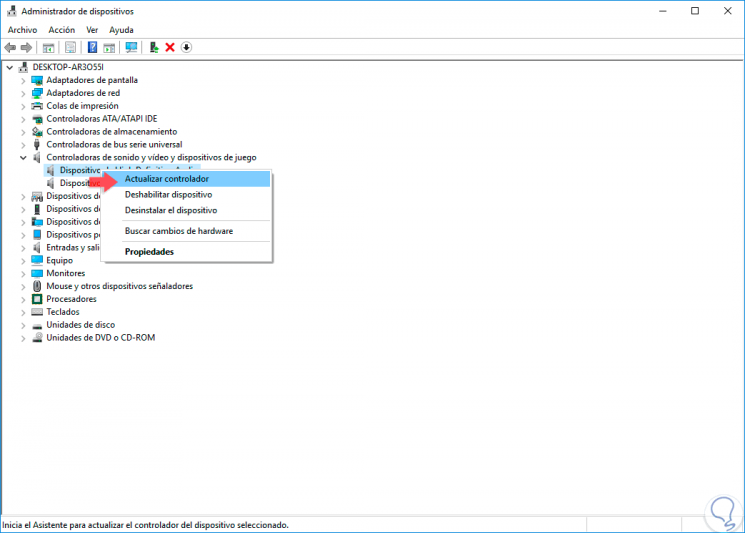
Once we define the action to be performed, it will be necessary to restart the computer to see the changes applied.
3. End processes with error in Windows 10
The processes in Windows 10 allow access to programs, applications and system elements to be performed optimally, but many processes can cause a negative effect on the shutdown or restart of the system by preventing it from performing the task for some reason as update, analysis, etc.
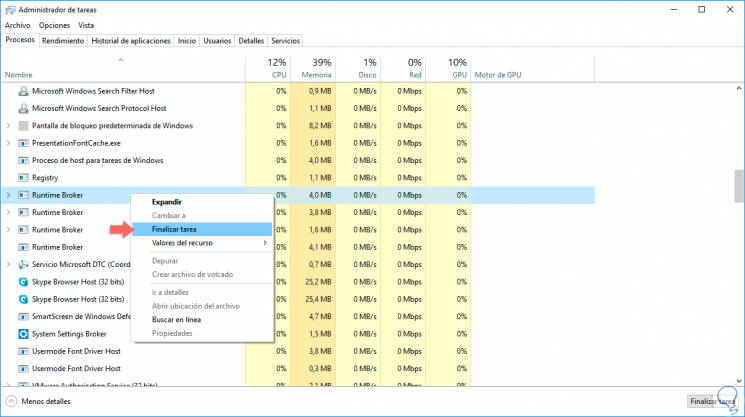
Step 1
To check the current processes in Windows 10 we must access the Task Manager by right clicking on the taskbar and then selecting the respective utility.
Once we access there, we go to the “Processes†tab where we will see all the system processes and once the faulty process is detected we can finish the task using one of the following options:
- By right clicking on it and select the option "Finish task".
- Select the process and click on the "End Task" button located at the bottom of the Administrator.
Step 2
In case the process involves an update of the operating system, we must access the command prompt as administrators and execute the following command:
net stop wuauserv
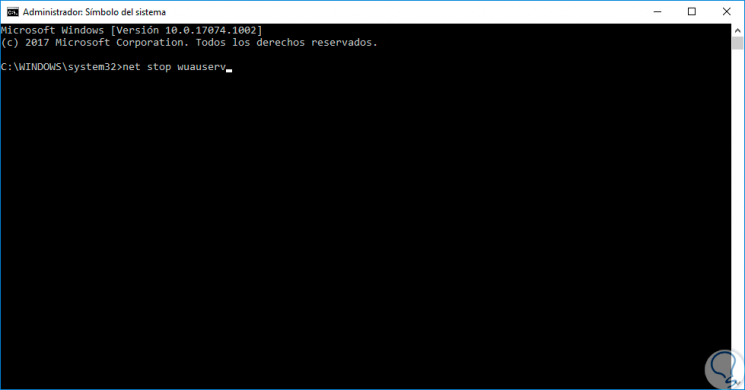
This will stop the system update task.
4. Make use of the Windows 10 troubleshooter
The versions of Windows 10 have a utility called Troubleshooting thanks to which it is possible to carry out a complete analysis of failures in various system components, such as disks, network, sound, etc., and look for an immediate solution.
Step 1
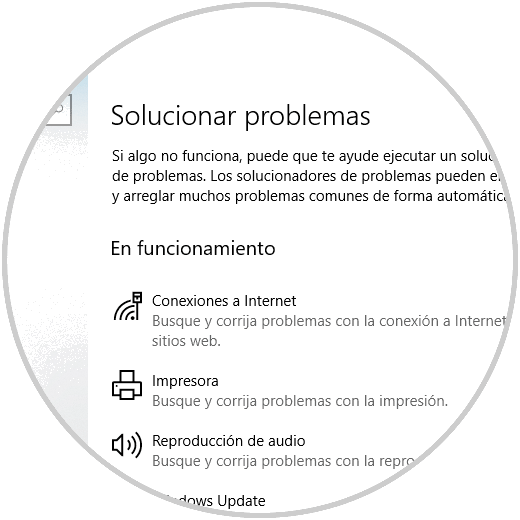
To access this utility we will go to the Start / Settings menu:
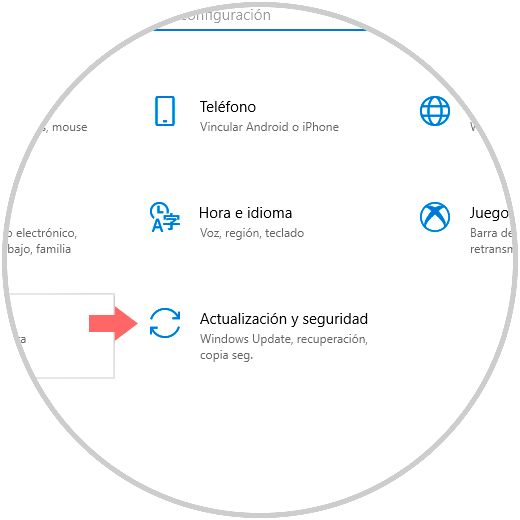
Step 2
There we select the "Update and security" option and we will go to the "Troubleshoot" section. In the window we will have multiple options to select the most appropriate:
Step 3
Another way to use this troubleshooter is to go to the following route:
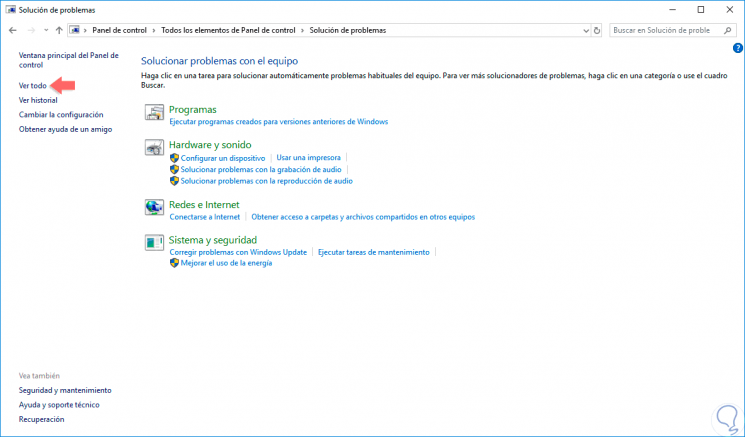
Step 4
Click on the "See all" option located on the left side and we will see the following:
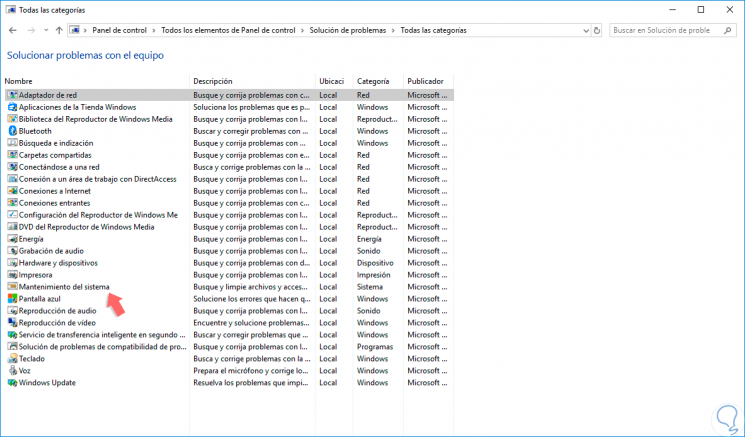
Step 5
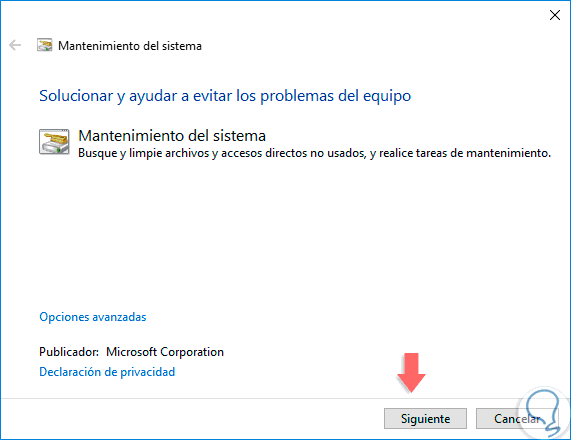
There we click on the “System Maintenance†line and the following wizard will be displayed where we will continue the process to analyze the system in search of errors:
When we have finished this process we can restart the system and verify that everything works in the correct way.
5. Check programs that start in Windows 10
This is one of the most frequent causes when we talk about speed when starting Windows 10 and it is that, by default, many applications and programs are configured to be run on Windows 10 startup, significantly affecting its fast startup.
To keep up, remember to subscribe to our YouTube channel! SUBSCRIBE
To check which items are configured with automatic start in Windows 10, we go to the task manager and there we go to the "Start" tab where we will see each of the programs with this action:
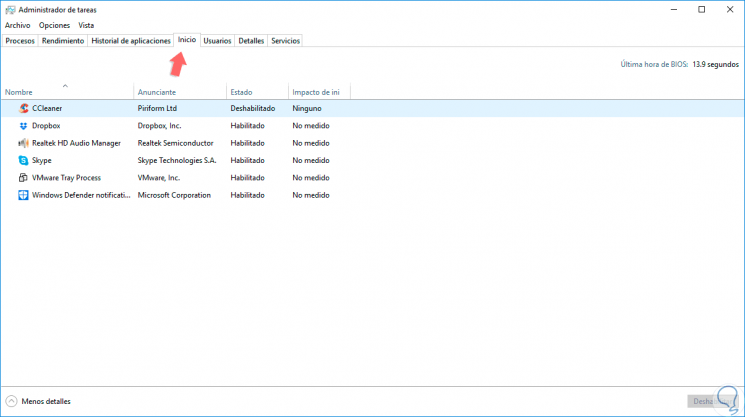
If we wish to disable any, just right click on it and select the option “Disable or select the program†and click on the Disable button located at the bottom of the administrator.
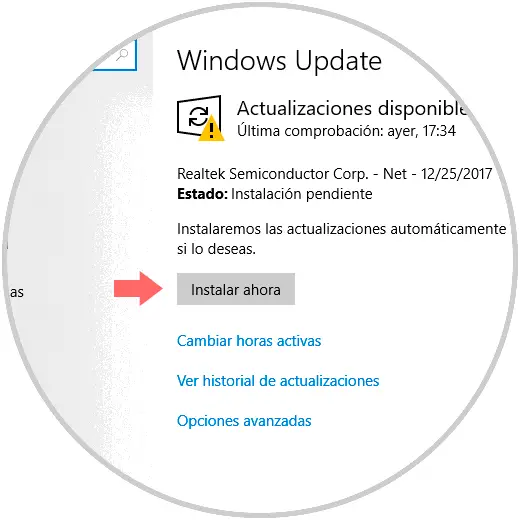
6. Update the Windows 10 Operating System
Frequently, Microsoft developers are releasing new updates for the operating system where some are security, some of the applications and others of the general behavior of the system.
It is ideal to keep the system with the latest updates since in some of them we can find the solution to the failure of shutdown speed or restart of Windows 10.
Step 1
To check the latest updates we go to the following route:
Step 2
There we go to the "Windows Update" section where we can search, download and install the latest operating system updates:
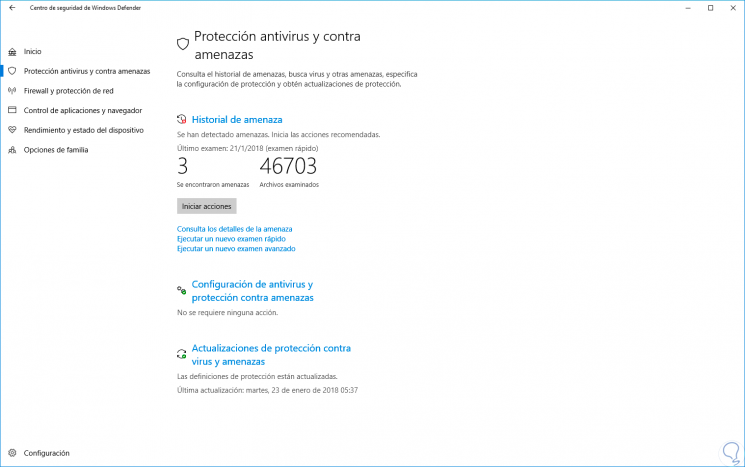
7. Make use of antivirus in Windows 10
Remember that we are constantly accessing the Internet and throughout the process of browsing or downloads, we can acquire a virus or malware for the computer which ultimately affects the startup or shutdown performance of it.
We can use some free antivirus or use the integrated Windows 10 tool called Windows Defender which has improvements to protect both our computer and the information stored there.
For this, just access the "Windows Defender Security Center" and there make the settings we deem necessary.
8. Reinstall and reset Windows 10
Although it is an extreme measure, it is a solution when the system definitely does not respond to any other option mentioned.
Step 1
To carry out this task we go to the following route:
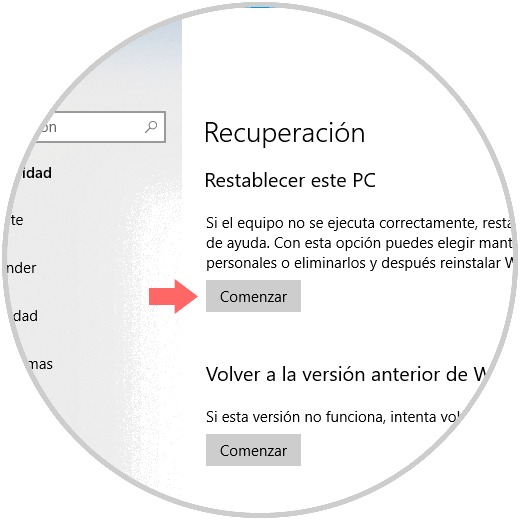
Step 2
There we click on the "Start" button located in the "Reset this PC" section and the following message will be displayed:
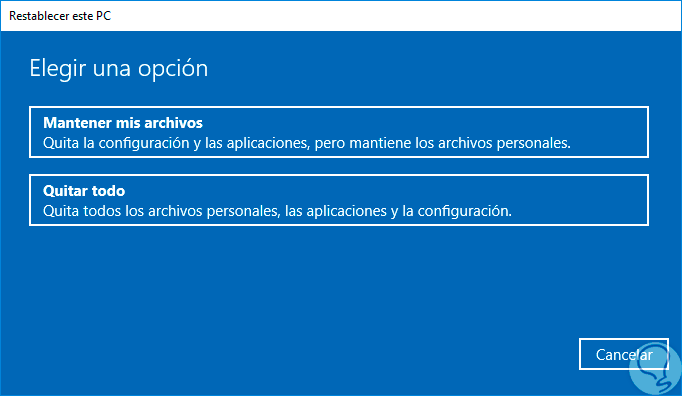
There we can keep our files or perform a clean installation of Windows 10.
9. Check the Windows 10 paging file
Windows operating systems make use of a paging file that fulfills the functions of virtual memory which allows access to certain files much faster and by default Windows 10 must clean this file when we turn off the system, deleting everything it contains this to ensure that no sensitive or personal data is stored in it.
As it is a default task, if this paging file is quite large this will undoubtedly affect the shutdown or restart speed of Windows 10.
Step 1
To check if Windows 10 is deleting this file we must go to the registry editor using the following keys and execute the regedit command.
+ R
regedit
Step 1
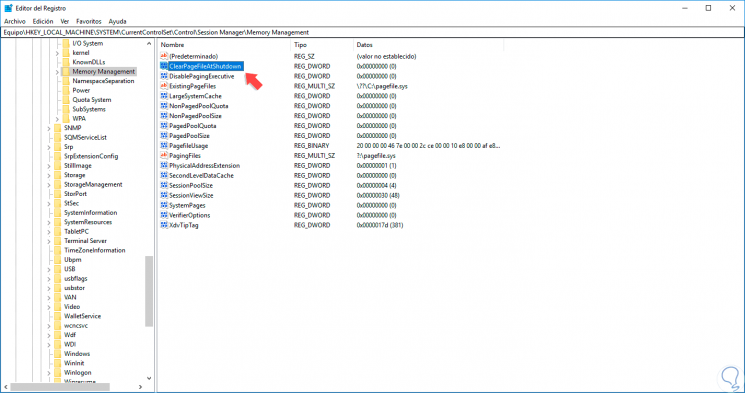
In the displayed window we will go to the following route:
HKEYLOCALMACHINE \ SYSTEM \ CurrentControlSet \ Control \ SessionManager \ Memory Management
Step 2
In this route we will check in the right panel the value called "ClearPageFileAtShutdown" and if its value is zero 0 it means that it is not being deleted and if it is 1 if the system is doing it when it is turned off:
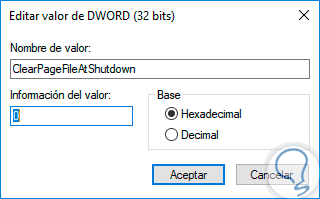
Step 3
If the value is one, just double click on this register and assign the number zero in the “Value information†field:
10. Check services that affect the shutdown or restart of the Windows 10 system
As mentioned earlier, there are processes and services in the system designed for each element to work ideally, but sometimes the opposite effect occurs.
Step 1
To see if any service is affecting the normal shutdown of Windows we must go to the event viewer and go to the following route:
- Application and service logs
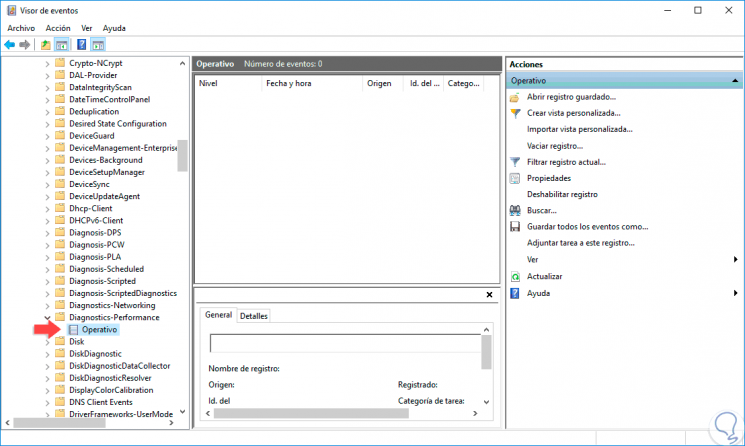
In this case no service affects the shutdown of Windows 10 but if so, there will be deployed and it will be necessary to locate, or filter, all services with ID 203 and there take the necessary administrative measures.
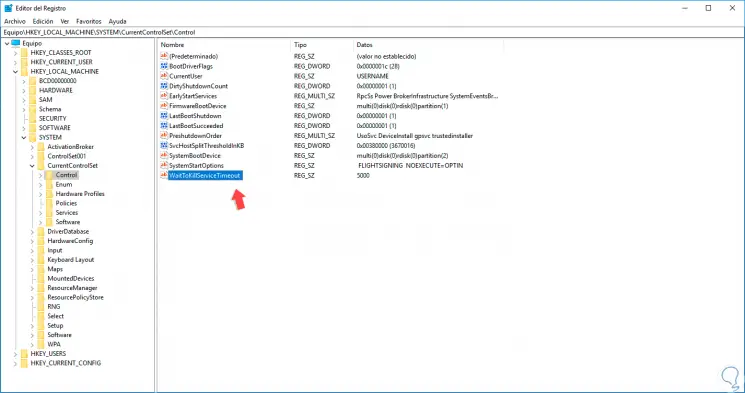
11. Check the WaitToKillServiceTimeout Windows 10 registry value
When we turn off Windows 10, it does not do so automatically, but sends a signal to all the applications and services that are running in the background and after this, wait for a while for them to conclude and store their data before forcing a shutdown and turn off the equipment correctly.
The time given by Windows 10 is 5 seconds by default and this value can be edited by some application or by ourselves without wanting to.
Step 1
To restore the default value of this record, we go back to the registry editor and go to the following route:
HKEYLOCALMACHINE \ SYSTEM \ CurrentControlSet \ Control
Step 2
There we will locate the “WaitToKillServiceTimeout†record and look at the “Data†column where its value should be 5,000:
In case of being older we can double click on it and set 5,000 as the new value. Click on Accept if we have made any changes.
Thus, we have seen multiple options to correct this type of problem and allow Windows 10 to shut down and be restarted correctly, which is what we all want as users of both the system and the computer.