+4 votes
400 views

Have you ever needed to record something of what happens on the screen of your Mac? It may have been for wanting to save a part of a video and share it with your friends and friends, or for wanting to teach someone how to do something specifically with the Mac, record a FaceTime call or stay with some strange behavior of the PC and share it with Technical support

Whatever the reason, you should know that it is possible to record the screen of your Mac, in addition, in a very simple way. In this article we will explain how to carry out this process.


in Mac by (550k points) | 400 views

2 Answers

+5 votes
Best answer

Record the screen in macOS Mojave
How to record your Mac screen with QuickTime
Record your Mac screen with ScreenFlow
Record your Mac screen with Camtasia
Record your Mac screen with Voila

Record the screen in macOS Mojave

Before we begin, we would like to mention that recording the screen of your Mac will be even easier when the new version of macOS Mojave arrives this autumn. 

Instead of using QuickTime (this is the method we explain below), you can use a specific tool that will appear on the toolbar.

  1. Open the screenshot tool by pressing the 'Cmd + Shift + 5' keys.
  2. Click on the 'Record entire screen' or 'Record selected part' button.
  3. If you choose the first option, the recording of everything that happens on your screen will start immediately, if you choose the second one, the recording will start once you have selected the part of the screen you want to record.
  4. You can choose to set a specific recording time (5 or 10 seconds) before starting the recording. To do this you will have to open the 'options' section.
  5. Click on the 'stop' button to stop recording.
  6. The recording will appear in the lower right corner of the screen. Make 'control + click' or right-click on the recording icon to open the MarkUp tools and be able to edit your video in case you need it.

This will be the process that you will have to follow to record the screen of your Mac when the macOS Mojave version arrives (probably in October 2018).

Now, while you wait, if you need to record the screen of your Mac you will have to follow some of the methods that we propose below.

How to record your Mac screen with QuickTime

As you probably know, the QuickTime tool is factory installed with your Mac computer. To record your Mac screen with it, follow these steps:

  1. Open QuickTime Player. To locate the app press 'Cmd + space' and type the name of the application in the search bar.
  2. Select the 'new screen recording' option. The easiest way is to right-click on the QuickTime Player icon in the Dock and choose this option from the options that will appear.

  3. A small window with buttons for recording will appear.
  4. Click the arrow next to the red circular icon to see more options, such as choosing whether you want to use the monitor's microphone or an external one for audio recording.

  5. For example, you might want to use your iPhone's headphones to record yourself speaking. In that case, connect your iPhone's headphones to the Mac and choose the 'external microphone' option.
  6. There is also an option to choose if you want your mouse clicks to appear during the screen recording process or not.
  7. When you have chosen all the options and are ready to start recording, you can choose to record part of the screen or the entire screen. Click on the red circular record button, and once the area of ​​the screen you wish to record is selected, click on 'start recording'.
  8. When you want to end the recording, right-click on the QuickTime icon and choose the option to 'end the recording'.

Record your Mac screen with ScreenFlow

Create tutorial videos for YouTube by recording what happens on your Mac's screen next to the recording of your voice explaining what you are doing.

These videos can then be shared with friends and followers since the same tool allows you to edit the recording.

You can download this app from the App Store by clicking on this link .

Record your Mac screen with Camtasia

Camtasia for Mac is a very complete option that also has numerous video editing tools that will allow you to record the screen of your Mac.

In addition to capturing everything that happens on your screen, you can record yourself using the Mac's camera.

If you use this program, you will not have to resort to third parties to make your video project from beginning to end.

To download Camtasia in iTunes click on this link.

Record your Mac screen with Voila

Voila is another third-party application that will allow you to make screenshots and screen recordings of your Mac. You can record the entire screen or a small part that you select yourself.

Unlike other programs, Voila can record stereo audio and offers you a frame rate option. You can make simple clippings of videos with the editing tools of this program, in addition to other simple functions.

If you want to download Voila on Mac, you can click on this link .


by (550k points)
+3 votes

Record your Mac screen with audio
MacOS screen recorder
Quicktime Player

Record your Mac screen with audio

MacOS screen recorder

In MacOS Mojave a function was included that allows you to record videos from your screen and make “screenshots” with the MacOS screen capture tool.

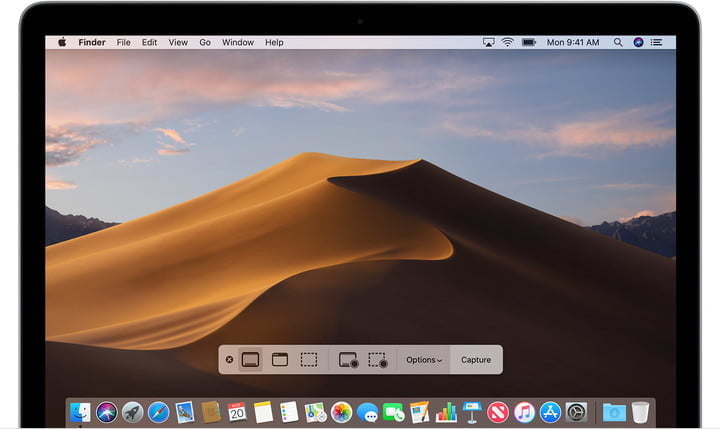
Step 1 : Press Command + Shift + 5 to bring up the screen capture toolbar.

Step 2 : decide if you want to record the entire screen or only a part of it, and then click on the corresponding button. If you choose the latter, you must select which part you want to record. Otherwise, recording will begin immediately.

Step 3 : When you have recorded everything you wanted, click the Stop button to stop recording.

Step 4 : As part of this version of MacOS, when a screenshot or recording is taken, a thumbnail appears in the lower right corner of the screen. Click on it and choose a location to save it.

Quicktime Player

If you are running an earlier version of MacOS, you can always use the QuickTime Player for basic screen recording (as well as audio recording). QuickTime recordings are not easy to edit in publications, but if you want a quick and easy method of recording on MacOS, it is one of the simplest.

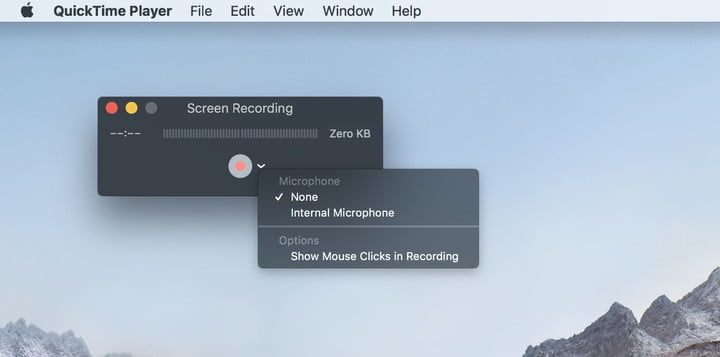
Step 1: Start QuickTime.

Step 2: Select “File” and choose “New screen recording” .

Step 3: To decide whether clicks and mouse sounds appear in your recording or not, click on the small white arrow and select the appropriate options from the drop-down menu.

Step 4: When ready, click on the red record button.

Step 5: You must select what you want to record. To record the entire screen, click once anywhere. To record only one part, click and drag a box and then click "Start recording . "

Step 6: When finished, navigate to the menu bar and click on the stop recording button designated by the square symbol. Alternatively, if you have one, touch the appropriate symbol on your Touch Bar .

Step 7: To save your recording, click on “File” , then “Save” and choose an appropriate save location and the name of the recording.


by (550k points)

Related questions

+4 votes
1 answer
asked Oct 31, 2019 in Mac by backtothefuture (550k points) | 202 views
+4 votes
1 answer
asked Aug 7, 2020 in Mac by backtothefuture (550k points) | 691 views
+5 votes
1 answer
asked Oct 24, 2019 in Mac by backtothefuture (550k points) | 196 views
+4 votes
1 answer
+5 votes
1 answer
asked Nov 19, 2021 in Guides by backtothefuture (550k points) | 84 views
Sponsored articles cost $40 per post. You can contact us via Feedback
10,627 questions
10,759 answers
510 comments
3 users