Windows 10 has been developed in such a way that it allows the end user to have management alternatives in case of system errors . Because the system is made up of so many processes , Microsoft has developed certain files where the data or the relevant information of the failure is stored. This is the case for memory dump files ..
A dump file is simply a snapshot in which the process we were working on at the time of the error is displayed, as well as the modules that were loaded for an application. This memory dump includes by default a memory snapshot of the application used at the time of failure for a more comprehensive recovery.
There are some types of memory dumps such as:
Full memory dump
It records all the memory content of Windows 10 until the moment the computer suddenly stops.
Core memory dump
It only registers the core memory, this allows speeding up the recording process in the registry at the time of equipment failure.
Small memory dump
It records only some information that is useful in identifying the reason for the equipment failure.
Now, these files are created in order to give the administrator better ideas when working on the error, especially for BSOD ( blue screen ) errors . The bad thing is that the accumulation of these files implies an unnecessary use of space on the hard disk that can affect other more critical processes. That is why there are different methods to delete these files in Windows 10 and with TechnoWikis you will learn each of them comprehensively..
1. Delete memory dump files
Tools for managing the hard disk have been integrated into the Windows 10 File Explorer, the drive cleaner being one of them.
Step 1
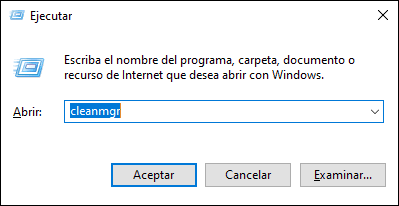
For this method we will use the Windows + R keys and execute the following command:
+ R
cleanmgr
Step 2
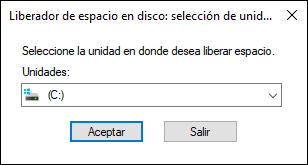
Press Enter and then select drive C:
Step 3
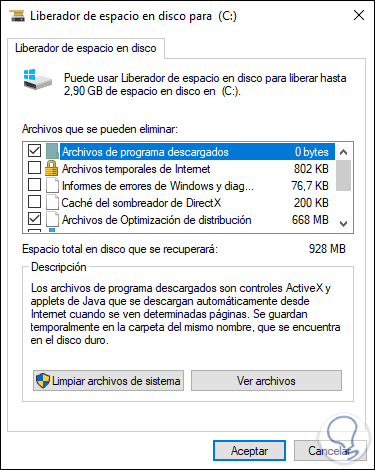
We click OK and the following will be displayed:
Step 4
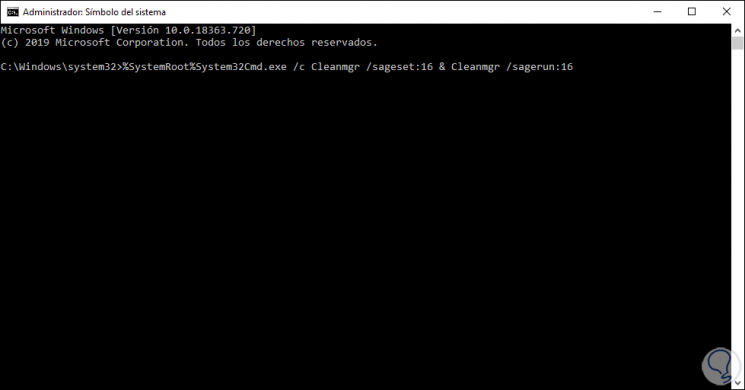
There we must look for the option "Memory dump files", select the box and click OK to delete its content, in many computers this option is not visible, if this is your case, we must access the command prompt as administrators and there execute the following command:
% SystemRoot% System32Cmd.exe / c Cleanmgr / sageset: 16 & Cleanmgr / sagerun: 16
Step 5
Press Enter and we will proceed with the opening of said option:

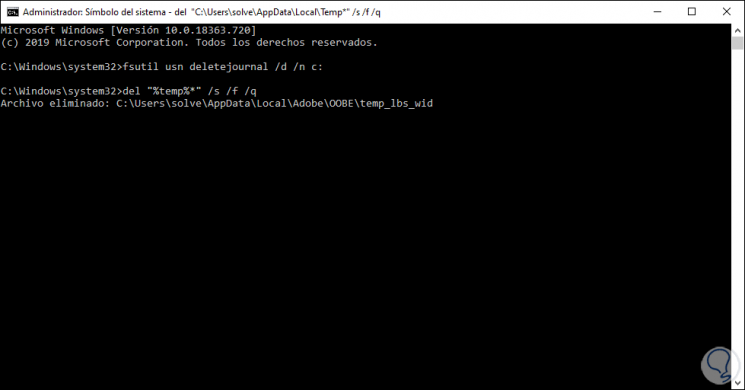
2. Delete Windows 10 memory dump files from command prompt
We have the opportunity to delete these files directly from the command prompt console. For this we access the command prompt console as administrators and there we execute each of the following commands in their order:
fsutil usn deletejournal / d / nc: of “% temp% *” / s / f / q del "C: $ Recycle.bin *" / s / f / q from “% systemroot% temp *” / s / f / q vssadmin delete shadows / for = c: / all / quiet Dism / Online / Cleanup-Image / StartComponentCleanup / ResetBase
3. Disable the creation of Windows 10 memory dump files
This is an option with which it is possible to completely eliminate the process of creating these files, but it should only be done if the disk space is really critical. Remember that this is an administration function for support tasks in system errors.
Step 1
If we want to disable the creation of these files we will go to the following path:
Step 2
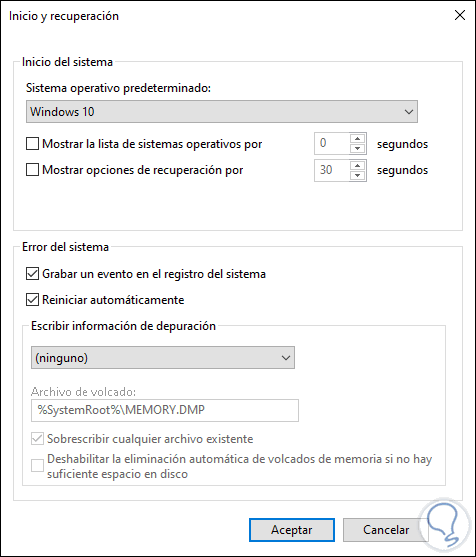
We click on the line "Advanced system settings" and in the displayed window we go to the "Advanced options" tab and there we click on the "Settings" button in the "Start and recovery" field:

Step 3
In the displayed window we select the option “none” in the field “Write debugging information”. We click OK to complete the process.
We see how these files are key for error correction, but on a computer with limited hardware it can be a problem, based on your needs, you determine whether or not to delete these files with the steps that TechnoWikis has explained to you.