It is natural that our Windows 10 Operating System may present some type of error during its daily execution due to certain software, service or process errors . We must keep in mind that this is normal since with the frequent updates that are released from Windows 10, certain points to correct are still in the air which will be solved or improved with the cumulative updates that Microsoft releases frequently through Windows Update
Now the issue is that when our Operating System has an error, we cannot wait for an update to be released since they can be critical errors that require a quick solution..
For this type of situation, Microsoft has developed two complete utilities that are in charge of analyzing in detail the system in order to detect anomalies or errors that directly influence its behavior. TechnoWikis will thoroughly explain these two utilities which are DISM and SFC .
Note
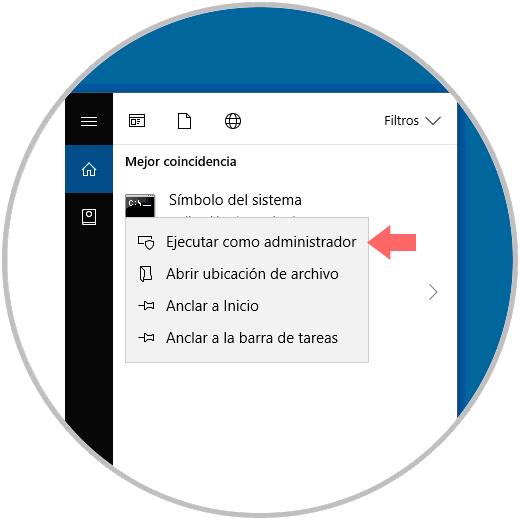
To execute one of these two commands correctly, it is required that we access the terminal as administrators, for this we go to the Windows search box and there we enter the term “cmdâ€, right click on it and select the option “Run as administrator":
To keep up, remember to subscribe to our YouTube channel! SUBSCRIBE
1. Repair defective system files with the DISM Windows 10 command
What is DISM?
DISM.exe (Deployment Image Servicing and Management), is a command created by Microsoft by which a Windows image file (.wim) or a virtual hard disk (.vhd or .vhdx) is mounted in order to take Make your repair. Alternatively, the DISM image management command gives us the possibility to carry out additional tasks such as:
- List each index number of the current Windows image
- Verify the architecture of the image being mounted
- Add one more image for analysis
Thus, once the process of updating the image has been completed, it must be disassembled and the changes that have been applied in the system to complete the process must be confirmed or discarded.
Step 1
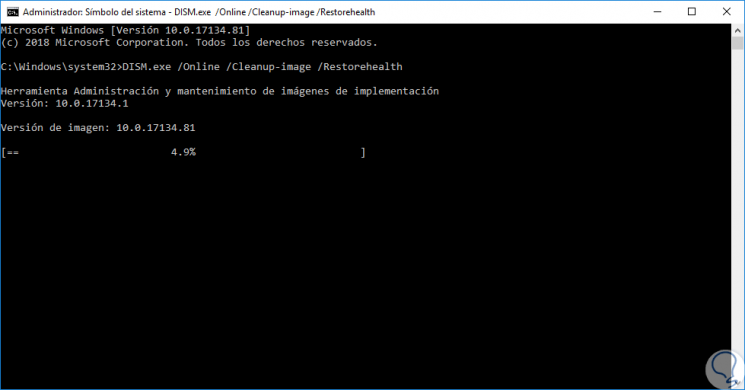
We have seen everything that DISM can give us in administrative tasks, now, we will execute the following line to analyze and repair, if necessary, the Windows 10 files:
DISM.exe / Online / Cleanup-image / Restorehealth
Step 2
Together with this command we can use the following orders:
DISM parameters
The parameters used are:
- / Online: This parameter specifies that the action must be carried out in the Operating System that is currently being executed, / Online This option cannot be used with the / Image or / WinDir option, at the time of its execution the Windows directory for the Online image is automatically detected.
- / Cleanup-Image: Performs cleaning or recovery operations on the current Windows image.
- / RestoreHealth: Its function is to scan the image in order to detect damage to the component store and, if any, perform repair operations automatically. This operation will take several minutes.
Step 3
When executing this line we will see that the process of analyzing the current image of Windows 10 begins:
Step 4
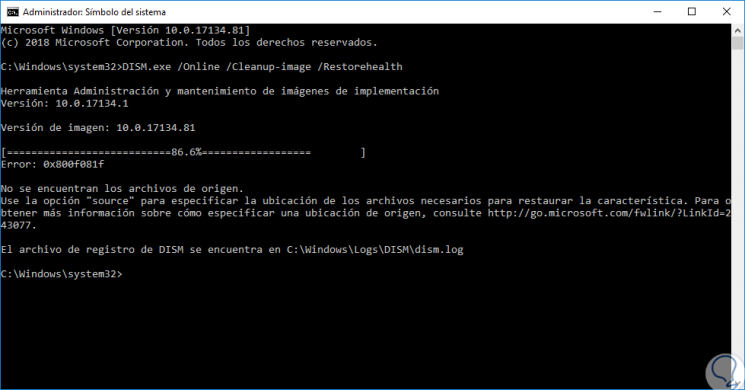
Once this process is finished the following will be displayed:
Note
Something important to keep in mind is that when this command is executed, DISM uses Windows Update to give the necessary files to correct the existing damage to the image, but, if the Windows Update client is not already functioning correctly, it will be necessary to resort to a running Windows installation as a repair source or take a folder from a network share or a removable media, such as the Windows 10 bootable USB DVD for them to act as the source of the files. If this is the case, we must execute the following command:
DISM.exe / Online / Cleanup-Image / RestoreHealth / Source: C: \ RepairSource \ Windows / LimitAccess
The "C: \ RepairSource \ Windows" field must be replaced with the correct path based on the letter assigned by the system to the boot drive. In this way DISM is a complete and comprehensive solution for the analysis of Windows 10 images.
2. Repair defective system files with the SFC Windows 10 command
What is CFS
SFC (System File Checker), is a command-line tool developed by Microsoft which gives us the possibility to search for damaged Windows system files and restore them to optimize their use again.
It is normal for any WRP (Windows Resource Protection) file to be missing or damaged, which results in the Windows Operating System exhibiting strange behavior which implies that some Windows functions do not work or that Windows is constantly locked..
Step 1
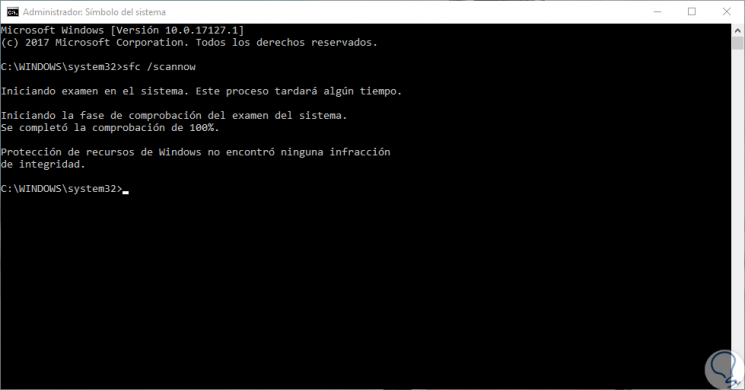
Once the DISM process is complete, we will execute SFC using the following command:
sfc / scannow
Step 2
The sfc / scannow command will take care of examining all protected system files and replacing damaged files by using a cached copy located in a compressed folder in% WinDir% \ System32 \ dllcache.
Once the SFC process is complete we will be able to see one of the following messages.
- Windows Resource Protection did not find any integrity violation: This message refers to no system file that is damaged or missing as such.
- Windows resource protection could not perform the requested operation: to solve this runtime error, it will be necessary to run the system file checker in safe mode and validate that the PendingDeletes and PendingRenames folders are available within% WinDir% \ WinSxS \ Tem.
- Windows Resource Protection found damaged files and repaired them correctly: This message indicates that SFC detected errors and corrected them, their results are created in a CBS.Log file in the path% WinDir% \ Logs \ CBS \ CBS.log.
- Windows Resource Protection found damaged files, but could not correct some of them: Like the previous point, the results are hosted in the CBS.Log file to analyze which elements could not be corrected.
Step 3
In case it is necessary to access the contents of the CSB.Log file we go to the command prompt console as administrators and there we execute the following line. This Sfcdetails.txt file contains details that are updated every time the SFC tool is run on the computer. This file includes information about the files that the System File Checker tool could not repair and there we can validate the date and time entries in order to determine the wrong files of the system files.
findstr / c: "[SR]"% windir% \ Logs \ CBS \ CBS.log> "% userprofile% \ Desktop \ sfcdetails.txt"
3. Other administration options for the DISM command
Although in this tutorial we will work on a special parameter, DISM offers us a series of useful alternatives for managing Windows images which are useful for various administration and support tasks, these options to use are:
/ Append-Image
This parameter is responsible for adding an additional image to a .wim file, the / Append-Image parameter is responsible for comparing new files against resources in the existing .wim file which will be specified under the / ImageFile argument, and After this, only one copy of each single file is saved so that each file is only captured once.
The .wim file can only have one type of compression assigned so it will only be possible to add files with the same type of compression. The general syntax of this parameter is:
DISM.exe / Append-Image / ImageFile: <image_file_path> / CaptureDir: <source_directory> / Name: <image_name> [/ Description: <image_description>] [/ ConfigFile: <File.ini>] [/ Bootable] / WIMBoot [ / CheckIntegrity] [/ Verify] [/ NoRpFix
The added parameters are:
- / WIMBoot: This is used to add the image using the boot configuration of the Windows image file (WIMBoot).
- / ConfigFile: specifies the location of a configuration file which lists exclusions for image capture and compresses commands.
- / Bootable: Mark a volume image as a boot image, this option is only available only for images of the Windows preinstallation environment (WinPE).
- / CheckIntegrity: its function is to detect and analyze the corruption of the .wim file when it is used with capture, disassembly, export and confirmation operations, so that / CheckIntegrity stops the operation in case DISM detects that the .wim file is damaged when during the application and assembly process.
- / Verify: It has the function of verifying errors and duplication of files.
- / NoRpFix: Disables the correction of the reanalysis point label.
An example to use would be the following:
Dism / Append-Image /ImageFile:install.wim / CaptureDir: E: \ / Name: Drive-E
/ Apply-FFU
This command is responsible for applying a Full Flash utility (FFU) or split FFU (SFU) to a physical drive that we have specified. The syntax to use is as follows:
/ Apply-Ffu / ImageFile: <Image file path> / ApplyDrive: <Physical path> [/ SFUFile: <pattern>]
The parameters used are:
- / ImageFile: Indicates the path and name of the FFU image file that will be applied
- / ApplyDrive: Refers to the physical drive path that will be displayed
- / SFUfile <pattern>; It is an optional function, it applies to split FFUs that are captured without compression.
An example of use is:
DISM.exe / Apply-Ffu /ImageFile:flash.ffu /ApplyDrive:\\.\PhysicalDrive0
/ Apply-Image
For WIM image files, this command applies a Windows image file (.wim) or a split Windows image (.swm) to a selected partition, since Windows 10, version 1607, DISM can apply and capture extended attributes ( EA) and this parameter does not support the application of an image from a virtual hard disk (VHD). The general syntax of use is:
DISM.exe / Apply-Image / ImageFile: <image_path> [/ SWMFile: <pattern>] / ApplyDir: <objective_directory> {/ Index: <image_index> | / Name: <Image_name>} [/ CheckIntegrity] [/ Verify] [/ NoRpFix] [/ ConfirmTrustedFile] [/ WIMBoot (deprecated)] [/ Compact] [/ EA] Most of the parameters have been mentioned in the first option, but some additional ones are:
- / SWMFile: Allows us to refer to the .wim files that are divided (SWM), indicates the names and location of the divided files.
- / ConfirmTrustedFile: Its function is to validate the Trusted Desktop image in Windows 10.
- / Compact Applies: It is responsible for applying an image in compact mode, which results in a saving of hard disk space, this option replaces WIMBoot and can only be run on Windows 10 with desktop editions (Home, Pro, Enterprise and Education).
- / EA: Apply extended attributes
An example of use would be:
Dism / apply-image /imagefile:install.wim / index: 1 / ApplyDir: D: \
Other DIS parameters
Similarly, we have other additional parameters such as:
- / Capture-Image: It is responsible for capturing an image of a drive to a new .wim file, the captured directories include all subfolders and data.
- / Cleanup-Mountpoints: Its mission is to eliminate all resources associated with a mounted image which has been damaged, using this command will not disassemble the images already mounted, nor will the images that can be recovered using the / Remount command be deleted. -Image
- / Commit-Image: It is responsible for applying the changes we have made to the mounted image.
- / Delete-Image: As the name implies, this parameter removes the specified volume image from a .wim file which has multiple volume images, with this option only metadata entries and XML entries are deleted.
- / Export-Image: Exports a copy of a specific image to another file, but the source and destination files must have the same type of compression.
- / Get-ImageInfo: It has the task of displaying information about the images that are contained in a .wim, .ffu, .vhd or .vhdx file for a better management of them.
- / Get-MountedImageInfo: It returns a list of the images.ffu, .vhd, .vhdx and .wim that are currently mounted, with details such as information about the mounted image, if the image is valid, its permissions to read / writing, mounting location, mounted file path and more.
- / Get-WIMBootEntry: This parameter shows the WIMBoot configuration entries for the defined disk volume.
- / List-Image: Displays a list of files and folders in a specific image in Windows 10.
- / Mount-Image: You are able to mount an image of a .ffu, .wim, .vhd or .vhdx file in the defined directory so that it is always available for system maintenance.
- / Optimize-Image / WIMBoot: Make specified settings to an offline image to optimize its use.
- / Unmount-Image: Dismantle the .ffu, .wim, .vhd or .vhdx file and launch a message to confirm or discard the changes that were made during the image assembly process.
In this way, DISM and SFC are two valuable tools integrated in Windows with which it will be possible to analyze and monitor the status of the Operating System files and thus validate their integrity and behavior at a general level so as not to give rise to errors.