Currently we can see how developers of both operating systems and applications launch new products, or updates of current ones, always seeking to optimize the use, compatibility, security and performance of these. In this way, resources at the hardware and software level are increasingly demanding and in view of the fact that we do not always have enough resources to manage and use these new products. We can use one of the most innovative and practical technologies to test any operating system or application without the need to invest large amounts of money in powerful equipment and this technology is virtualization..
Advantages of virtualization
Thanks to virtualization we are able to implement the vast majority of known operating systems which gives us advantages such as:
- Know in advance the behavior of a new implementation before it happens to be in a productive environment.
- Know your environment and global performance.
- Validate compatibility with applications and programs.
- Possibility of creating network structures to define and evaluate certain behaviors and much more.
One of the most important advantages of virtualization is that it does not require equipment with large hardware resources, although TechnoWikis recommends having good RAM, hard drives and CPU so that the performance of the virtual machine is adequate.
One of the most widely used virtualization platforms is VMware, which is available in the Player and Pro versions, the latter being one of the most versatile due to its integrated functions levels since VMware Workstation 15 Pro is able to improve the hypervisor desktop through a user interface with high values ​​of PPP, a new API of type REST, and offers compatibility with the latest Windows and Linux operating systems..
Systems supported by VMware
VMware can support the following guest operating systems:
Now, VMware in its most current version, 15, can be installed in the following operating systems:
- Red Hat Enterprise Linux 6 0 higher
- Oracle Linux 6.0 or higher
- openSUSE Leap 42.2 or higher
General characteristics of VMware
At the level of general characteristics of use of VMware we find:
- Possibility of creating large virtual machines with technical details such as 16 CPU, 64 GB of RAM, 3 GB of VRAM and more.
- Creation of new virtual machines in a few steps.
- Compatible with more than 200 guest operating systems.
- Massive implementation of virtual machines.
- Running virtual machines using different view modes as needed
- Use of 3D graphics compatible with DX10 and OpenGL 3.3
- Ability to share files between hosts and guests
- Compatibility with 4K screens
- Compatible with smart USB card readers and USB 3.0 devices
- Execution of encrypted virtual machines
- Compatibility with UEFI start
Download VMware
VMware offers us the possibility to download VMware Workstation Player 15 for free at the following link. There it will be possible to download VMware for Windows or Linux.
VMware Workstation Player 15
When using VMware Workstation Player 15 we will be able to isolate corporate desktops, this if we implement it as system administrators. From the BYO devices to deactivate the functions of copy and paste, access to the USB devices and drag and drop, shared folders, it will also be possible to run restricted virtual machines which will be encrypted and protected with a password, this allows only the users with the Due permissions may access corporate data.
One of the operating systems compatible with VMware is the new Windows Server 2019 which has the 1809 version and has been developed by Microsoft with new and improved performance, security and scalability functions..
What it is and how to download Windows Server 2019
Windows Server 2019 is a version of the Long Term Service Channel (LTSC) which includes the desktop experience in order to more centrally manage all the objects that we manage in the organization.
Windows Server 2019 can be downloaded for free at the following link:
Windows Server 2019
Features Windows Server 2019
Within the new and improved functions, roles and features of Windows Server 2019 we find:
- Improvements in the desktop experience
- Integration of System Insights which is one of the new features in Windows Server 2019 and its function is to provide local predictive analytics capabilities natively to the Windows Server operating system.
- Compatibility of the Server Core application on demand, also known as on-demand anointing (FOD) of Server Core App Compatibility, which improves the compatibility of the application by having the Windows Server Core installation option in turn integrating a subset of binaries and Windows Server components in the desktop experience.
- New Advanced Protection against Threats feature in Windows Defender (ATP) (Windows Defender Advanced Threat Protection) which seeks to avoid attacks at the kernel and memory level through the elimination or non-execution of malicious files, as well as the termination of processes malicious detected.
- Security through software defined networks (SDN) which improves the execution of workloads in all types of use environments.
- HTTP / 2 integration for faster and safer web browsing.
- Improvements at the level of armored virtual machines which in turn are reflected in improvements in troubleshooting, better Linux support and more.
- Improvements in the storage migration service.
- Windows Admin Center support.
- Reduplication and compression for ReFS volumes.
- Migration of clusters between domains.
- Cluster infrastructure improvements.
- The failover cluster no longer uses NTLM authentication.
- Kubernetes support and much more.
Now we will learn to install Windows Server 2019 in VMware Player 15.
1. Create and configure Windows Server 2019 virtual machine
Step 1
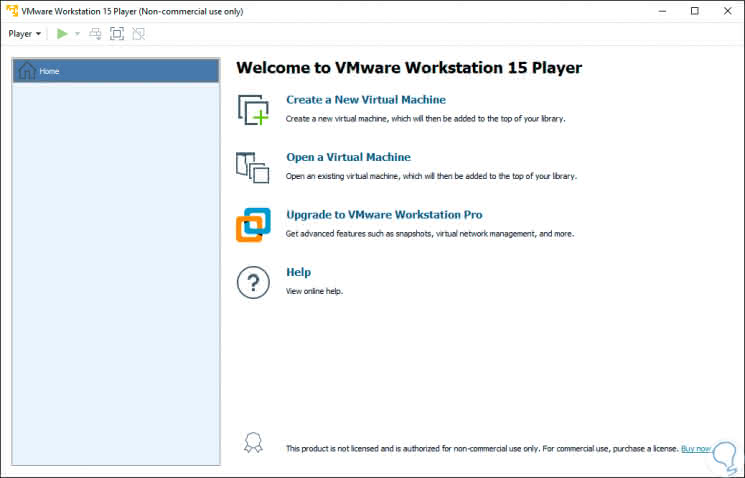
Once we have downloaded and installed VMware 15, we proceed to its execution and the following window will be displayed:
Step 2
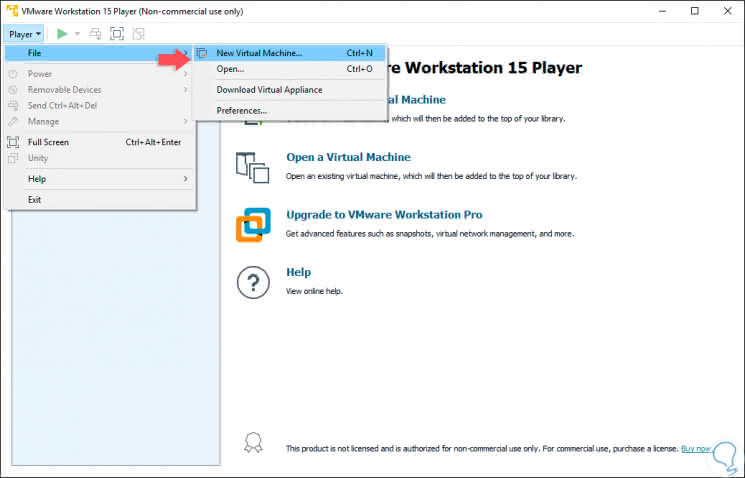
To create our Windows Server 2019 virtual machine we have the following options:
- Click on the "Create a New Virtual Machine" line in the center panel.
- Click on the "Player / File / New Virtual Machine" menu.
- Use the key combination Ctrl + N.
Step 3
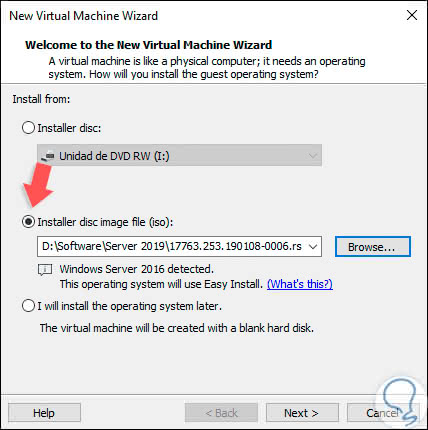
The following window will be displayed where we will activate the "Installer disc image file (iso)" box and proceed to go to the path where we have downloaded the ISO image of Windows Server 2019:
Step 4
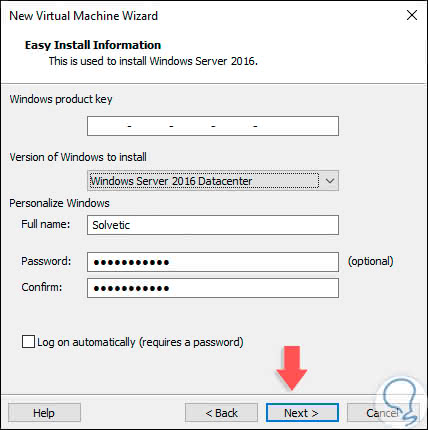
To be taken into account, although it is 2019, VMware Workstation Player recognizes it as 2016. We click on Next and in the following window it will be possible to enter the system password (if we have one) as well as user name and password:
Step 5
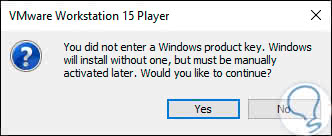
In the case of not entering any password, the following message will be displayed:
Step 6
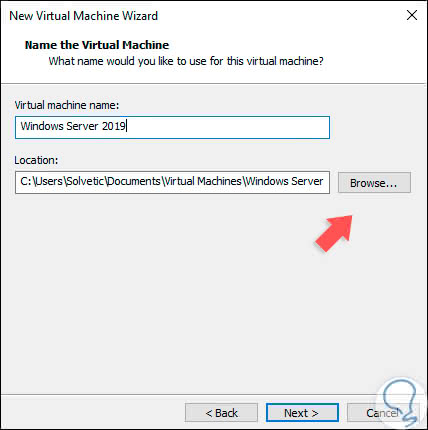
We click on Yes and in the next window we will assign the name to the virtual machine, as well as its location on the hard disk:
Step 7
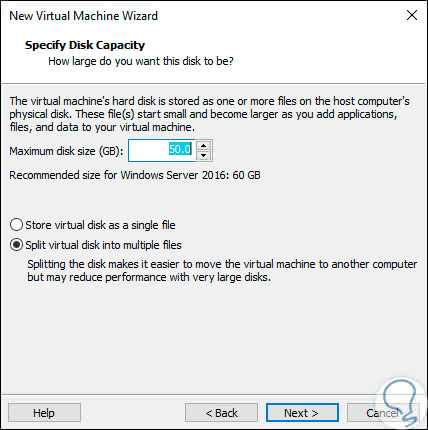
By clicking on Next we can configure the size that will be assigned to the Windows Server 2019 virtual hard disk as well as define the type of storage it will have:
Step 8
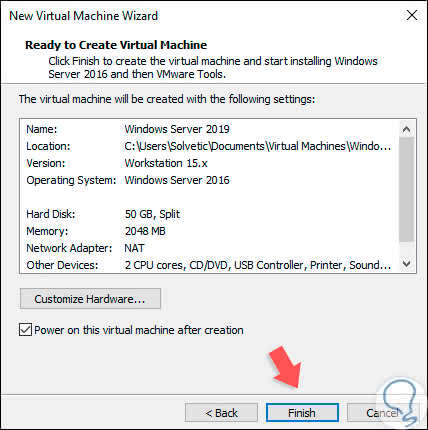
We click Next and we will see a summary of the machine to be created:

Login Join up!