Each of us awaits the launch of a new operating system , because we know that it brings new features, security improvements , compatibility and performance. However, we must be very aware that with the launch of a new system, TechnoWikis recommends that you test this system in a virtual environment before it is installed in a real environment. This helps to avoid numerous problems which we can solve in a virtual machine and it is better than having to correct failures in a real equipment since although before launching a system the necessary tests are carried out, it is normal that something could fail..
Linux Mint has announced its Linux Mint 20 edition "Ulyana" which is supported until 2025 and has updated software focused on users feeling a new user experience.
Linux Mint 20 is available for download at the following link:
Linux Mint 20
News
To learn a little more about what we will see in Linux Mint 20, TechnoWikis brings you some of its news:
- XAppStatusIcon can handle scroll events with the mouse wheel
- Warpinator has been added with which it will be possible to share files over the local network
- Improved support for NVIDIA Optimus
- Gdebi with which we can install .deb files has been updated with a new user interface
- Linux-firmware 1.187 and Linux kernel 5.4 integration
- Apturl has updated the Synaptic backend to Aptdaemon
- Login screen now supports multi-monitor backgrounds
- Snapd has been disabled by default and when using APT packages they will not be able to install it
- Grub boot menu will always be visible in Mint 20
To virtualize our Linux Mint 20 system we have one of the best options such as VirtualBox which we can download at the following link:
VirtualBox
VirtualBox is available to support the installation of different operating systems and thanks to its Guest Additions it will be possible to allow greater interaction between the physical and virtual equipment. Next we will see how to install Linux Mint 20 in VirtualBox..
1. How to create Linux Mint 20 virtual machine in VirtualBox
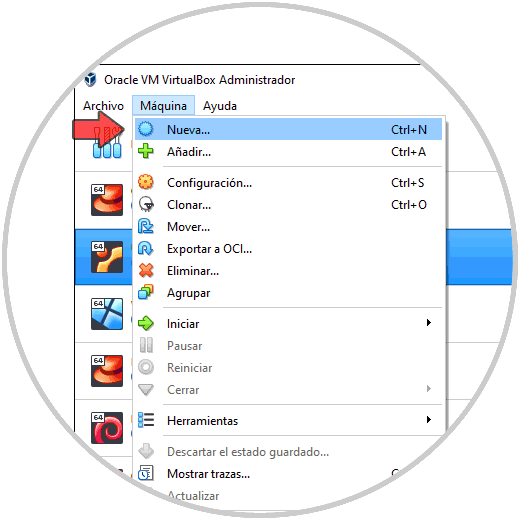
Step 1
The first step will be to access VirtualBox and create the virtual machine using one of the following options:
- Using the key combination Ctrl + N
- Accessing the Machine - New menu
- Clicking the New button in the central panel
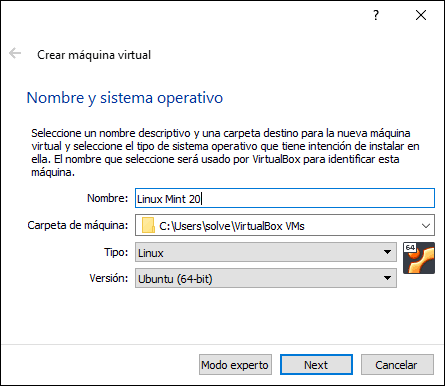
Step 2
The following wizard will open where we define:
- Name of the virtual machine to create
- Location of the virtual machine on the local disk
- Type of operating system to use, in this case we select Linux
- System version to use, we select Ubuntu (64-bit) since Mint is based on this system
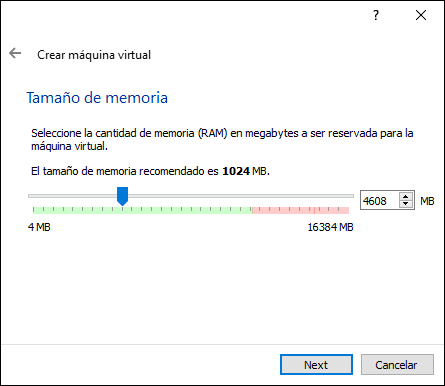
Step 3
We click Next and assign the amount of RAM to the virtual machine:
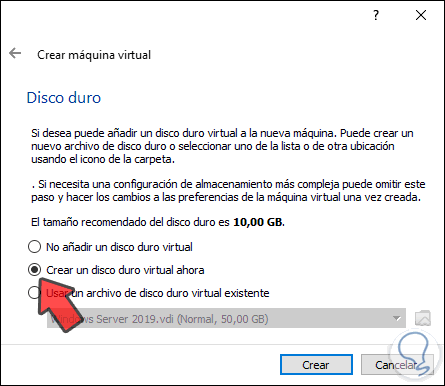
Step 4
In the following we adjust the values of the hard disk, the options to use are:
- Do not add a virtual hard disk: if we check this box it will be possible to add the hard disk before running the virtual machine from the Configuration
- Create a virtual hard disk now: it is the default option and allows you to create a hard disk where its size is defined based on the selected operating system, Linux systems use a 10 GB disk as the base
- Use an existing virtual hard disk file: thanks to this option it is possible to use a disk in VHD or VDI or VMDK format which must be mounted on the Linux Mint 20 virtual machine
We leave the default option:
Step 5
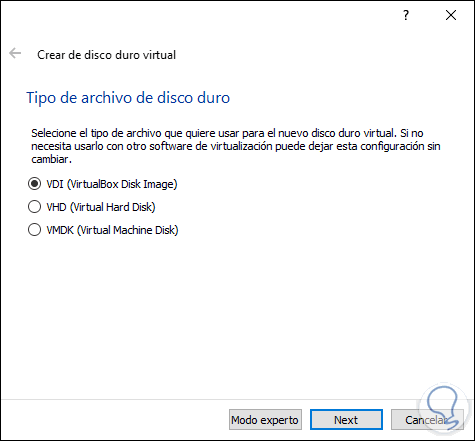
We click on "Create" and define the type of hard disk to create:
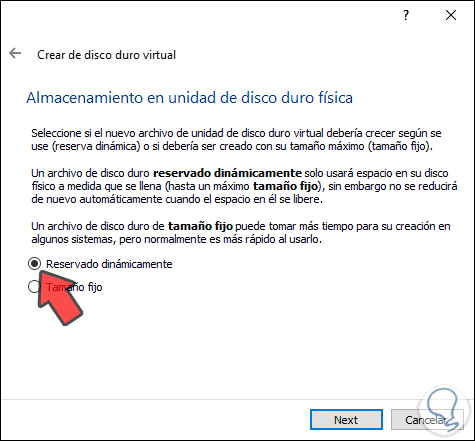
Step 6
These can be used based on the virtualization system to use, after this we click Next and we will establish the storage format, it is possible to use:
- Dynamically reserved: this option allows the space on the physical hard disk to be filled as we save data on it, once the data is deleted this space is not recovered
- Fixed size: it allows to limit the use of data up to the size that we define in the following window
Step 7
We click Next and define:
- The place where the virtual hard disk will be saved
- Hard drive size to allocate
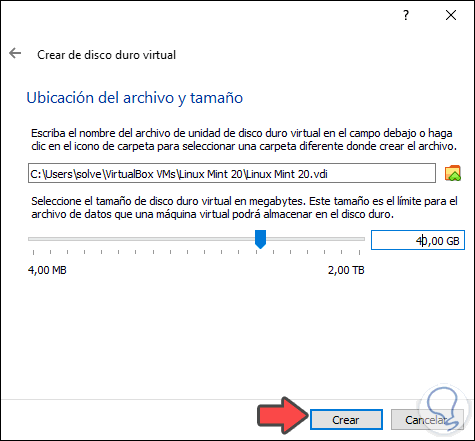
Step 8
We click "Create" to complete the process:
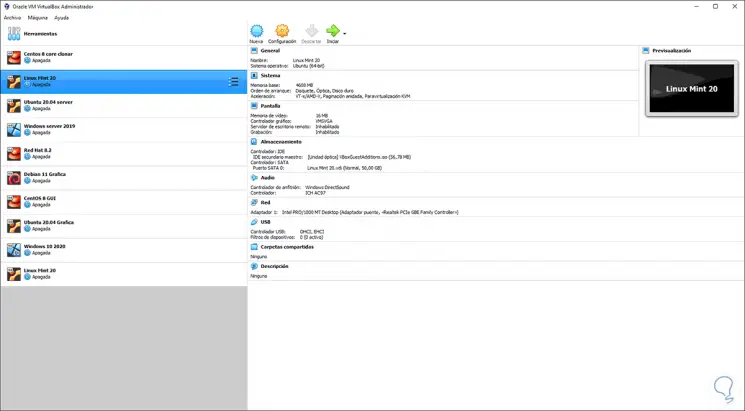
2. How to configure Linux Mint 20 virtual machine
It is time to make some basic adjustments in the virtual machine, one of the most important is the network adjustment which allows the virtual machine to have access to the Internet.
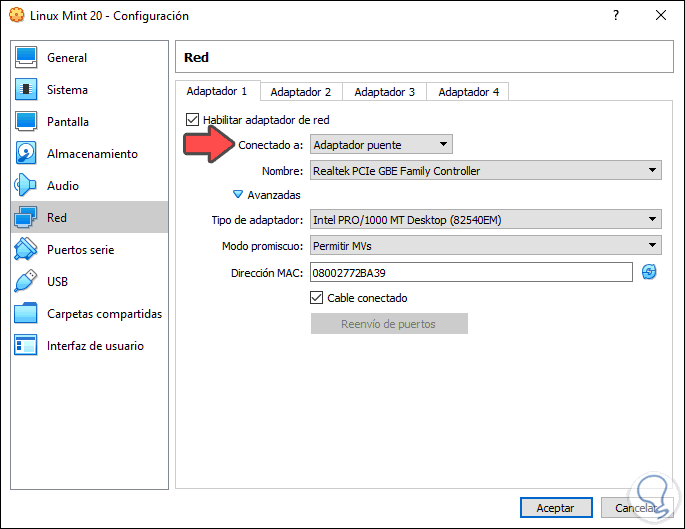
Step 1
For this we will click on the "Configuration" button and go to the "Network" section, in the "Connected to" field we will establish the physical network adapter:
Step 2
We can go to the "System" section and make some extra adjustments there, such as increasing RAM memory or adding virtual processors:
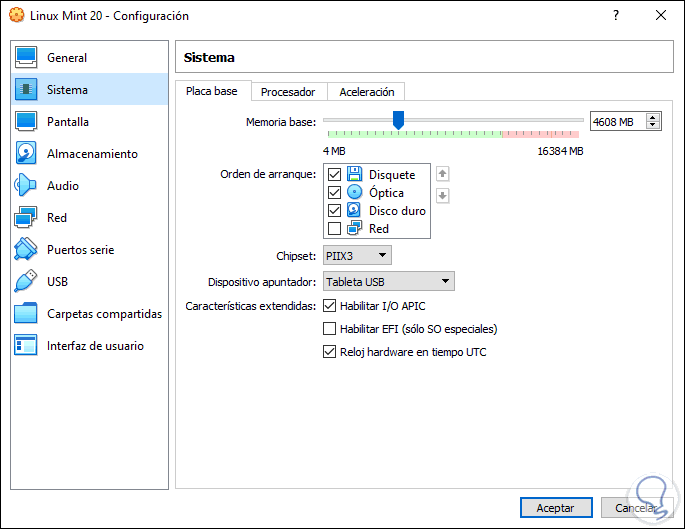
The other values are optional and can be adjusted based on the measurements of each one.
We click OK to save the changes.
3. How to run the Linux Mint 20 virtual machine in VirtualBox
Step 1
We click on the "Start" button and we will see the following:
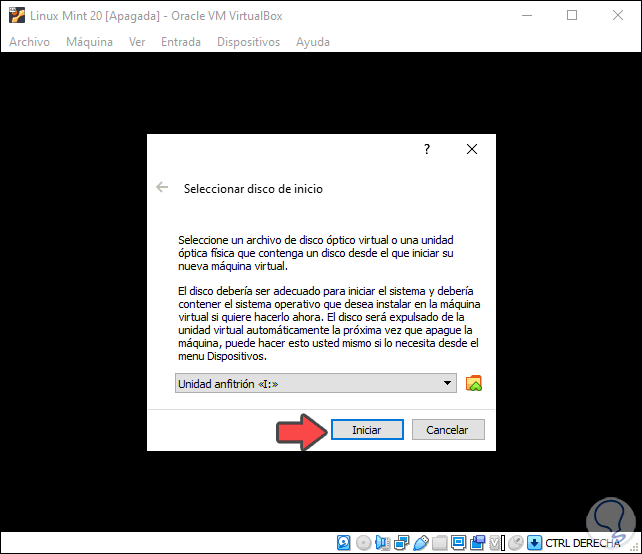
Step 2
There we click on the folder icon and we will see the following. We click on "Add"
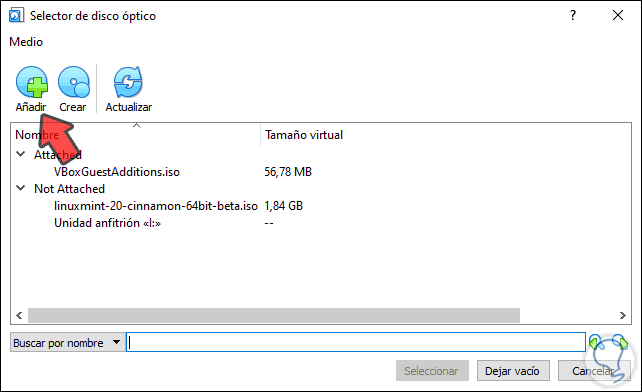
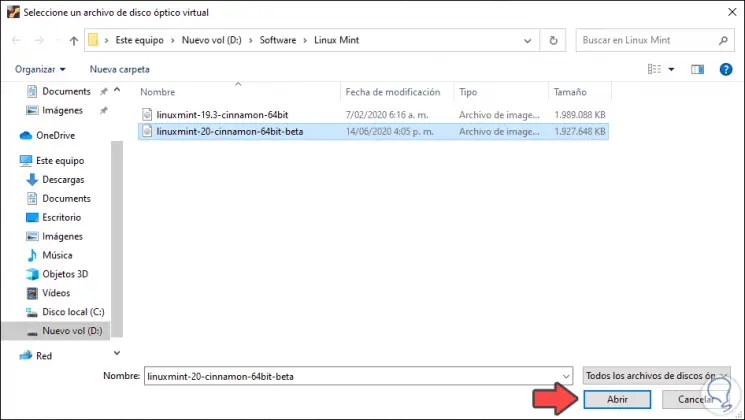
Step 3
And we will go to the path where we have downloaded the Linux Mint 20 ISO image. We click Open
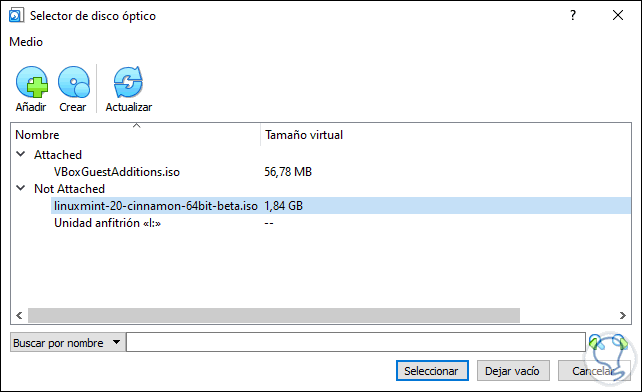
Step 4
The Linux Mint 20 ISO will be integrated into VirtualBox. We click "Select" so that the virtual machine starts from there:
Step 5
We click on "Start"

Step 6
We access the Linux Mint 20 boot menu where we will have the following options:
- Start Linux Mint - Starts the installation of Mint 20 in Live mode
- Start in compatibility mode: allows you to start the system in compatibility mode and applies if any minimum requirement is missing
- OEM install: allows you to install it on original factory machines (OEM)
- Integrity check: it is in charge of evaluating a hardware and software integrity analysis to validate whether or not it is possible to install the system there
- Hardware detection: performs a hardware analysis on the computer
- Boot from local drive: start Linux Mint only if there is an existing installation
- Memory test: run a RAM memory scan
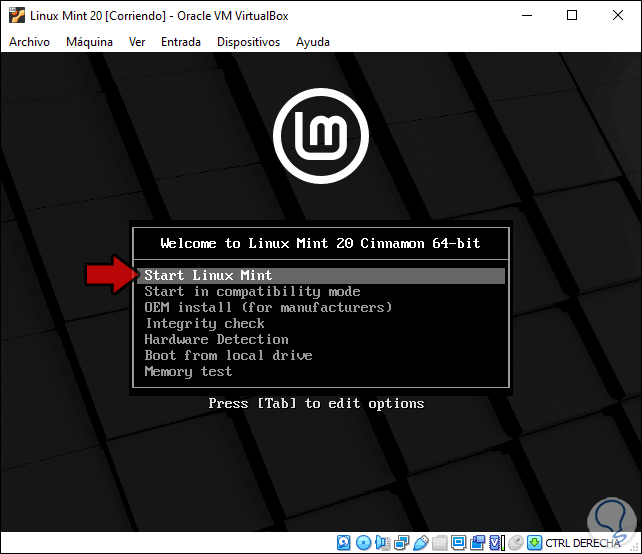
In this case we must select "Start Linux Mint" with which we open the "live" mode, that is, everything we do here runs but is not saved..
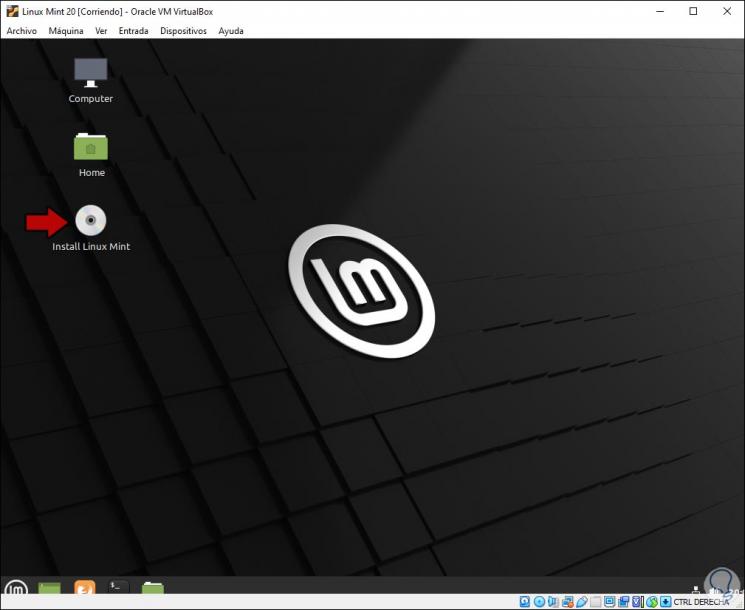
Step 7
To install Linux Mint 20 we double click on the “Install Linux Mint” icon
Step 8
We will define the system installation language:
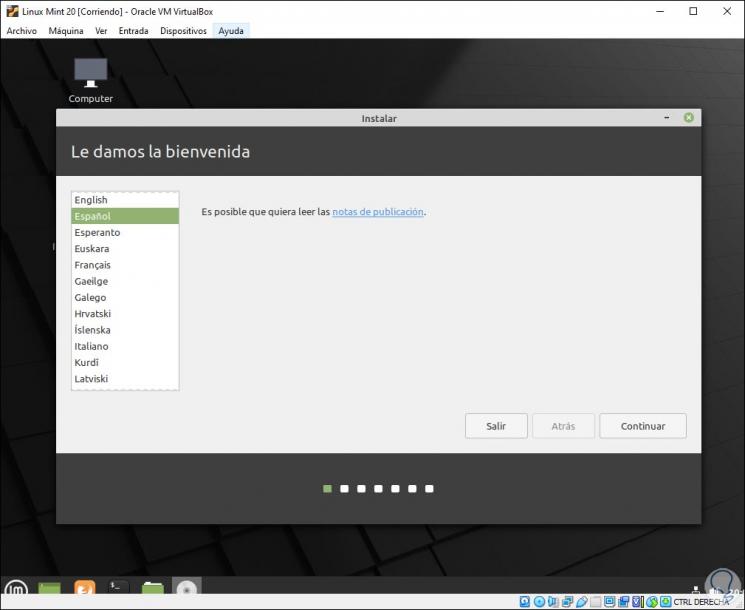
Step 9
We click "Continue" and now we configure the keyboard language
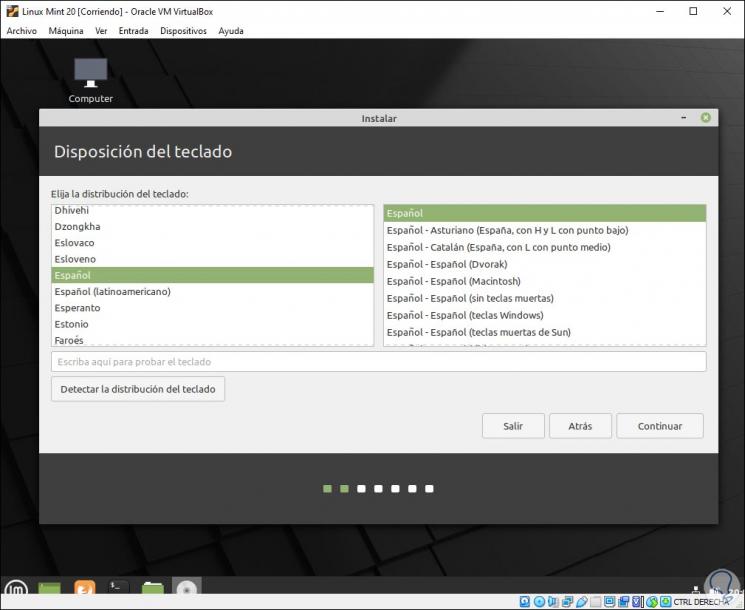
Step 10
We click "Continue" and now it is possible to install the multimedia codecs:
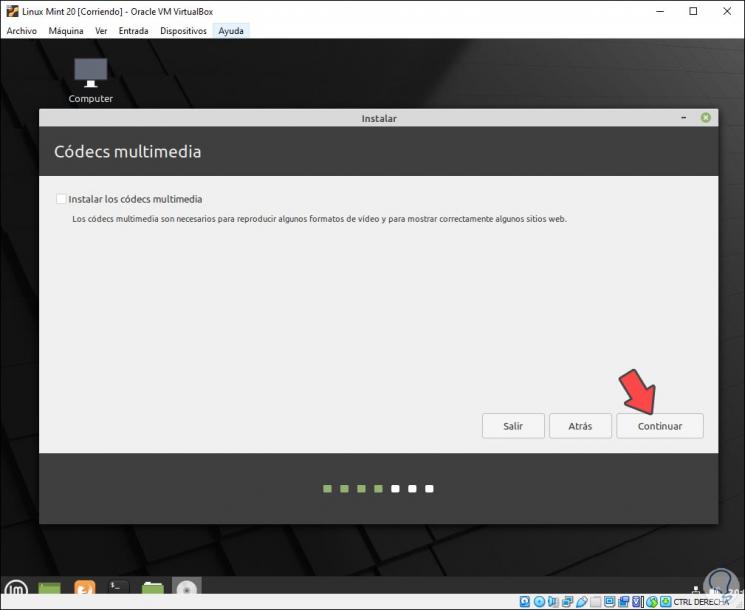
Step 11
We click "Continue" and now it is possible to define how to install Linux Mint 20 on the hard disk. There we have an "Advanced Features" button which allows us to use the LVM security system.
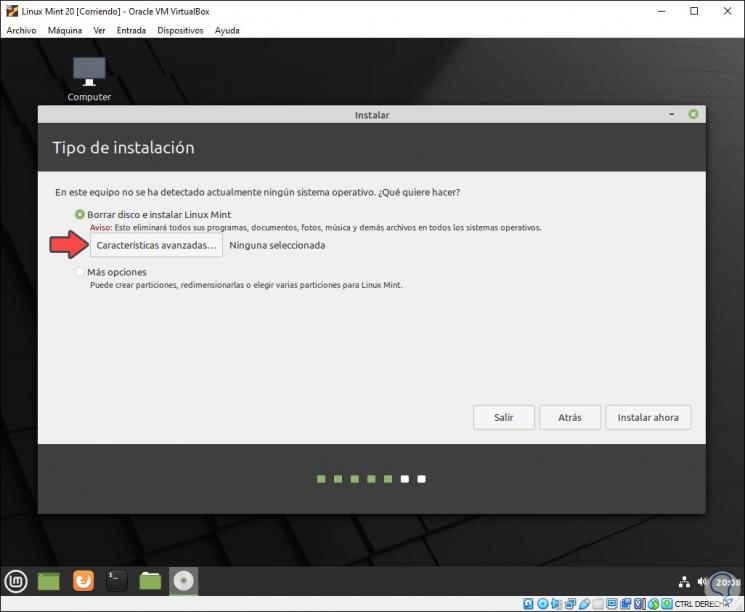
Step 12
If we activate the "More options" box we can create the partitions manually. When this has been configured we click on “Install now” and the following message will be displayed:
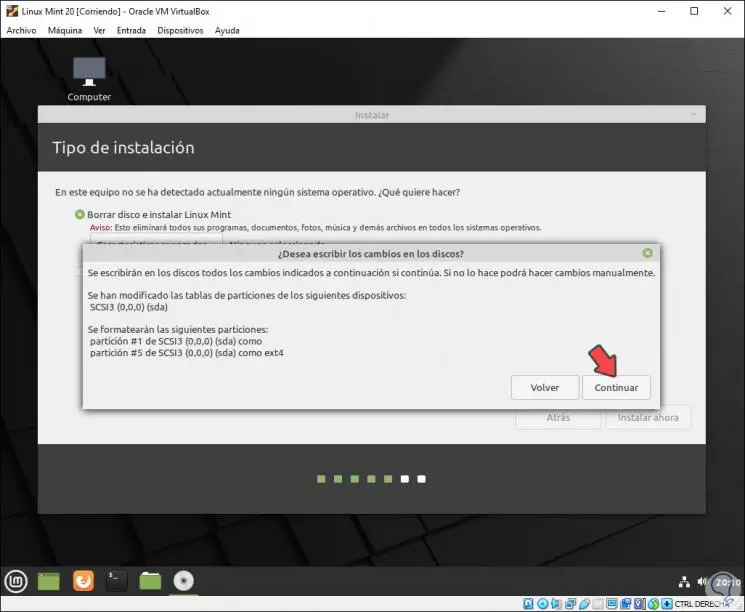
Step 13
If we are sure of the configuration we click on “Continue” and now we select the geographical location:
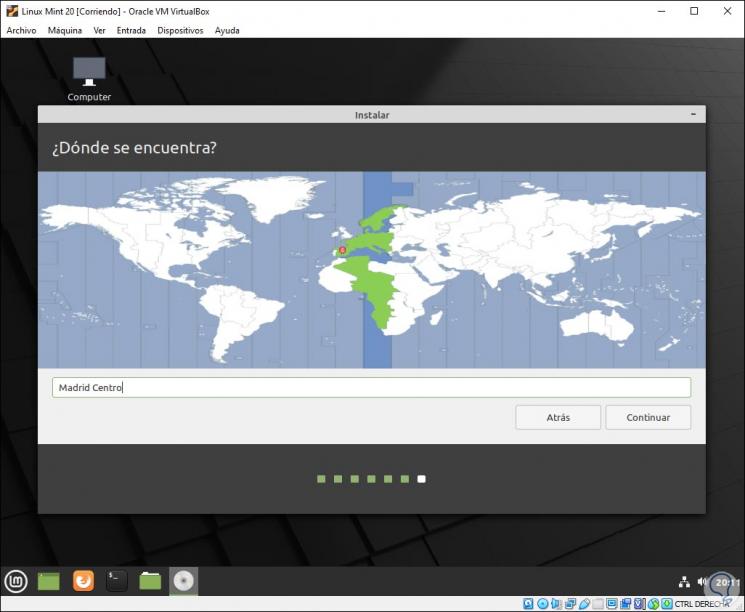
Step 14
We click Continue and we will configure the administrator user:
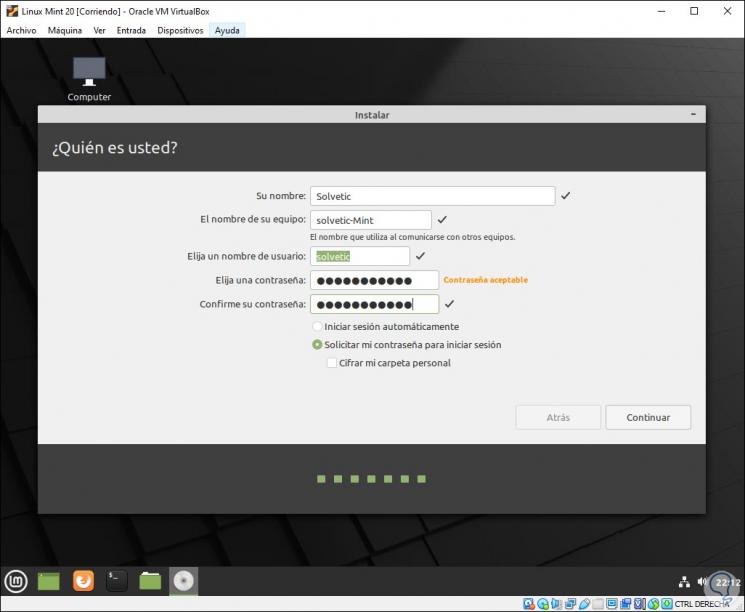
Step 15
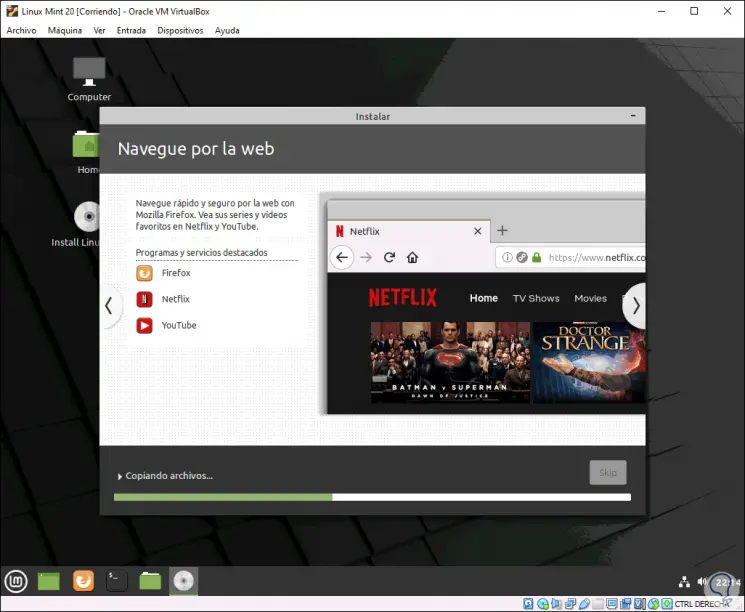
There we can activate the box "Start session automatically" to avoid the use of the password. Once this is defined, we click on "Install now" and the installation process of Linux Mint 20 will start in VirtualBox:
Step 16
At the end of this process we will see the following:
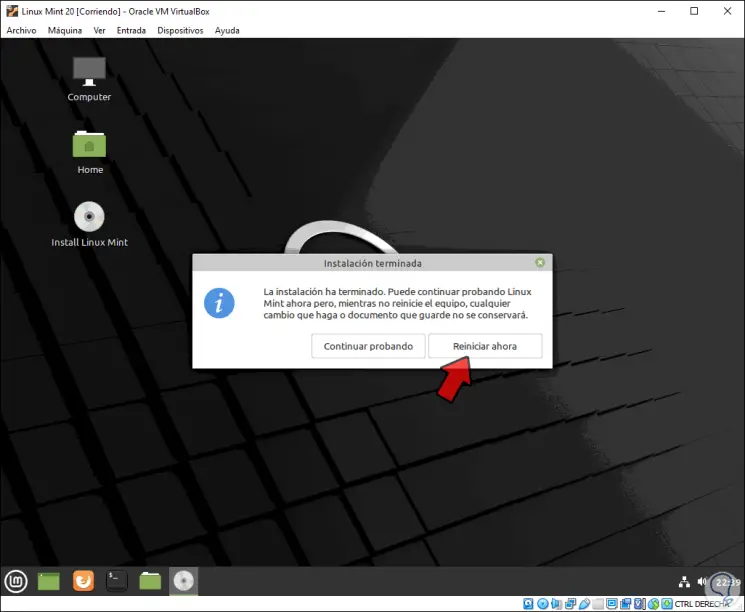
Step 17
We must click on "Restart now" to restart the system and we will see the GRUB boot manager:
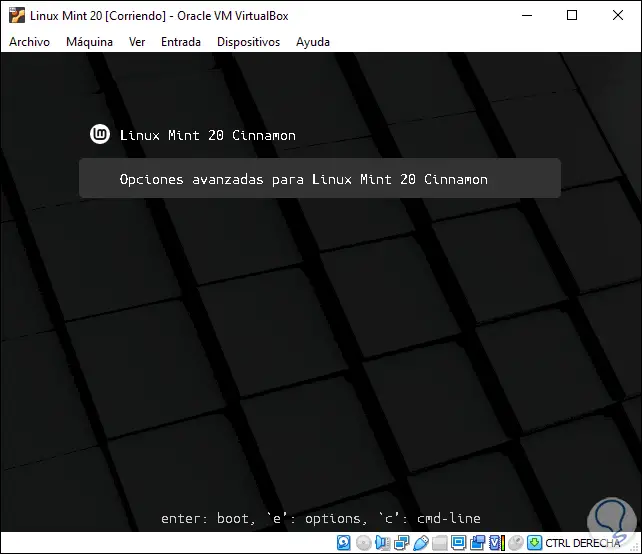
Step 18
Select "Linux Mint 20 Cinnamon" and we will go to the login screen where we enter the credentials we have created:
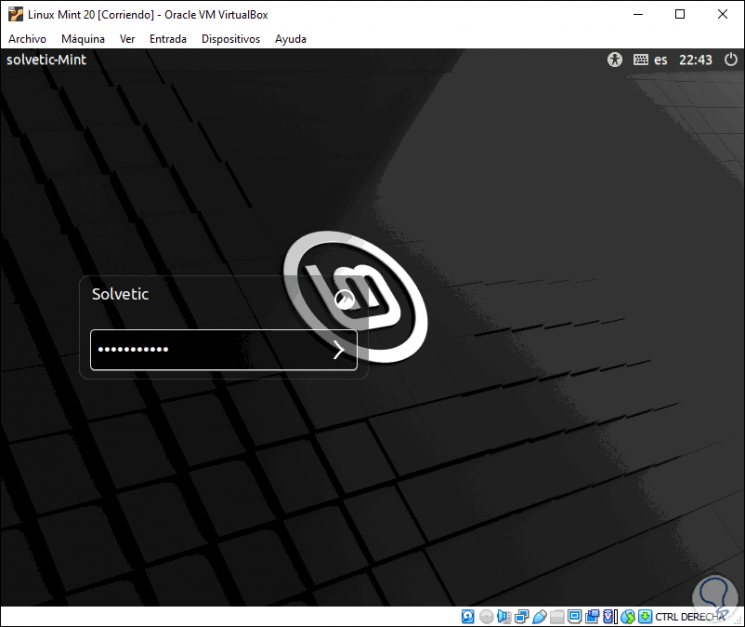
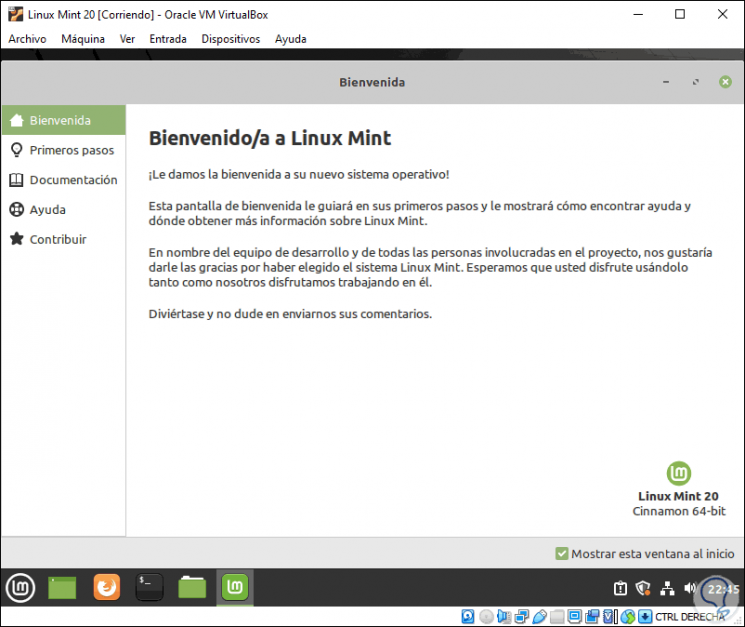
Step 19
Once we log in, we will see the Linux Mint 20 welcome screen:
4. How to install Guest Additions VirtualBox
As we mentioned, Guest Additions are a set of VirtualBox utilities to get the most out of both systems.
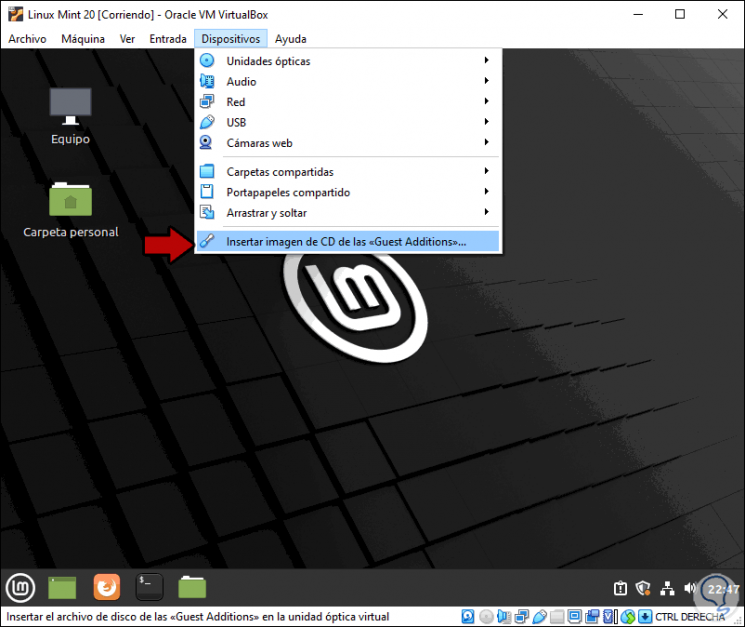
Step 1
For this installation, we go to the menu "Devices - Insert CD image of the Guest Additions":
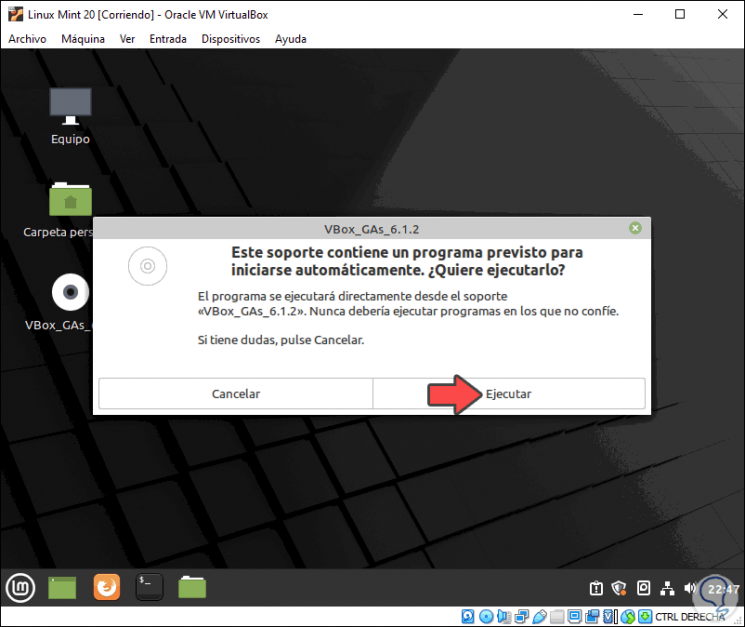
Step 2
The following will be released. We click "Run"
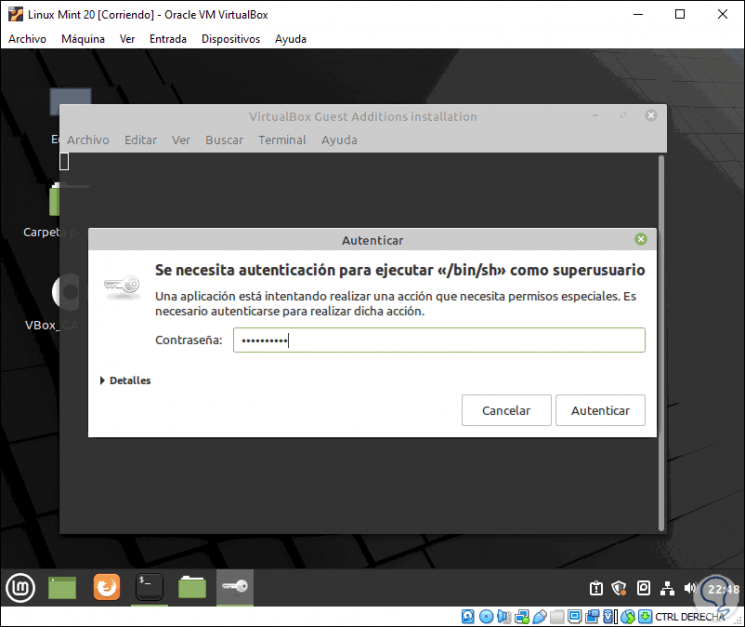
Step 3
We must enter the administrator password. We click on "Authenticate"
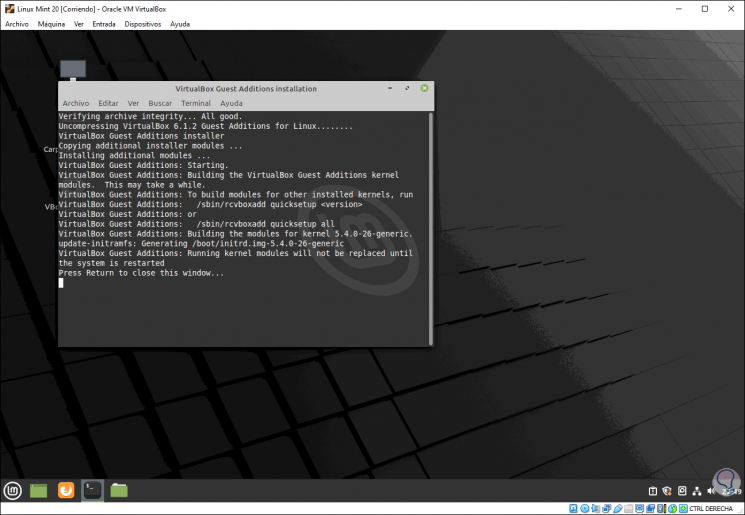
Step 4
Once the password is validated, Guest Additions will be installed in Mint 20:
From this point we are ready to use Linux Mint 20 in a virtualized environment and with the best functionalities.