Windows 10 is proving to be a clean, reliable, and fairly fast operating system. It is difficult to adapt to what changes, but it is perhaps the Microsoft OS that has best known how to combine new features with the successes of the past. As we use it, our computer fills up with files that, sometimes, are not useful to us and all they do is take up precious space. Deleting files in Windows 10, especially if we refer to temporary files, is a very simple activity to perform..
How to delete temporary files in Windows 10
To delete these temporary files in Windows 10 there are very few steps. We see them below
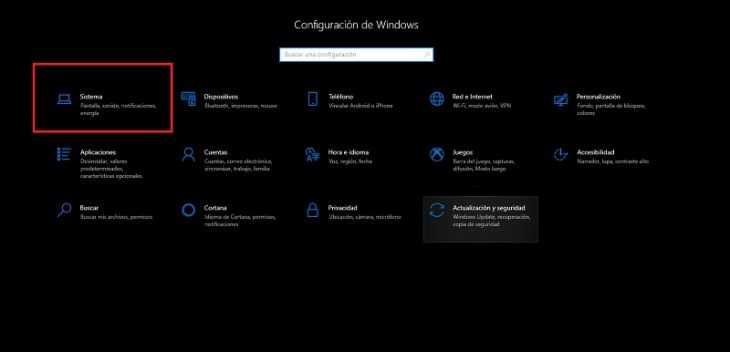
- We enter the Windows 10 configuration and choose the 'System' section.
- In the sidebar, we go to the 'Storage' section.
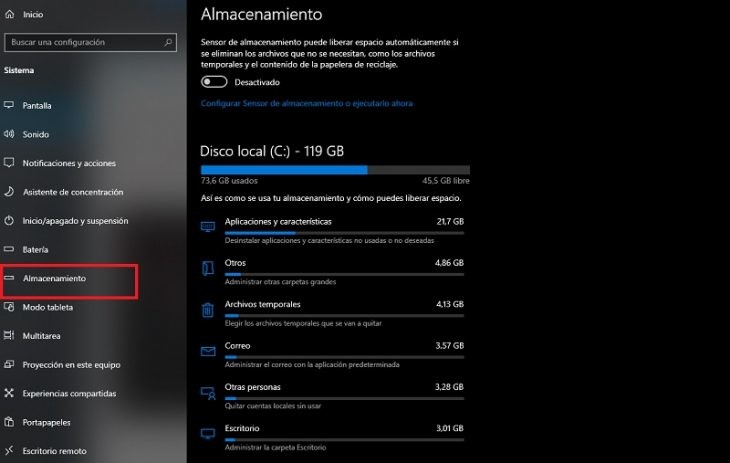
- We wait for the computer to finish collecting everything that is inside. Once the process is ready, we look for where it says ' Temporary files '. In our case, as you can see in the previous screenshot, there are more than 4 GB of temporary files stored.
If we click on 'Temporary files', a new screen will open indicating which ones we can delete without our PC experiencing any problem. Click on ' Remove files ' and that's it.
Disk Cleanup: Another Way to Delete Files
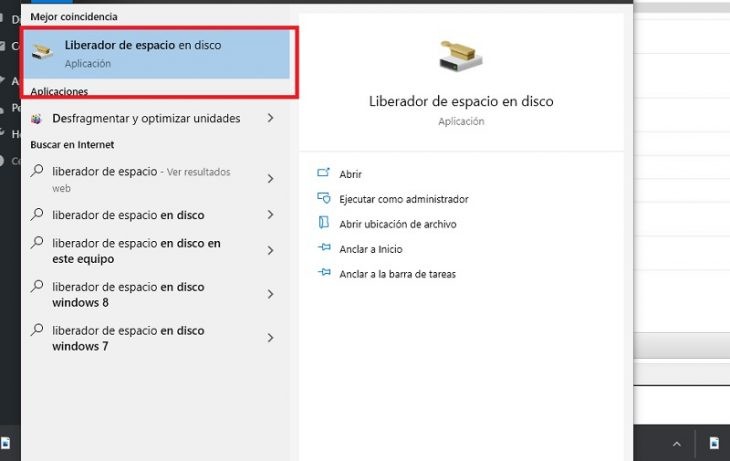
The purpose of this function is to remove unnecessary files from our hard drive. To do this, we are going to type in the Windows search engine Cleanup and select the option that appears..
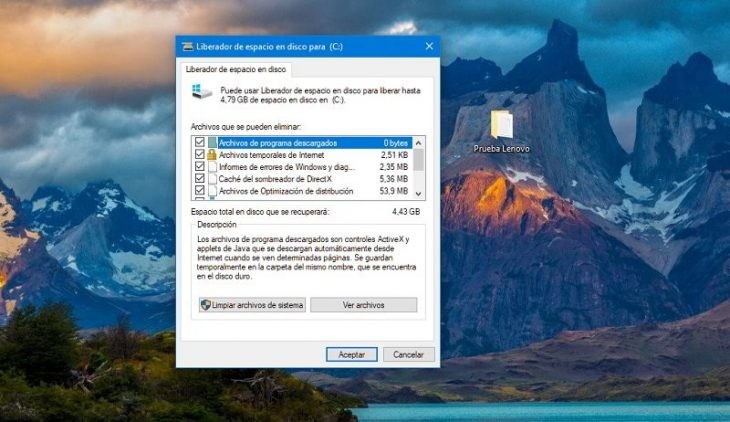
We choose the drive from which we want to delete unnecessary files. Later, all the ones that we can delete will appear . We select them and click on 'OK'.
Delving into the hard drive
We tend to believe that when we delete files, they cease to exist. But they can still be recovered before that space is taken up by other newer files. One of the most used applications to eliminate them permanently is called Eraser. In this link we can download it for free. Now let's see how to delete a file permanently in this program..
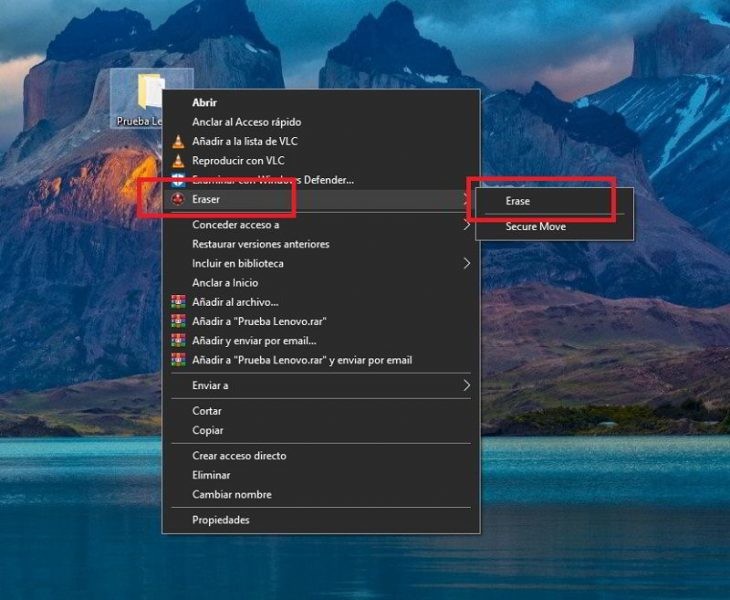
To begin, we look for the file that we want to delete and click on it with the right mouse button. We select 'Eraser' and then 'Erase'. We say yes to everything and that's it. But you have to be careful, because this file can not be recovered in any way .
Delete duplicate files
It's easy to create duplicate copies of any document by mistake. We may have downloaded the same file twice, we have a backup copy in a Dropbox, Google Drive or OneDrive folder and, just a few pixels away, another copy with the same files.
To avoid these problems there are many applications. Let's look at some of the best.
- DoubleKiller analyzes the hard drive and the folders we want, as well as locating identical files and then deleting them. Examine the main data, date and size, to check the age, in addition to checking the checksum . It integrates a secure uninstaller to erase those applications that leave traces on the system. In addition, it includes intelligent verification, through its CRC code (cyclic redundancy verification).
- Anti-Twin is a very light tool. Find duplicate files by analyzing the complete structure of folders or specific directories. Use a color code to help identify the clones and, by clicking on them, it is in charge of sending them to the Trash.
- CloneSpy and Fast Duplicate File Finder are two other interesting alternatives. The first one has the simplest and most intuitive interface of all, and from it we can search up to 4 levels deep . The second is also capable of analyzing files and finding duplicates even though they have different names, using an advanced synthesis algorithm. It even allows you to create a protected folder that it will never scan , in the case of critical system files that we do not intend to delete.
Avoiding hibernation
Laptops, unlike desktop computers, save boot files, drivers, application previews, and application states. This creates a virtual image that consumes RAM and data from the physical hard drive. If we want to avoid redundant copies, due to the habit of closing the computer instead of turning it off, something that continues to consume battery power, we can deactivate the 'Hibernate' function.
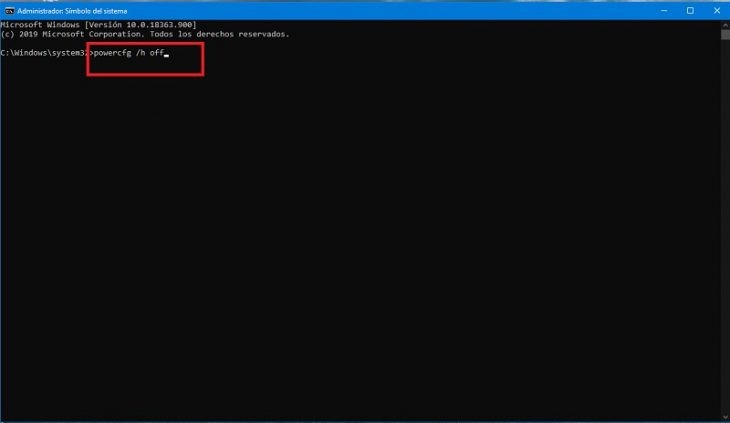
First of all, we must open the CMD (system command console) window as administrator. We type CMD in the search bar, click on the result with the right mouse button and enter as administrator. Once open, we type the words powercfg / h off , without italics, of course. In this way, we will have eliminated the automatic hibernation that orders the hiberfil.sys file, contributing between 4 and 5 GB to the hard disk space. If we want to activate it again, we just have to repeat the process, but typing powercfg / h on .
Shrink, move, or modify the pagefile.sys file
With this tool we can free up a lot of RAM, in addition to a virtual space of about 2 GB. First, we type Advanced System Settings in the search bar. Next, click on 'Advanced options' and on 'Performance', we enter 'Settings'. On this screen, we access the advanced options again and look at the ' Virtual memory ' section and 'Change'.
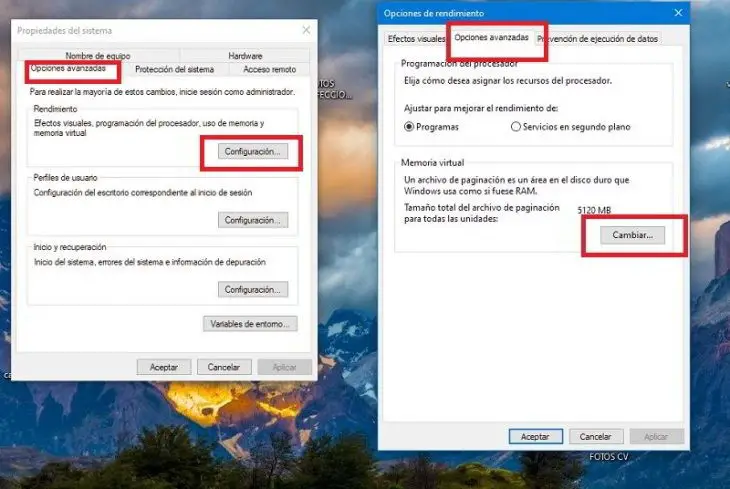
By pressing this tab, we can find our hard drives and the assignment by letters of each one. From here, it is possible to assign the space that we want to the size of the pagefile.sys file , by clicking on 'Custom space'. Earlier, we turned off automatic memory tuning. In addition, we are allowed to disable paging or assign the file that we want for that path, even move it to an external hard drive, which must be conveniently connected at each system boot.

If we are careful, we keep the folders tidy, the Trash clean and we do not abuse the installation of untrustworthy applications, our computer will endure the type without accumulating junk files. For safe uninstallation, we recommend Revo Unistaller, very reliable and accurate in finding the trace of updates. And we must not forget to erase browsing histories every few days. Our system will thank us.