The new Windows 10 operating system includes by default the possibility of creating a Hotspot or local internet access point. This allows you to connect to the internet from your mobile device through your computer connection. In other words, let's imagine that your computer has an internet connection, but your mobile phone does not. Then you can activate the option: Area with mobile wireless coverage to share your connection with mobile devices.

Related:
This function is really useful in certain situations such as in Airports or in places where we only have the option of connecting via Ethernet cable. In this way you will create a WiFi network from your PC to which your mobile device can connect. However, this feature will not always remain active even after you have enabled it manually..
When you enable the Zone with mobile wireless coverage in Windows 10, it will stay on as long as a device is connected to it. In some cases, if a device is connected but is not actively using the connection, the access point will be disabled. This means that you will have to activate it again and reconnect the device to continue having internet access.
However, this can be somewhat uncomfortable, since many users, including myself, would like to have the Zone with mobile wireless coverage activated permanently so that they do not have to perform the configuration every time we want to access the Internet through the point of access created on your Windows computer..
But how do you always keep the Windows 10 Hotspot active? Well then, we show you step by step everything you have to do to keep the internet access point activated even if you are not using it:
How to always keep the Zone with mobile wireless coverage active in the latest version of Windows 10.
- The first thing we will have to do is access the Windows configuration using the keyboard shortcut: Windows key + I.
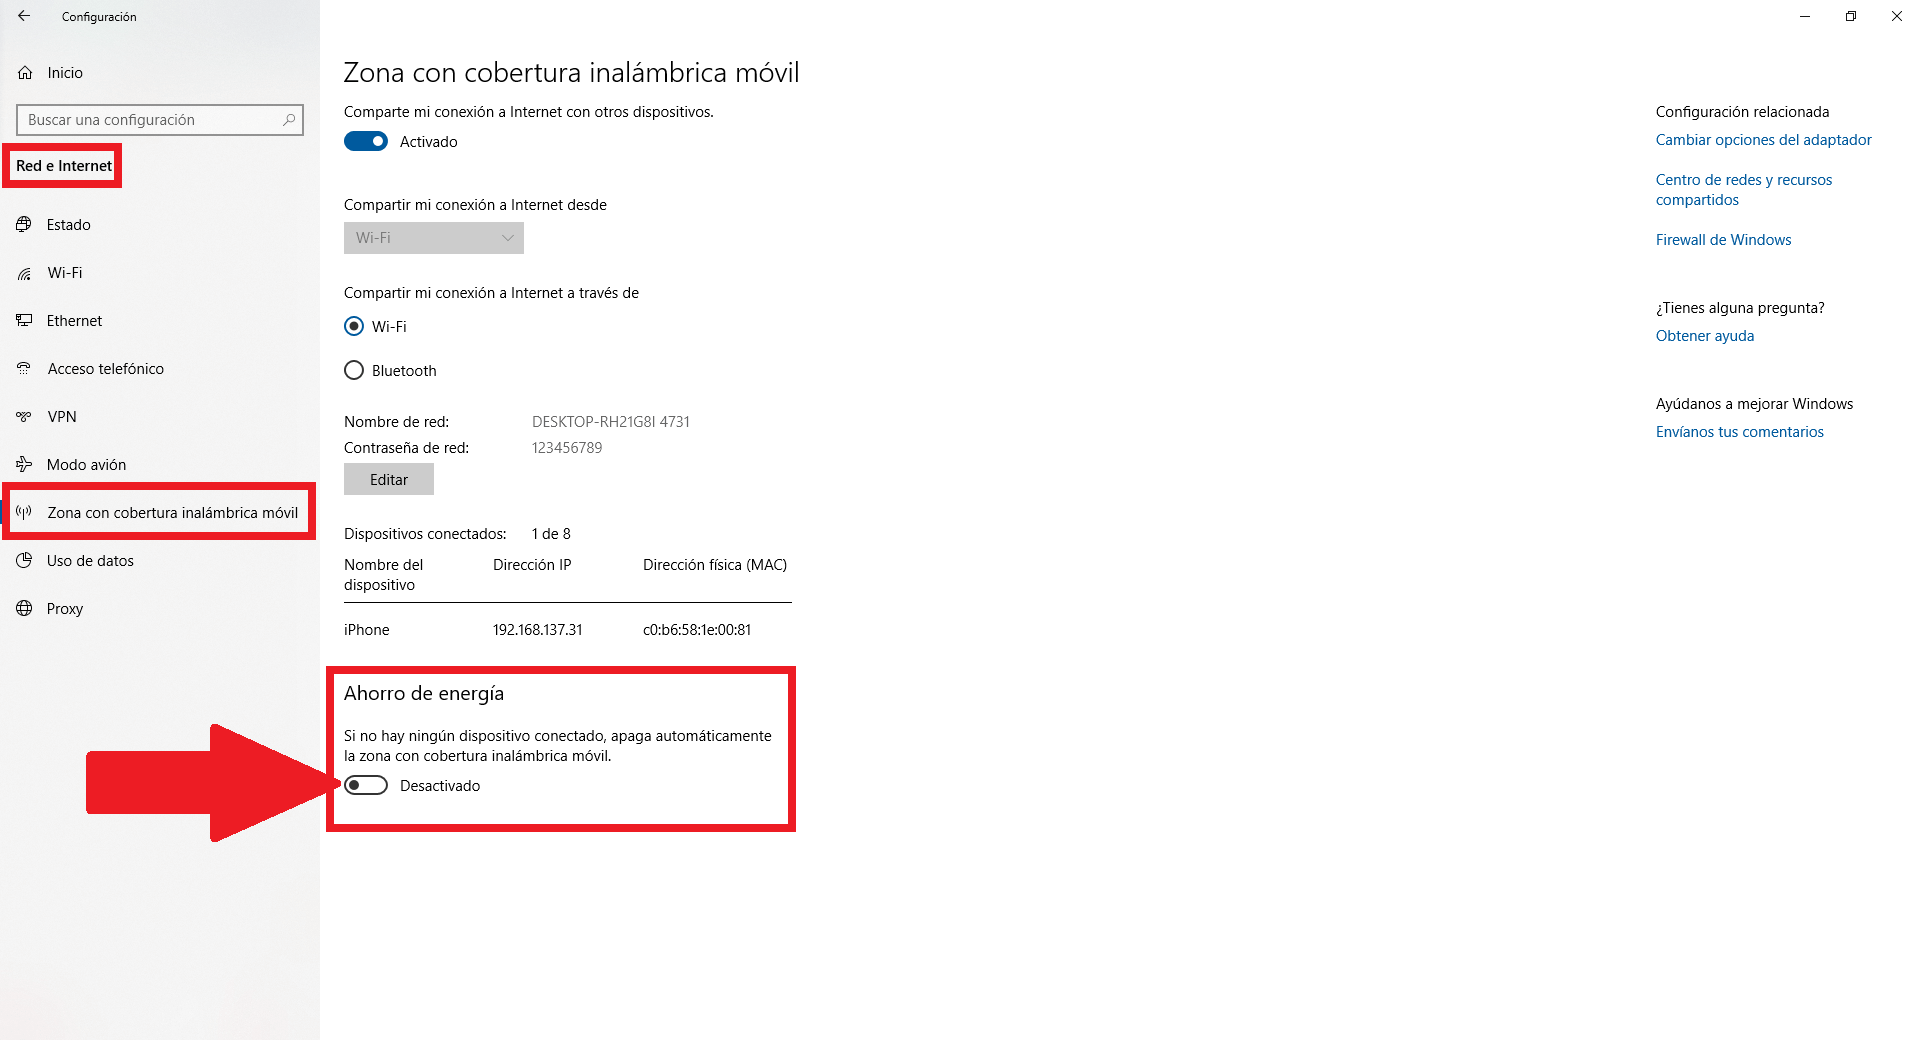
- Within the configuration you will have to go to: Network and Internet> Area with mobile wireless coverage.
- On the next screen you will have to click on the button next to the option: Eat my Internet connection with other devices ..

- Once the option is activated, you will have to scroll down until you find the Energy Saving section. Under it you will have to deactivate the switch that allows you to disable this option.
- Once deactivated, even if no device is connected, the area with mobile wireless coverage will NOT automatically turn off.
How to always keep the Zone with mobile wireless coverage active in previous versions of Windows 10.
- If you are running an earlier version of Windows 10 which lacks the power saving switch in the Mobile Wireless Coverage Zone setting , you can use a specific script for PowerShell thanks to which you can keep the mobile access point permanently activated even if it is not being used.
- Access the Windows search and enter the name Notepad. When the tool is shown among the search results, you must double-click with the left mouse button to open it.
- In the new Notepad document you will have to paste all the text (script) that we show you below:
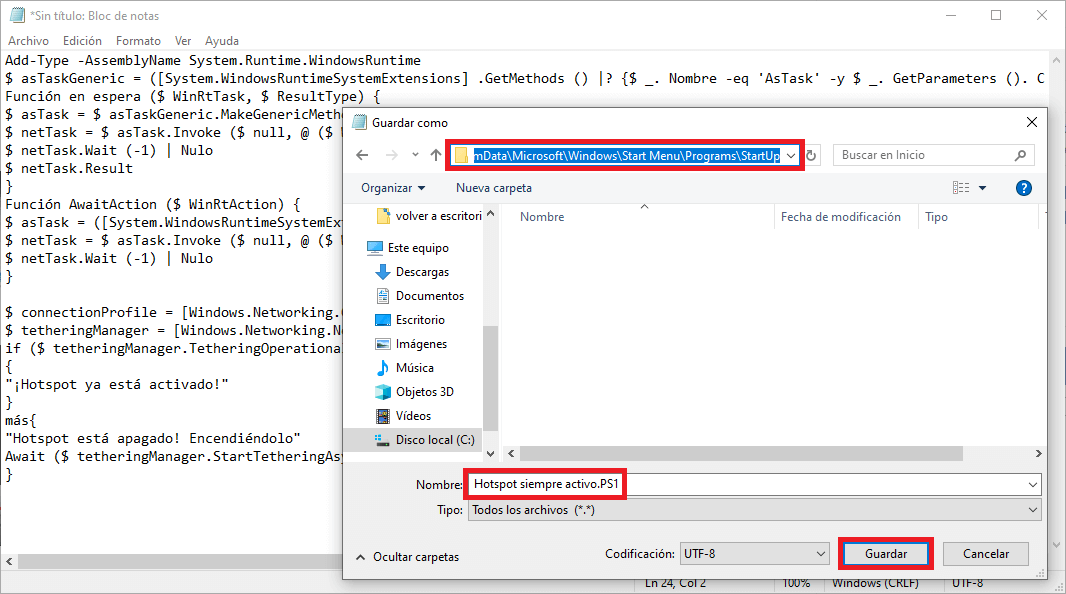
Add-Type -AssemblyName System.Runtime.WindowsRuntime $ asTaskGeneric = ([System.WindowsRuntimeSystemExtensions] .GetMethods () |? {$ _. Name -eq 'AsTask' -y $ _. GetParameters (). Count -eq 1 -y $ _. GetParameters () [0]. ParameterType.Name -eq 'IAsyncOperation`1'}) [0] Standby function ($ WinRtTask, $ ResultType) { $ asTask = $ asTaskGeneric.MakeGenericMethod ($ ResultType) $ netTask = $ asTask.Invoke ($ null, @ ($ WinRtTask)) $ netTask.Wait (-1) | Null $ netTask.Result } Function AwaitAction ($ WinRtAction) { $ asTask = ([System.WindowsRuntimeSystemExtensions] .GetMethods () |? {$ _. Name -eq 'AsTask' -y $ _. GetParameters (). Count -eq 1 -and! $ _. IsGenericMethod}) [0] $ netTask = $ asTask.Invoke ($ null, @ ($ WinRtAction)) $ netTask.Wait (-1) | Null } $ connectionProfile = [Windows.Networking.Connectivity.NetworkInformation, Windows.Networking.Connectivity, ContentType = WindowsRuntime] :: GetInternetConnectionProfile () $ tetheringManager = [Windows.Networking.NetworkOperators.NetworkOperatorTetheringManager, Windows.Networking, Windows.Networking ] :: CreateFromConnectionProfile ($ connectionProfile) if ($ tetheringManager.TetheringOperationalState -eq 1) { "Hotspot is already activated!" } more { "Hotspot is off! Turning it on " Await ($ tetheringManager.StartTetheringAsync ()) ([Windows.Networking.NetworkOperators.NetworkOperatorTetheringOperationResult]) } - After copying and pasting the script in the notebook, you must save it with the extension ".PS1", that is, you must provide a name and just after it add: .PS1

- Now we will have two options, run this script manually every time we turn on our computer or add it to the Start folder so that it is automatically executed by Windows every time it is started. To add the script to the start folder you will have to open Windows File Explorer and go to the following path:
  C: \ ProgramData \ Microsoft \ Windows \ Start Menu \ Programs \ Start
 C: \ ProgramData \ Microsoft \ Windows \ Start Menu \ Programs \ StartUp
- When you paste the .PS1 file with said script, you will make sure that every time you start the Windows operating system, the internet access point will be activated and will remain permanently active.