In Windows operating systems, there are several elements that play a fundamental role in its behavior, as well as its processes or applications. One of these components is the whole theme associated with network connectivity since without this it would be complex, not only to access websites, but also to receive updates, news and other uses where network connection is required ..
There are multiple causes for which we can receive the non-connectivity error in Windows 10, either because of a physical problem, for example, in the adapter or because of a logical problem at the driver or configuration level .
TechnoWikis will give a series of tips on how we can solve the error of impossibility of connecting to a network and thus navigate safely..
1. Uninstall the network driver to fix network error in Windows 10
The first step we must take is to uninstall the network driver. Although it sounds somewhat illogical, after rebooting the system, Windows 10 will automatically detect the latest available driver and install it.
Step 1
For this, we must access the device manager using one of the following options:
To keep up, remember to subscribe to our YouTube channel! SUBSCRIBE
Step 2
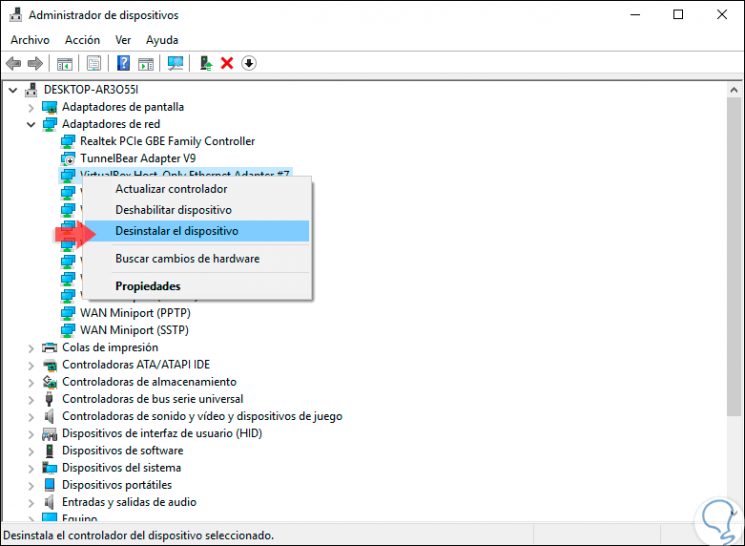
In the window that will appear, we will go to the “Network adapters†section and there we will right click on the current adapter and select the “Uninstall device†option:
Step 3
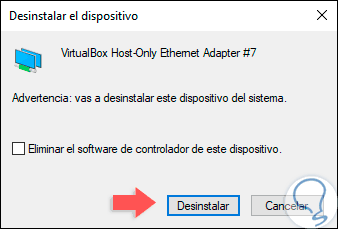
The following window will be displayed once we select this option. There we click on "Uninstall" to confirm the action.
2. Modify the Wi-Fi network channel to solve network error in Windows 10
In case we connect through a Wi-Fi network, one option is to change the Wi-Fi connection channel since the selected channel may be saturated with too many connections which results in connectivity failures.
Step 1
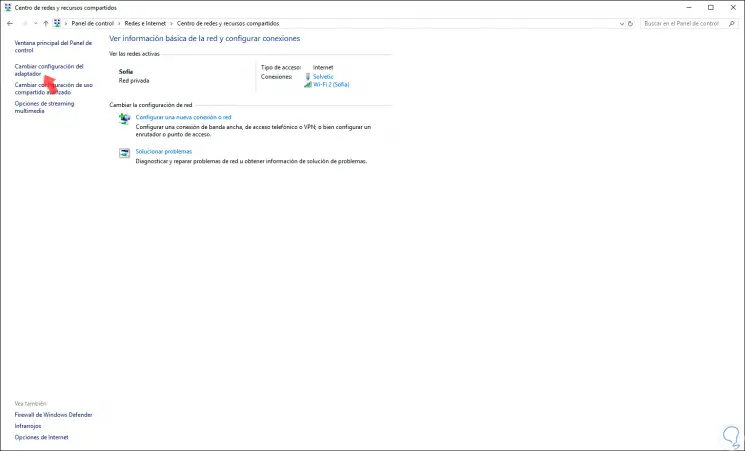
To carry out this process, we will go to the following route:
- Center network and sharing
Step 2
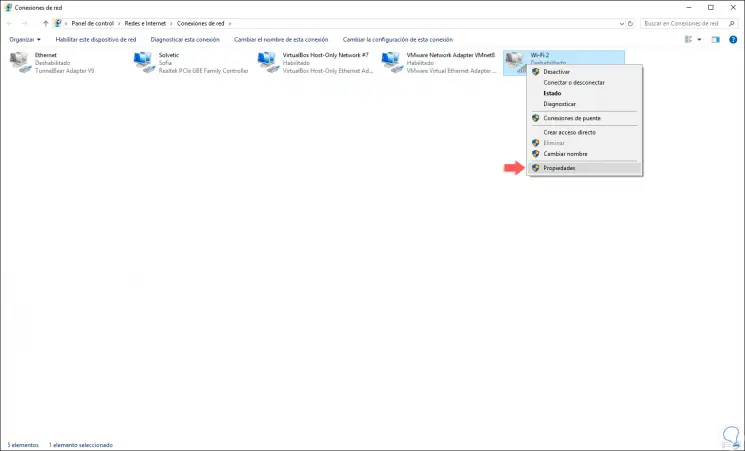
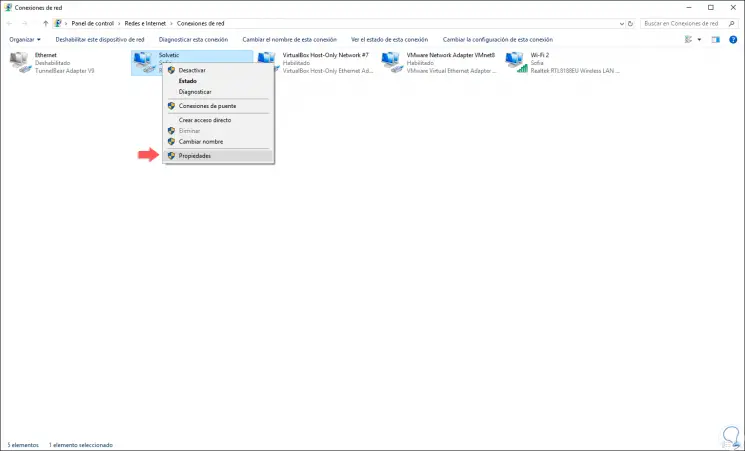
There we click on the “Change adapter settings†line located on the left side and in the new window we will right click on the Wi-Fi network adapter and select the Properties option:
Step 3
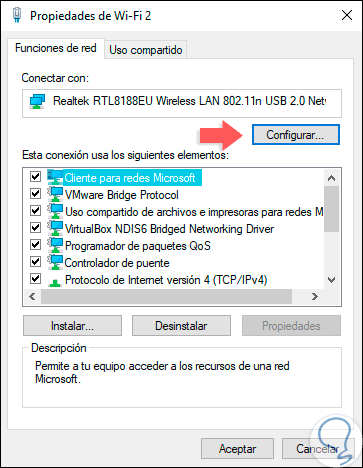
Now, in the new window that will be displayed, we will click on the “Configure†button located in the “Network functions†tab:
Step 4
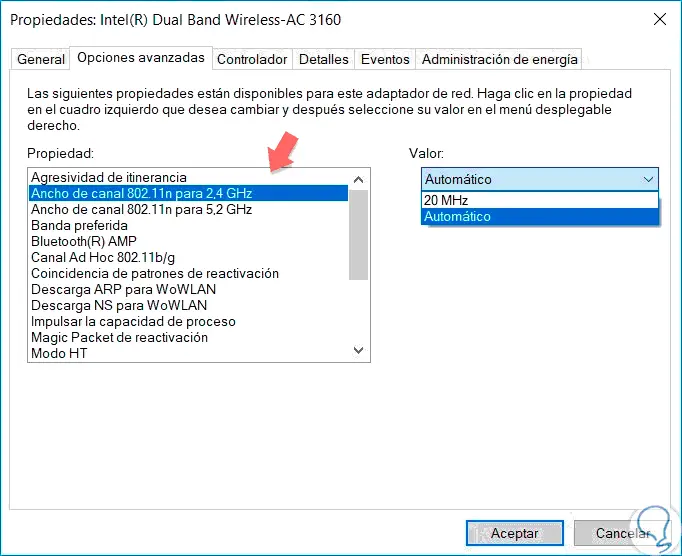
In the next window we go to the “Advanced Options†tab and there we will locate the “802.11n Channel Width†line to edit its value. Click on OK to save the changes.
3. Disable IPv6 configuration on the driver to fix network error in Windows 10
Currently, most networks make use of the IPv4 protocol for their IP addressing, but due to the increase in connections, the IPv6 protocol has been developed to cover all this demand for connections. But if our team uses the address format 192.168.0.xx, it means that we are under IPv4, so Ipv6 can cause conflict with the connection.
Step 1
To disable IPv6 on our Windows 10 system, we will go to the following route:
Step 2
There we will right click again on the current network and select the Properties option:
Step 3
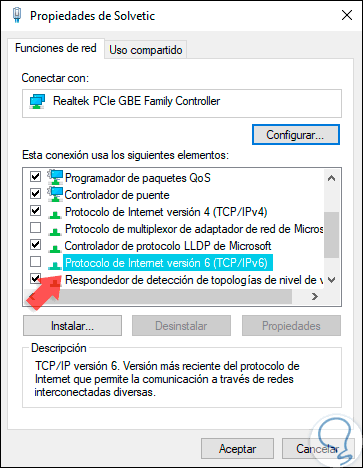
In the window that will be displayed, we will locate the “Internet Protocol version 6†line and uncheck its box. Click on OK to apply the changes and we can restart the system to make this modification effective.
4. Check controller and router security types to fix network error in Windows 10
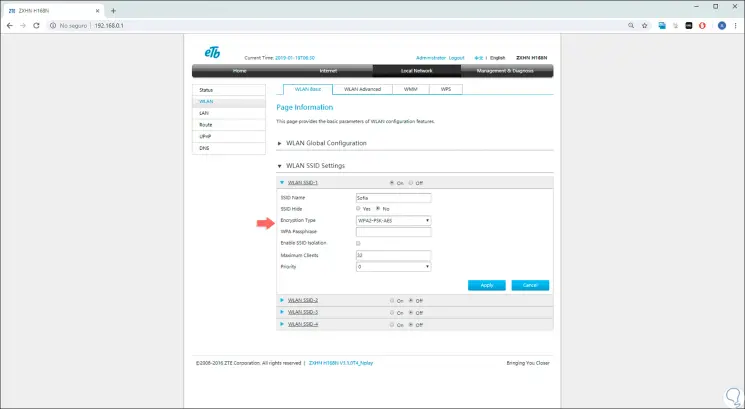
This option applies especially to Wi-Fi networks, since these in order to protect the data that is transferred, have different types of security such as WPA2-PSK (AES) or WPA-PSK (AES). In order for the network connection to function properly, both the router and the computer equipment must make use of the same type of security. To configure the type of security of our router we must use the manual that came with it.
Step 1
To access the router, we must enter the IP address of the gateway which is usually http://192.168.0.1/ . We can validate this by executing the “ipconfig†command on the Windows 10 command line.
Once we access the router, we will go to the Wi-Fi section and in the WLAN SSID Settings section we define the type of security to apply in the “Encryption Type†field:
Step 2
Defined this, we go back to the following route:
Step 3
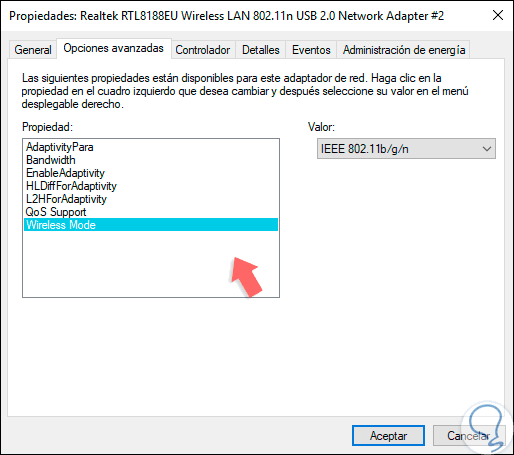
There we right click on the Wi-Fi network adapter and select Properties, then Configure and in the "Advanced options" tab we define that the type of security is the same as the router.
Note
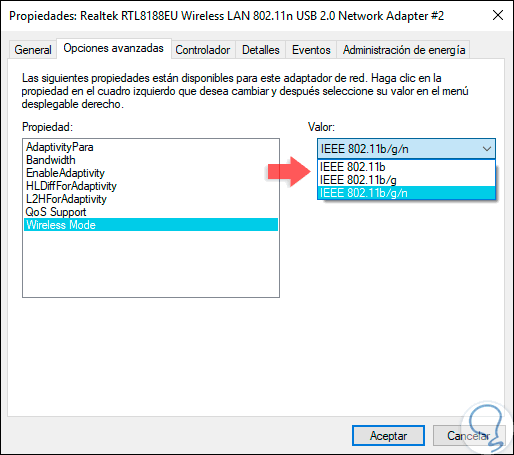
In this same section it is possible to change the mode of the Wi-Fi network, remember that Wi-Fi networks manage different protocols and the current one may be more saturated than others, for this in the “Wireless Mode†line we display the options available in Value and choose the most appropriate:
5. Configure the network manually to solve network error in Windows 10
Step 1
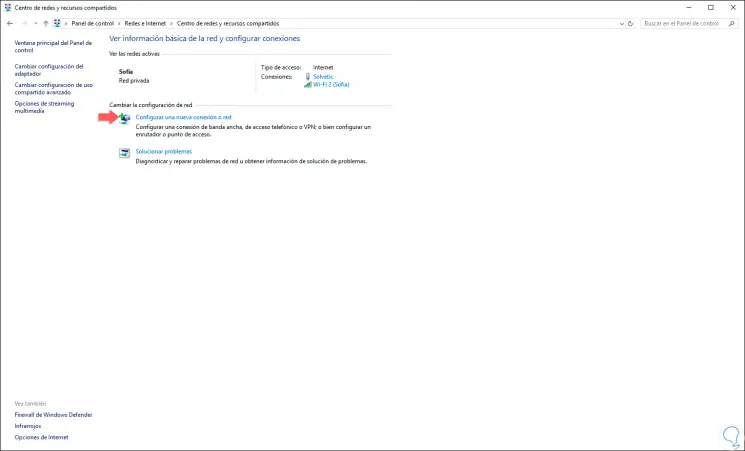
This option allows us to manually add the configuration of the network parameters, for this we will go to the following route:
- Center network and sharing
Step 2
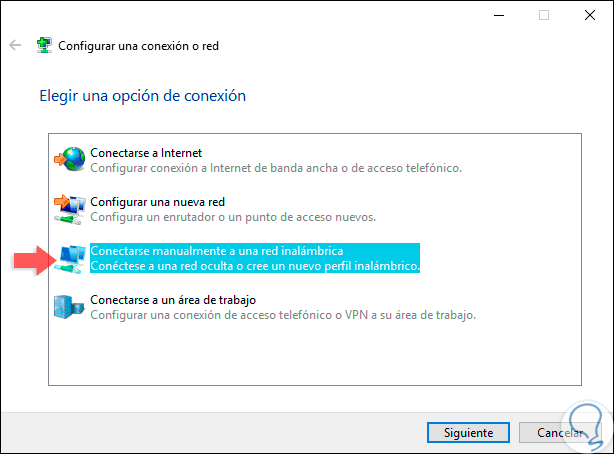
We click on the line “Configure a new connection or network†and the following window will be displayed where we select the option “Connect manually to a wireless networkâ€:
Step 3
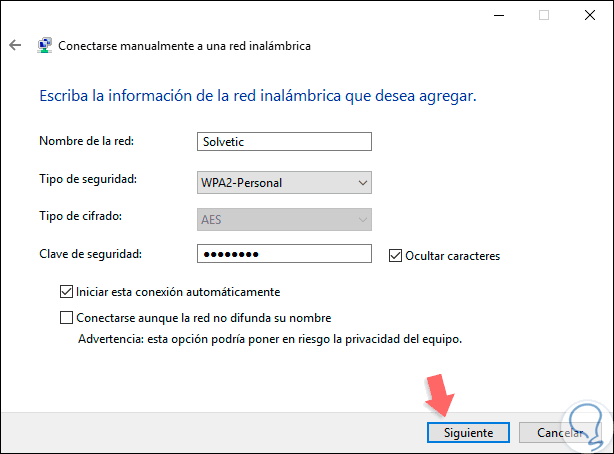
Click Next and complete the data of the network to connect. Click Next and wait for the process to complete.
6. Forget Wi-Fi connection to fix network error in Windows 10
By default, when we connect to a new Wi-Fi network, Windows 10 stores it locally so that the next time the network is detected, the connection is much faster. The problem lies in the fact that the network may have been deleted or its name changed, so that the connection attempt will fail, in this case it is best to remove that network from the local Windows 10 files.
Step 1
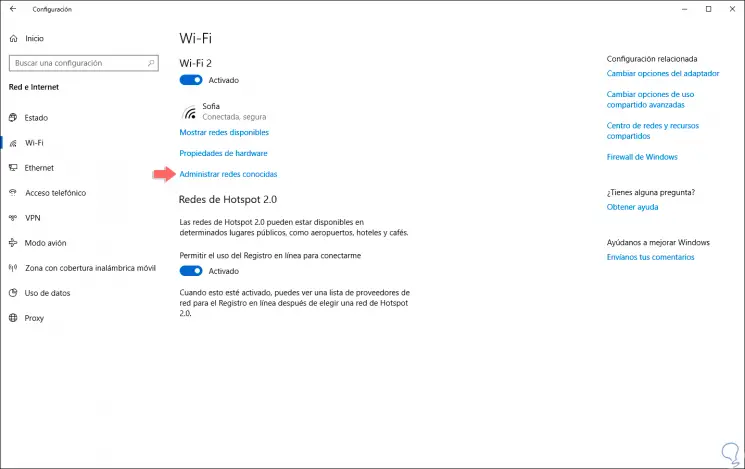
For this task we will go to the Start / Settings / Network and Internet menu and in the “Wi-Fi†section ¸ we click on the “Manage known networks†line:
Step 2
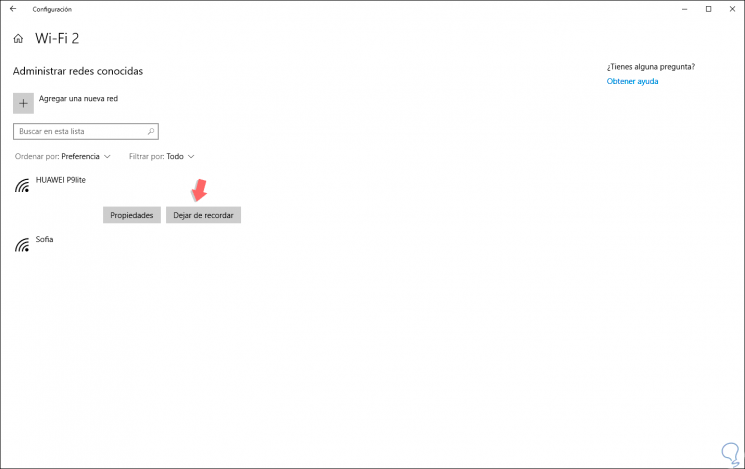
In the new window we select the desired network and click on the "Stop remembering" button:
7. Disable and enable Wi-Fi network to fix network error in Windows 10
Step 1
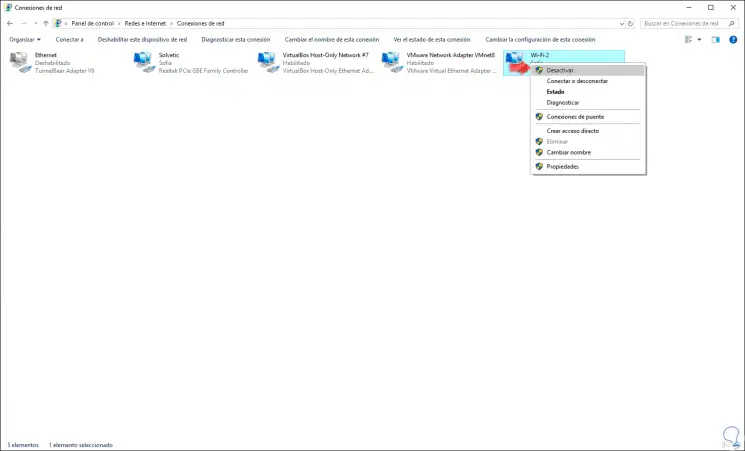
By temporarily disconnecting from the Wi-Fi network we can refresh the internal services and thereby allow the connection to be effective again, for this we will go back to the route:
Step 2
There we right click on the Wi-Fi adapter and select the option “Disableâ€:
Step 3
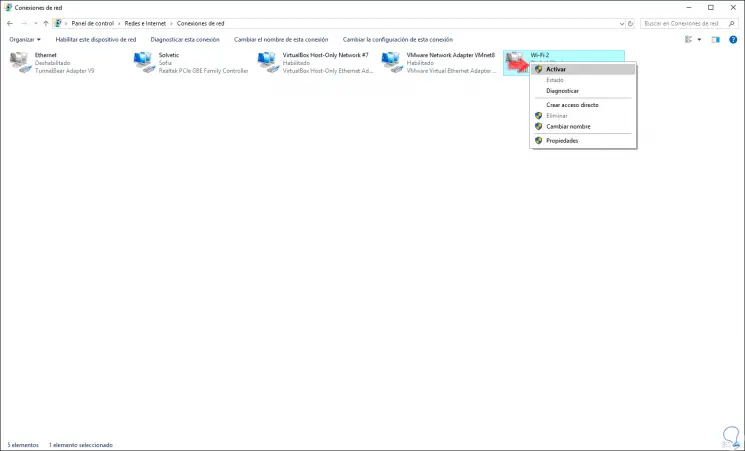
We wait for about a minute, then right click again and this time we select "Activate":
8. Install network drivers manually to fix network error in Windows 10
Windows 10 automatically makes use of Windows Update for the entire update process in the system, but if we wish not to wait for this process, we have the opportunity to go to the website of the manufacturer of our network card and download the latest available driver and then install it manually.
Step 1
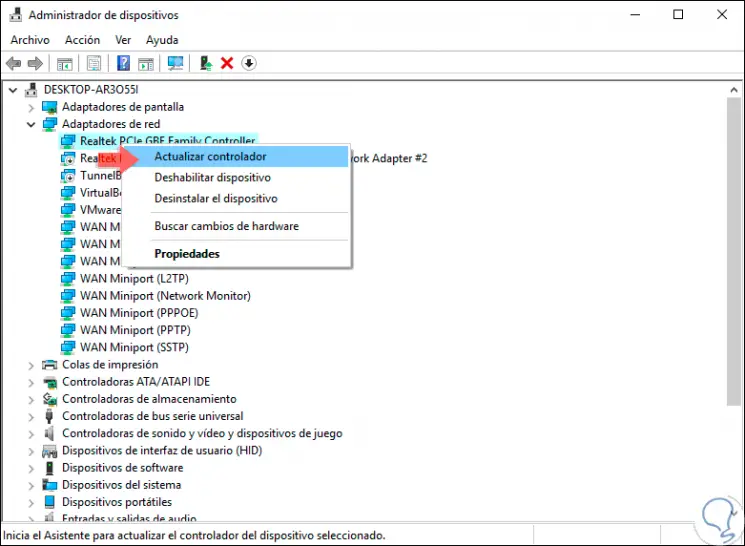
Once the driver has been downloaded, we will go to the Device Manager and in the “Network adapters†section we right click on our driver and select the “Update driver†option:
Step 2
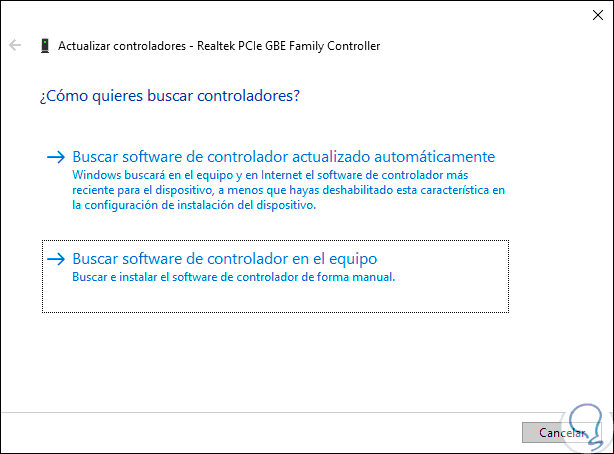
The following window will be displayed where we select the option "Search for driver software on the computer":
Step 3
The following window will be displayed where we select the path where the driver is to be searched on the device:
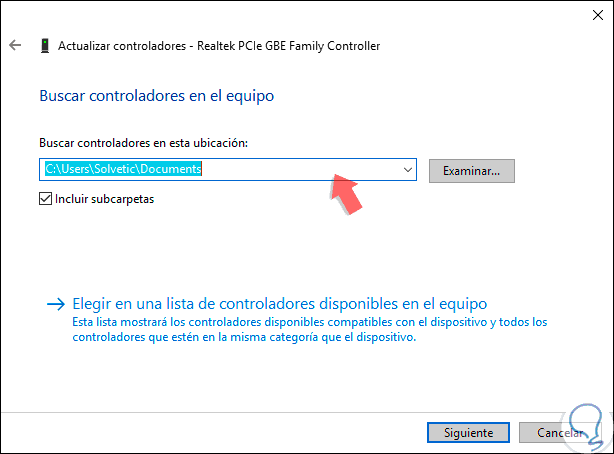
Step 4
Then we will select the downloaded driver or the system itself will determine that the driver meets the latest available version.
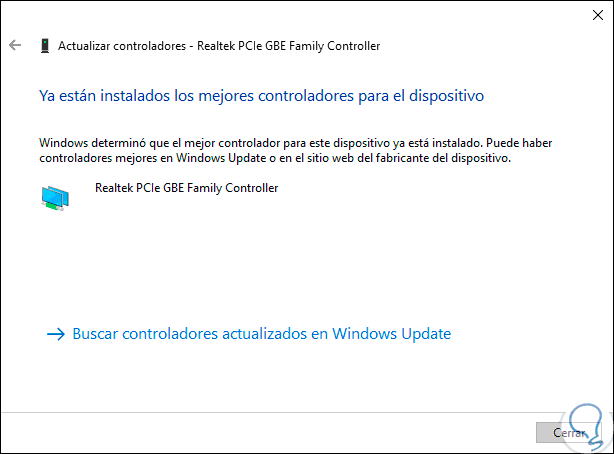
9. Use ipconfig / relay commands to troubleshoot network error in Windows 10
This command is executed from the terminal and allows us to release the IP address in order to renew it later.
Step 1
For use, we access the command prompt as administrators and there we execute the following:
ipconfig / release
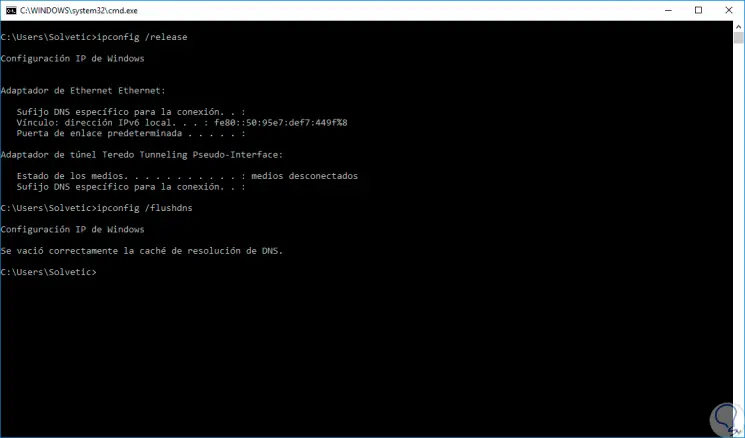
Step 2
Then, we will execute the following command to renew the IP address:
ipconfig / renew
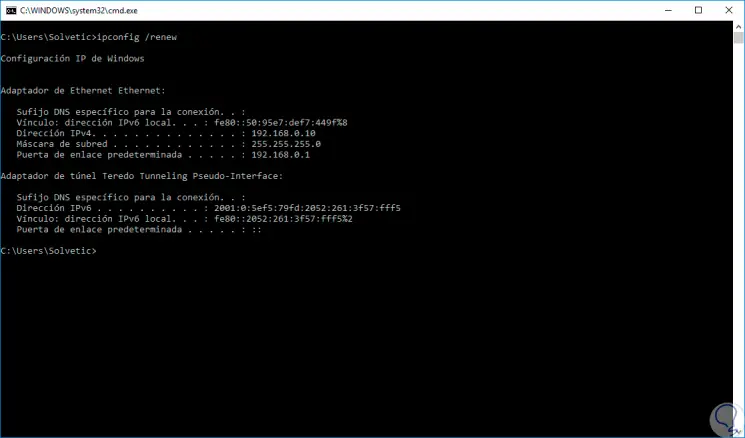
Step 3
Now we will see some solutions to this connection error after updating the equipment. For this case, we must access the command prompt as administrators and then execute the following:
reg delete HKCRCLSID {988248f3-a1ad-49bf-9170-676cbbc36ba3} / va / f 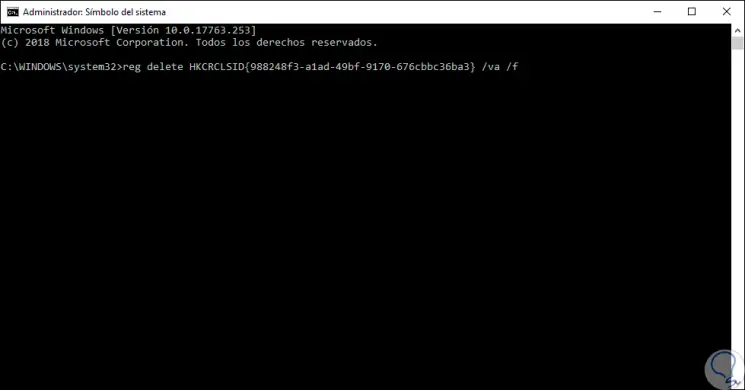
Step 4
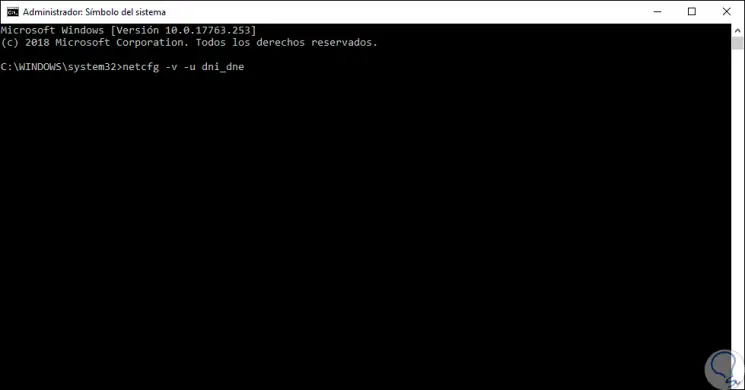
Press Enter and then execute:
netcfg -v -u dni_dne
10. Enable or disable Wi-Fi networks hotspots to fix network error in Windows 10
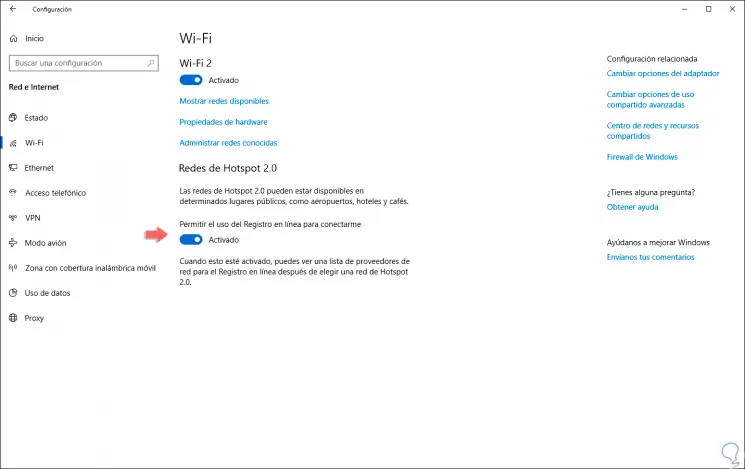
For this option we will go to Configuration / Network and Internet / Wi-Fi and there we must validate that the “Allow use of online registration to connect†box is cleared.
11. Reset router settings to fix network error in Windows 10
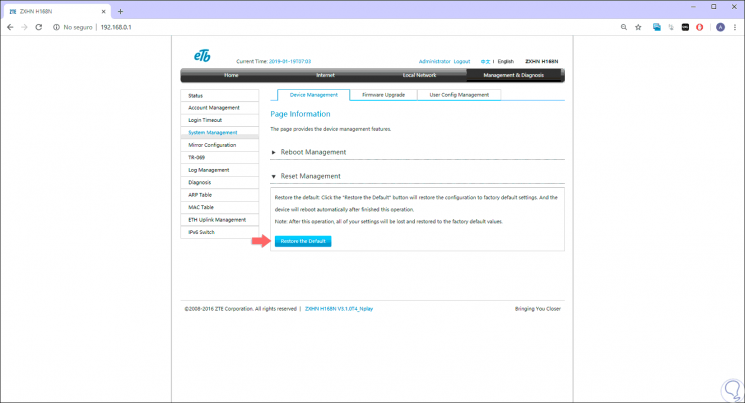
If any of the indicated options does not give an effective solution, we can restore the router to its original values, for this we have two options that are:
- Go to the modem configuration and locate the "Restore the Default" option.
- Use a needle or pin and hold the Reset button located on the physical router for 5 seconds.
Note
To download the latest drivers we can visit the official websites such as:
With any of the solutions offered, it will be possible to fully enjoy our network connections in Windows 10 without affecting its natural use..