Budget planning is an essential aspect of managing money, be it for personal or business purposes. And when it comes to planning, compiling and analyzing budgets, Excel is still the first choice for many. But where do you even start with budget planning? We'll explain everything you need to know here.
Create a budget in Excel using ready-made templates
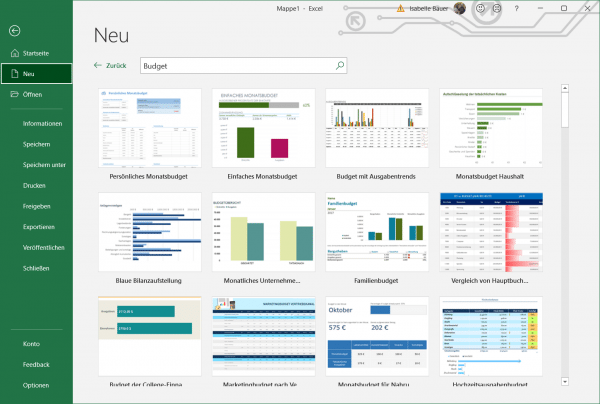
The easiest and fastest way to create an Excel budget is to use the library of pre-made budget templates included in Excel. If you're not sure where to start, we recommend starting with one of the software's budget templates. This will give you a first feeling for what you want to include in your own budget. When you open Excel, just go to the " File " tab, click " New " and search for the term " Budget ." You will then see several Excel budget templates, such as a family budget, a personal expenses calculator, a vacation budget and much more .
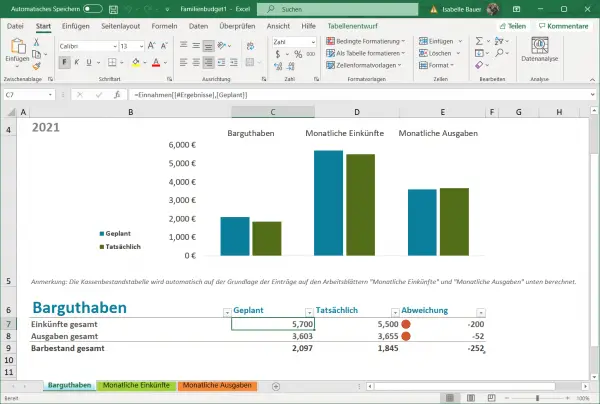
For example, if you choose the family budget template, you get a pre-made table with a cash flow chart on the first tab. This tab allows you to change the family name and budget title. But leave anything that contains a formula unchanged. For example, if you click on the 5700, the message " = Income [[# Results], [Planned]] " appears next to the input field fx . If you play with the formulas, you will mess up the automatic calculations that make Excel so easy to use.
Instead, the other two tabs - Monthly Income and Monthly Expenses - have space to fill in your details. These numbers automatically flow into the Cash Balance tab so you always know how much you're making and spending..
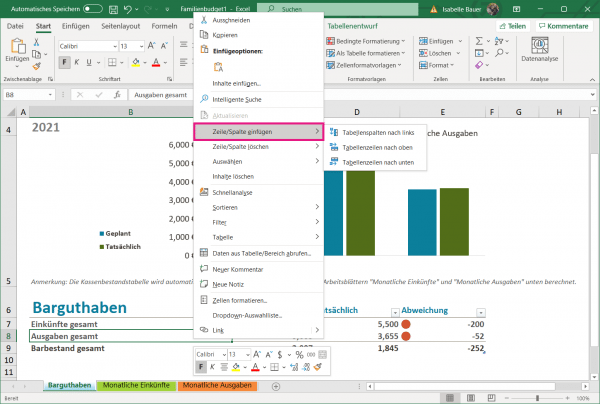
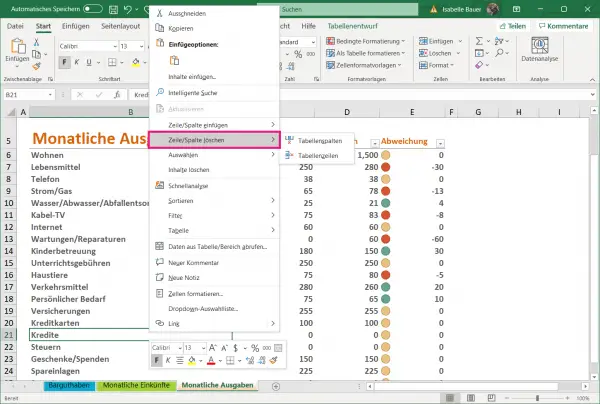
Now, if you want to add something to the existing template, just select where you want to add a field and right-click. Scroll down to " Insert Row / Column " and select either " Table Columns Left / Right " or " Table Rows Up / Down ". This should automatically synchronize the new information with the existing tabs.
You can also delete sections that you don't need. If, for example the line of credit on the " Monthly Expenses not need", just click with the right mouse button on the tab, select " row / column delete " and " table row "..
Create a budget from scratch in Excel
Would you like to adjust your budget even more? You can also create an Excel budget table from scratch! Here's the best way to do this, including some tips and tricks for adjusting your new budget:
Open a Blank
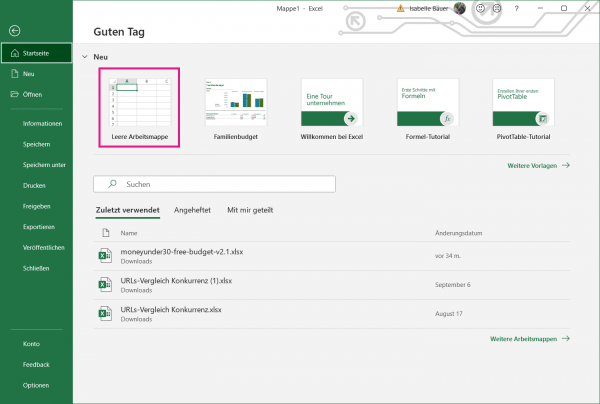
Workbook First, open Excel and select " Empty Workbook " to start a new Excel document. Now you have a new canvas to start with.
Set Up Your Income
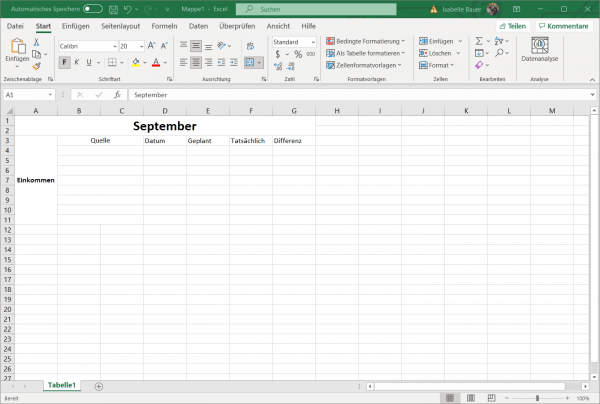
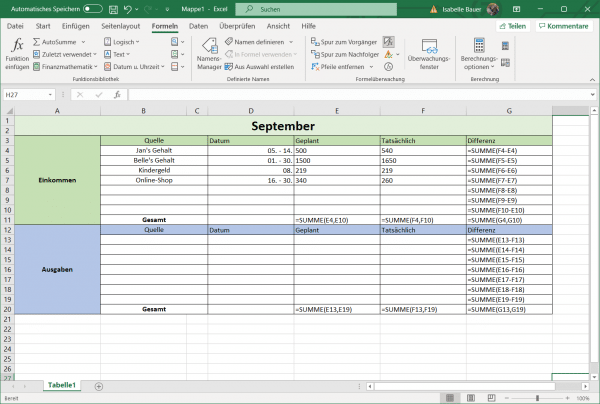
Tab Once you have a blank workbook, block part of the columns to use as a heading for the month. To do this, select the first two rows of columns A to G and select the " Connect and Center " option in the " Start " menu of the workbook . You can find this button in the " Alignment " section. This will now make the entire section A1 and you can label it however you want. Next, highlight cells A3 through A11 , choose " Join and Center " again, and write and center the word " Income. "
If you want to get creative, you can choose a variety of fonts and colors. Then, summarize cells B3 and C3 and label them " Source " to represent where your income comes from - that is, your main salary, yours Side job, etc. You should also individually merge each row from B and C through row 11. Label cell D3 " Date " so that you can keep track of when these payments came in. Adding a date range is optional and helpful if your Sources of income vary each month and may not make sense with predictable salary payments.
Then label section E3 with " Planned " or " Budget ". That is the amount of income that you plan on. Section F3 is your " Actual " column, and this is the actual amount of money that will be deposited into the bank account. Finally, in the " Difference " column in G3 , the difference between the planned and actual income is automatically recorded. The whole thing could then look like this:
Add formulas to automate
Now, to make your Excel budget a little more manageable, highlight the entire section. Then use the Marquee tool on the " start " of the workbook (looks like a divided into four parts square) and select " All Borders on". You can also shade or colorize some areas for better readability.
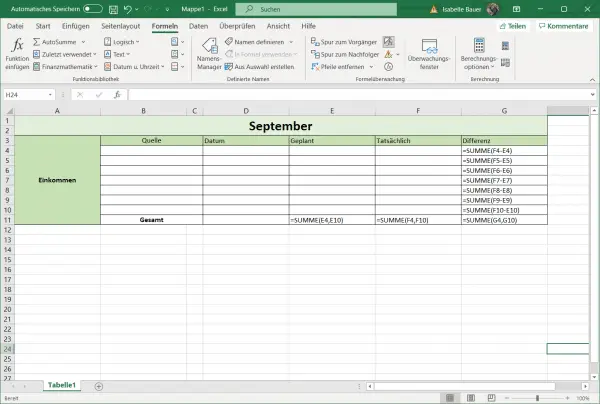
If you like the look of your budget table, you can now add the formulas that will automatically calculate everything for you. In the example below we have " Total "is placed in cell B11. Or, you can put it at the bottom of any income stream you want to track. After creating the " Total " label , select the last row in that column and type the formula" =. " SUM (E4E10) ". Of course, you 'll need to replace the labels E4 and E10 with the range of cells you want to add up. Repeat this process for the" Actual " column .
To automatically find the difference between your" planned "and" actual. " "To calculate income, now enter the formula" in each line of " Difference " = SUM (F4-E4) Again, replace F4 and E4 with the cells that correspond to your Actual and Planned sections . When you're done, it looks something like this:
You can now start filling the table with your earnings.
Add Your Expenses
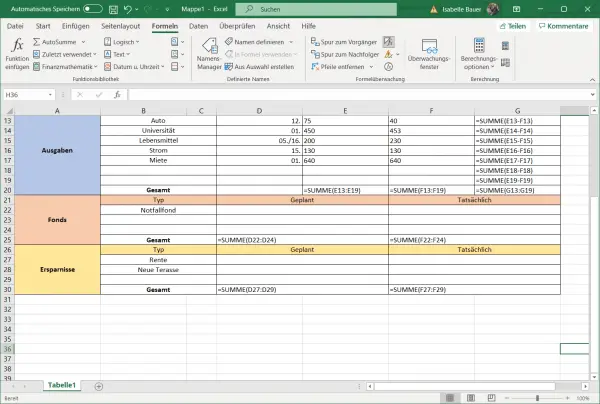
Once you've established your income, it's time to calculate your expenses. You can either do this on the same sheet of paper or start a new sheet. If you want to keep the expenses on the same sheet of paper, create a new area below the " Income " section and adjust it however you want . Then use the same column headings - Date, Scheduled, Actual, and Difference - as before. If you'd rather list your expenses on a separate sheet of paper, just click the + sign at the bottom of " Sheet1 ". You can then rename each sheet,by right-clicking and " Select Rename ".
Create the formulas in the same way as above - with one important exception: In the" Difference " column , instead of the formula" = SUM (Actual Number - Planned Number) "you must use a different formula. For the calculation In your spending, use the formula " = SUM (Planned Number - Actual Number) " to calculate how much you have overpayed .
Now when you list your expenses, you can adjust the categories as you wish. You can make them as specific or as vague as you'd like. The most important thing is that you can easily track your regular expenses. Some may want to list gas, electricity, and garbage separately while others want to group them together under "utilities". That is entirely up to you, of course.
Add More Sections
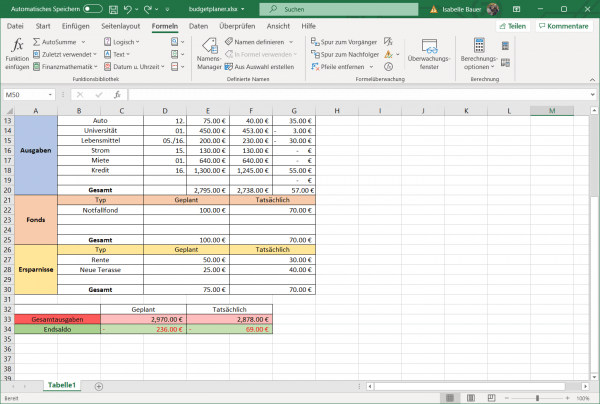
Now you can add as many sections or sheets as you want to your Excel budget. In this example, we've added the Funds and Savings sections .
The Closing Balance
Once you have created all of the sections that you want to keep track of, it is important that you always know your current balance. Fortunately, you can leave your calculator in the drawer and keep track of it in Excel automatically. Keeping everything on one sheet of paper makes it easy. Just create another section at the bottom of the sheet. Then label one line " Total Expenditures " and another " Ending Balance ". This makes it easy for you to keep track of your expenses and compare your planned with your actual expenses.
To calculate the total planned budget, enter the formula " = SUM (Total Planned Expenses, Total Planned Funds, Total Planned Savings) ". To calculate the planned balance, use the formula" = SUM (Total Planned Revenue - Total Planned Expenses) ". Do the same for the Actuals sections Expenditures and the balance, but use the actual totals. Of course, you have to replace the "Planned Revenue" values and so on with the appropriate cells in your budget planner for it to work.
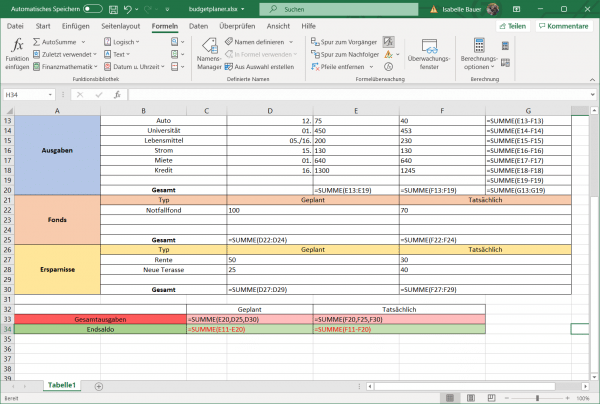
In our example below, the budget is € 69 too high because we end up in the red. Since we created our budget using a spreadsheet program, it is very easy to see where the family has spent too much and where the family has earned too little. And that's exactly what it's all about: It should be as easy as possible to monitor your money so you know what every dollar is being spent on.
