Need to format a hard drive but can't do it in Windows? Is it because Windows is broken? Or is it the Windows HDD? With a bootable data carrier and Gparted, this can be done very quickly.
Create boot disk
First of all, you need the boot data carrier, which is usually a USB stick these days. You can also use a CD-R to create a live CD. To do this, you need the Unetbootin software to create the data carrier. And on the other hand the software for formatting: There are two variants here. Either you use a completely normal Ubuntu or the specialized Linux distribution Gparted Live..
Under Ubuntu, you can simply right-click a hard drive in the file browser - just like under Windows. If necessary, the hard disk must also be (re) partitioned, i.e. divided into individual drives such as "C:" and "D:". In this case you would start the partition manager on Ubuntu - which is not entirely randomly Gparted. In the following, Gparted Live will be used, as this very small distribution is wonderfully suitable for building an emergency system out of an old, small USB stick.
First you have to download GParted Live as an ISO image and Unetbootin.
Then insert the USB data carrier and start Unetbootin: Now select the saved ISO file under "Image" and the USB stick under "Drive". Start the writing process with "OK". Warning: The USB stick will be completely overwritten, so make sure you choose the right drive!
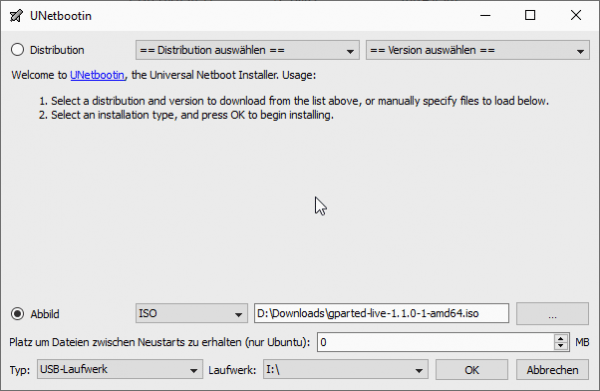 With UNetbootin you create bootable USB sticks.
 Optionally change the boot order
Basically, most computers are designed to first look for bootable removable media such as CDs or USB sticks - only if they are not found does the first hard drive boot with Windows, for example. However, if the computer does not boot immediately from the stick, you have to change the boot sequence in the BIOS. The BIOS (Basic Input Output System) is the computer's firmware, i.e. the software that basically mediates between the hardware and the operating system..
You get to the BIOS immediately after switching on the computer, before Windows boots: Most manufacturers display a corresponding message on the screen, such as "Enter ESC to enter Setup" or "DEL for UEFI / BIOS". In other words: Shortly after the start, press - in most cases - the "DEL" key to enter the BIOS. How exactly, but depends on the manufacturer. Once inside, look for the "Boot Order" function, or "Boot Management", "HDD Options" or something similar. Then put the USB stick in the top position. Don't worry: when the USB stick is gone, the hard drive starts up as normal.
Sometimes a separate boot menu is also offered at the start (via "F12", if you like), through which you can manually select which data medium is to be booted from. Some BIOS / UEFI variants also have boot menus as an alternative to permanently changing the order. It does it just as well, of course!
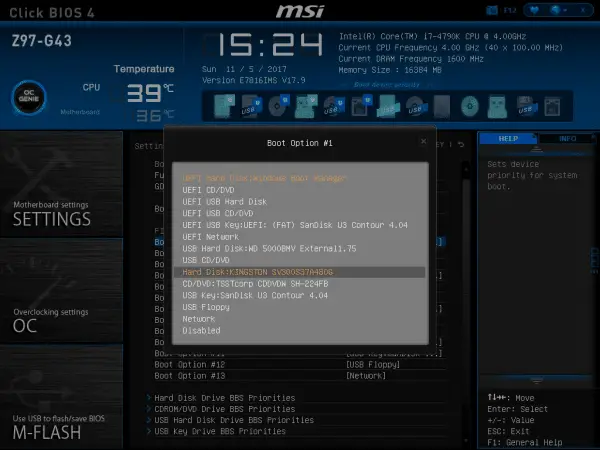 In the BIOS you make sure that the stick is booted.
 Format hard disk
However you managed to boot it, a GParted boot menu follows. Here you just leave it at the default to start Gparted. Shortly afterwards the question for a "keymap" follows: Confirm the default and then select the entry for the keyboard layout "German", here "10" from the following list..
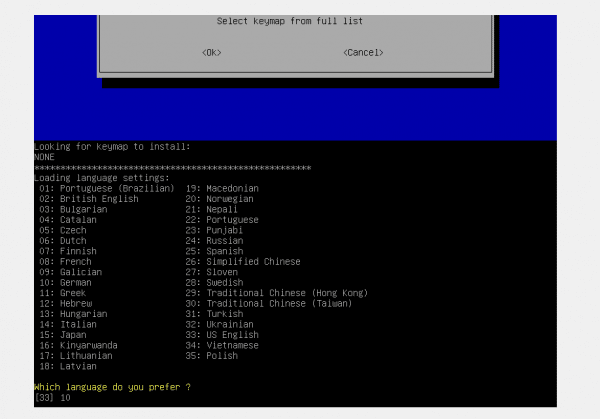 Select keyboard layout.
 Now Gparted is finally starting itself - from now on it is the same procedure as under a regular Ubuntu. If you are dealing with a completely new, unformatted hard disk, there is still something to do before formatting: Right-click to open the context menu of the hard disk you want and click "New" to create a new partition. The first message probably comes that a partition table is missing.
In this case, create this first via "Create drive / partition table". Simply accept the default type for the partition table ("msdos").
Then call up "New" again from the context menu, whereupon the editor for creating partitions opens. Here, too, you can leave everything at the defaults if you want a single partition for the entire hard disk. The exception is the "File system" field: The default is "ext4", which is intended for Linux systems. Select either "NTFS" or "FAT32" - depending on how you want to use the disk. In case of doubt, NTFS should be the safest choice, as Linux can also handle this Windows file system. Confirm with the "Add" button.
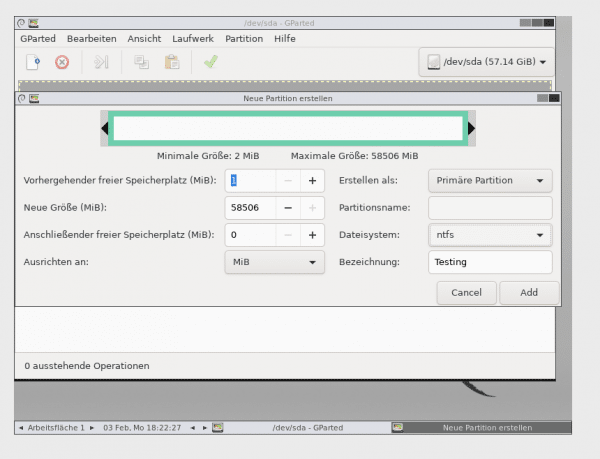 New hard disks must also be partitioned.
 The program now first shows you your changes, which are only actually implemented by clicking on the tick button.
If the hard drive is already partitioned, formatting is even easier: right-click on the desired partition / hard drive and then simply select the desired file system under "Format as ..." - done!
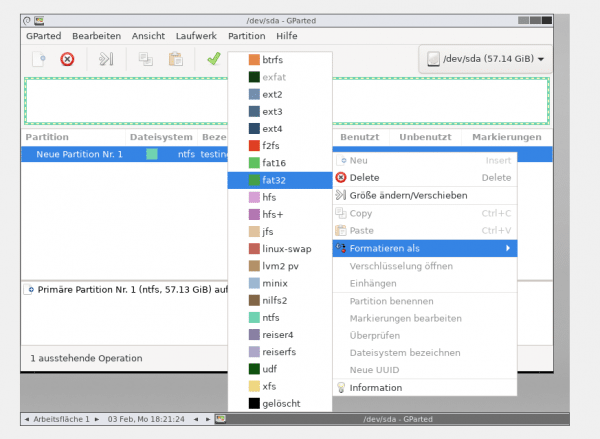 Formatting with GParted is extremely simple.