If we talk about taking photography or recording video to create audiovisual content, the camera will be our basic tool to achieve it. With the inclusion of cameras that included both options, it meant being able to have a device that would allow us to take photography and video in an alternative and simple way, even at home. Today, the camera on our mobile devices is a widely exploited medium, since the content we create on them can be quickly shared on different platforms. We find that from a mobile we can do a whole creation process, from taking the photograph to editing it and laying it out for a final project that can be our social networks..
As TechnoWikis tells you in different chapters, Lightroom Mobile is an application that allows us to do professional editing of our images and videos from mobile devices. In addition to its multiple options, it must be included that it has a camera with professional or automatic mode that will allow you to use the different variables of an image manually.
That is why today what we want is to show in detail what we can find within the Lightroom Mobile camera tool. We will see that we have an automatic mode that will make it easier for us to create videos and photos, or use the professional mode to adjust its different parameters one by one before pressing. We are going to see where to find the Lightroom Mobile camera, its main settings and then how to use the camera both manually and professionally..
How to access the camera in Lightroom Mobile
To access the Lightroom Mobile camera is easy since we will find ourselves on different occasions with an icon that will help us to open it. Whether we are in an album or on the cover of the application itself, we will see the following icon where we will see a camera. This icon will help us to click on it and open the camera.

After that we will have the Lightroom Mobile camera open and so we can start to see its options as we will see below.

Lightroom Mobile Camera Settings
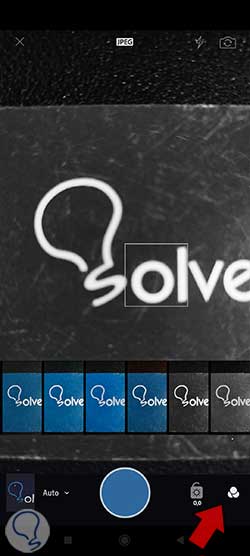
Before starting to use your camera within Lightroom Mobile, it is useful for you to know that there are a series of options that you can configure when you go to take photos with this tool. To find these settings you can click on the gear icon that you will see when you click on the three dots below the image:
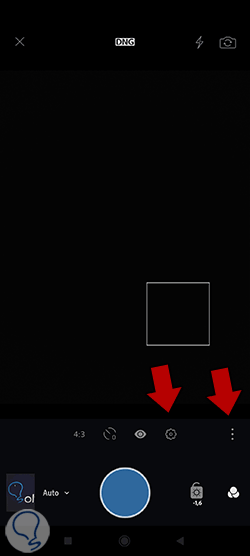
Here we will find different settings for the camera in general that we can use by activating or deactivating the options that can help us with this camera:
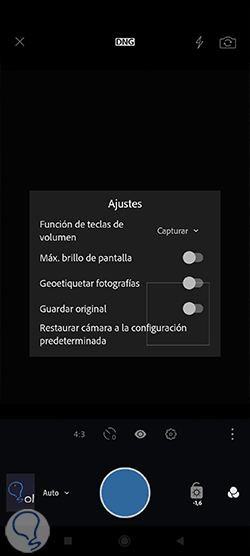
Here we will find the options of:
- Volume keys function. This allows us to configure what function the volume button that we have on one of the sides of the phone will have. You can choose its functions among “None”, “Compensation Exposure”, “Capture” or “Zoom”.
- Max Screen brightness. Allows you to adjust the brightness that the screen will have at maximum levels.
- Geo tag photos. On allows tagging with location data to be done within the EXIF metadata category of the image.
- Save original. It will store a copy of the image that we have made inside the phone.
- Restore camera to default settings. It will reconfigure the default values of our camera.
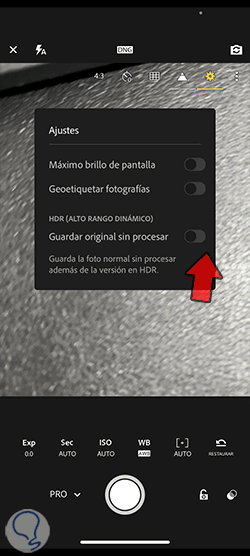
- Save raw original. If we are on iOS we will also find this option on HDR that will store our raw image including the HDR version.
Now we are going to see how we can use the Lightroom Mobile camera in both manual and automatic modes..
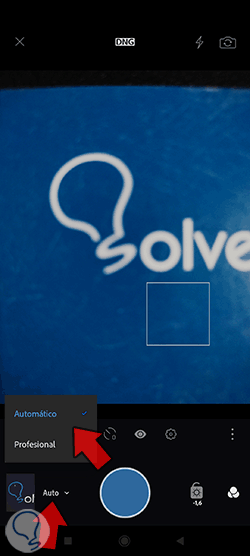
1 Use camera in automatic mode Lightroom Mobile
Professional photography always seems to be associated with having a very advanced and expensive technical infrastructure. Although if we are going to create really relevant projects it would be the most appropriate, the truth is that with more affordable materials we can also create quality audiovisual content. If we have the necessary knowledge and some tools that work well, we can produce really interesting material.
The advancement of technology in mobile devices has encouraged the creation of content to be continuous and with increasing quality. The speed and these complete properties that we can perform from any mobile phone make it really comfortable for us to make non-stop videos and photography. The camera is the fundamental part to be able to generate all those videos and images with a great appearance and that we can even improve later. Lightroom Mobile will appear here to complete this whole process as it will help us to make the image with your camera and then edit it right here with great results.
If you still don't fully handle these photography concepts, don't worry because Lightroom Mobile includes an automatic mode with which to take those photos and videos easily. This automatic mode will decide for you when it comes to regulating the different elements such as light, contrast, white balance... and will give you balanced and fast results. Let's see what we can do from this automatic camera mode in Lightroom Mobile.
Activate taking photos in automatic mode
We are already seeing that the automatic mode can save us time when taking pictures, although that will take us away from the possibility of interacting with the camera parameters and image properties. But many times we need to take a picture quickly and we don't have time to be configuring each of these parameters individually or we simply find that we don't control these settings too much and we prefer to play it safe and then apply some readjustment if necessary.
If we prefer to enter the Automatic Mode in the Lightroom Mobile camera we will go to the camera as we saw before. Then next to the capture button we will see a dropdown of options. Here we will find the possibility to choose the automatic mode.
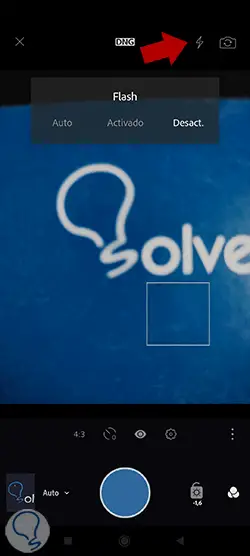
Turn Flash on or off
Using the flash will help us to generally compensate for light problems and that is normally installed in mobile cameras. Although it can be a favorable ally in some situations, in most cases it is used incorrectly and the results are usually not very positive. To know if we have used the flash well is that when they see our photograph they do not even notice that we have used it. If we don't know when to use it and how to play with it, we can find ourselves with very overexposed photographs and with the unwanted effect of red eyes.
In the end, the flash is an automatic function of the camera that also does not allow us to see the final result when it is applied, so we will go a bit blind. In addition, its use is inconspicuous and emits a large flash of light that will show its use. We recommend that you use it occasionally, practice with it and try to complement it, for example, with diffusers to enhance its results.
To activate or deactivate the Flash in our Lightroom Mobile camera we will open the camera interface. Then at the top we will see the icon corresponding to the flash and we can activate or deactivate it. In addition, we will find the options of:
- Auto. It will automatically activate according to external light conditions.
Focus and zoom
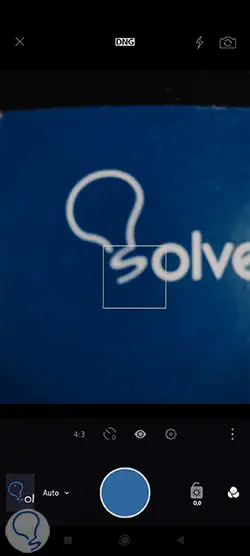
When we are taking photography it is important that we take into account the issue of focus. Many times when working in autofocus and not controlling how the camera works, we find results where the element that interests us has become out of focus and our image has been ruined. That is why a simple gesture can help us avoid these types of common problems. To focus we will only have to press on the screen a moment before taking the photograph in the area where we want it to focus. We will see the focus box on the screen and then we can make our image.
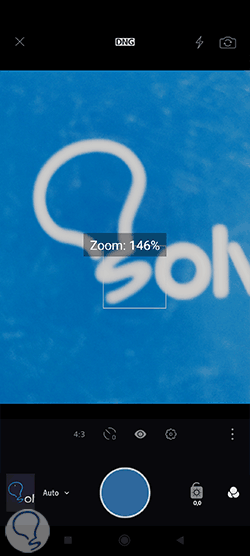
The zoom can also be an option to take into account since many times we are too far from our element or the final frame is not what we are looking for. That is why being able to zoom in or out will be very useful in our Lightroom Mobile camera. To be able to zoom we will go to the camera screen and with two fingers we will make an enlarge gesture to be able to zoom in on the objective. To zoom out again we will do the reverse gesture by pinching the screen inwards. We will see that the percentage of zoom that we have appears on the screen.
Take RAW photos
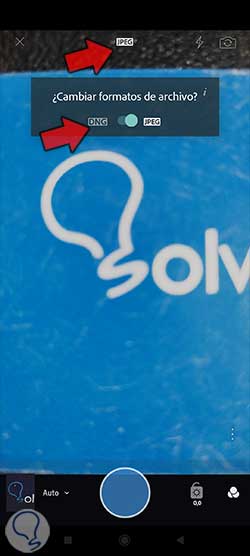
A file in RAW format means in its translation "raw" and this refers to the state of the settings and properties when we make an image. Let's say that this type of file stores its raw information, that is, we do not have data compression, so its subsequent editing is faithful to the initial shot. By having the information decompressed we will be working with the number of original pixels, something that we lose when we work with compression formats such as JPEG. In Lightroom Mobile we will find the RAW format determined by the DNG or digital negative type, a type of RAW file created by Adobe.
Please note that by saving more information these RAW DNG files will take up more storage space on your device.
To choose if we want to work with this type of file, we will open the Lightroom Mobile camera interface and at the top we will see the notice of what format we are using. By clicking on it we will see that we can choose between DNG and JPG.
Use grid overlay
When taking photography, we will look for some type of composition that attracts our attention and convinces us. Depending on our objective, the composition will vary, but normally we follow some type of composition rule. To help us distribute the content within our frame we can use grids provided by Lightroom Mobile.
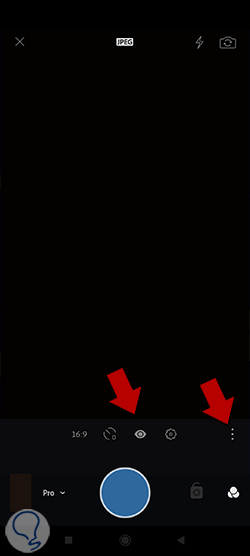
To activate this grid we are going to click on the three lower options points and then we will see an eye icon that we will have to click on.
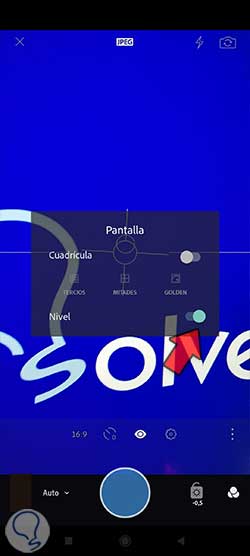
Here we will see the Screen options available among which we can activate grid rules: “Thirds”, “Halves”, “Golden”. Activate the “Grid” option and choose the type you want to overlay on the screen.
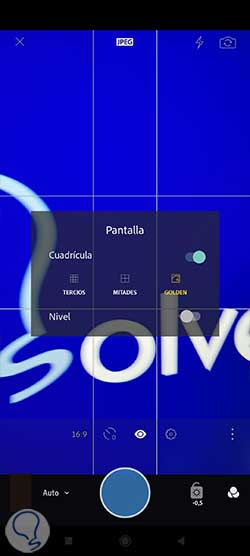
You also have the “Level” option available to get photographs where the horizon is well referenced with a rectilinear appearance.
Use Filters or Presets
With the course that TechnoWikis offers you about Lightroom Mobile, we are seeing that we can use this tool to edit the final appearance of our photographs. Within the editing options we will have the possibility to apply preset adjustments or filters. What you can also do is that when you go to take the photograph you can directly apply a certain filter that will affect the light and color parameters of your image but that can avoid having to edit it later, for example, if we are looking for a blank image and black directly.
To apply a filter or preset we will go to the Lightroom Mobile interface and click on the lower right icon. We will see different filters that we can click to apply to our image.
See last photo taken
When we have taken photos with our Lightroom Mobile application, we can find them within our gallery in the traditional way or we may not have to leave our interface to see that last image we have taken. To do this we are going to go to the thumbnail image on the bottom left and the last photo taken will open.
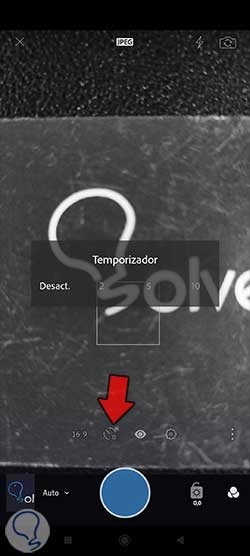
activate timer
Sometimes we need a few seconds to get in front of the camera or we just need it to be completely still, so using the timer will help us a lot with this. The Lightroom Mobile camera also includes this function and we can find it within the application interface. We will only have to click on the three option points and we will see the icon corresponding to the Timer.
From here we can deactivate it or set a certain time for the countdown to be made. To start it, press the capture button and the timer will start counting and the photo will be taken automatically.
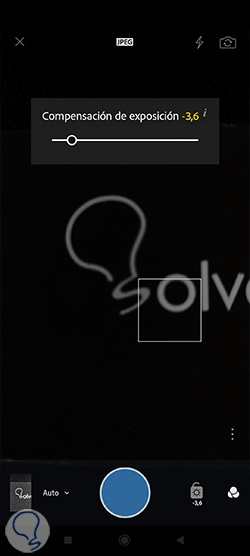
Use automatic exposure compensation
You can make an adjustment of the image exposure compensation manually while we are going to take a picture. To do this it is simple, we just have to press on the screen and slide to the right or left to move the exposure balance. A slider will appear on the screen that will tell you what level of exposure you are at and how it is moving. With this you can adjust the exposure of the scene manually, thus being able to lighten or darken the exposure of the scene.
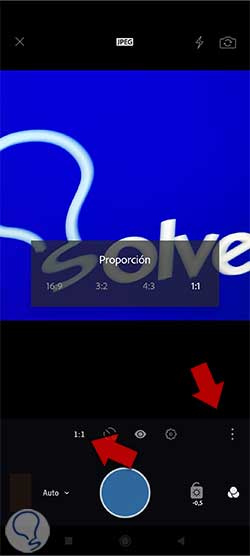
Change aspect ratio
When we make an image, depending on its final objective, we will need some requirements or others, so it is important that we know what they are from the beginning because this is how its configuration is made from the beginning. One of the needs that may arise is the proportion of the image that we are going to have, something that we can clearly see in Social Networks where, depending on the end zone, it will change completely. That's why we also have an option here to change the ratio from the start.
To do this, we are going to click on the three option points below the image. We will see here the possibility of changing the image proportion, by clicking on each one it will vary on the screen.
2 Use Camera in Professional Mode Lightroom Mobile
If Lightroom Mobile was already a truly complete tool with all the options and settings it contains for professional mobile photography editing, the fact that we include the possibility of having a Camera that lets you work in professional or manual mode makes it the Ideal application to create video photography content with a really interesting character. We already know that creating photography and video is a constant task that is facilitated by having our mobile phone at hand at all times and wanting to immortalize any type of moment. Hence, many times we even need more prominent and complete material to upload to our profiles and have a more interesting appearance.
Although professional photography and video editing has always been associated with the computer world, the rise of social networks, the constant exchange of information through applications and the web, make it necessary to have alternatives on mobile platforms that speed up all these instantaneous workflows.
This is where Lightroom Mobile stands as a suitable tool for making professional editions from any mobile device, be it Android or iOS. And it is that in addition to allowing us to edit the very complete transform photography even in raw format, we will also have the possibility of using its Camera option in professional mode and making the adjustments individually when taking our photography. If we are working on somewhat more professional jobs, the ideal is to use this Camera mode and work on the scene configuration ourselves, this will allow us to want a unique character to our compositions, preventing the application itself from deciding for us. We are going to see how to use the Professional Camera in Lightroom Mobile and what we can find in it.

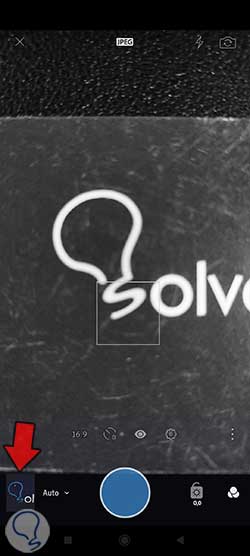
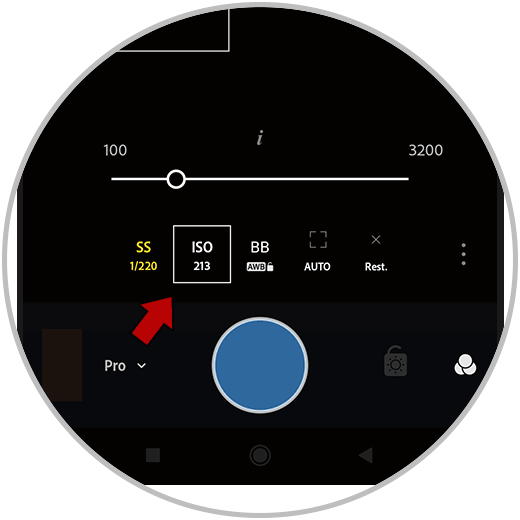
The first thing we will have to see is how to enter the professional mode of the Lightroom Mobile camera. To do this, within the camera interface we will see an option to the left of the camera capture button. If we click on it we will see the option to choose the "Professional" option so we will click on it to enter this mode.
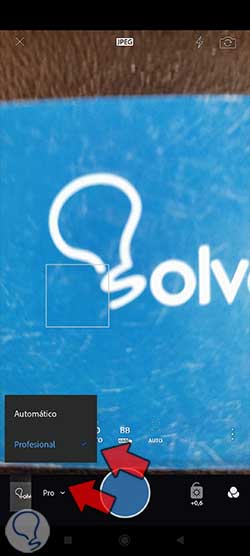
We will see that the camera interface changes and we will now have the possibility of adjusting different elements manually.
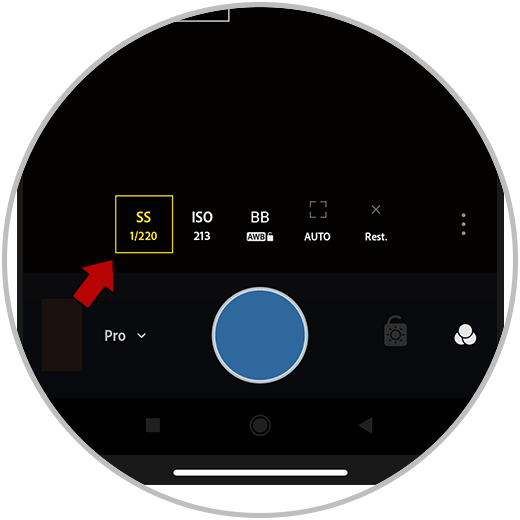
Adjust Shutter Speed
Shutter speed corresponds to how quickly the shutter will close to take a photograph. Since we are configuring that shutter opening time, we will also be configuring the amount of light that will be able to enter our camera. Depending on the configured speed, we will have images with more or less light or blurrier or sharper images. For a frozen effect use high speeds and for blurry effects or long exposures use low speeds.
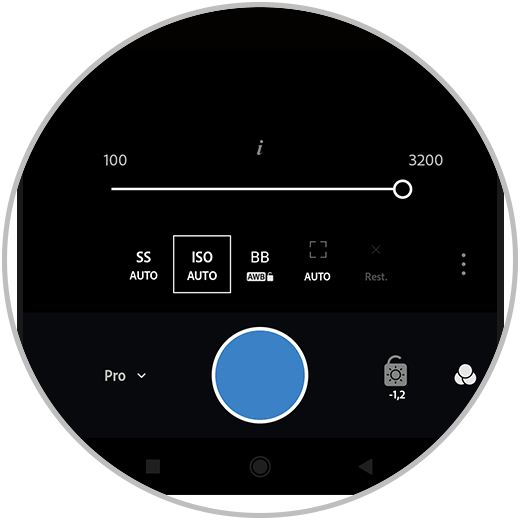
Adjust ISO value
The ISO configures a sensitivity scale that measured this property in analog cameras and that has been adapted in digital. With the ISO we will determine the amount of light that we are letting through to the camera and it is a key value to configure the exposure in our photographs. The ISO does not control the amount of light that passes through, but is responsible for enhancing the amount of light digitally. Hence, the ISO is preferred to use in moments of low light where we need to force the appearance of light. Be careful with its excessive use as it can produce noise in our image.
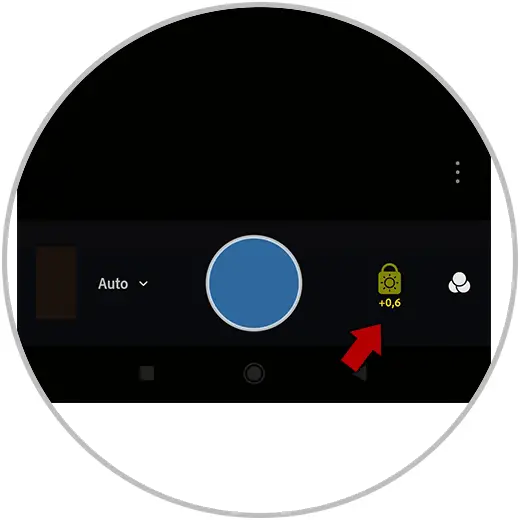
Adjust or lock exposure
By activating this icon we will block the exposure compensation at the current value that we have configured.
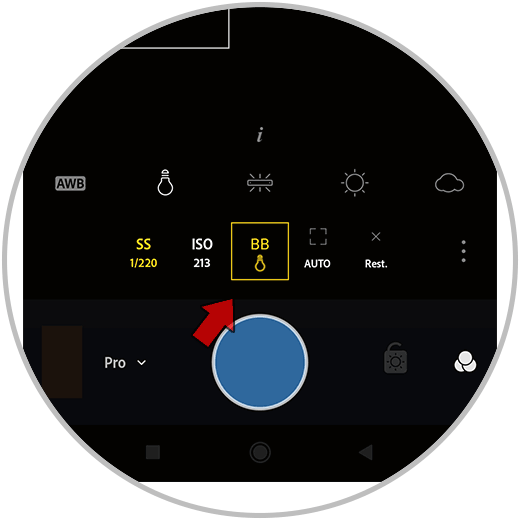
Adjust White Balance
With the white balance adjusted we will achieve a correspondence between the light source of the scene and our camera. Normally current cameras tend to have a good white balance, but in this case if you want to choose a manual mode you can also in Lightroom. This will help you to adjust the light of the scene since a sunny day outside will not be the same as an afternoon inside with a fountain lamp.
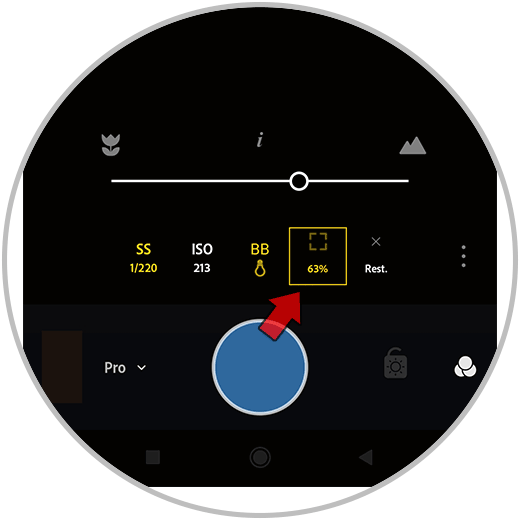
Adjust focus distance
With this adjustment we are going to modify the focus distance to the objective of our scene, thus modifying the parts that are in focus or out of focus.
Options available in iOS versions
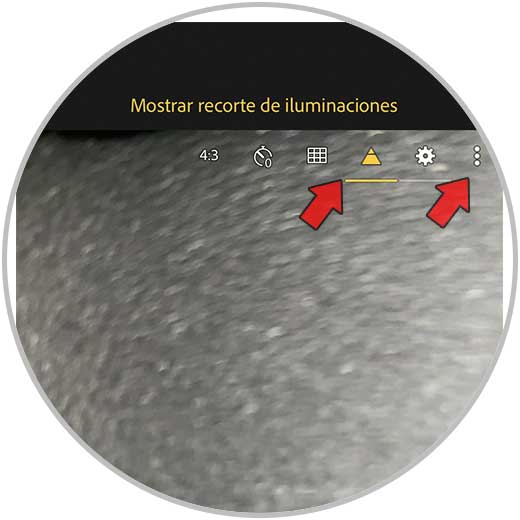
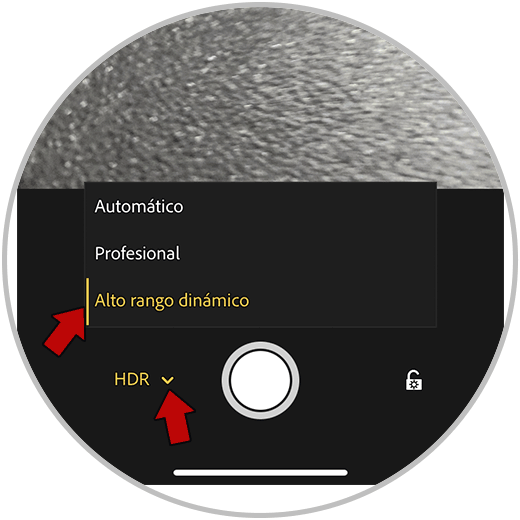
In addition to the options that we have seen previously, we have additional ones when we are working with Lightroom Mobile in the iOS version:
- Show lighting clipping overlay. This option will display a highlight clipping overlay of overexposed areas of our image. This way we can quickly see which areas of our image are darker and thereby better regulate the exposure when taking a photograph.
- Activate HDR Mode. It allows us to use the HDR mode in our photographs:
In this way we will be able to fully use the camera in Lightroom Mobile either in automatic mode or using the manual options that allow us to use the professional camera in Lightroom Mobile.