When we talk about Instagram Reels, there are many creation options that we can carry out using the same tool. The possibilities are endless, since it allows us to make Reels with photos, Reels with videos and add lots of effects such as text, filters, music and a long list of possibilities..
It is for this reason, due to all the creation options that exist in Reels, it is interesting to know all of them to know the creation options that exist and see which one best suits our needs at any given time; since, depending on the type of Reel that we want to record, it will be better to use one or the other.
This section focuses on creating Instagram Reels using videos, and for this reason we are going to explain the two options that exist to do it step by step..
Create Instagram Reels with new videos
This would be the classic option, which would be to create Instagram Reels with videos that we are recording at the same time that we create the Reel; that is to say live.
This is the most natural option, since we are going to broadcast content that we are experiencing right at this moment. Also, you should not worry if you cannot upload a Reel at the time you create it because you do not have an Internet connection, since on Instagram you have the opportunity to save that Reel in drafts to upload it at another time when the network connection is better.
Create Instagram Reels with already recorded videos
In this option we are going to use already recorded videos that we have saved in the gallery of our terminal to assemble a Reel video.
This option is highly recommended when we want to set up a Reel with content that we have recorded over several days: a vacation, a trip, a whole year, a school year and a large number of etceteras that you can imagine. In the event that we want to set up a Reel showing this, the best option will be to create the Reel with the content that we have already recorded over the days, weeks or months and use it to set up the Reel.
In this case, we are going to explain the option of creating an Instagram Reel of videos with both options: Videos recorded at the moment but also videos that we had previously recorded and that we have saved in the gallery of our terminal. Here you will find the option on how to perform each of them step by step and in the form of text and video..
1. How to make an Instagram Reel with videos
First of all, we are going to explain the main way to create Instagram Reels, which would be recording videos at the moment that will make up the different parts or clips of the Reel.
So to speak, this would be the classic way to create Instagram Reels, and then we are going to give you some examples of Reels in which it would be ideal to use this method:
Reel ideas with videos created on the spot
- Show the process of a makeup
- Show the process of a hairstyle
- Show the different rooms of a house or workplace
- Show different outfits for an event
These are just a few examples, but surely you can think of many more examples of Reels to create with videos recorded at the moment. To carry them out, the process is the one that we explain below in the form of text and video:
To stay up to date, remember to subscribe to our YouTube channel!
SUBSCRIBE ON YOUTUBE
Step 1
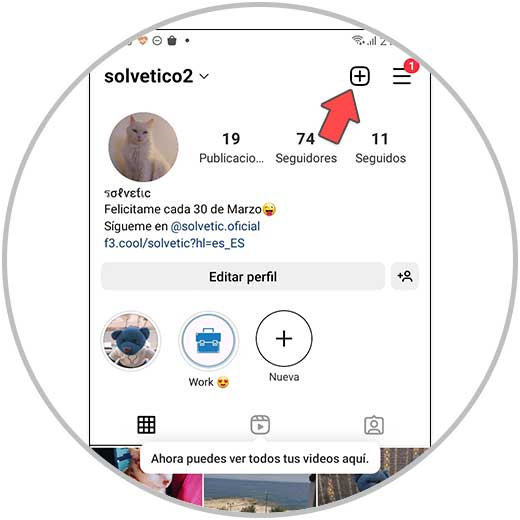
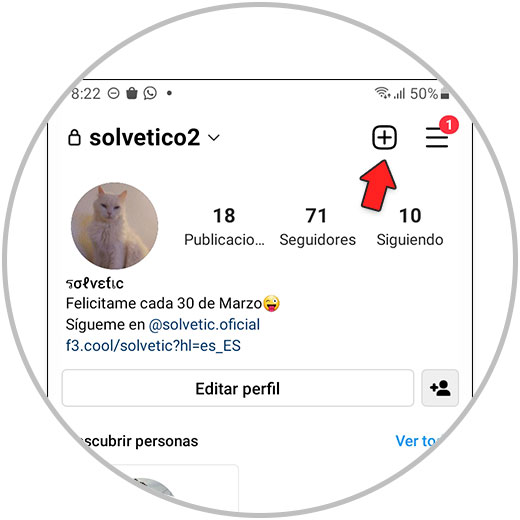
From your Instagram profile, click on the “+” icon in the upper right corner of the screen.
Step 2
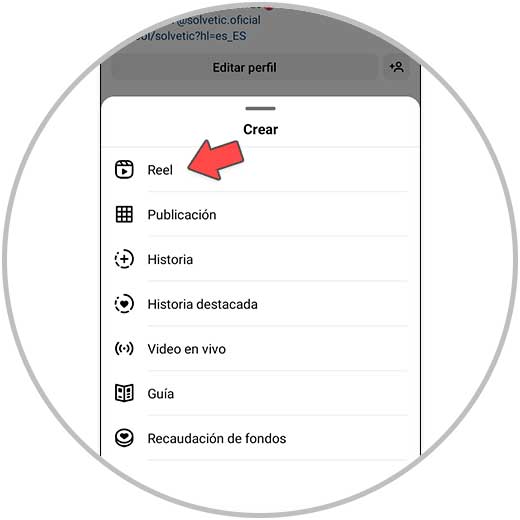
Now, all the content that you can make will be displayed and you will have to click on the Reels option to continue.
Step 3
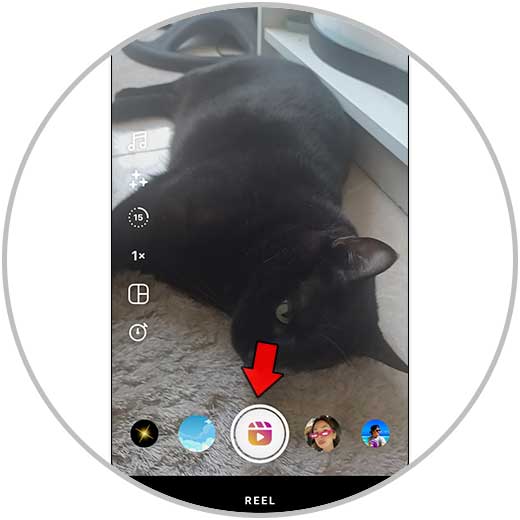
In the options in the left column you can configure the following elements of the Reel:
Music
Choose a song or audio to play in the background when you record your Reel.
effects
Here you can add different filters to your Reels.
Duration
Here you can edit the duration of your Reel, 15 seconds, 30 seconds, 60 seconds or 90 seconds.
Velocity
Here you can make your Reel record in slow motion or fast motion.
Collage
Here you can edit different collages so that the Reel is presented in one format or another.
timer
Here you can set a timer to start a countdown and that the different clips of the Reels are recorded in hands-free mode, that is, without the need to hold the button down
Note
How each of these elements work and the possibilities they offer us are explained in more depth in the following sections of the course.
To record the first clip of the Reels, hold down the center button.
Step 4
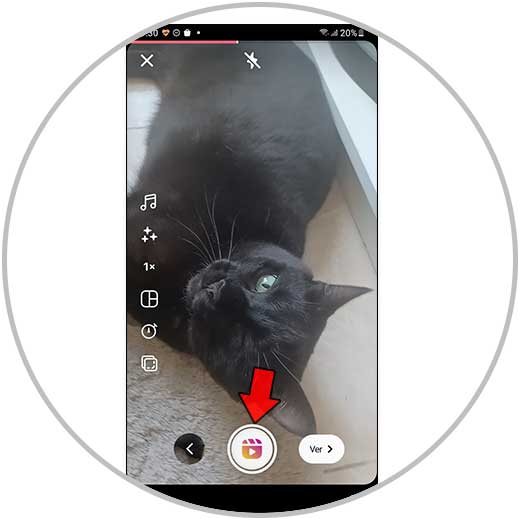
In the red bar at the top, you will see what the first recorded clip occupies and the time you have left to record on the Reel (the whole bar representing the full duration of the Reel). Now hold the center button again to record the second clip (you can focus elsewhere, change the angle, record somewhere else, etc)
step 5
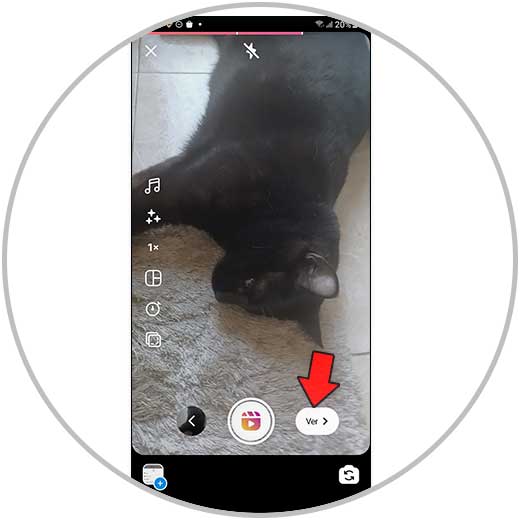
When you have recorded all the clips that will make up the Reel, click on the “View” button.
step 6
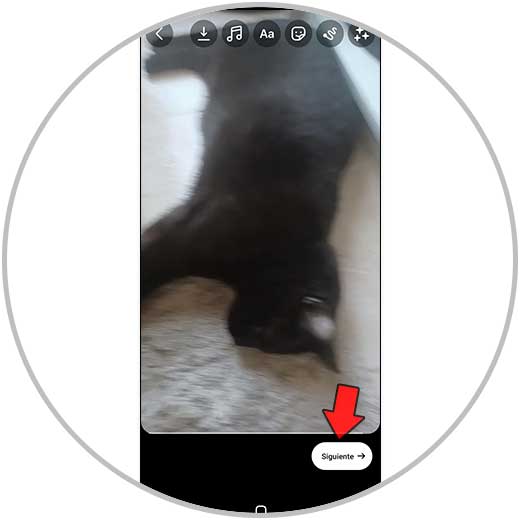
Here, you will see a preview of the result of your Reel and in the upper options you can perform the following actions:
Once you have configured the Reel to your liking, click on "Next" at the bottom.
step 7
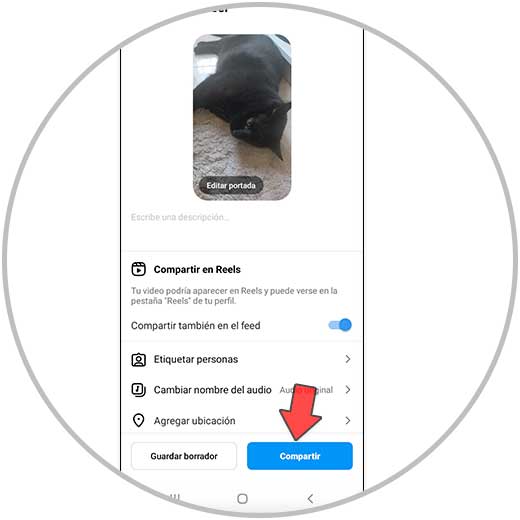
Finally, on this screen you can select a cover, tag people, add a location... Once you have configured this, click on "Share" to publish your Instagram Reel.
2. How to make Instagram Reels with already recorded videos
Another way to create or make Instagram Reels will be using videos that we already have recorded and saved in the gallery of our terminal. As we have already mentioned, making a Reel with already recorded videos is ideal when we want to show processes that last a long time in a Reel; that is to say, it is not something that happens at a certain time and place, but rather the actions last for days, weeks, months...
Next we are going to show you some examples in which it is convenient to have the videos already recorded and saved in the gallery of our terminal to create a Reel.
Reel ideas with already recorded videos
- Most important sites to see when traveling to a country
- Show my looks through the years
These are just a few examples, but surely you can think of many more in which we have to record content and save it in the gallery to create a Reel. Once this is seen, we are going to explain the process for when we want to make a Reels with already recorded videos; and we are going to show you this in the form of text and video:
To stay up to date, remember to subscribe to our YouTube channel!
SUBSCRIBE ON YOUTUBE
Step 1
From your Instagram profile, click on the “+” icon located in the upper right corner.
Step 2
A drop-down will appear with several options, where you must select “Reel”.
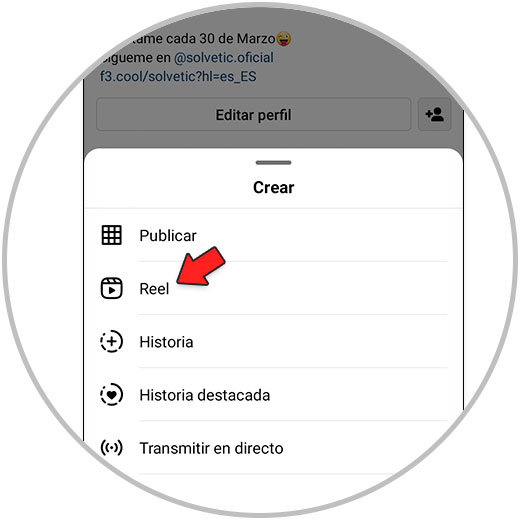
Step 3
Now, on the Reels creation screen, click on the small “+” icon that appears in the lower left corner of the screen to add the videos already created.
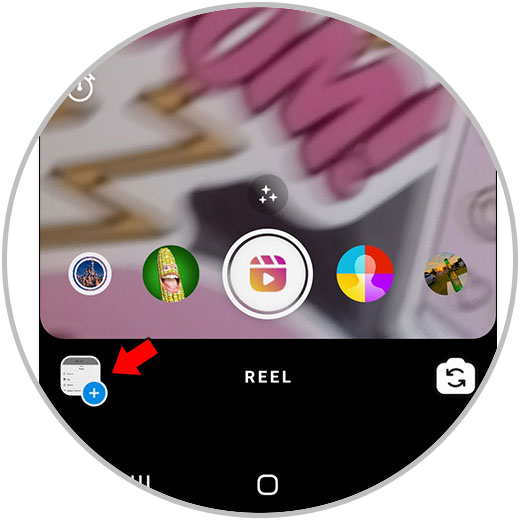
Step 4
Now, select the already recorded videos from the gallery that you want to appear in the Reel. Remember that as you select them, a blue number will appear indicating the order in which they will appear. Once done, click on “Next”.
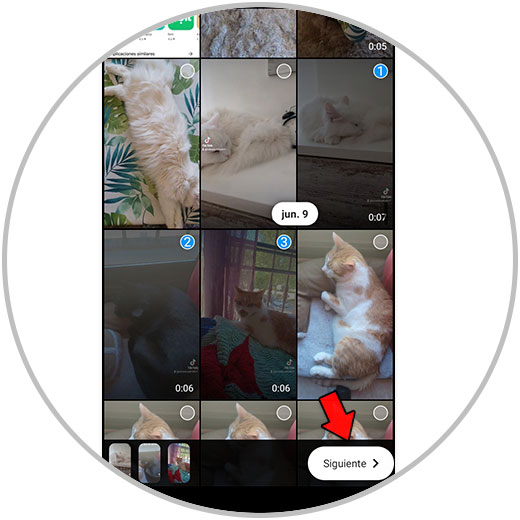
step 5
Suggested audios for your video Reels will appear at the bottom of the screen. You can select one of these audios by clicking on it or search for one that you like by clicking on the "Search" magnifying glass icon. You can also remove the music by clicking on “Skip”. Once done, click “Next”.
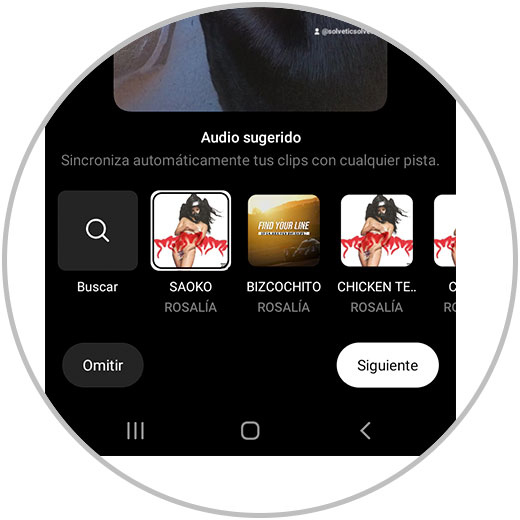
step 6
The assembled video will appear, and at the top you can add effects such as music, text, draw, stickers, tec. When you have the effects you want added, click on “Next”.
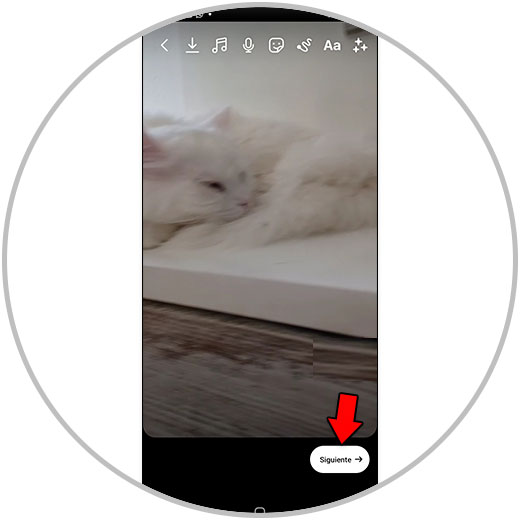
step 7
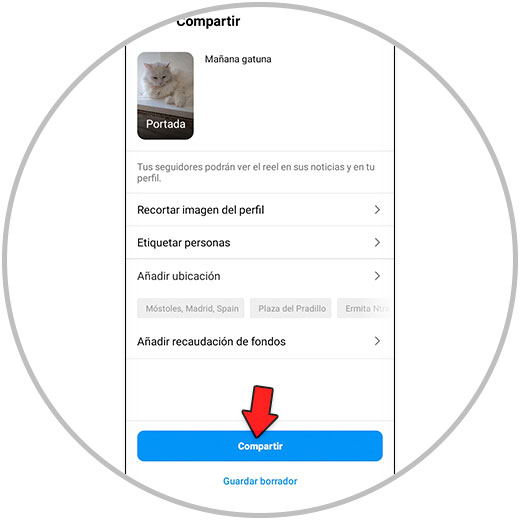
Finally you will see this screen, where you can modify the final options of the Reel, such as the cover, add a footer, tag people, etc. When you have everything, finally click on "Share" and the Reel will be shared for everyone on Instagram.
With this, we have thoroughly analyzed how Instagram Reels are made with videos; whether they are videos recorded at the moment or videos that we already had recorded and that were stored in the gallery of our terminal. We have also analyzed when it would be advisable to use one or another creation strategy in the Reels, in addition to seeing some practical examples in which it would be ideal to use one or another option.
With this you will have become an expert in creating your video Reels, since in addition to perfectly knowing the process to execute them, you will know how to analyze when it is preferable to use one or another creation strategy.