Protecting our content is important to prevent others from mastering it without permission. In the unbridled use of the Internet, it is common to share photos, videos, texts... which, if we do not highlight the authorship, may be shared and even go viral at the risk of losing that copyright property right. That whenever you create audiovisual content or of any type in a unique and original way, it is recommended that you include authorship data that we will call copyright to prevent any user from saying that it is theirs. It is increasingly common to see fights, especially on the Internet, where different people claim to be the authors of the same content. The problem comes when these people, even knowing who its real author is, use it under a different authorship that does not correspond to them..
Mentioning as yours something that is not yours in terms of content is illegal and that is why as an author you should always have the necessary weapons that can demonstrate at any time that you have done it. One of the options that we can use to prevent, for example, our images from being used without our express consent is the use of the watermark.
What is a watermark
A watermark is a visual element that can comprise different types such as a text, a signature or a logo and that will identify the author. In photography, for example, this is a very common resource and it will help us both from a marketing perspective to quickly identify ourselves as the authors of a piece and to protect its authorship.

If you are a photographer or professional in a similar discipline, it is recommended that you create your own watermark as it will be an element that will end up representing you in your pieces and creations. In this way, once you show your photographs and compositions, users will end up with your name or pseudonym when seeing it embodied in a wide variety of content. Hence, creating and using a watermark has a series of really interesting advantages..
Advantages of a watermark
Some of the advantages that we can have if we work with a watermark in our work are:
- They allow you to improve your marketing strategy by making your portfolio include that identifying brand that will also grow significantly if your content becomes viral.
- It will be easier for the end user to identify the author of the photograph since many times if we like an image or composition we tend to look for more content from the same author.
- In work processes with clients, it is usual to send a previous result with a watermark or low resolution and until payment is received, not give the final benefits. In this way, we will avoid unwanted defaults from customers.
- Putting a watermark on a composition of yours also indicates that you are proud of the work you have done and that you like people to associate you with it and recognize your talent.
Although watermarks in our photographs can be a great point in favor, the truth is that we can also find some type of negative point that also influences our final result. Once you think about the positive and negative, you will have to assess what compensates you more when using or not those watermarks in your photographs.
Disadvantages of a watermark
Some disadvantages that we could find when using a watermark are:
- Despite the fact that the watermark is an element that makes it very difficult to infringe copyright, the truth is that there are already tools that allow you to eliminate them and that you hardly notice. It is something negative that you have to count on, but think that no matter how much the authorship of an image is taken from you, the talent is still yours.
- If you use watermarks that are very present in your final photograph, in the end it is possible that we end up spoiling the final result of our image and that is why there are many professionals who avoid their use. That is why you will have to assess whether the watermark you use greatly influences your final photograph and it is not worth using it.
- Normal when a person sees an image on the internet and likes to contact or mention the author where they are going to use it, but perhaps even though that watermark on your photographs they will think more about it when using them, for example, on their web pages or blog.

A watermark is a quick visual element with which to identify the author of the photograph or piece that we are viewing, but there are other methods such as metadata that will also include data referring to the author and the creation of the image, even if we do not see it. that photograph or audiovisual piece. For this reason, in addition to taking into account the watermark, we suggest that you also activate the inclusion of metadata from your Camera or device where you take the photos and thus, even if your image is shared, that metadata will normally be included.
If we have to create a watermark to identify your photographs more quickly, we suggest that you take into account the following elements to make it suitable..
What to consider when creating a watermark
Some of the aspects that you have to take into account if you want to create a good watermark will be the following:
- Size. This property is important since depending on the size that we put on our watermark, it will have a greater or lesser visual weight within the composition. For example, on a website that is dedicated to providing images with paid resources, it is normal to see large watermarks or watermarks that occupy a large part of the image so that it is difficult to remove it. In the case of a photographer who only wants to give visibility to his name or brand, he will surely opt for a smaller watermark and somewhere where it does not excessively disturb the rest of the photograph. Always try to find the right balance between what you want to achieve with your watermark and the importance of making your photo look good.
- Design. This is the initial step you must take when you want to create a watermark and where the first thing you will have to choose is if you want a text-based or graphic-based watermark. It may be that you prefer that you only put your name, a signature or even a logo that represents you. The most recommended is a watermark that is as minimalist as possible where it prevents the user who is viewing our photography from being distracted by it and in the end the attention is dispersed. I tried to look for designs that are not going to go out of style and that have a simple and easy-to-read structure, here less is more.
- Position. Once you have a clear design and a size that convinces you, the next thing to do is to think about where that watermark is going to be placed. The position will also be essential and will surely vary depending on the photograph since perhaps at some point we do not want to cover or obstruct any area of our photograph. The ideal is to try positions and see which is the one that convinces you the most, but the most recommendable thing is to choose the corners of the photographs since it is usually where there is less compositional information. Always try to make your watermark add to the composition and not ruin it or detract from it.
As we see, the watermark is an important element that we must take into account if we want to protect our copyrights and we want to strengthen our brand. That is why we recommend that you spend time and make a watermark that convinces you. Think that this watermark will normally represent you for a long time, so look for simplicity and timelessness to avoid its use expiring soon.
To stay up to date, remember to subscribe to our YouTube channel!
SUBSCRIBE ON YOUTUBE
How to put a watermark in Lightroom Mobile
As they have previously mentioned, the issue of copyright is important and must be taken into account when we are content creators and we must bear in mind that we always run the risk of this content being used without our permission. It must also be taken into account that, although we take the photograph, we are the intellectual authors and we have full rights to it, our services are usually contracted to take those photographs according to the agreement, we may lose that copyright property there. This is something that, for example, we can see on social networks or magazines sponsored by specific brands where the copyright will belong to the company that advertises them and not to the photographer who made it. All this will depend on the legal contract that is signed between both parties.
The good thing is that within the watermark options that we are going to see in Lightroom Mobile we will see that we will have the option to customize it with these options above the main photograph and that they coincide in Text mode or graphic mode:
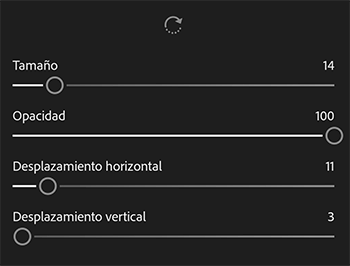
- Size. With this regulator we can enlarge or reduce the size of the text or the graphic of the watermark.
- Opacity. We can reduce the transparency of the watermark so that it is not 100% visible.
- Vertical displacement. We can move the watermark vertically through different positions on the image.
- Horizontal displacement. Allows you to move the watermark horizontally over the image.
- Turn. You will see an icon with an arrow that allows you to rotate our text or graphic as a watermark.
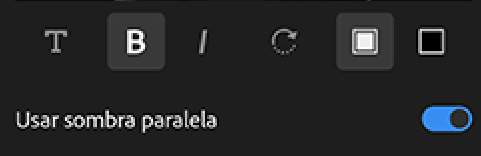
In addition to these options, if we are going to put a type of watermark in Text mode, we will see that we can give it more customization options such as the text style, be it bold, italic or even give it shading.
With these options that Lightroom Mobile allows us, we will be able to customize a watermark from our mobile phone or tablet and thus make our name or brand present in a simple but unique way.
Step 1
The first thing we will do to edit our photograph is to search for it in an album or folder where we have imported it or import it or do it with the icons that appear in the lower right part.

Step 2
Once the image is open, we are going to make sure that we are in the Edit mode that is indicated at the top so that the adjustment panel appears.

Step 3
From here we will begin to edit our image according to what we need using the lower panel of options that appear.

Step 4
The watermark will be placed at the end of the process so it will be one of the last steps. Once we have our photograph ready, we will click on the share icon in the upper right part.

step 5
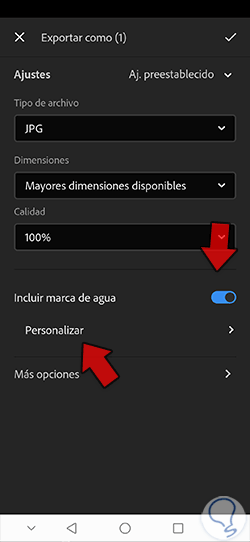
In the options panel that appear, we will choose the "Export as" option to configure different options when saving the image.

step 6
We will see that the export options panel opens, among which we can activate the "Include watermark". In order to create a personalized watermark, click on "Customize".
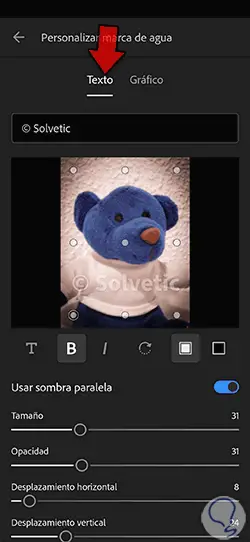
step 7
Here we will be able to use two types of watermark and customize it. We can put a watermark in text or use a graphic as a watermark.
In this case we are going to start by seeing that in the "Text" section we can put the text as a watermark that we want. In addition, we can give it different effects such as bold or adjust its "Opacity" or position on top of the image.
To play with the orientation of the displacement, click on one of the points on the screen and the “Horizontal displacement” or “Vertical displacement” will be activated depending on the one you have selected.
step 8
If you prefer to configure a watermark with an image, we can click on "Graphic" Here we can load our image from "Choose a file".
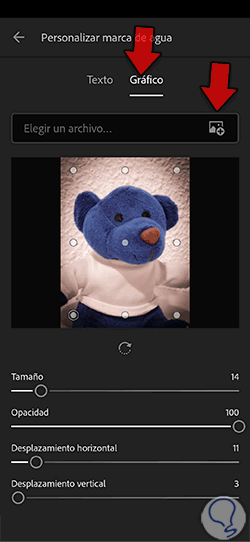
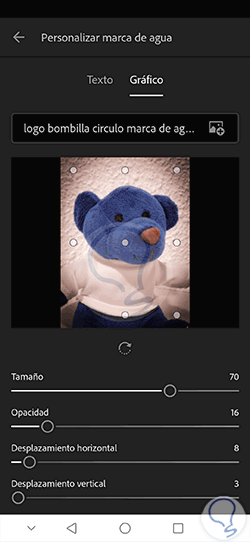
step 9
Once you have loaded the image that will be the watermark, we can configure it on top of the image and be able to put a "Size", "Opacity" or "Displacement" in a personalized way.
To change the orientation of the scroll, click on one of the points on the screen and the “Horizontal Scroll” or “Vertical Scroll” will be activated depending on which one you touch.
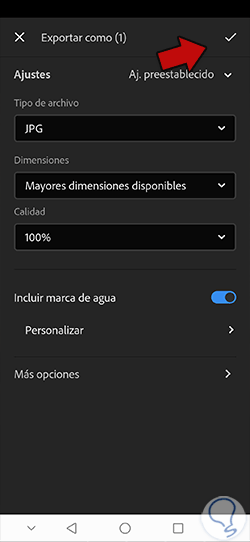
step 10
Once you finish configuring the watermark we will go to the back window where we saw the "Export as" options. Set up the rest of the export options for your final photo.
To finish the export process with our watermark, click on the upper check that you see.
step 11
We will see that the export of our file will be carried out satisfactorily and we confirm with "OK".
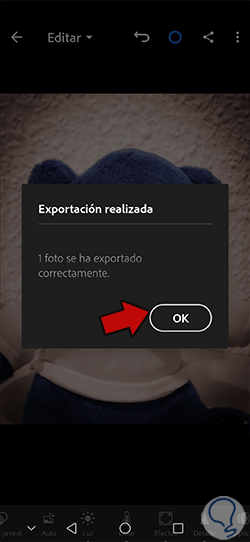
step 12
Once exported we can search for our image in the gallery and see our personalized watermark that we have configured.

In this way we will be able to configure and put a watermark on our photographs and in a personalized way using Lightroom Mobile. So we can configure and add a watermark in Lightroom Mobile and highlight that a photograph is created under our copyright.