Microsoft has been linked to the current trend of launching new editions of its Windows 10 operating system with a much higher frequency than normal, so we have seen how we have had editions such as Anniversary update, Creators Update, Fall creators, April 2018 and soon we will be before the October 2018 edition which, like all new editions, with new features, improvements and updating of other features..
News
Among the new we will have with the October 2018 edition, with build 1809, we find:
- Clipboard history and cloud synchronization which adds the following key combination to the paid processes and in addition to this we can synchronize the clipboard on other Windows devices.
+ V
- Dark Mode is added for Microsoft applications.
- A SwiftKey keyboard is added for touch devices.
- Improvements in the screen clipping tool will now be called Snip & Sketch.
- Better options for reboots after updates .
- Separate font size regulator and more options.
Undoubtedly all this is striking and can be of great help to improve the experience of using Windows 10, but we know very well that when a new edition of an operating system is launched normally in the first months some kind of failures can occur in its performance , operability, process execution and others, which has a negative impact on the overall user experience and this is something that Microsoft does not want.
As Windows 10 users we have the possibility of delaying updates for up to 365 days and thus expecting the new October 2018 edition (redstone 5) to be much more stable for use. TechnoWikis will explain how we can carry out the process to delay these updates and thus be sure to install it when it is stable enough..
1. Delay updates using the Configuration utility in Windows 10
Step 1
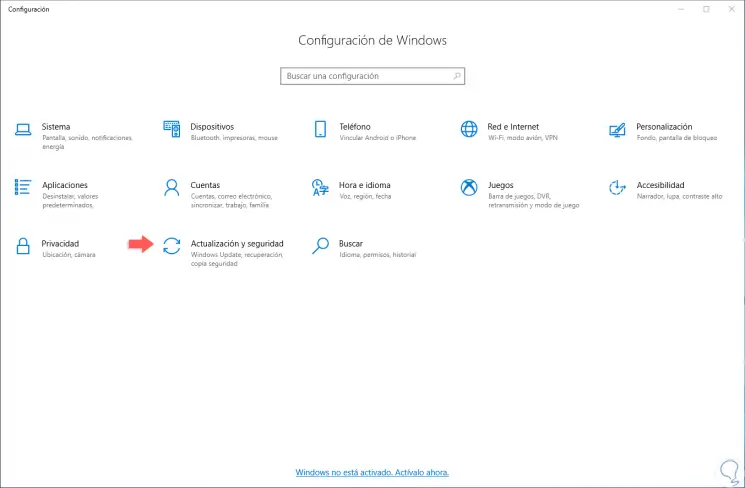
The first method we will see is through the Configuration utility, for this we go to the Start menu and there we select Configuration, the following will be displayed:
Step 2
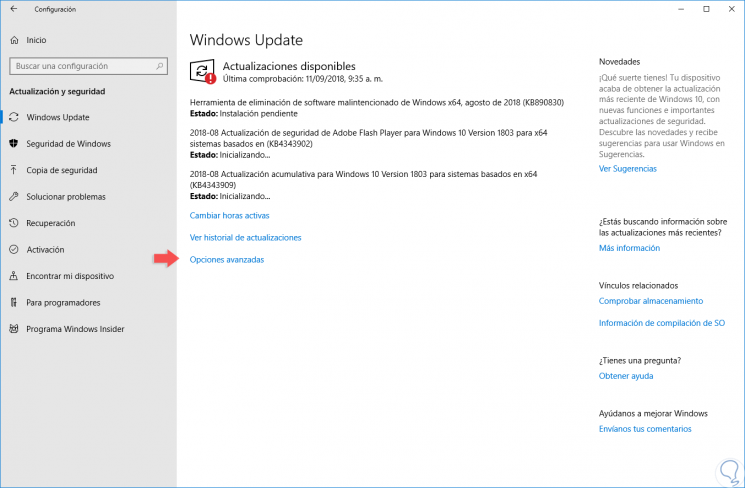
We click on the “Update and security†category and in the new window we go to the “Windows Update†section where we will see the following:
Step 3
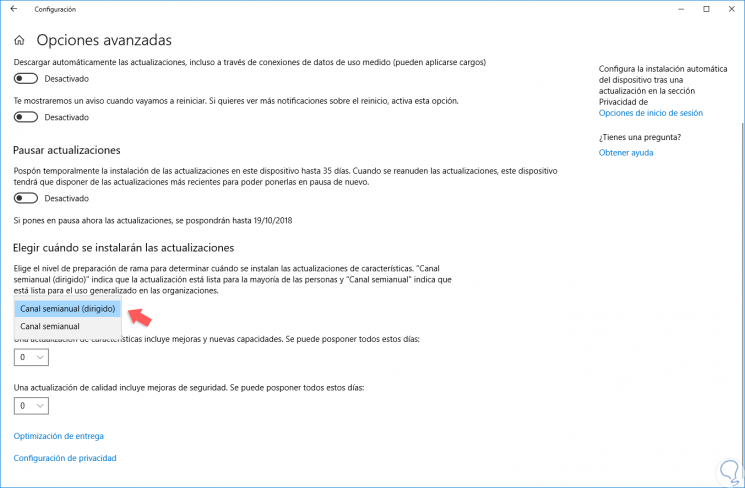
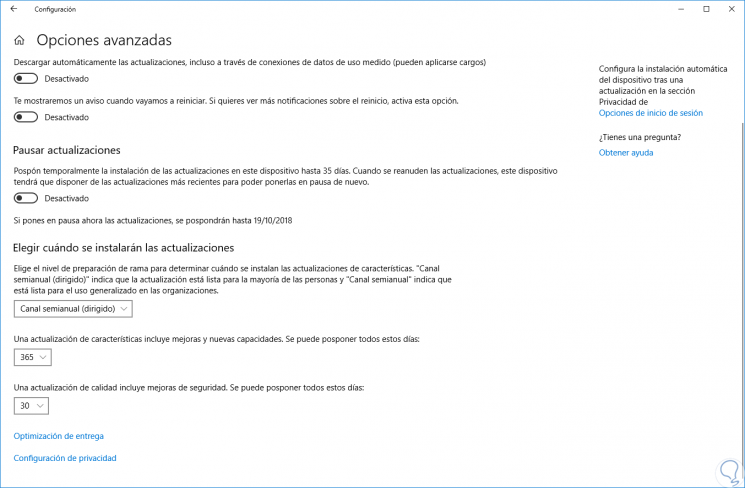
We click on the “Advanced options†line and in the new window we will go to the “Choose when updates are installed†section. In this section, in the Preparation level field, we find the following options:
- Semiannual channel (directed)
Step 4
The Windows 10 semiannual channel is a feature update version which is distributed twice a year, in March and September, with a service period of 18 months for each version. This semi-annual channel replaces the current branch (CB) and current branch for companies (CBB), as of version 1703 of Windows 10, which was distributed for wide implementation on July 27, 2017.
The semi-annual (targeted) Channel is the default service channel for all Windows 10 devices, except those with the LTSB edition installed.
Step 5
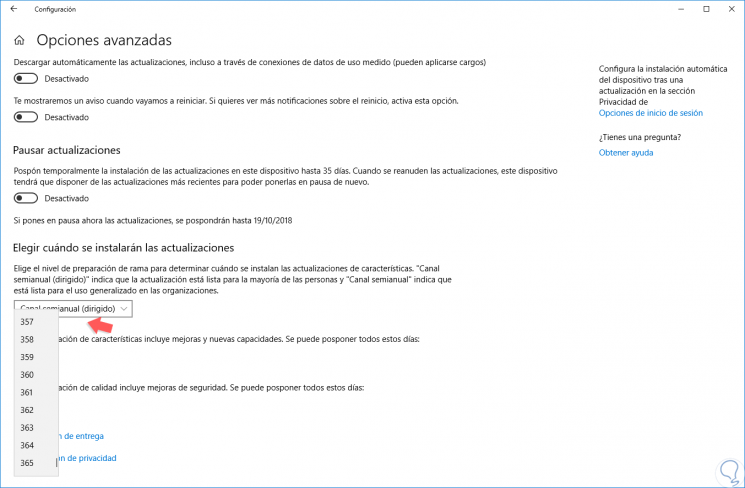
Once we select the desired channel, we will have the opportunity to delay updates based on its function like this:
- Feature updates: can be delayed up to a period of 365 days.
- Quality updates: these can be delayed up to a period of 30 days.
Step 6
Simply click on the drop-down field of each to select the desired period. It's that simple to delay updates using the Windows 10 Configuration utility.
2. Delay updates using Registry Editor in Windows 10
Before using this method, we must create a backup copy since any badly configured registry can have a negative impact on the system.
Step 1
We will access the registry editor using the following key combination and using the regedit command
. + R
regedit
Press Enter to access.
Step 2
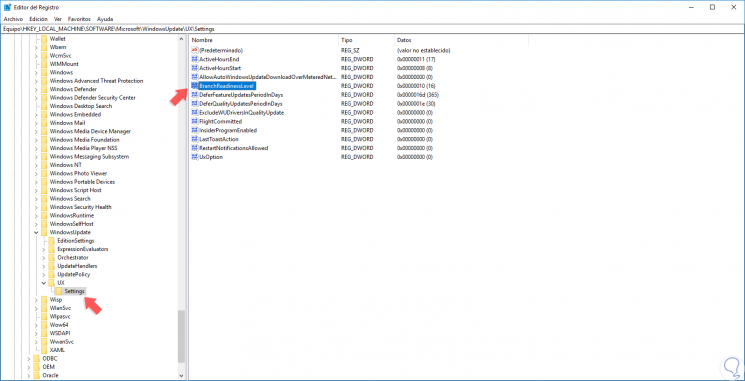
Then, we will go to the following route:
HKEY_LOCAL_MACHINE \ SOFTWARE \ Microsoft \ WindowsUpdate \ UX \ Settings
Step 3
There, first, we must locate the value called "BranchReadinessLevel":
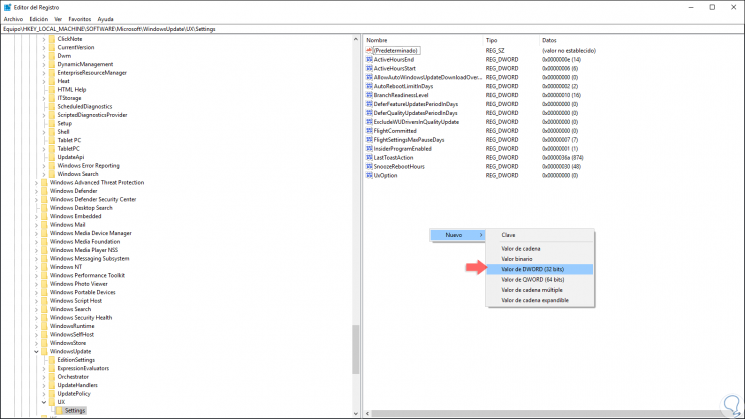
Step 4
If this does not exist, we must right click somewhere free and select the option “New / DWORD Value (32 bits)â€.
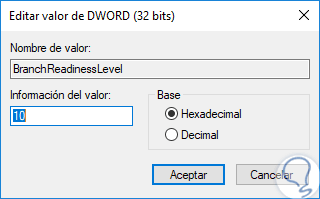
Step 5
Then we assign the respective name. We will double click, or right click / Edit on this value, and in the field "Value information" we define the type of channel as well. Click on OK to save the changes.
Semiannual channel (directed)
We enter the value 10.
Semiannual Channel
We enter the value 20.
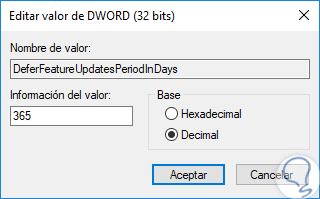
Step 6
Now, we will locate the following values:
DeferFeatureUpdatesPeriodInDays
It allows us to define the period in days to delay security updates.
DeferQualityUpdatesPeriodInDays
Define the period to delay quality updates.
Step 7
We access each of these lines, activate the “Decimal†box and enter the period in days, up to 365 for security updates and up to 30 for quality updates. Click OK to save the changes and we can exit the editor. We restart the system to apply the changes.
Thus, we have learned to delay updates in Windows 10 in a practical way..