When we are working on an Excel sheet, one of the situations that can arise, and for which there is not one but two resources that provide the perfect solution, is wanting to join or join the content of two or more cells in just one..
This is the case, for example, of having a table with several columns that contain the names and surnames of several people. If we want to have the first and last name of a person in the same cell, we can use the resource called “CONCATENATE”, a resource that we will undoubtedly have to use, and therefore we must learn how it works and how to use it in practice. .
We must keep in mind that knowledge of Excel, as well as its most important functions and resources, opens up a new way of reasoning when we work with Excel, which provides us with solutions to tasks that we have to perform, to be able to do them more efficiently. agile, and that also give rise to the use of other functions to achieve our objective: what could be called the synergy of functions and resources in Excel. In short, they are benefits of Excel that we will be able to take advantage of with knowledge and in practice..
For all these reasons, which are not a few, we are going to explain how to use the concatenate function in Excel, and we are also going to teach you a trick that allows you to join the contents of the cells faster.
Aspects to take into account when concatenating in Excel
The methods that exist in Excel to concatenate also allow us to concatenate the content of cells with content that is not included in a cell. For example, we are talking about concatenating a cell, for example, with words that we can write directly into the formula;
In the same way, we must know that we can introduce parameters into the formula so that, when putting the content together, we have a space in between. In the example we have mentioned, it would be being able to leave a separating space between the first name and the last name..
For this reason, in order to provide a solution to all these cases, we are going to explain to you in a complete and easy way how we can carry out this action in Excel of combining the content of cells; And know how to introduce spaces between the content of one cell and another, and learn how to concatenate one or more words with the content of a cell.
The objective is to first understand that there are several ways that we can use to join content, and know how to use these resources in practice and in different situations to learn the lesson well.
What is concatenate in Excel?
The word concatenate means to join, join, or combine. In Excel, when we talk about concatenating we are referring to the fact of joining, joining or combining the content of several cells within the same cell. This action of joining the content of two or more cells can be done in two ways:
- On the one hand, thanks to the “CONCATENATE” function.
- On the other hand, using the “&” sign within a formula in Excel, the use of a function is not necessary in this case.
1 How to concatenate cells in Excel
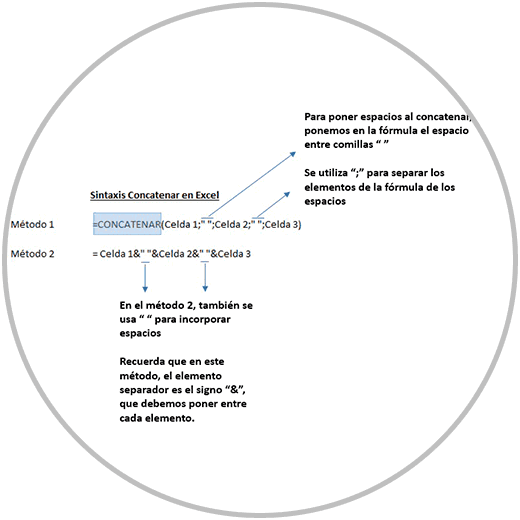
When it comes to concatenating the content of cells in Excel, as we have just explained to you, there are fundamentally two methods that are equally effective, and that you can use them interchangeably. But, as we will see below, each concatenation method has a different syntax since one of the methods involves the use of a function (“CONCATENATE” function), while with method 2 we can JOIN content using the “&” sign.
This would be what a concatenation formula should look like, depending on the method we use.
- For Method 1, we use the “CONCATENATE” function
- In method 2, we use the “&” sign as an element to unify the content of the cells
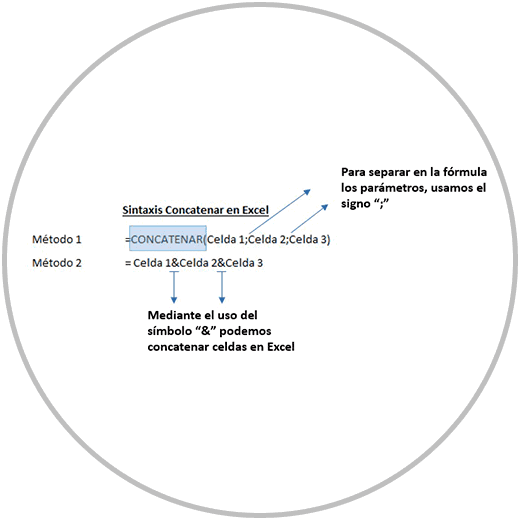
- Method 1: We use the concatenate function, with the same process that we use when we want to make a formula in Excel: we place ourselves in a cell, we include the equal sign, we enter the name of the function (in this case “CONCATENATE” and we open parentheses to indicate which elements we want to concatenate. To keep in mind in this method, the elements that we introduce in the formula to concatenate must always be separated with the “semicolon” sign, which would be like this “;”.
- Method 2: The formula in method two is simpler because we do not use any function, but we must keep in mind that we always have to enter the “&” sign to separate the elements within the formula, as we have seen in the picture.
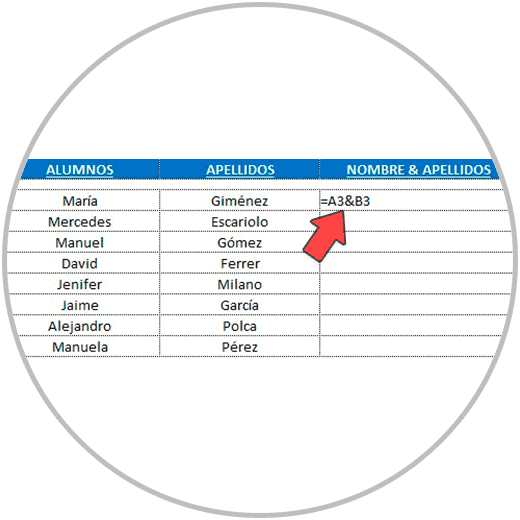
Example 1, How to use concatenate in Excel
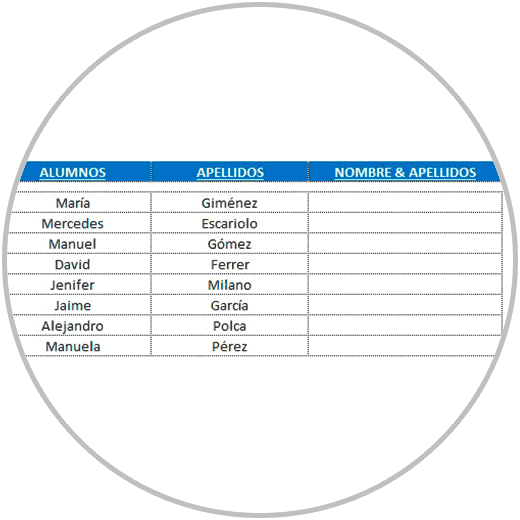
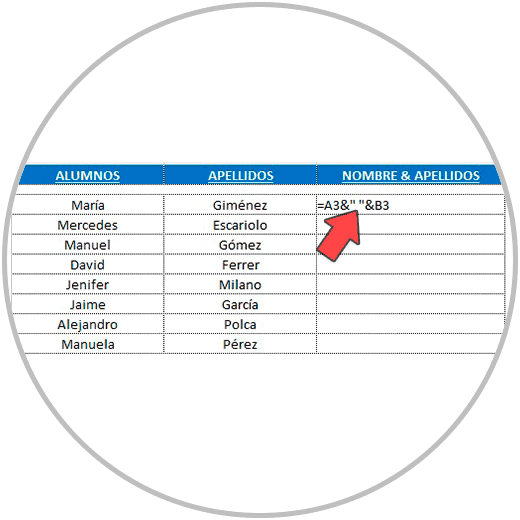
Let's see in this example, where we have a simple table with names and surnames of several students. We have built a column where we are going to enter the first and last name of each student in the same cell.
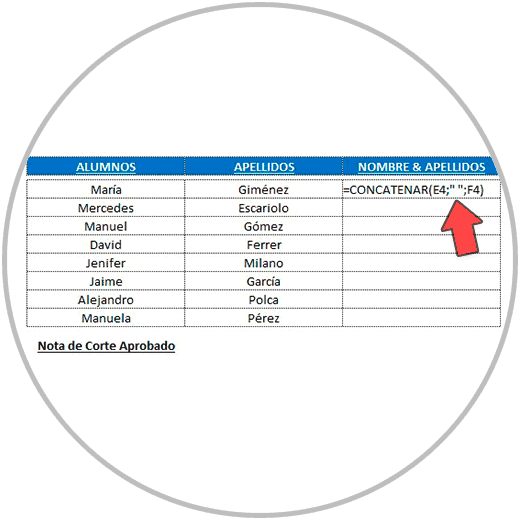
Method 1: Using the Concatenate Function
If we use the concatenate formula, we build the formula as we have explained, using the “CONCATENATE” function after the “=” sign and separating the elements of the formula with “;”
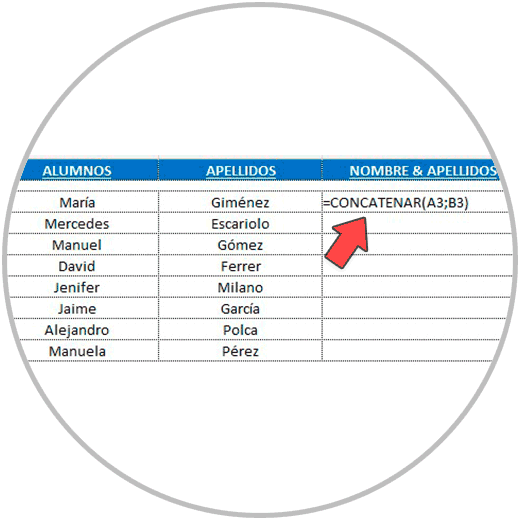
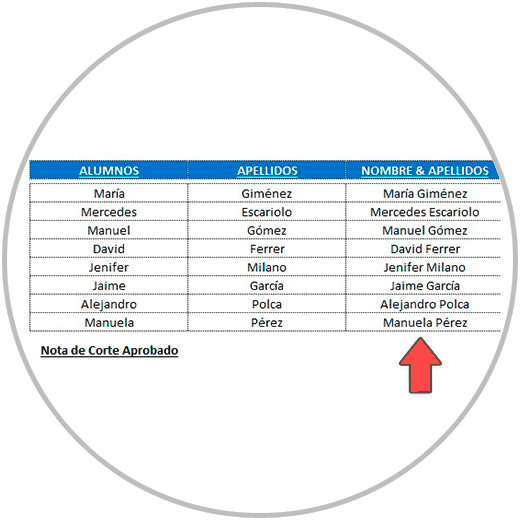
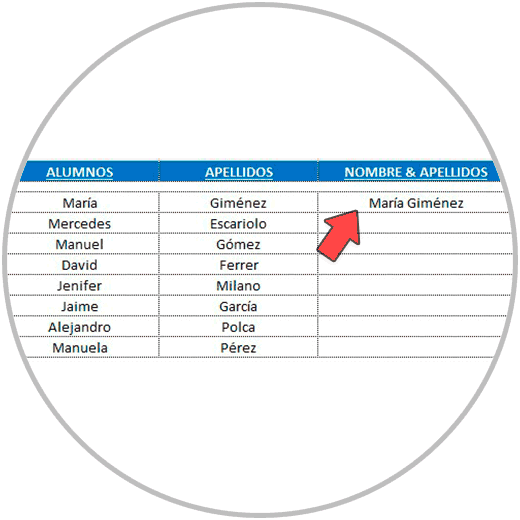
Once the formula is built, we press the Enter key on our keyboard, and we will see the result.

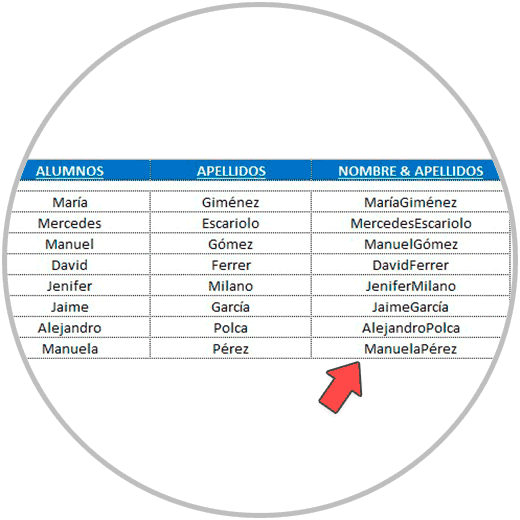
To drag the formula to the rows below, as we already know, we click and hold in the lower right corner and drag the formula to the last row.
Method 2: Concatenate cells without using the "CONCATENATE" function
In this method, we do not use a function, we directly write the “=” sign to start the formula, and then we select the elements to concatenate, using the “&” sign to separate the elements in the formula.
By pressing the Enter key on our keyboard, we will see that the result is the same as the one obtained previously. We would drag the formula to the end as we have already explained (by clicking from the lower left corner of the cell where we have made the formula, and holding it while dragging the formula to the end).
2 How to concatenate Cells in Excel with spaces
When joining the content of the cells, on many occasions we will want to include spaces between the different elements that we want to concatenate. So, for example, if we are joining a cell that contains a first name, and another cell that contains a last name (as in the example we just saw), we probably want the result to be “First Name Last Name” and not “First Name Last Name”.
In order to include spaces when we concatenate in Excel, we only have to include a space between quotes within the formula: ““
We can use this resource interchangeably in any of the methods that we use to be able to concatenate cells, following the scheme and syntax, and using in each case the elements that we use in each method to separate the elements within the formula.
Look below at what the syntax of a formula would be like in which we want to include spaces between the different elements that we want to concatenate, using method 1 and also using method 2.
- Method 1: concatenate with spaces with the “CONCATENATE” function: The syntax of the formula is the same as the one we have seen before, but in this case, as you can see in the image, we introduce the space, which in the formula is represented as “ “. Keep in mind that within the formula, between an element and the space, we must always include the “separator” element, which in this case, when we use the “CONCATENATE” function is the “;” sign.
- Method 2: we follow the same simple formula structure that we used before in method two, but in this case introducing the spaces that are represented as we already know by putting a space between quotes “”.
To keep in mind in this method that between the element and the space that we are incorporating, there must always be the separate or union element in this case, which is “&”
Example 2, formula concatenate with spaces
In this example, we are going to use the same table that we have seen before with first and last names.
But now, the difference is that we are going to introduce a space in the formula between the first and last name of each person. (As we already know, putting between the first and last name within the formula “”.
Method 1
We use the “CONCATENATE” function, as we have explained before, following the syntax, and introducing the spaces between the first and last name within the formula.
Now the result we get is what we wanted, the first and last name inside a cell, but with the separating space. We stretch the formula downwards so that we can have all the names of each student concatenated with her last name.
Method 2
As we have seen in the syntax, we carry out the formula as we already know using the “CONCATENATE” function. Now in the formula we introduce the space, which as we already know is represented in the formula like this ““
As we can now see in the image below, the result is the same as what we obtained before using the Concatenate function. (In this case, using the cell “connectors” in the formula which is the “&” sign.)
By dragging the formula down, as we see in the image, we apply the formula in each row so that each student has a cell with their first and last name.
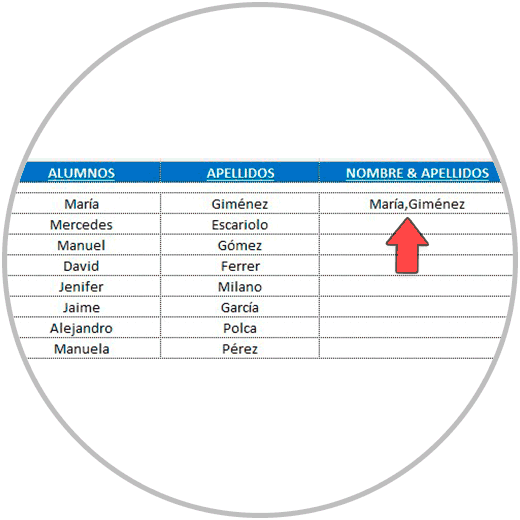
3 Concatenate multiple cells in Excel separated by commas
In the example, we have explained how to add spaces when concatenating in Excel. But if, for example, instead of needing spaces, you need to separate the elements with a comma “,” we could carry out the same task, in the same way, replacing the space with the “,” as in the image below:

By pressing the Enter key on our keyboard, we will see how we manage to have the first name with the last name in a cell, in this case separated by a comma.
Using this criterion, that of entering elements in the formulas between quotes, we can concatenate not only the content of the cells, but also the content that we want or need at any given time.
Thus, following the same logic, we are going to explain in the next section how we can concatenate the content of the cells with other text content that we are going to add directly to the formula.
4 How to concatenate Cells in Excel with text
One of the options that concatenation offers in Excel is the ability to concatenate cells and cells as we have seen, incorporating spaces; But when we concatenate in Excel, we can also concatenate text, numbers, or symbols. As?
The answer is by introducing the text, number or symbol that we want within the formula between quotes (“Text”), respecting as we already know the “separators” that we use in each case, those that we have seen in method 1 and in method 2.
Let's see what the syntax would be like, for method 1 and method 2, when we decide to incorporate a text for example, leaving, as we already know, separating spaces.

Let's see in practice, with an example, how we could carry out this formula
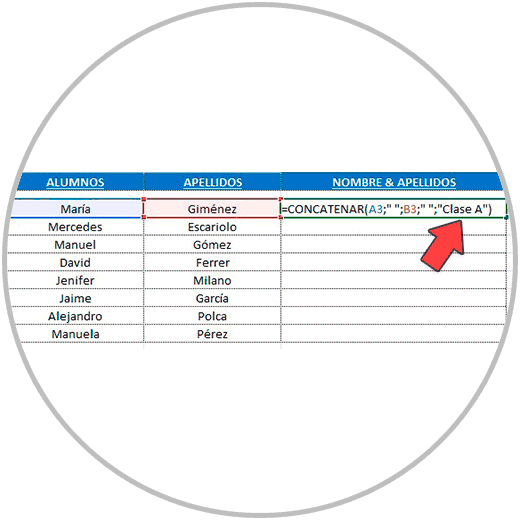
Example 3: concatenate formula with text and spaces
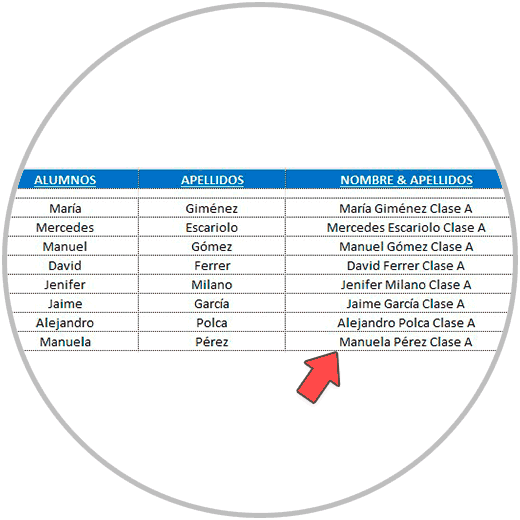
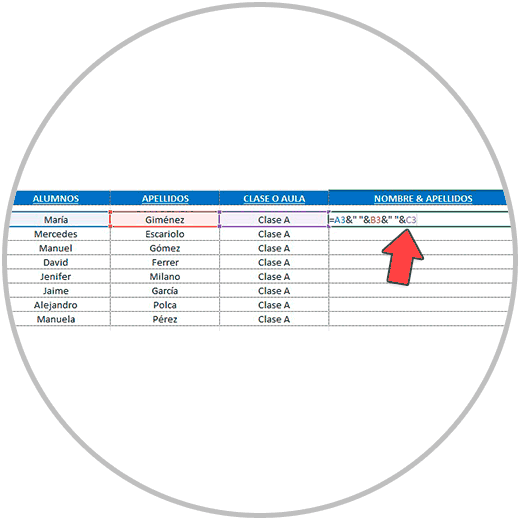
We continue using the same example as before, in which we have a table with the names and surnames of the students in a class. The exercise we want to do now is to concatenate first and last name, leaving a space in between, and also concatenating the class or classroom to which they belong, which is “Class A”. In the formula, we are going to enter the text “Class A” after the first and last name of each student, in order to have all this information in one cell:
Student's name + Last name + Class or classroom to which they belong.
We are going to use, as in the previous examples, the two methods.
Method 1: Using the “CONCATENATE” function
If we use the concatenate function to carry out this action, we must build the formula as we already know and have done before, in this case we will add one more space at the end, and we will add the Class to the one to which the students belong, “Class A”.
This is how the formula would look taking into account all these nuances, and using the “CONCATENATE” function.
By pressing the Enter key, after writing the formula, the result we obtain is the desired one.

And if we stretch the formula downwards, we will obtain the expected result, with the first name, last name and class of all the students.
Method 2
Now we perform the formula without the “CONCATENATE” function, linking the cells as we already know using the “&” sign, respecting the spaces that we will add to the formula also using “”, and adding the text between quotes that we want to concatenate, which is “ A class". The formula, therefore, with all these characteristics, would look like this:

By pressing Enter on our keyboard, we will obtain the same result as before, with the first name plus the last name plus the class or classroom, all in a cell with separating spaces between the first name and the last name, and between the last name and the classroom.
By stretching the formula downwards, we obtain the same result for the rest of the students.
We must keep in mind that, as we have explained on more occasions,
it is not very convenient to introduce fixed elements in the formulas, and that whenever we can, we will use cell references within the formulas .
This example case that we have seen could have been solved by adding one more column to the table, at the end, filling in the entire column with the text “Class A”. In this way, we could concatenate the name of each student, with her last name, and with the class or classroom in which she is located.
Error when concatenating in Excel
If at any time you encounter an error when you are trying to formulate, it is likely that you have forgotten to add a sign, you are missing a parenthesis or quotation marks, or you have not written the formula correctly. Check these aspects of the formula in case you find an error, which is usually common, especially at the beginning when we start practicing on our own.
The examples that we have given will always help you establish your formula, and correct possible errors by looking at the examples that we have just explained to you.
Using the example, the formula structure that we have explained to you in method 1 and in method 2 (with or without the “CONCATENATE” function), we can carry out any concatenation in Excel that comes to mind.
Always keep in mind to use the correct elements in each case; Regardless of whether you use the “CONCATENATE” function, or if you use the “&” sign, we have already seen in the examples how to construct the formula in each case. We have also explained how to include separation to leave a space, or a separation sign such as a comma. And we have explained how to add the text we want to the concatenation. Remember that always practicing the lesson we have seen will help you memorize what the structure of the formula should be, and will help you gain agility in the use of Excel, and its functions and resources to be able to work better, safer and more fast.