Windows 10 is a modern system that is complemented with different functions that have been added to allow as advanced users or administrators we have the ability to solve various problems that are generated in the system and one of these problems, which is very delicate, is the one associated to the controllers since these have the task of allowing the hardware elements to function normally both at the level of compatibility and of services. It is always important to have support from our controllers in case of failures or resets..
When a controller has failures we can face situations such as:
- Off or flickering of our screen
- Network connection errors
- The sounds do not reproduce as it should be and many more.
Windows 10 has an integrated tool that we rarely use to perform a detailed analysis of the drivers and this tool is called Driver verifier and for this reason in TechnoWikis we will make a complete analysis on how to use it and thus have full drivers in Windows 10.
What is Driver Verifier?
Driver Verifier is a tool developed by Microsoft in order to monitor the drivers in the Windows kernel mode and the graphics drivers in order to detect calls to illegal functions or any other type of situation that can damage the system. With Driver Verifier we will be able to subject all Windows 10 system controllers to various types of variables and tests only in order to detect incorrect behavior and thus take the necessary correction measures.
We have the possibility of running Driver Verifier on several controllers simultaneously or on a single controller at the same time, in the same way it will be possible to configure the tests that have to be executed, which allows us to subject a controller to great stress loads or through more optimized tests to see your status level in real time.
1. Access Driver Verifier in Windows 10
One of the advantages is that it will not be necessary to download Driver Verifier (Verifier.exe) since this utility is already included in all versions of Windows after Windows 2000, except in Windows 10 S., in this way there is no package of Driver Verifier download separately, this is in the following directory
% windir% \ system3
Step 1
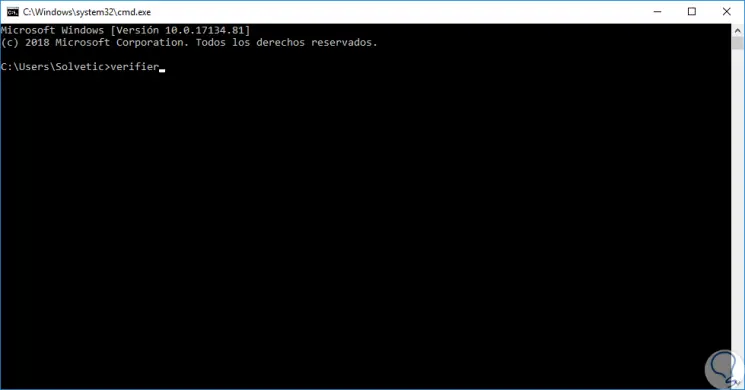
To access this tool, simply access the command prompt and then execute the following line:
verifier
Step 2
Some recommendations for using this tool are:
- Running Driver Verifier may cause the device to crash.
- We should only run the driver verifier on the computers that are being used to test and debug errors.
- We must be in the Administrators group to use Driver Verifier.
- The driver verifier is not included in Windows 10 S.
- We can use the Driver Verifier to find problems at the beginning of the controller development life cycle since at this point they are easier and less expensive to correct.
- It will be possible to use this tool when a driver is implemented in order to run the WDK, Visual Studio and Windows Hardware Certification Kit (HCK) tests.
- We will use the driver verifier to troubleshoot and eliminate test failures and equipment blockages.
Step 3
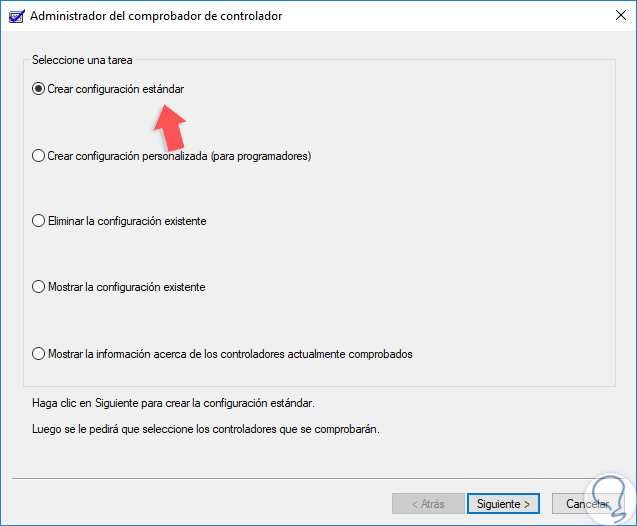
Press Enter on the command prompt and the following window will be displayed:
Step 4
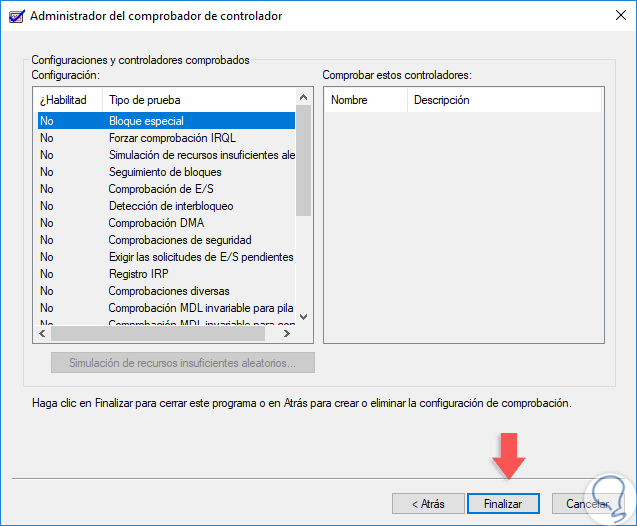
There we found a series of options, some specific to developers, but in particular we must leave the default option “(Create standard configuration)â€. If we want to see the current structure, we activate the “Show existing configuration†box and click Next and we will see this:
2. Use Driver Verifier in Windows 10
Step 1
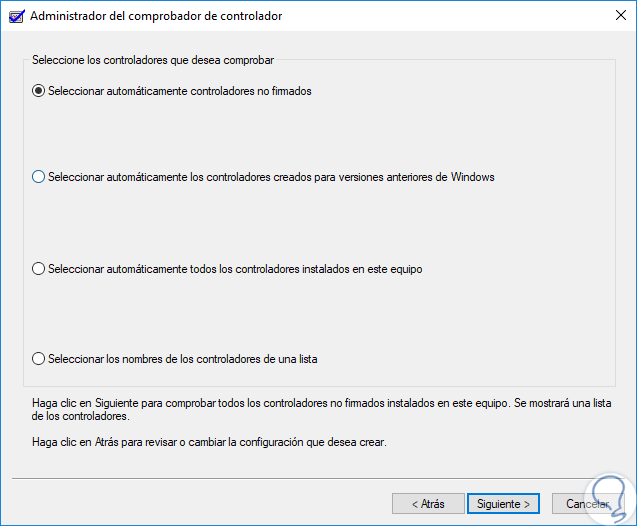
As mentioned, we select the option “Create standard configuration†and the following will be displayed:
Step 2
There we find the following options:
Automatically select unsigned drivers
With this option it will be useful to analyze computers with versions of Windows that do not require signed drivers.
Automatically select drivers created for versions prior to Windows
This option is useful for testing driver compatibility with the latest versions of Windows.
Automatically select all drivers installed on this computer
This option offers a maximum level of coverage related to the number of controllers that can be tested in the system. This option is useful for test scenarios where a controller has to interact with other devices or controllers in a specific system. By using this option it will also be possible to deplete the resources available to the panel and some monitoring resources. Testing all drivers can also adversely affect system performance due to the level of tests that are run.
Select controller names from a list
Thanks to this option it will be possible to select some controllers in a list of devices whereby the option of Enhanced I / O Verification is allowed to track objects in a more integrated and complete way and thus verify compliance when an IRP is passed between each of the selected controllers resulting in much more complete information.
Step 3
In this case the standard configuration of Driver Verifier gives us a series of options that are:
Automatic checks
This type of check will always be performed on a controller that is being verified, regardless of the options that have been selected for that purpose.
Special pool
By activating this option, Driver Verifier is responsible for allocating most of the controller's memory requests from a special group. This special set is monitored in order to detect increased memory, memory errors and more issues associated with the memory accessed after it is released.
Force IRQL Checking
When using this option, Driver Verifier adds extreme memory pressure to the controller by invalidating its paginable code, so if the controller tries to access the paged memory in the wrong IRQL or while holding down a turn lock, Driver Verifier detects this behavior and proceed with its management actions.
Low resource simulation
By activating this option, Driver Verifier randomly fails to assign group assignments and other resource requests, by performing this, Driver Verifier tests the driver's ability to cope with a low-resource situation that can affect the overall system behavior. .
Pool analysis
This option checks if the controller has released all its memory allocations when it is downloaded.
I / O check
With this option Driver Verifier assigns the IRP of the controller of a special group and manages the I / O management of the controller, thus detecting the illegal or incoherent use of the I / O routines.
DMA Verification
By activating this option, Driver Verifier analyzes the use of the DMA routines controller to detect the incorrect use of DMA buffers, adapters and map registers.
Step 4
One of the most useful options is to select the option “Select controller names from a listâ€:
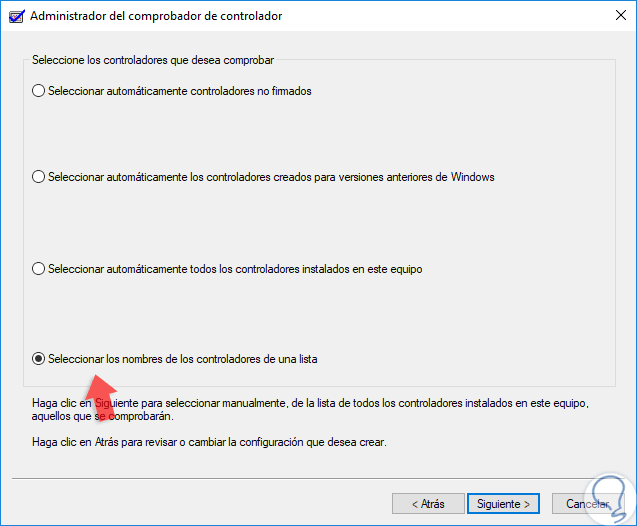
Step 5
Click on Next we must activate the checkboxes of the controllers we wish to analyze:
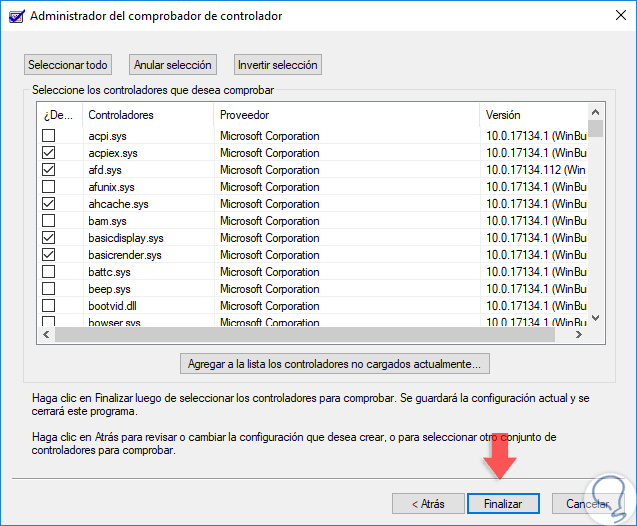
Step 6
If we want to select them all, click on the Select all button. Click on the "Finish" button to complete the action and the following message will be displayed:
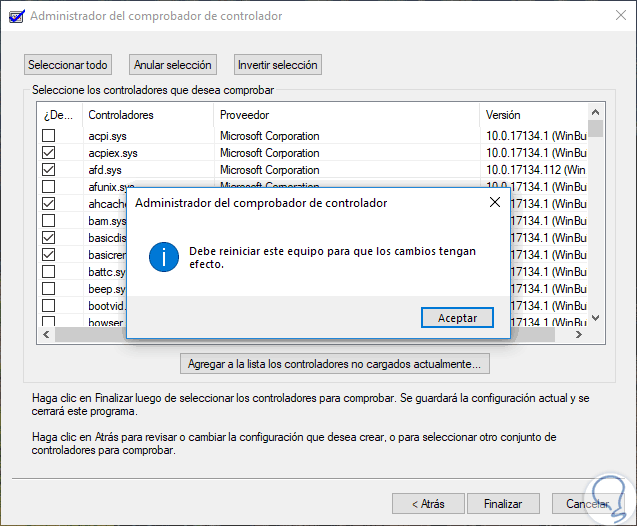
Step 7
As we can see, it will be necessary to restart the system to execute the respective analysis. It is also possible to run Driver Verifier in a command prompt console, for this, for example, if we want to run the tool with the standard configuration on a controller called acpi.sys, we execute the following command. Once the system is restarted, the background analysis task will be executed.
verifier / standard / driver acpi.sys
3. Manage Driver Verifier in Windows 10
There are certain tasks that we can apply on Driver Verifier in Windows 10 directly from the command prompt console as administrators or from the console, some of these are:
Stop or reset the tool
To do this, we execute one of the following options:
- From the command prompt we execute the “verifier / reset†command
- We execute “verifier†in the command prompt and in the deployed console we activate the “Delete existing configuration†box and click on “Nextâ€.
See the current configuration
To display the current structure we have the following options:
- Execute “verifier†from the command prompt and in the graphic console activate the “Show existing configuration†box and click on “Nextâ€.
- Execute the “verifier / querysettings†command from the command prompt
Show Verifier Statistics
To know the statistics of the results of the analysis we can use one of the following options:
- Execute the following command at the command prompt: "verifier / query"
- Execute "verifier" at the command prompt and in the graphic console check the box "Show information about currently checked drivers".
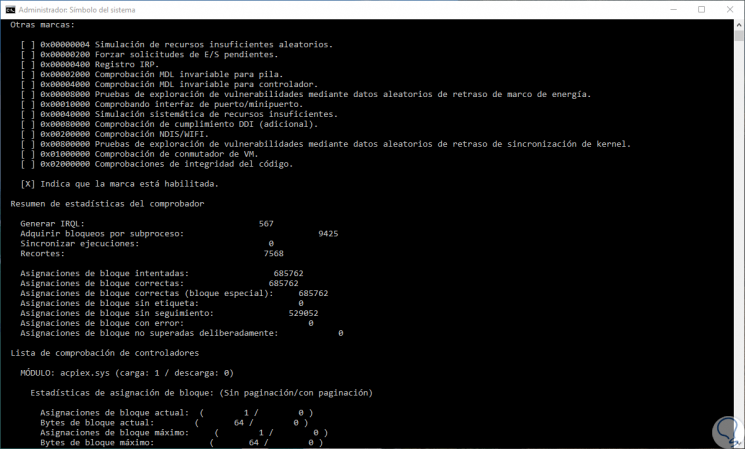
Error checking
If Driver Verifier detects some type of violation, it will generate an error check in order to stop the computer, but this is done to provide as much information as possible to debug the problem. All violations detected by the tool result in fault checks, the most common being:
- 0xC1: SPECIAL_POOL_DETECTED_MEMORY_CORRUPTION: Indicates that the controller wrote in an invalid section of the panel
- 0xC4: DRIVER_VERIFIER_DETECTED_VIOLATION: It is a general fault verification code for fatal errors found by Driver Verifier in the controllers.
- 0xC6: DRIVER_CAUGHT_MODIFYING_FREED_POOL: This indicates that the controller tried to access a released memory group
- 0xC9: DRIVER_VERIFIER_IOMANAGER_VIOLATION: This is the error checking code that applies to all I / O Verification violations of the Driver Verifier.
- 0xD6: DRIVER_PAGE_FAULT_BEYOND_END_OF_ALLOCATION: This indicates that the controller accessed the memory beyond the end of its group assignment.
- 0xE6: DRIVER_VERIFIER_DMA_VIOLATION: This is the error checking code associated with all DMA Verification violations by the tool.
We can see how this integrated Windows 10 tool gives us an option to centralize all the analysis of each system controller to see its current status in real time and thus determine possible failures and, if any, proceed with its correction..