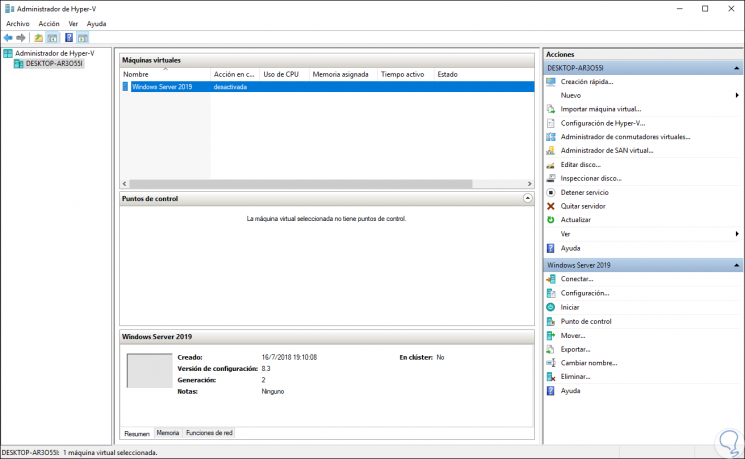
Hyper-V is Microsoft's commitment to the topic of virtualization which is a topic that helps all IT administrators and staff in all types of organizations regardless of their size since this virtualization is a tool through which they can be performed tests of applications and operating systems without the need for them to be mounted in a productive environment and in this way it will be possible:
- Know the new operating systems and their functions
- Avoid buying new hardware resources
- Implement network or support structures effortlessly
Common Hyper-V Errors
Some of the common errors associated with Hyper-V are:
- Error enabling Hyper-V Windows 10
- Failures to install Hyper-V
- Errors in Hyper-V integration services
Hyper-V offers multiple functionalities such as the enhanced session, support for both 32 and 64 bit architectures and many more..
Currently, many Windows 10 users have reported errors when installing Hyper-V which precludes the option to create and edit virtual machines correctly and integrates and that is why TechnoWikis will give a series of tips on how to correct this error and thus make the most of the use of Hyper-V.
1. Check the hardware requirements to fix Hyper-V Windows 10 error
The first step, and one of the most important to take, is to verify that our equipment meets the necessary hardware requirements since without this it will be impossible for Hyper-V to be enabled and used as expected.
Windows 10 requirements
In the case of Windows 10, the following are required at the requirements level:
- Windows 10 Enterprise, Professional, or Education
- 64-bit processor with Second Level Address Translation (SLAT).
- CPU that supports VM Monitor Mode Extension (VT-c or Intel CPU).
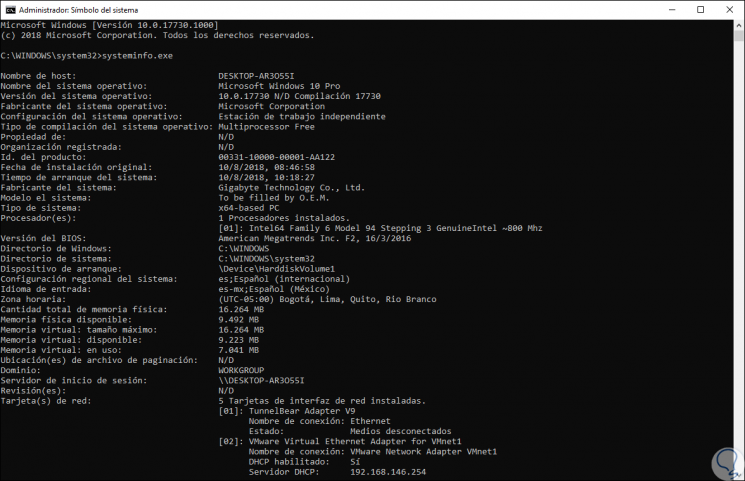
Step 1
To verify that our equipment meets these conditions, we can go to the command prompt, or Windows PowerShell, as administrators and there execute the following:
systeminfo.exe
Step 2
As a result we will have a complete report on the hardware aspects of the equipment and there we can validate whether or not we meet the minimum requirements required:
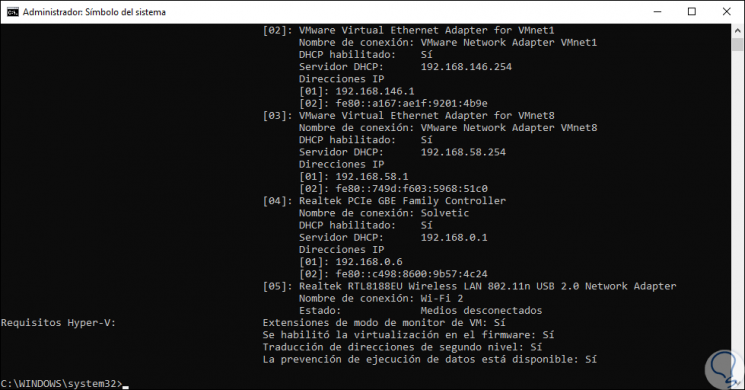
Step 3
There, at the bottom, we find the Hyper-V section where it is indicated if the equipment and the system for it are not compatible. Data execution prevention and virtualization enablement in firmware features can be enabled directly in the BIOS, but features such as VM monitor mode extensions and second level address translation functions are associated with the hardware , so that, if these features are not available, it will be necessary to update the CPU.
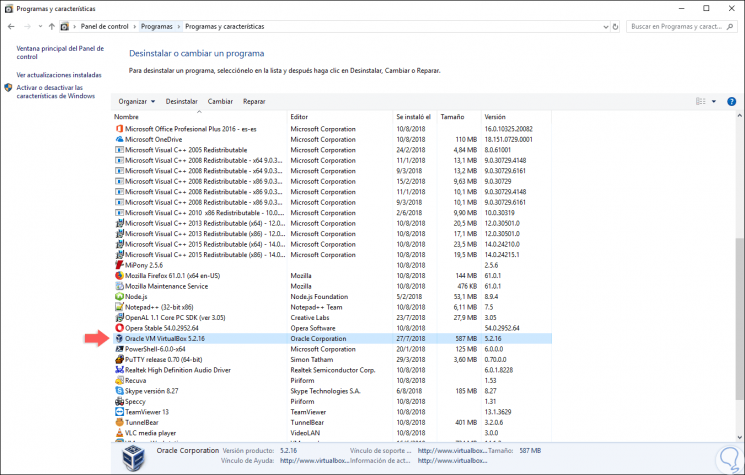
2. Uninstall third-party software to fix Hyper-V Windows 10 error
As we have mentioned, Hyper-V is a virtualization software which is integrated in Windows 10, but it can become unstable with third-party applications. Because this type of software can install own drivers that interfere with Hyper-V.
The most common is that other virtualization platforms such as VirtualBox or VMware cause this error, for this we can uninstall them and check that Hyper-V can be installed in a way..
Step 1
To uninstall these applications we must go to the following link:
- Programs and characteristics
Step 2
There we select the program to uninstall and click on the "Uninstall" button located at the top:
3. Update the system to fix Hyper-V Windows 10 error
We have seen that there are a series of minimum requirements to install and use Hyper-V in Windows 10, to this the versions of Windows 10 are added since for example the 10049 compilations are not compatible with Hyper-V. The most common cause is that they are older machines which may not have the ability to enable and use Hyper-V if their hardware is not compatible and less possible to upgrade it, at the CPU level, because their board does not support this. Another reason is that wstorvsp.inf was not added correctly to the driver store during online driver maintenance and this causes Hyper-V to not be installed.
If wstorvsp.inf has not been successfully added to the driver, Microsoft offers us a Windows update to solve this problem, for this you must run the technical preview of Windows 10 build 10049 and it will be necessary to restart the computer after applying the update.
Step 1
Another common cause at the system level is that when enabling Hyper-V in Windows 10, error 0x800F0906 is generated, this error occurs when the source files could not be downloaded properly, to solve this error, we must count With the Windows 10 ISO image, right click on it and select the option "Mount":
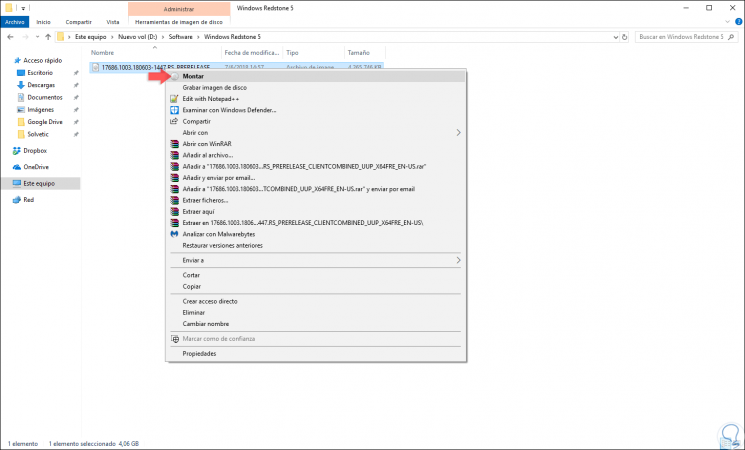
Step 2
Once mounted, a virtual drive will be created in the Windows 10 file explorer, we will right click on it and select “Openâ€:
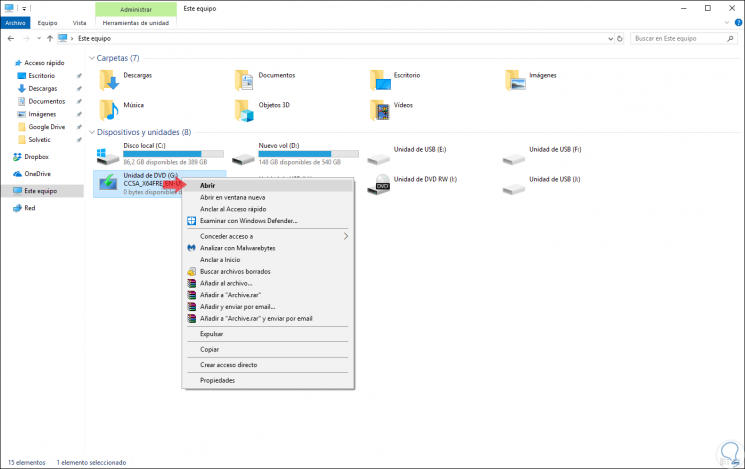
Step 3
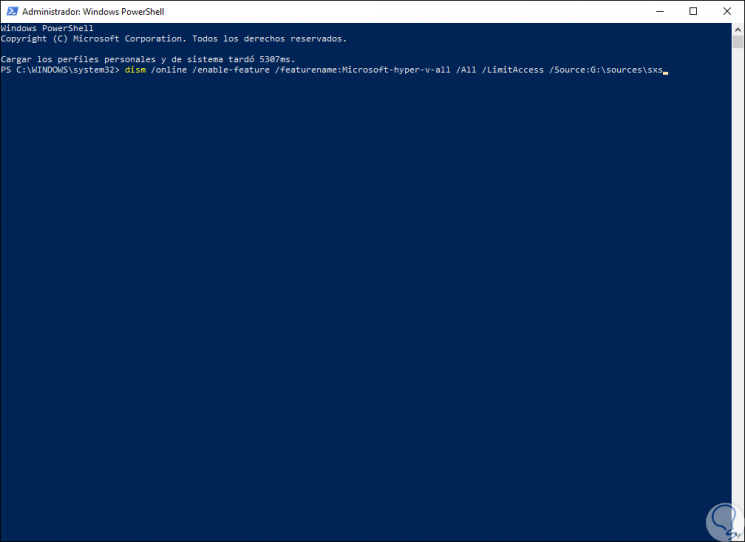
In the content of the image, we go to the \ sources \ sxs path and copy the full path to this directory, for example, G: \ sources \ sxs. Now, we open Windows PowerShell as administrators and run the following syntax. Press Enter and in this way we will enable Hyper-V.
dism / online / enable-feature / featurename: Microsoft-hyper-v-all / All / LimitAccess / Source: <SXS path>
4. Validate the version to fix Hyper-V Windows 10 error
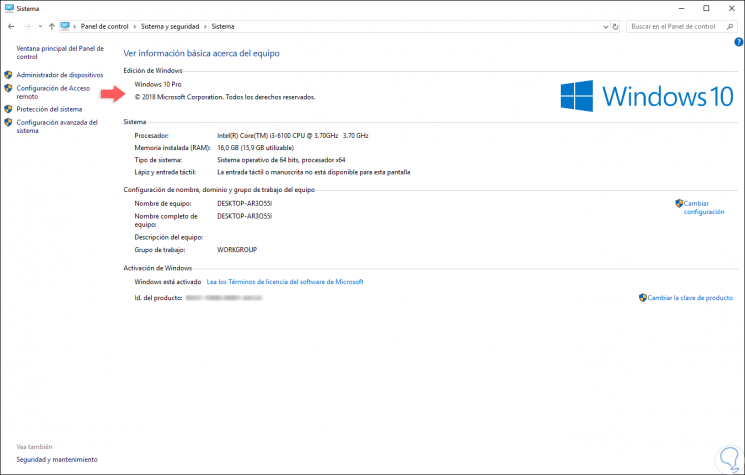
Recall that Hyper-V is only supported in Enterprise, Professional, or Education editions of Windows 10 so that if we use the Home version it will be impossible to enable the Hyper-V role.
Step 1
To know what version of the system we are using, we go to the following route:
Step 2
In the "Windows edition" section we find the currently used edition of Windows 10.
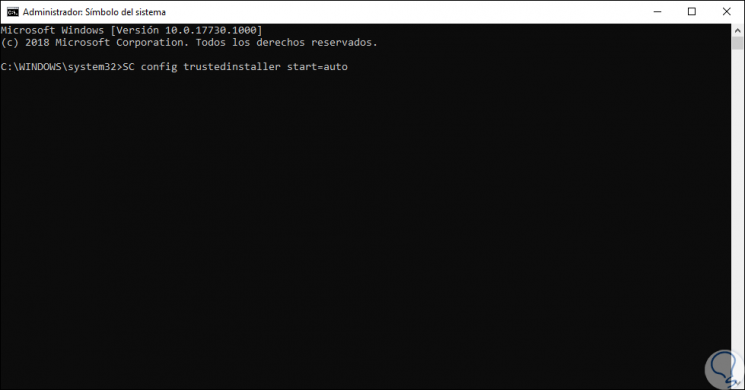
5. Use command prompt to fix Hyper-V Windows 10 error
The command line is another useful option to correct Hyper-V problems in Windows 10, to use this option we must access as administrators and run the following line:
SC config trustedinstaller start = auto
6. Install Hyper-V components separately to fix Hyper-V Windows 10 error
Another option available is not to install all Hyper-V functionalities at once, but separately, because some of them may present some type of error.
Step 1
To perform this action, we go to the following route:
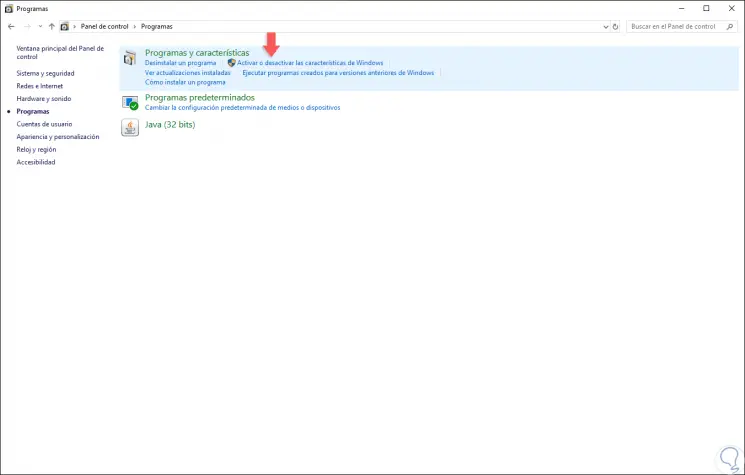
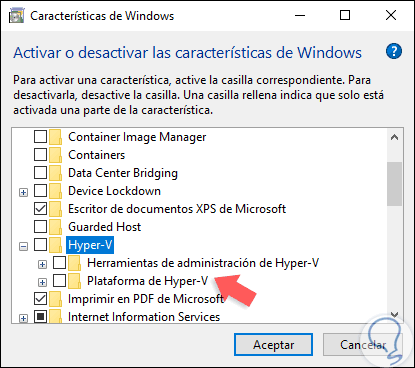
Step 2
There we click on the line "Activate or deactivate the Windows features" and in the window displayed we activate the "Hyper-V Platform" box, click on OK and it will be necessary to restart the system. After this, we go back to the Windows 10 features and activate the “Hyper-V Administration Tool†box and repeat the process.
7. Modify records separately to fix Hyper-V Windows 10 error
For this option it is recommended to create a restore point of the operating system or create a backup because some badly edited record can trigger a general system failure. These logs are associated with the EFI system with the Safe Boot feature enabled which can cause problems with Hyper-V in Windows 10.
To use this, we access the command prompt and it will be necessary to execute each of the following commands in order:
reg delete HKEY_LOCAL_MACHINE \ SYSTEM \ CurrentControlSet \ Control \ DeviceGuard / v EnableVirtualizationBasedSecurity reg delete HKEY_LOCAL_MACHINE \ SYSTEM \ CurrentControlSet \ Control \ DeviceGuard / v RequirePlatformSecurityFeatures bcdedit / set {0cb3b571-2f2e-4343-a879-d86a476d7215} loadoptions DISABLE-LSA-ISO, DISABLE-VBS 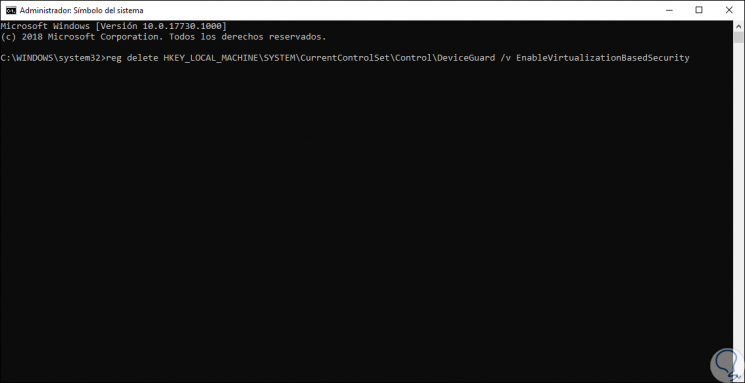
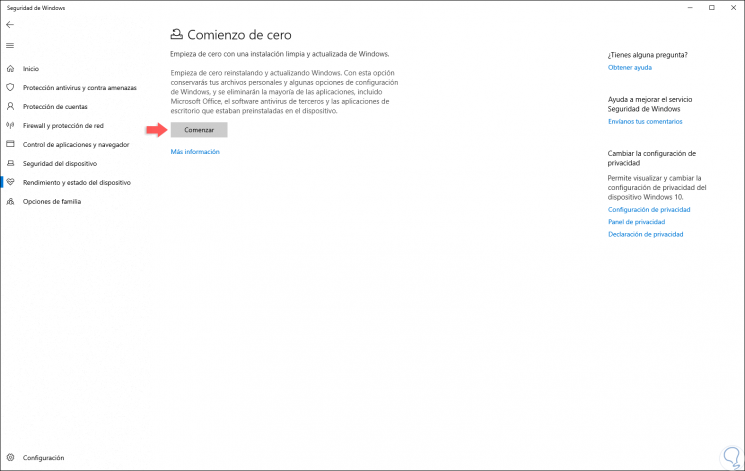
8. Execute the Start from scratch function to solve Hyper-V Windows 10 error
This is an option integrated in the security of Windows 10 and thanks to which a clean and current installation of Windows is executed. When executing this alternative, personal files and certain configuration options are preserved.
Step 1
To use this option, we go to the "Windows Security" utility and in the "Performance and device status" section we locate the "Start from scratch" section:

Step 2
We click on the "Additional information" line and in the new window displayed click on the "Start" button:
With any of these solutions, it will be possible against everything Hyper-V offers us and thus enjoy virtualization to the fullest in Windows 10..