One of the tasks we perform on Windows operating systems every day is to copy and paste information. We copy all kinds of data, files, images, multimedia, etc., and then simply paste this content into the destination..
Basically, when we use the Copy option or the Ctrl + C keys, the copied item is stored temporarily in a memory space and is released when we paste or use the Ctrl + V keys. This space we are talking about is the clipboard Windows 10, and this is why it is one of the most useful and used elements within the operating system.
When copying and pasting to transfer information from one place to another on the equipment, we accumulate information in it that we normally do not attend, but that it will be necessary to eliminate the accumulated information to free space from it..
Reasons to clean the clipboard
Why clean the Windows 10 clipboard, it's basically for two reasons:
- The first for security because, if we use a public computer, sensitive information can be housed there and other people with the necessary knowledge can take it.
- Improve the performance of the copy and paste action, this is because many times we copy a large amount of data and do not paste it, which affects the space reserved for it.
This is why today TechnoWikis brings some practical advice on how to erase the Windows 10 clipboard in a practical way.
1. Use the print screen option in Windows 10
This is one of the classic copy and paste options in Windows 10 without using the Windows clipboard, remember that to use this function we have two options:
- Press the Print Screen key which selects the entire desktop
Print Screen
- Use the Alt + Print Pant combination to copy only the current window.
+ Impr Pant Alt + Impr Pant
- When this key is pressed, the selection will be copied and we can paste it using Ctrl + V or the Paste function, but without this content being temporarily stored in the memory which for security is ideal.
+ V Ctrl + V
Restart your computer
It is perhaps an extreme method, we must have it as a last option, but when we restart the computer, Windows 10 automatically deletes all the elements of the clipboard so that they will no longer be available for use.
2. Create a desktop shortcut to erase the Windows 10 clipboard
This is a simple and effective method because with just one click we will erase all the contents of the Windows 10 clipboard. This shortcut can be created on the desktop, preferably, or in some other location on the computer.
Step 1
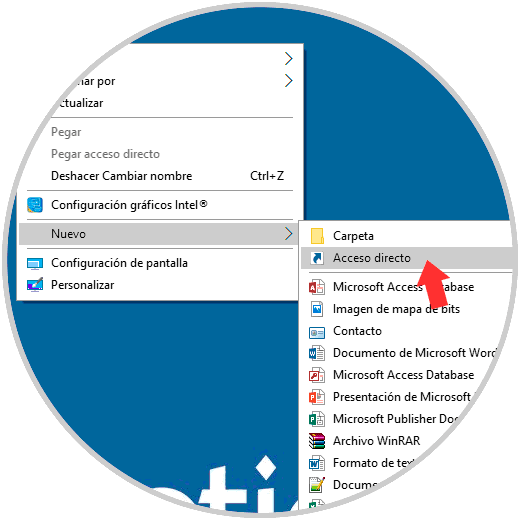
To create this shortcut we will right click on some free space on the desktop and select the option "New / Shortcut":
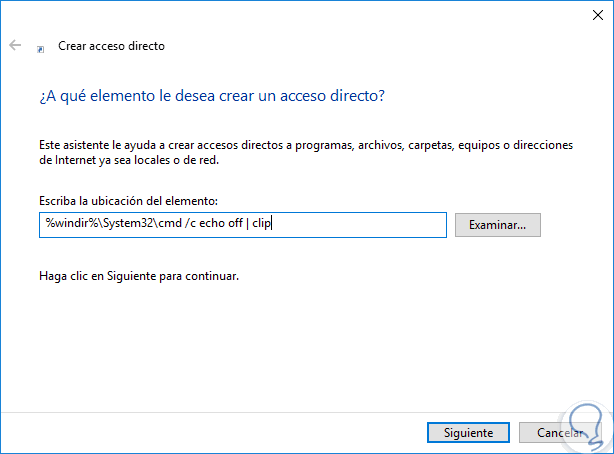
Step 2
In the displayed window we will paste the following line:
% windir% \ System32 \ cmd / c echo off | clip
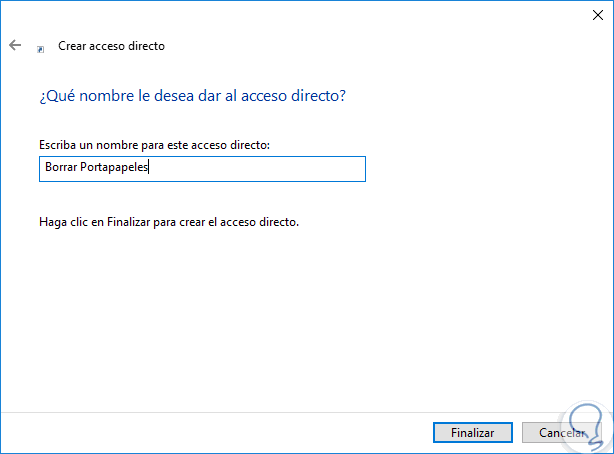
Step 3
Click on Next and assign a name to that access:
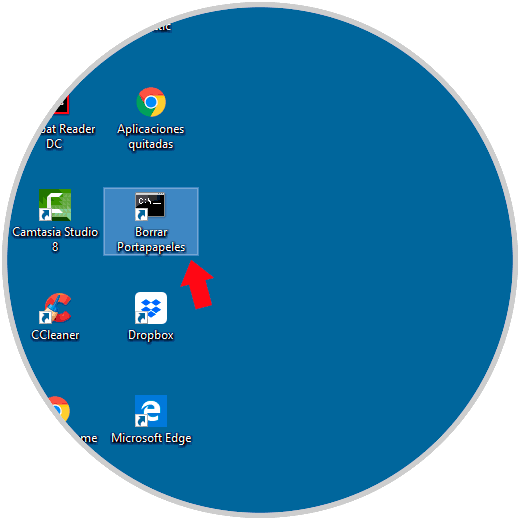
Step 4
Click on "Finish" and we will see our shortcut on the desktop:
Step 5
As we see it has the outline of a command prompt, we will right click on this access and select the option "Properties":
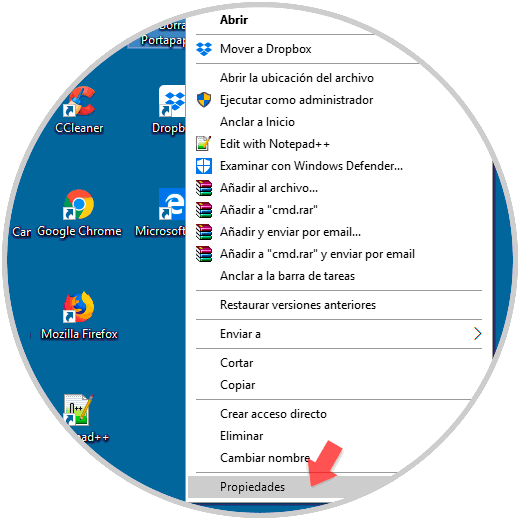
Step 6
In the displayed window we go to the "Shortcut" tab and we will see the following:

Step 7
Click on the "Change icon" button and go to the next route and there we have different options to add:
C: \ Windows \ System32 \ imageres.dl
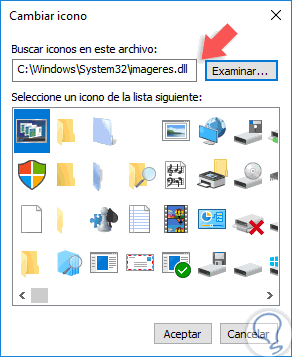
Step 8
Select the desired icon and click on Accept and then on Apply and Accept to save the changes. We will see the new shortcut icon:
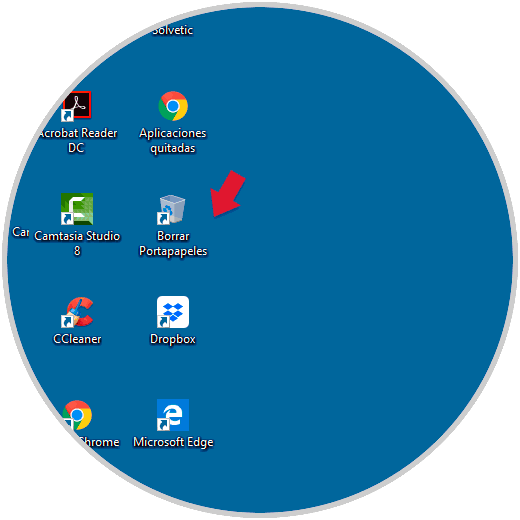
Now simply run the shortcut and we will see that no content copied in Windows 10 will be pasted..
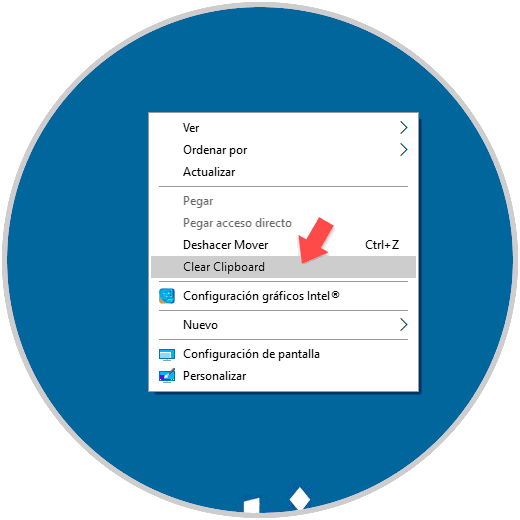
3. Add the option to delete Clipboard to the Windows 10 context menu
Using this method, just right click on the desktop or some space and we will have the opportunity to delete the clipboard from there.
Step 1
For this, we must go to the registry editor and remember the importance of being careful with the records we edit, to access the Registry Editor we will use the following keys and execute the regedit command, press Enter or Accept.
+ R
regedit
Step 2
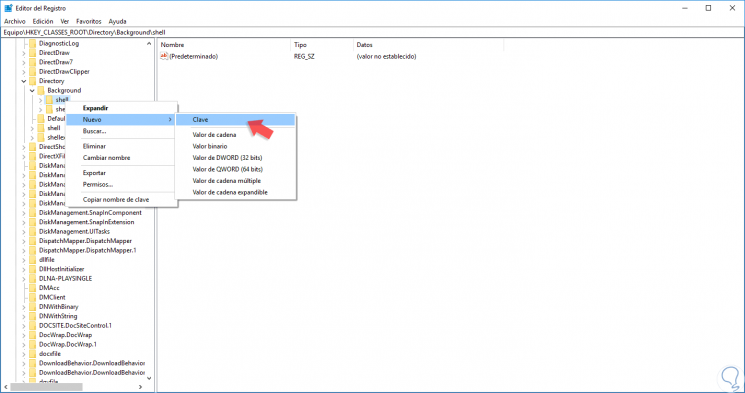
In the displayed window we will go to the following route:
HKEY_CLASSES_ROOT \ Directory \ Background \
Step 3
There, we display the Background option and right click on Shell to select the New / Key option:
Step 4
This new key will be called “Clear Clipboard†Now, we will right click on the new key created and again select the New / Password option:
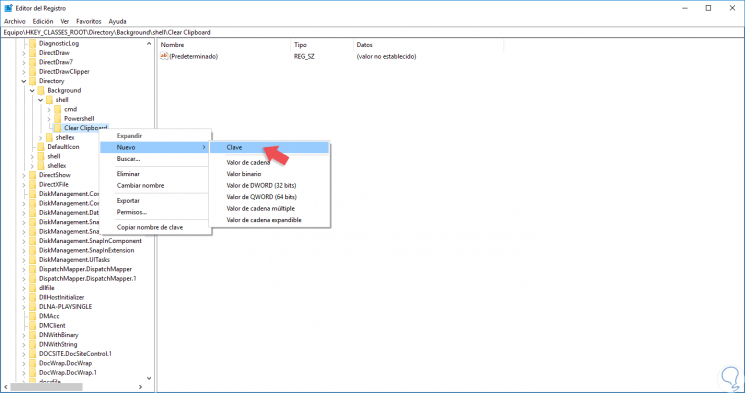
Step 5
This new password will be called "Command."
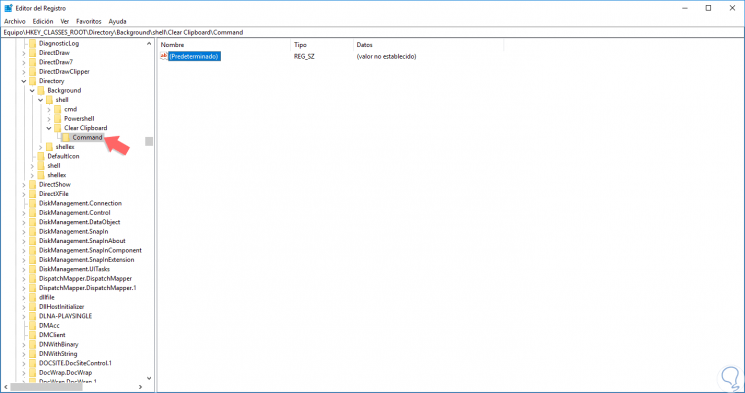
Step 6
We will double-click on the record (Default) on the right side and in the field “Value information†we will paste the following:
cmd.exe / c echo off | clip

Step 7
Click OK to save the changes and we can exit the registry editor. With this, when we right click we can see the option to clean the Windows 10 clipboard:
4. How to view, use and delete clipboard history in Windows 10
The new updates that Windows 10 includes are bringing news and improvements within the operating system that are very useful as users. In the case of the April 2018 update, the Windows 10 clipboard underwent changes that we appreciate, such as including its history.
Thanks to this, what happened to us with the traditional way of using the clipboard will stop happening to us, since before the update we did not know for sure what was the element that was going to be stuck later. But from the update, with the clipboard history, we can know with certainty what will be the element, image or text that we are going to copy and paste.
This new element completely changes the way you use the clipboard, so it is important to know or know how to use the clipboard history in Windows 10. In this tutorial we explain how to use, copy, paste and delete elements of the clipboard history :
Speaking of deleting items from the clipboard, it is also important to know that it is possible to view and delete items within the clipboard history when necessary. For this you will have to follow the following steps that we explain in the following tutorial:
With these methods we will be able to perform this action on the clipboard or on the clipboard history in Windows 10 in a simple and practical way.