The security of information and storage devices where such information is located should be one of the most sensitive issues when we manage and are frequent users of Windows and the reason is more than simple, we are in an online world where attackers make use of thousands of techniques to steal our personal data and thus perform blackmail, theft or data vulnerability tasks..
We must not be security professionals to implement protection techniques in our system since Windows 10 itself offers us the ideal tool to prevent unauthorized access to our storage units and is BitLocker.
We have heard many times about BitLocker but today we want to give an in-depth analysis on how BitLocker works, its benefits and how it is a useful tool for the proper management of these storage units..
What is BitLocker?
BitLocker Drive Encryption is a function implemented from Windows 7 with which data protection is sought and the most useful of this is that BitLocker integrates with the operating system and offers a solution to today's latent threats such as data theft or vulnerability of a lost or stolen computer.
BitLocker offers us greater protection because it makes use of the Trusted Platform Module (TPM) version 1.2 or later. The TPM is a hardware component installed on many computers by the manufacturer itself and works alongside BitLocker to help protect user data and to ensure that a computer is not accessed at any time without our authorization.
If we do not have TPM version 1.2, BitLocker will also be compatible, but the user will be required to insert a USB startup key to boot the computer or resume it from hibernation..
In addition to these benefits, BitLocker offers us the possibility of blocking the normal startup process until the authorized user provides a personal identification number (PIN) or inserts a removable device, such as a USB flash drive, which contains a password start. These security measures are additional allow us to enjoy a multifactor authentication which is a guarantee that the equipment will not be started or resumed from hibernation until the correct PIN or startup key is presented.
Some points to keep in mind when using BitLocker in Windows 10 are:
- BitLocker is only compatible with Windows 10 Pro and Windows 10 Enterprise editions
- The equipment must be compatible with TPM
- It will be possible to use BitLocker without a TPM chip through software-based encryption but requires additional configuration.
- The computer's BIOS must be compatible with TPM or USB devices during the boot process.
- The hard disk of the computer must use two partitions: a system partition, which contains the files needed to start Windows, and the partition with the operating system as such, if not, BitLocker will perform the partition process.
- The process will take based on the amount of data on the hard disk.
Comparison of data protection in Windows 7 and Windows 10
In the following table we will see how BitLocker has advanced from Windows 7 to Windows 10 to verify its protection capacity.
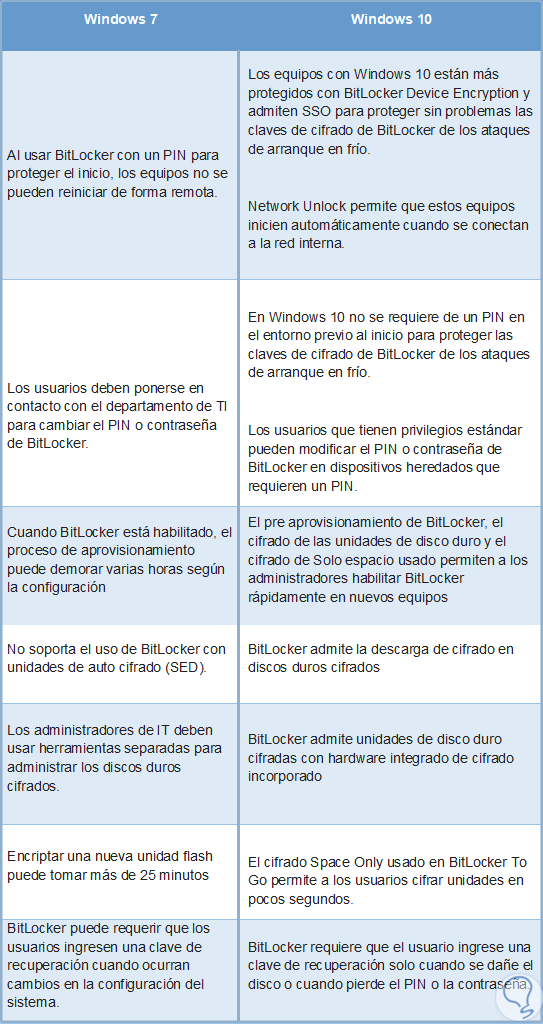
We can see the evolution that BitLocker has had through the new editions of Windows 10.
To keep up, remember to subscribe to our YouTube channel! SUBSCRIBE
1. Check if the equipment is compatible with TPM
To verify this we have only two options, whether or not TPM is enabled on our equipment.
Step 1
To check if TPM is enabled we go to the device manager and there we will locate the “Security devices†section and deploy it:
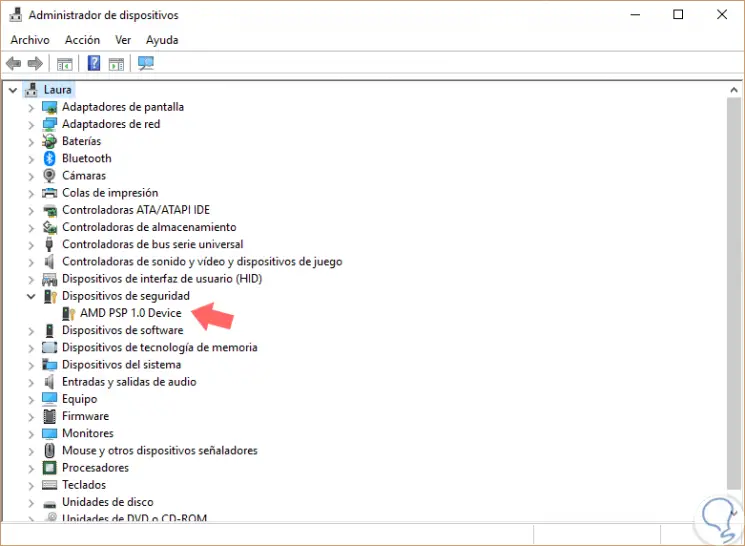
Step 2
In this case we do not have TPM, in case it was enabled we would see a line called Trusted Platform Module with its respective version. Now, if we don't have TPM enabled there, what to do ?, TechnoWikis has the practical solution.
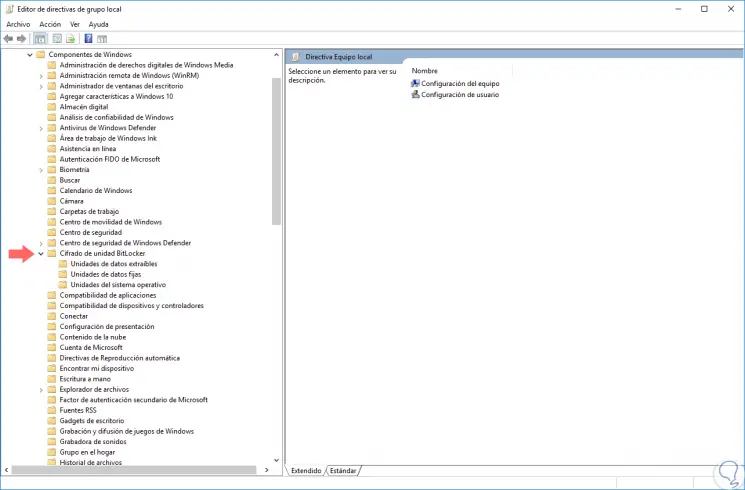
For this process we must access the local Windows 10 policies using the following key combination and execute the gpedit.msc command, press Enter or Accept.
+ R
gpedit.msc
Step 3
In the displayed window we will go to the following route:
- BitLocker Drive Encryption
Step 4
In this section we will click on the policy called "Operating System Units" and in the policies displayed on the right side we locate a call "Require additional authentication at startup":
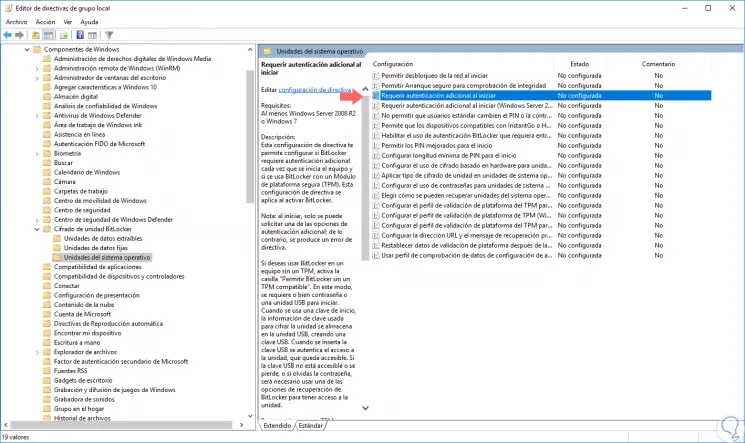
Step 5
We will double-click on this policy, or right click / Edit, and in the new window displayed we activate the “Enabled†box. Click on Apply and then OK to save the changes.
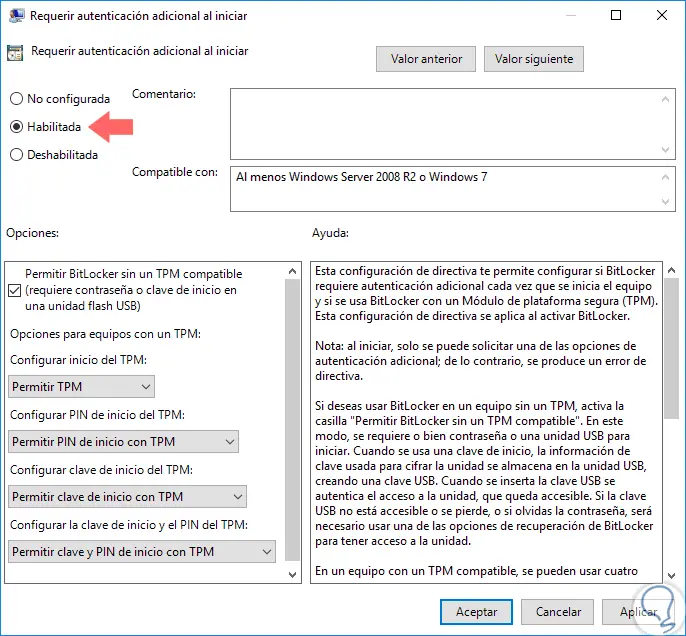
Note
We must ensure that the "Allow BitLocker without a compatible TPM" box is checked.
2. Encrypt Operating System hard disk drive with BitLocker Windows 10
Step 1
To enable the hard drive, we will access the control panel and there we will see the following:

Step 2
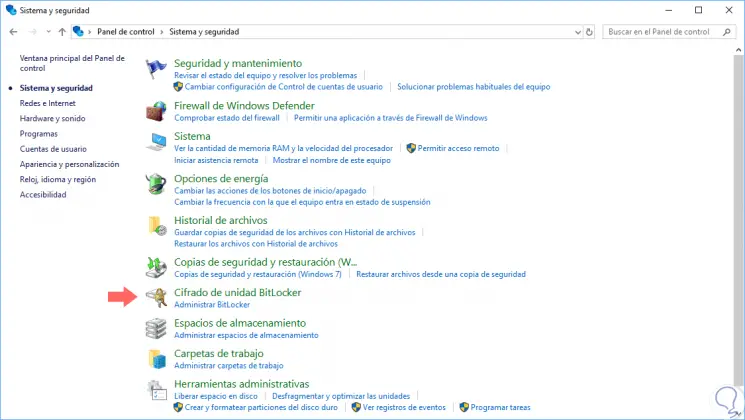
We click on the "System and security" option where we will see the following:
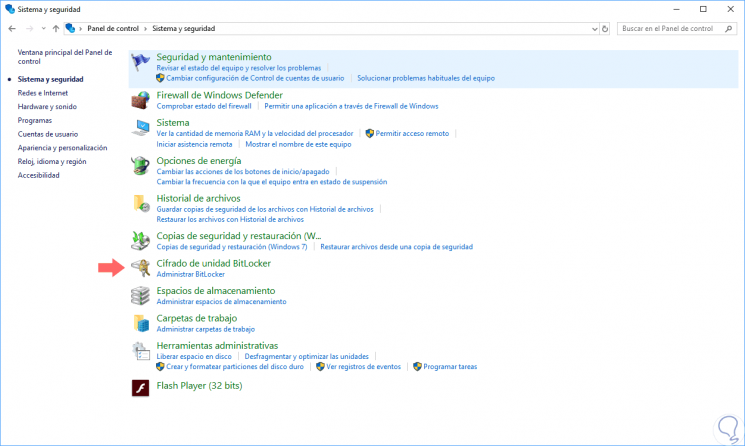
Step 3
There we will click on the “BitLocker Drive Encryption†option:

Step 4
We will click on the “Activate BitLocker†line of unit C and the following window will be displayed:
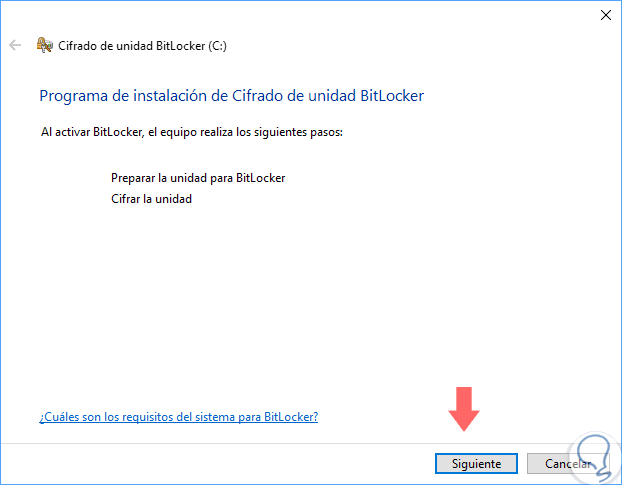
Step 5
Click on Next and then we have two options:
- Use a USB stick for initial connection
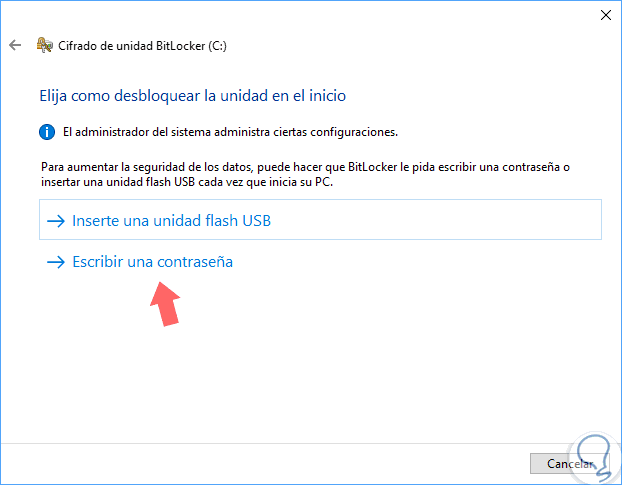
Step 6
In this case we select the "Enter a password" option and we must enter and confirm the password to use:
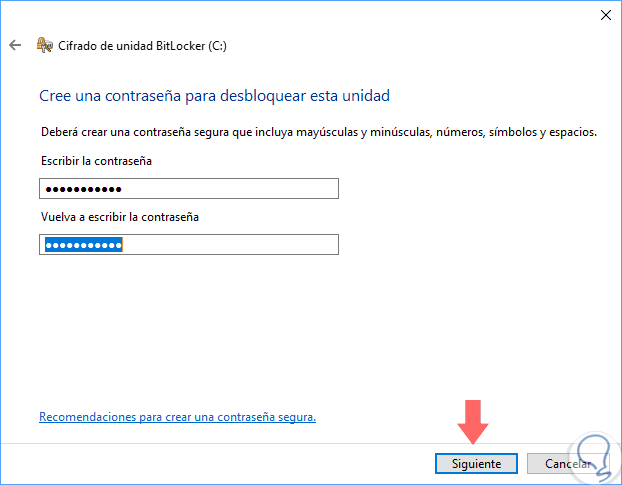
Step 7
Again click on Next and we will see this:
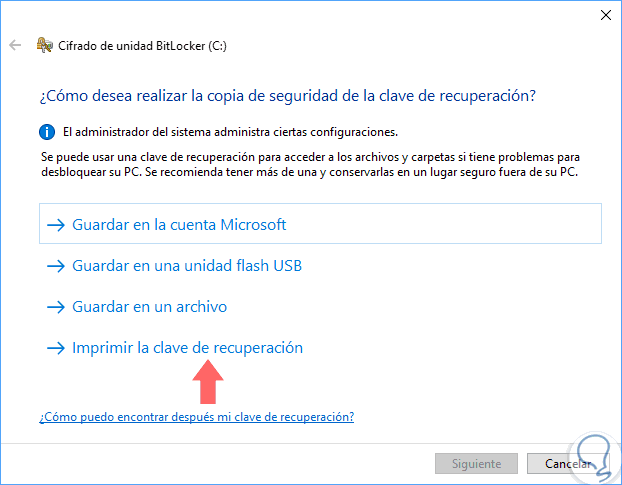
Step 8
There we can use any of the following options:
Save to Microsoft account
This option allows us to store the BitLocker key in the cloud through our Microsoft account, then it can be retrieved at the following address
Onedrive
.
Save to a USB flash drive
This option allows us to store the key in a USB medium.
Save to file
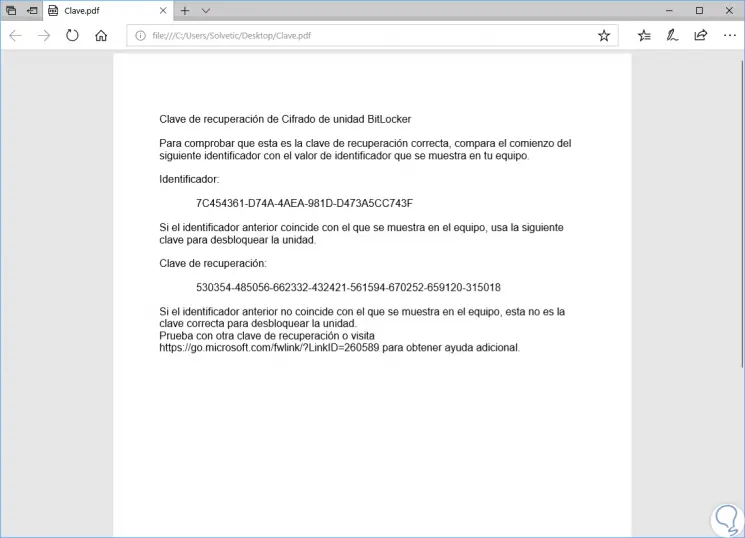
With this option it will be possible to save the password in a file and then, if we wish, print it.
Print the recovery key
It allows us to directly print the BitLocker key.
Step 9
In this case we will select the option “Print the recovery key†which will look like this:
Step 10
Click on Next and the following will be displayed:
Step 11
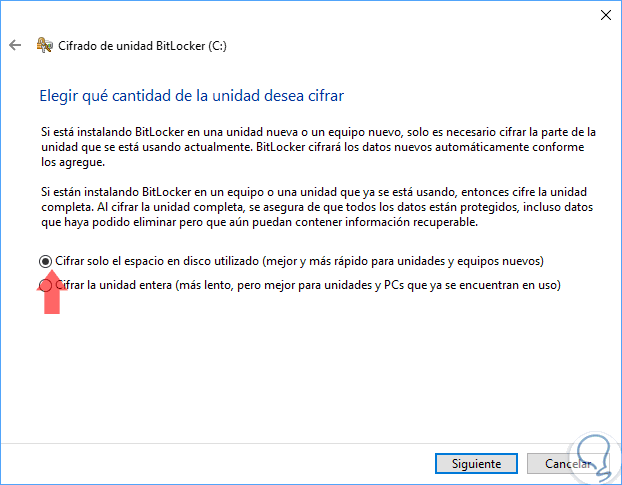
There we have the following options:
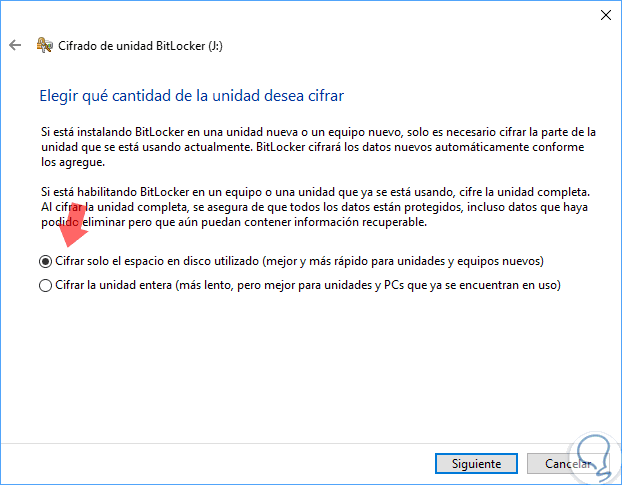
Encrypt only the disk space used
This option allows only the space used in the selected unit to be encrypted.
Encrypt the entire unit
This option encrypts the unit selected in total, which means more time.
Step 12
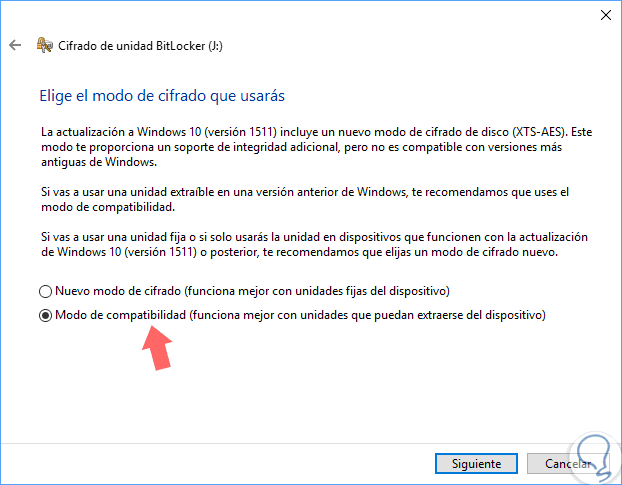
Once we define the best option, click on Next and it will be necessary to define the type of encryption to use:
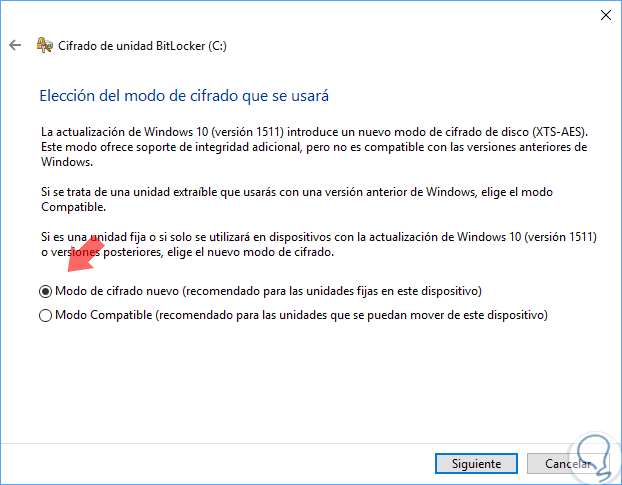
Step 13
Microsoft introduced support for the XTS-AES encryption algorithm in its latest editions, and thanks to this new encryption method we will have additional integrity support and protection against new attacks that make use of encryption text manipulation to cause predictable modifications in clear text BitLocker is compatible with 128 and 256 bit XES AES keys which is a guarantee of security.
Select the default option and click Next, the following will be displayed:
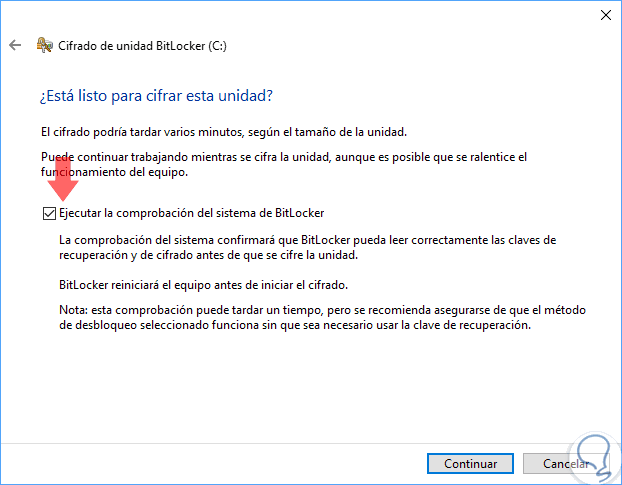
Step 14
There we must check the box “Run the BitLocker system check†and click on Continue.
The following message will be displayed:
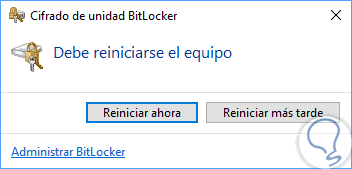
Step 15
Click on the "Restart now" button to continue the process. Once the system is restarted we will see the following:
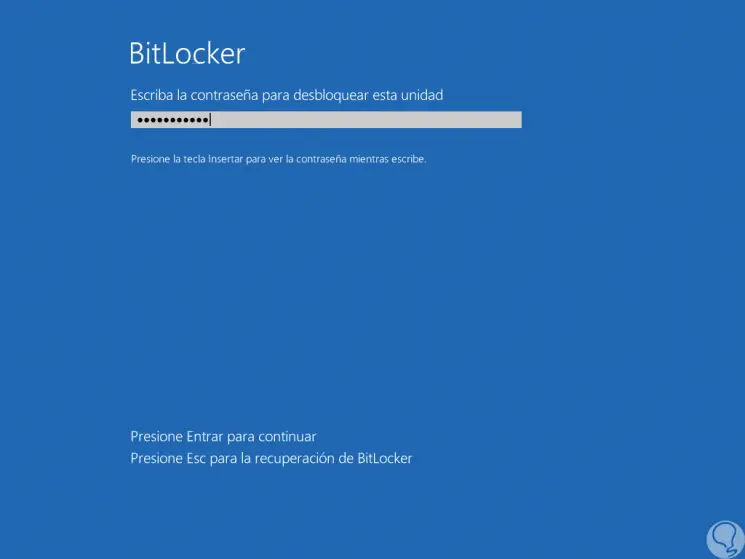
Step 16
There we will enter the password that we have defined in the previous process. We can access the system and if we go back to the path Control Panel \ System and Security \ BitLocker Drive Encryption we will see that the system is still in the encryption process:
Step 17
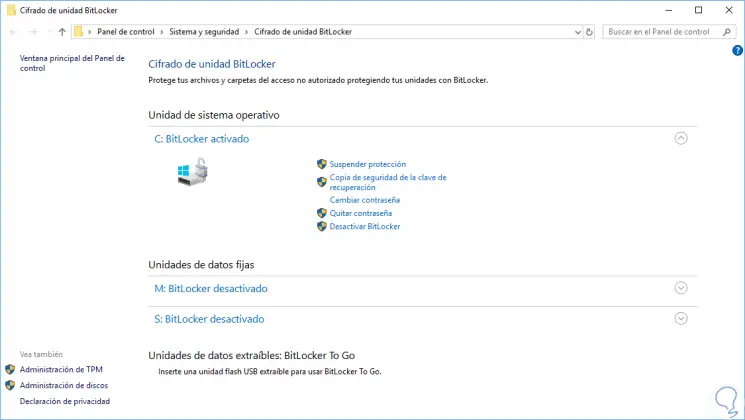
This depends on the options we have selected. Once this process is finished we will see the legend "Bitlocker activated".
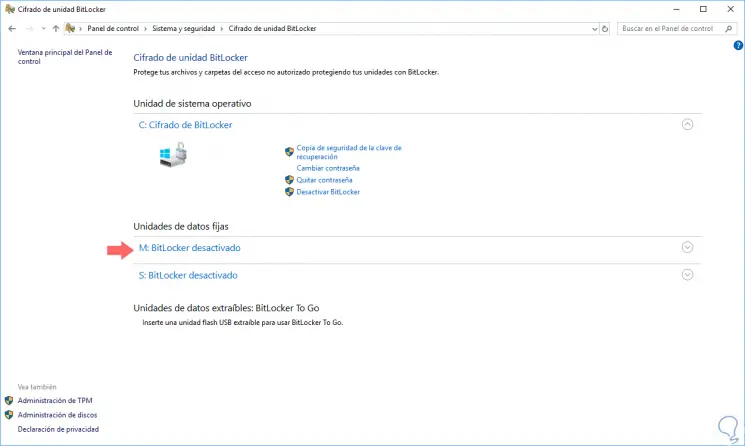
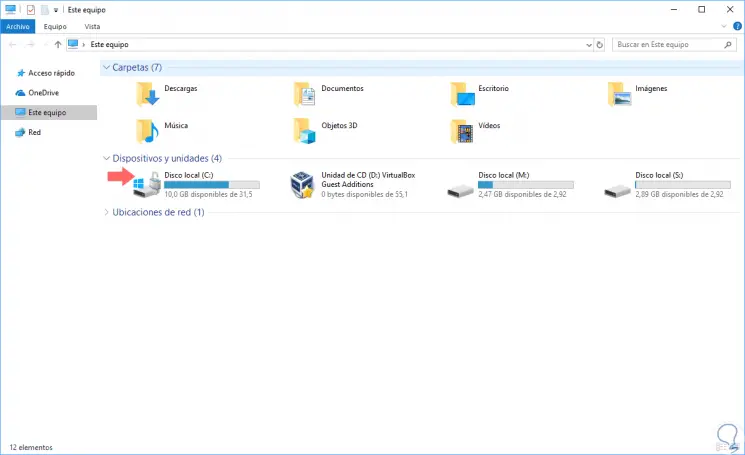
We can verify that the unit has active BitLocker since when accessing the file explorer the unit is with a lock icon:
Step 18
When using BitLocker in Windows 10, being enabled, we will have the following options:
Suspend protection
With this option the data will not be protected, this option applies when we install a new operating system, firmware or hardware update. If we do not enable encryption protection again, BitLocker will automatically resume during the next restart of Windows 10.
Recovery key backup
In case of losing the recovery key and even being registered in the account, this option allows us to create a new backup copy of the assigned key.
Change Password
This option allows us to set a new password for BitLocker.
Remove password
It is important to remember that BitLocker cannot be used without a form of authentication. We can delete the password only when a new authentication method is configured.
Disable BitLocker
This option applies to the time when BitLocker protection is no longer required on the selected drive.
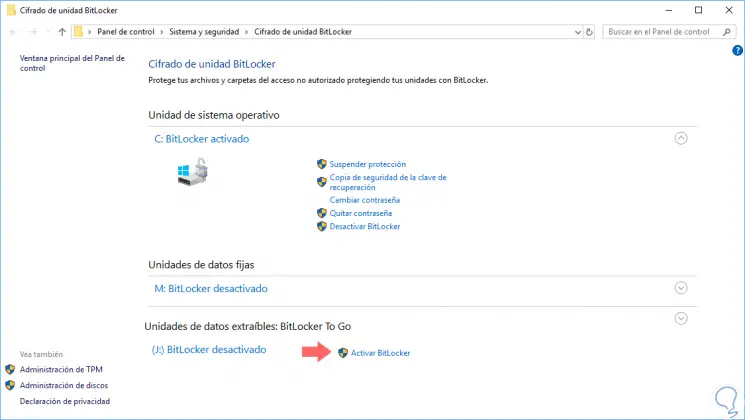
3. Encrypt USB or SD disk drive with BitLocker To Go Windows 10
BitLocker as such does not have the ability to protect all the units connected in the equipment, in case of using external means, such as USB or SD, we can use BitLocker To Go.
To keep up, remember to subscribe to our YouTube channel! SUBSCRIBE
Step 1
With BitLocker To Go we will be able to encrypt external drives in Windows 10. To use BitLocker To Go we will go to the following route: Control panel \ System and security
Step 2
There we will click on “BitLocker Encryption†and in the window we can see the type of removable drive connected to the computer with the legend “BitLocker To Go†or, another option, is to right click on the removable drive and select the option "Activate BitLocker."
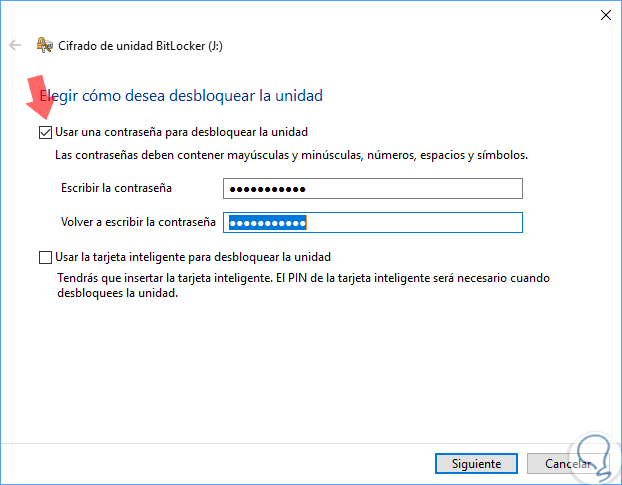
Step 3
By clicking on this option we will be directed to the following window where we will enter the password to use:
Step 4
Click on Next and now we will define where we have to store the password:

Step 5
Once we define the location where the password is to be stored click on Next and now we will define the type of encryption to use:
Step 6
At the top we have explained each of these options, we define the ideal and click Next and then specify the type of encryption to use:
Step 7
By clicking on Next we will see this:
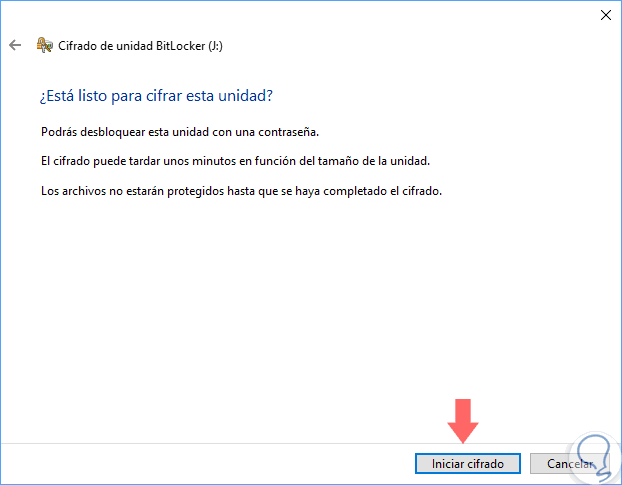
Step 8
If we are sure, click on the "Start encryption" button so that BitLocker is applied to that unit.
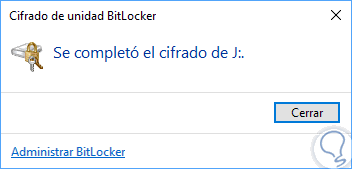
Once the process is finished we will see the following:
Step 9
Thus, when we want to access this unit, the following message will be displayed:
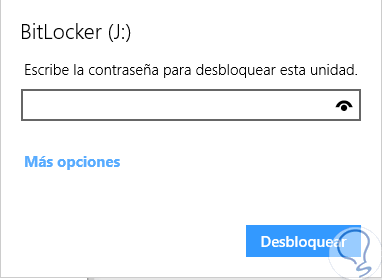
Step 10
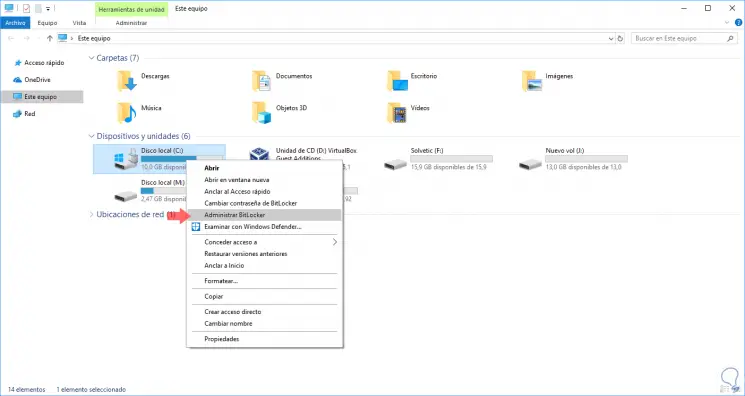
There we will enter the password defined in the process to access said unit. To manage all BitLocker values ​​we can right click on the C drive and there select the option “Manage BitLockerâ€:
We have seen how this is one of the best security tools that Windows 10 offers us for all its internal and external drives.