RAM is one of the most fundamental hardware components in any operating system because thanks to it you can increase or not the speed of access and execution of multiple applications and files. Currently, we have high performance and capacity memories , with capacities of up to 16 GB, which greatly improves the performance of the equipment..
One of the points to consider is that many times we do not have the option to add modules of this capacity either for economic reasons or for compatibility of the equipment and for this, there is a technology called ReadyBoost which allows us to use our USB memory as a complement to the physical RAM of the computer. This ReadyBoost technology was implemented from Windows Vista and its basic operation is to use the external memory as a complement to the memory already added in the system with the aim of increasing the size of the RAM.
Technically, ReadyBoost technology is a software function that is capable of storing applications and data files on a USB device in order to free the physical RAM of the computer and try to accelerate or improve the speed of the operating system..
To make use of this technology the following is required:
- A USB memory of at least 4 GB capacity
- Use Windows 10 in any edition
1. Enable ReadyBoost technology to increase RAM in Windows 10
Step 1
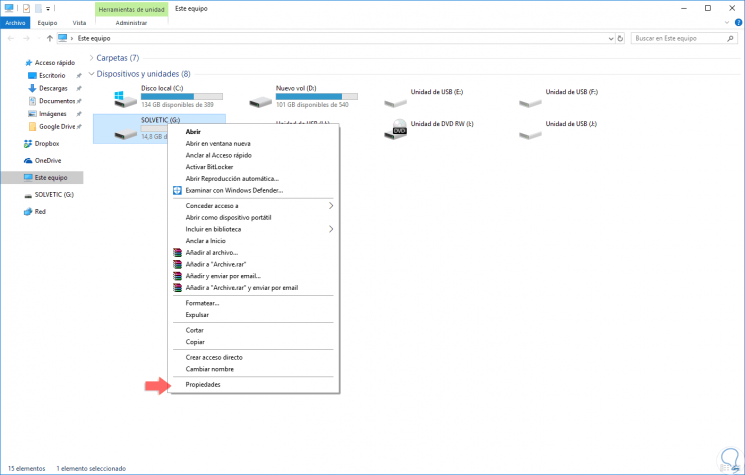
To start this process, we will connect the USB memory to the computer, go to the Windows 10 explorer and there we will right click on the USB drive and select the “Properties†option:
Step 2
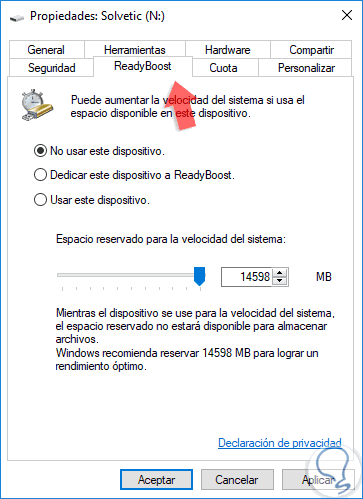
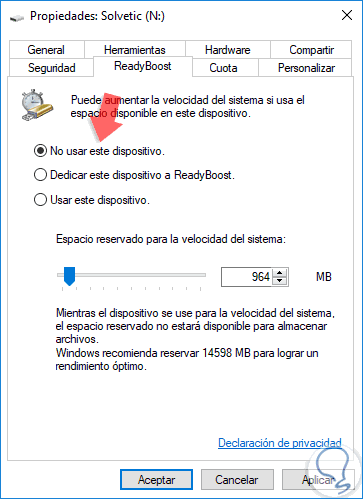
In the window that will be displayed, we go to the “ReadyBoost†tab and we will see the following:
Step 3
There we have the following options:
Do not use this device
This option prevents the USB from being used for ReadyBoost.
Dedicate this device to ReadyBoost
With this option the total USB capacity for this technology is dedicated.
Use this device
This option allows us to define the amount of space to use with ReadyBoost.
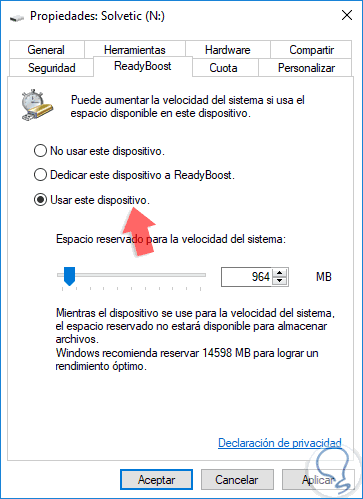
Step 4
We will activate the “Use this device†box and define the amount of space to use for ReadyBoost:
Step 5
Once we confirm these points, click on the "Apply" button and then on "OK" to apply the changes.
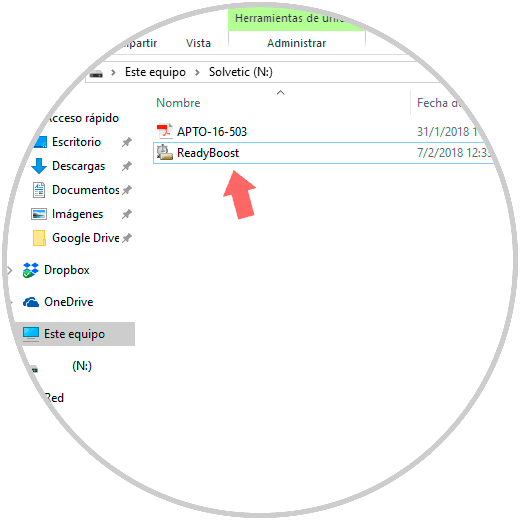
Once this process is done, we will see that a “ReadyBoost†file has been created inside the USB drive:
In this way we will be using that ability to increase the productivity of RAM in Windows 10.
2. Disable ReadyBoost technology to not increase RAM in Windows 10
In case it is no longer necessary to make more use of ReadyBoost technology in Windows 10, the step to disable it will be to go back to the properties of the USB drive and in the “ReadyBoost†tab check the box “Do not use this device†.
Click on Apply and Accept to save the changes..
3. How to view and free RAM in Windows 10
In addition to knowing how to increase the memory through a USB in our computer, it is interesting that we know in what way we can check the RAM memory that we have in our computer, as well as what procedures we can follow to know how to free it.
How to view RAM in Windows 10
It is possible that before increasing the RAM of our computer, we want to know how much we have, to make a decision based on this. Knowing this data we can do in different ways since this data can be seen through:
To keep up, remember to subscribe to our YouTube channel! SUBSCRIBE
In addition to seeing all these methods on video, we can do it in the text tutorial in which this is explained in a detailed and complete way.
How to free RAM in Windows 10
It is possible that before increasing the RAM, we want to free some of what we have occupied in our computer. To free the RAM in our Windows PC there are different methods as well as applications to carry out this process. In the following tutorial you will be able to see step by step in detail how to carry out each of them. In this way we will be cleaning and releasing our computer of unnecessary information.
It's that simple to enable or not ReadyBoost in Windows 10 and have better access to everything we have there and thus manage the RAM of our Windows 10 computer.