In a world where everything is more linked to the network every day, it is essential that we be aware of how to configure, use and adjust preferences of the different alternatives offered by software developers in both operating systems and applications..
Today, we can see how everything revolves around digital, smart TVs and home theaters, control of elements from our cell phone and many more options have become the fundamental basis for many users today. A point within all this technology can be seen with the new televisions, called SmartTV, which are in the ability to connect to the Wi-Fi network or LAN of our home and transmit multimedia elements.
Today there is a wide range of devices that include DLNA as it has become a wireless connection standard for transferring images, videos, music ... DLNA creates the same language within a home network and allows all our devices to understand each other..
Before this was only possible in a computer. This new or improved technology is known as DLNA (Digital Living Network Alliance - Alliance for the Digital Lifestyle Network) and is basically an association of manufacturers of electronic and computer devices through which guidelines for sharing media are defined digital between devices connected to each other.
What is DLNA?
DLNA or Digital Living Network Alliance was born as a non-profit organization in 2003 led by Sony. It includes a standard that allows devices to share multimedia elements among themselves such as images or videos. This connection allows it to be made as an imaginary bridge between devices thus expanding the possibilities of multimedia content playback.
Thanks to this technology we can send our mobile screen to the TV or share the music we are listening to. We will no longer depend on the cable or a physical location for our devices to interact. Of course, we must bear in mind that DLNA works within a home network either WiFi or cable, although WiFi can be more limited if we do not have enough broadband.
By implementing and configuring a DLNA server on Windows , it will be possible to stream video and music elements through the network from the computer to the TV or device while retaining all its integrity and fidelity. What many of us do not know is that Windows 10, actually from Windows 7, includes an integrated DLNA server which will be useful for carrying out this streaming task..
1. How to enable DLNA Media Server multimedia in Windows 10
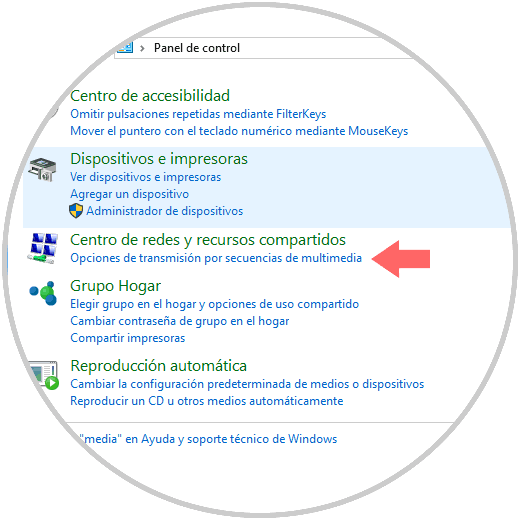
Step 1
To access this option we open the control panel and in the search box located in the upper right we enter the middle term and these will be the results displayed.
There we will select the line “Streaming options for multimedia streams†located under the Network and Sharing Center line and the following window will be displayed.
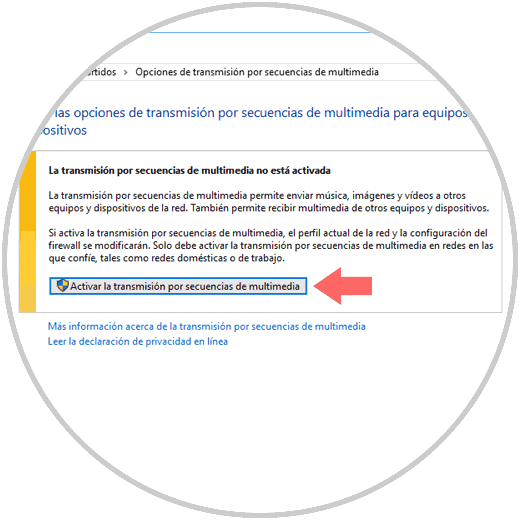
Step 2
We can see that nowhere does the term DLNA appear, this option of multimedia streaming sequences is compatible with DLNA. Click on the button “Activate the transmission by multimedia sequences†and when clicking on this option we will have the following options:
Step 3
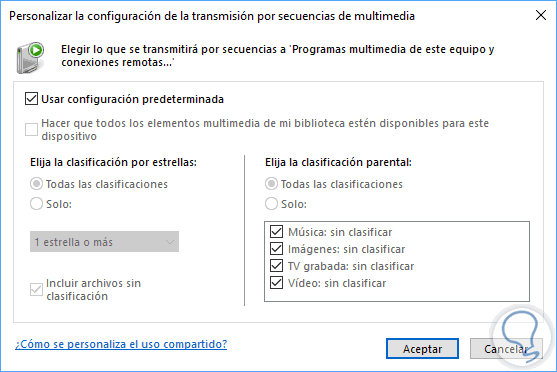
There we can click on the Customize button to select what kind of elements will be transmitted.
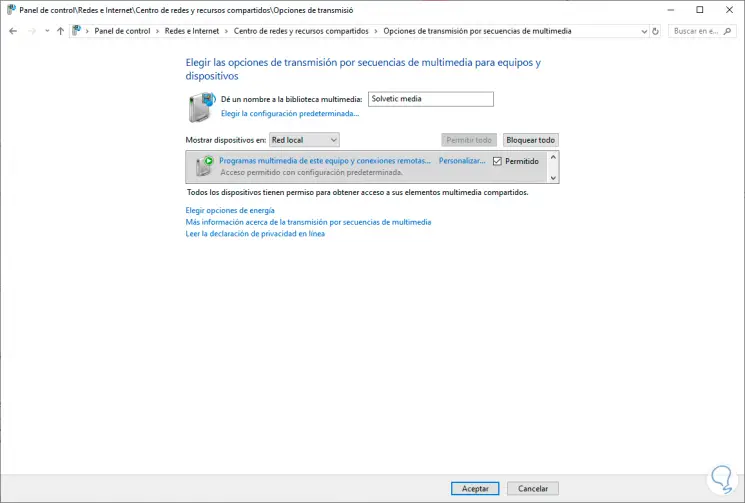
Values ​​to customize
- Name to assign for the multimedia library
- Define the path where the DLSNA server will be deployed (Local network or all networks)
- Establish which programs will have permission to make use of this means of transmission
Step 4
With this configuration, each of the DLNA servers in the local network will be displayed by list, and there we can select the equipment we have configured and transmit multimedia files from it directly.
2. How to add multimedia files with DLNA in Windows 10
Remember that what will be transmitted depends on the Windows Libraries such as Images, Videos or Music.
Step 1
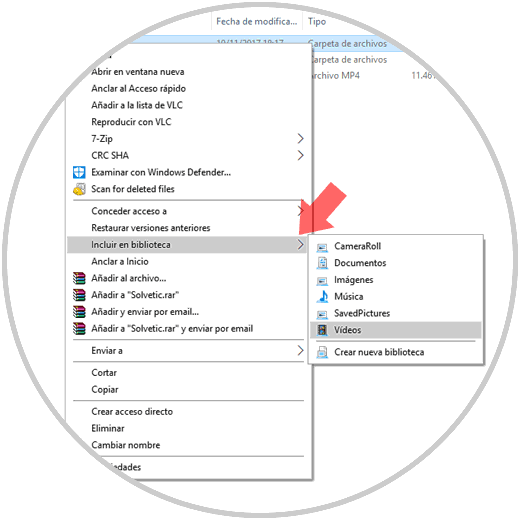
From this point, if we want to add some element through DLNA, we must first add it to any of the Windows libraries and for this we will right click on the folder or file, select the Include in library option and then select in which system library will be added:
Step 2
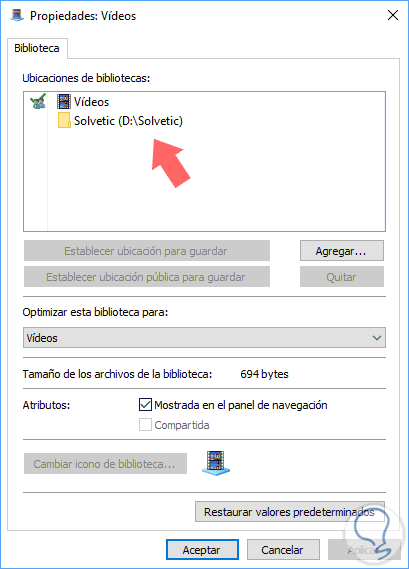
We can verify the properties of this library to verify that the selected folder has been added. From this point it is enough to access our SmartTV and there select the Windows 10 device and be able to navigate in the shared libraries.
3. How to disable DLNA Media Server multimedia in Windows 10
To deactivate the configuration of a library created in streaming using DLNA in Windows 10 we will do these simple steps:
Step 1
The first step will be to enter the Control Panel as follows:
Step 2
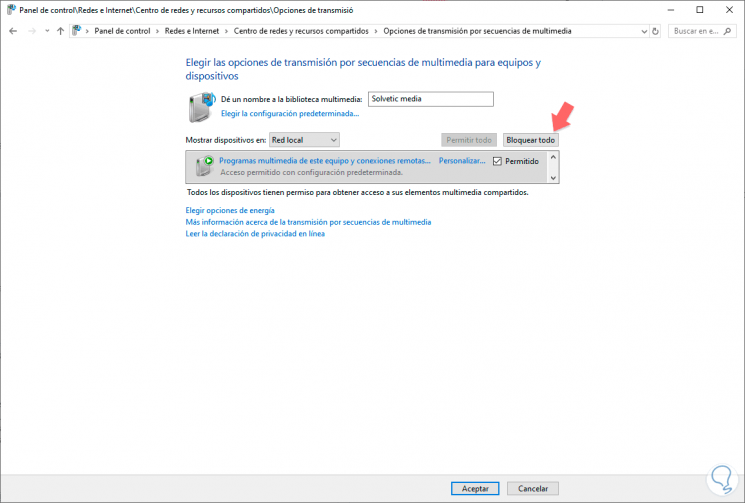
The next step will be to search for the category of Network and Sharing Center and then enter the option of “Streaming media optionsâ€.
Step 3
Now click on the "Block all" option next to the media library created to disable this option.
As we see Windows 10 is not far behind in this changing world and is always at the forefront of new technologies.