Today we have the possibility of using different operating systems, depending on our preferences and tastes. We can use Windows , Linux or Mac , as we are interested. However, we have the possibility to virtualize these operating systems , so that we can test them or use them at certain times..
VirtualBox is one of the most popular platforms to virtualize multiple operating systems and thereby test each operating system that is launched, as well as validate its behavior before it is installed in a productive environment.
In addition to this, we can not fail to mention the advantages of virtualizing to save costs, space and others, but there are some things that you might not know that are possible to perform in VirtualBox and that will help simplify the tasks between the physical and guest equipment ( virtual). One of them is the possibility of sharing folders between them and thus transferring files in a secure and fully functional way..
Today TechnoWikis will explain in detail how to create and manage shared folders in Ubuntu 19 and Windows 10.
1. How to create and manage shared folders in Ubuntu 19
Ubuntu 19 is one of the most versatile Linux systems and sharing folders there is something useful.
Step 1
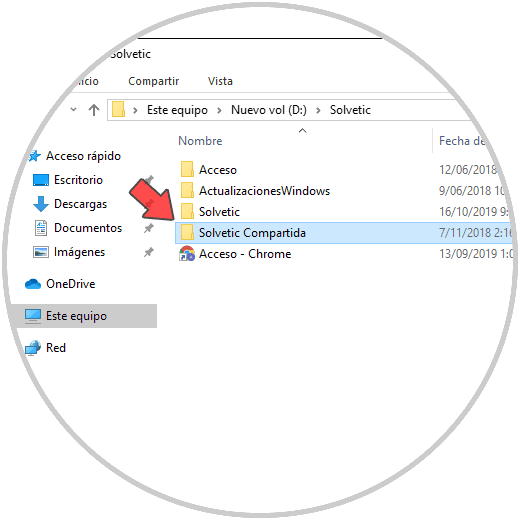
For this we will first go to the physical system (in this case Windows 10) and proceed to create a central folder in which the objects will be shared:
Step 2
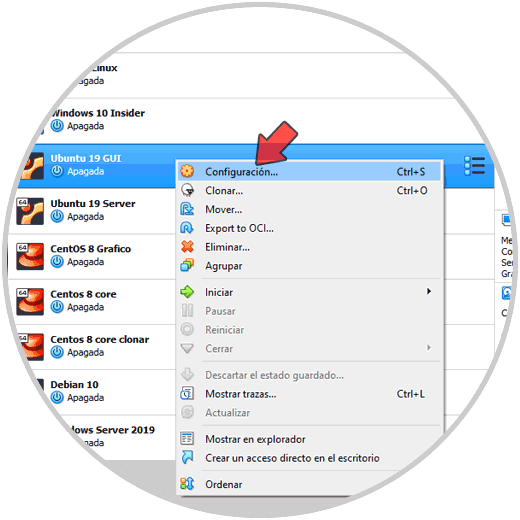
Now we access VirtualBox, select the virtual machine and go to its configuration using one of the following options:
- From the Machine / Configuration menu.
- By right clicking on the virtual machine and selecting Settings.
- By clicking on the Settings button in the center panel.
Step 3
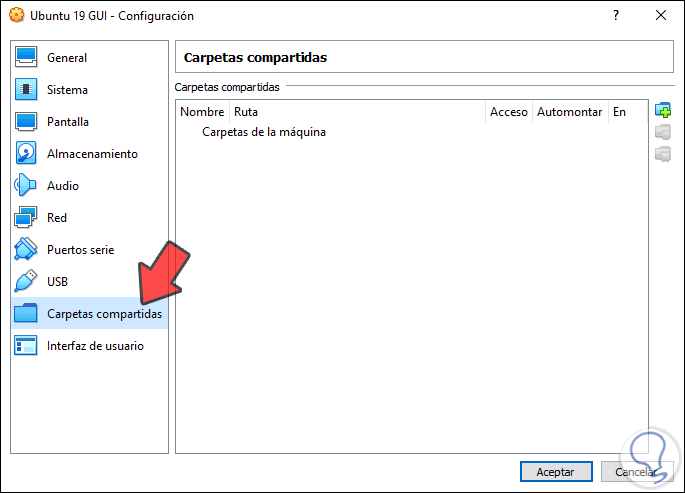
In the configuration window we will go to the section "Shared Folders" where we will see the following:
Step 4
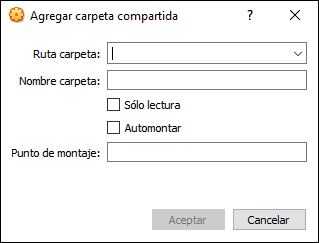
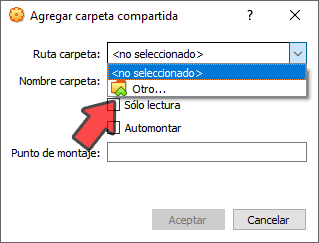
There we click on the “Add new shared folder†icon and the following will be displayed:
Step 5
There we click on the drop-down field of the “Folder path†line and select “Otherâ€:
Step 6
Then we must go to the folder that we have defined to be shared between both systems:
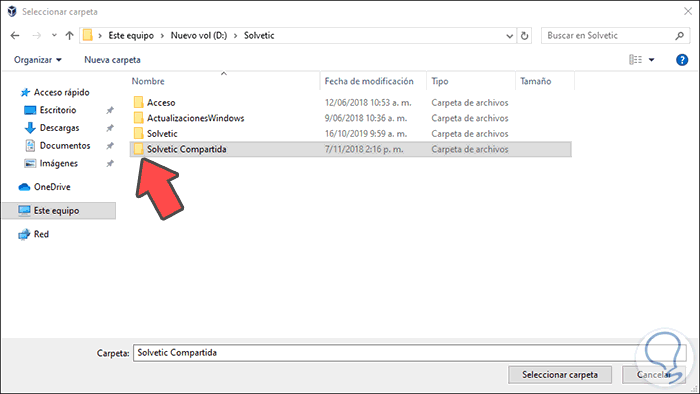
Step 7
We click on Select folder and then we will see the path of that folder, as well as the following options:
- Make the read-only folder
- Autontarla with which in each Ubuntu login this folder will be mounted
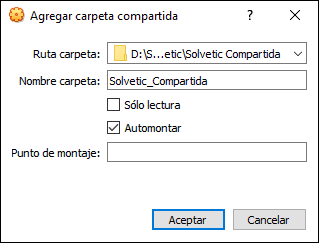
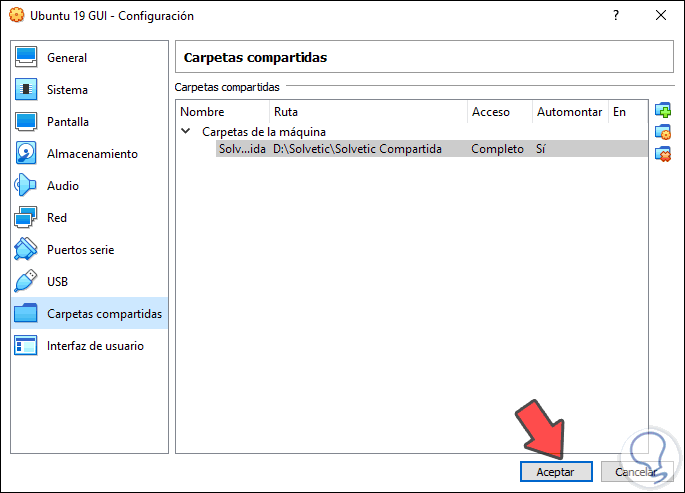
Step 8
Click OK and after this we will see the folder created in the VirtualBox shared folders menu. Click OK to close it and proceed to run the virtual machine of Ubuntu 19.
Step 9
Next we go to the terminal in Ubuntu 19 and there we execute the “whoami†command to determine the current user:

Step 10
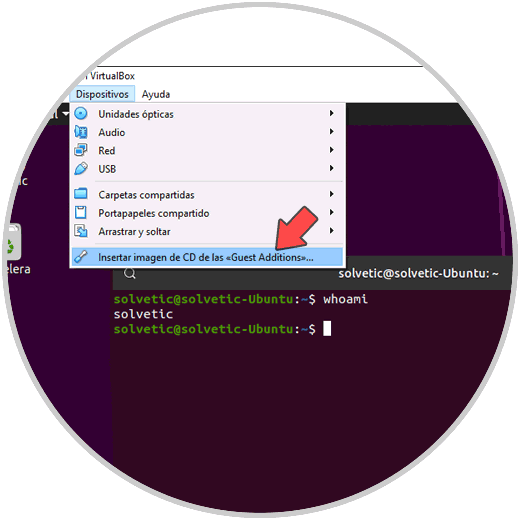
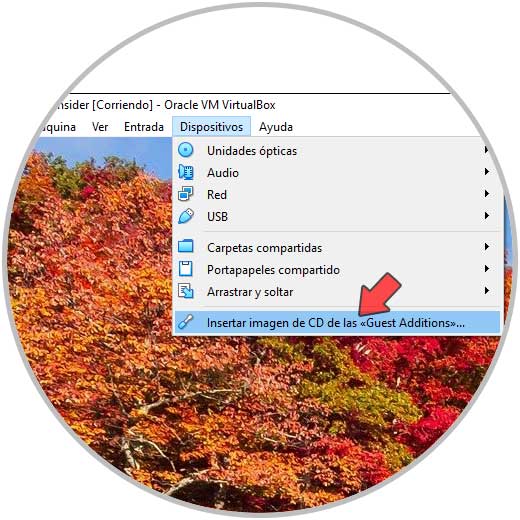
Before continuing it is vital that the VirtualBox Guest Additions are installed in the virtual machine, for this we go to the Devices / Insert CD image menu of the << Guest Additions >>:
Step 11
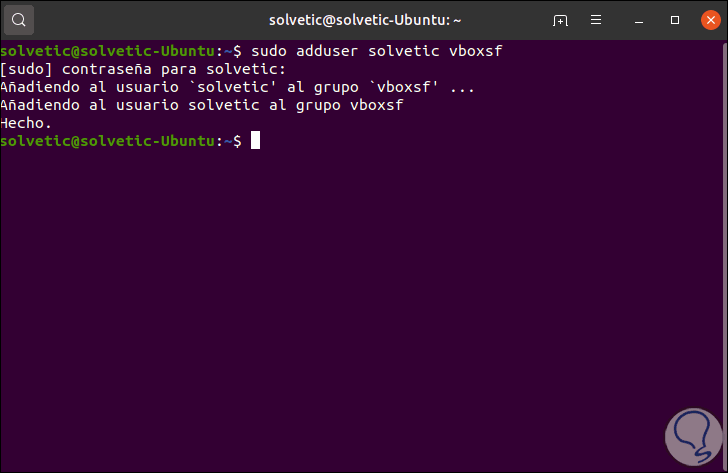
Once installed, we will execute the following command in the terminal to add the current user to the VirtualBox group. We left the Ubuntu 19 terminal.
sudo adduser TechnoWikis vboxsf
Now we must turn off the virtual machine and turn it on again so that the changes are applied to the shared folders..
Step 12
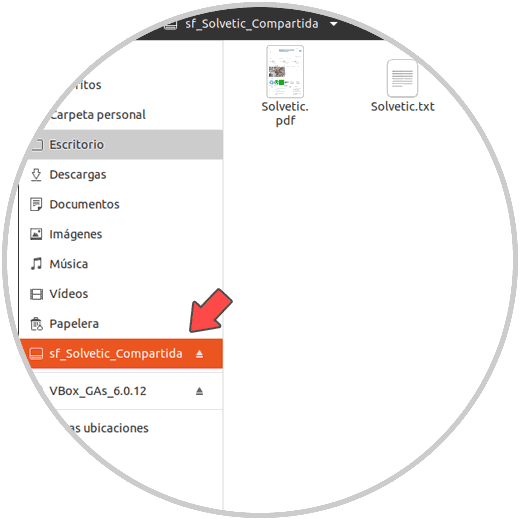
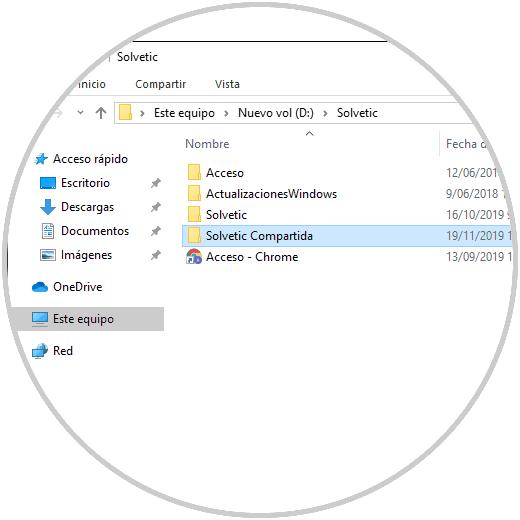
Once we access Ubuntu, we will go to Files and there we will find a new section called, in this case, sf_TechnoWikis_Compartida and when accessing it we find the files that are in the shared folder of Windows 10:
Step 13
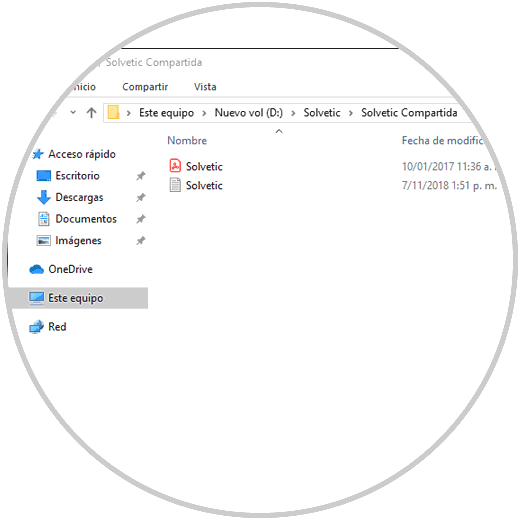
We can validate the files in Windows 10:
Step 14
In the same way, we can create new elements in Ubuntu and we will see them reflected in Windows 10:
Step 15
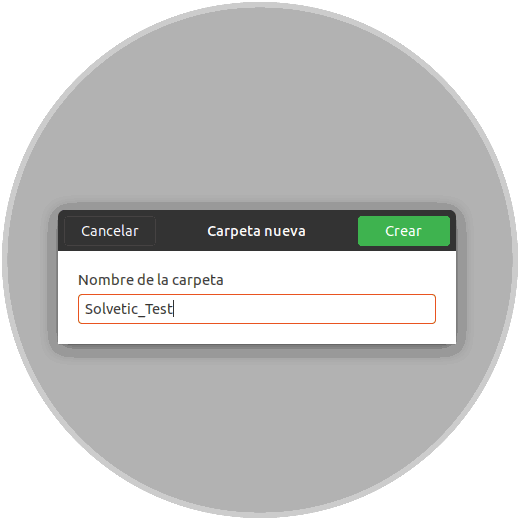
Click on Create and now we will see it in Windows 10 available:

It's that simple to share folders between Ubuntu 19 and Windows with VirtualBox.
2. How to create and manage shared folders in Windows 10
Step 1
Now let's see how to create shared folders between a Windows 10 system in VirtualBox and Windows 10 physical. Like the previous process, the first step to take will be to define the shared folder in Windows 10 physical:
Step 2
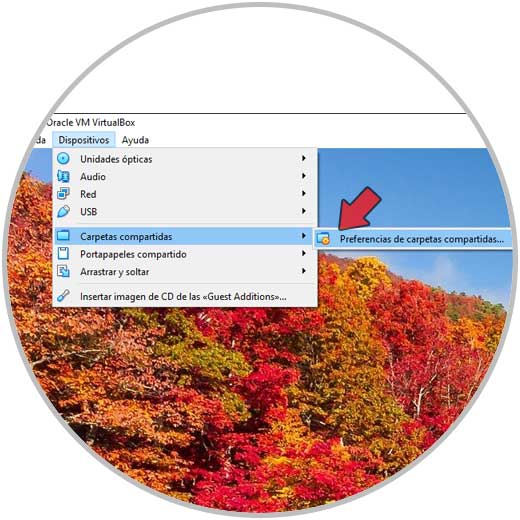
Now, in Windows 10 we can share the shared folder either with the method described above from Ubuntu (From Settings) or we can do it with the active virtual machine from the Devices menu / Shared folders / Shared folder preferences:
Note
For everything to work as expected we must always add the Guest Additions of VirtualBox:
Step 3
Once installed, we can go to the shared folder manager where we will see the following:
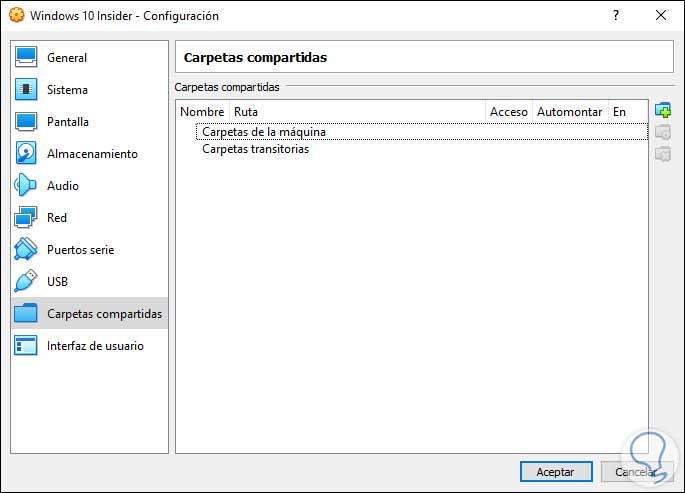
Step 4
There we click on “Add new shared folder†and the following will be displayed where we must click on “Path folder†and then click on “Otherâ€:

Step 5
Now we are going to the folder path on the Windows 10 physical machine:
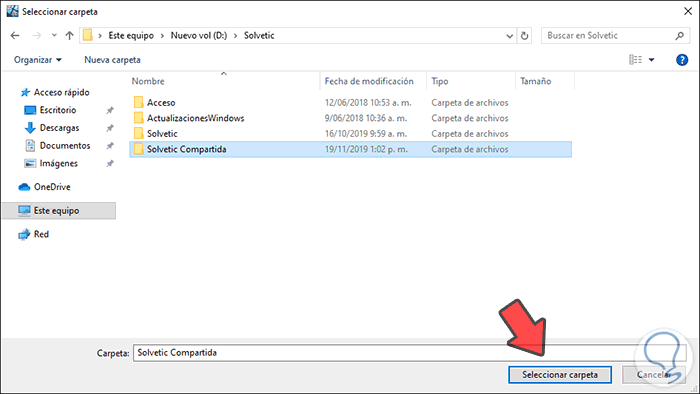
Step 6
We click on Select folder and we will see that it is added and to make it permanent we activate the Autontar box:
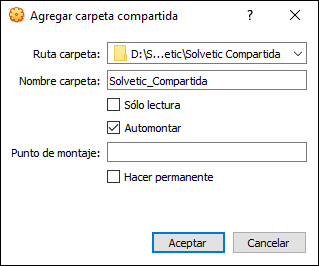
Step 7
We finish the process by clicking on OK and we will see the mounted folder. Click on OK to conclude the process of shared folders.
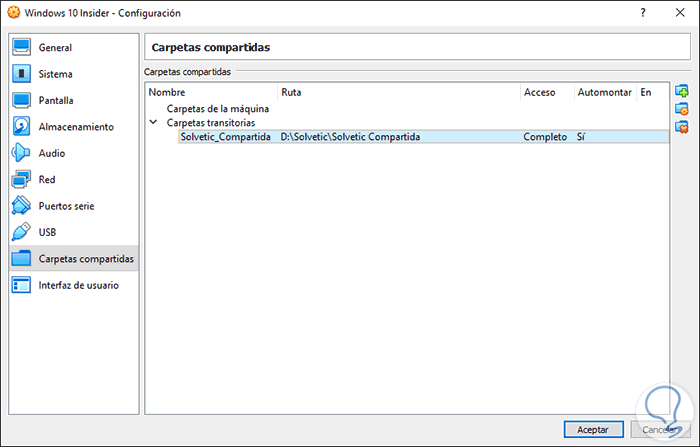
Step 8
Restart the Windows 10 virtual machine in VirtualBox so that the changes are effective and to verify it we access the File Explorer and in the Computer section we can view the shared folder:
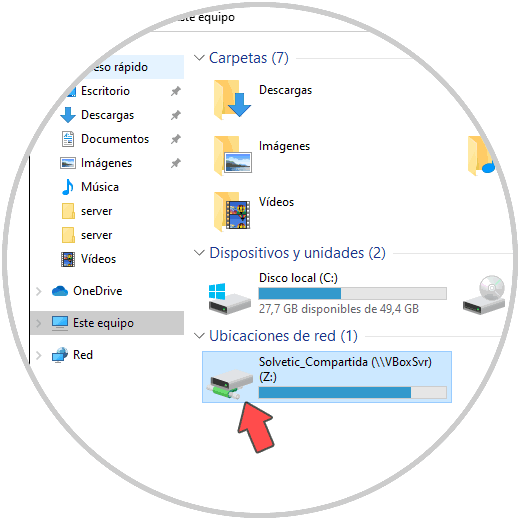
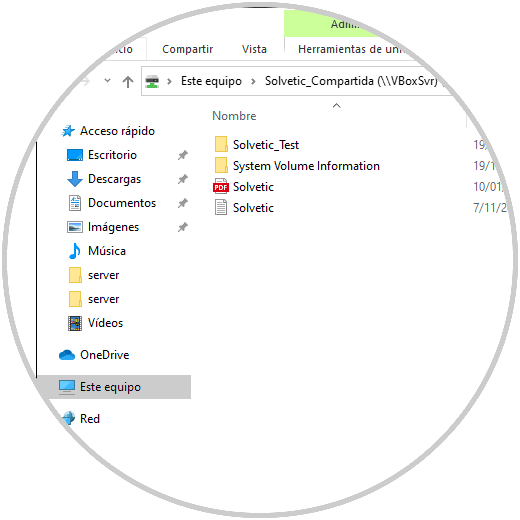
Step 9
From there it will be possible to share files between both systems with full freedom and security, thus optimizing administration tasks in a simple way.
With these methods TechnoWikis has taught you, it will be very easy to share folders between Ubuntu or Windows in VirtualBox and work with both the real and virtual operating systems in a complete and comprehensive way.