Windows 10 File Explorer is one of the most used parts of the system every day since from it we can access the units of the computer and in the process go to the different libraries available such as images, music, etc..
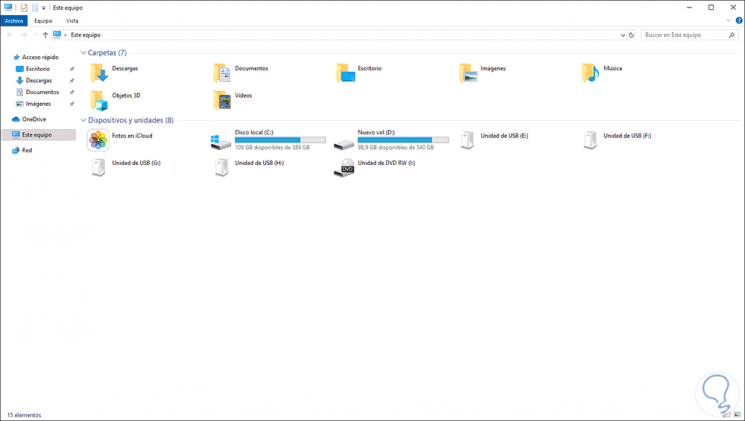
Although its normal use is of good performance both in the opening and in the access to the elements , it is possible that for various reasons the behavior of the File Explorer becomes slow. That is why TechnoWikis brings you different solutions with which you will recover the good functioning of the Explorer.
1. How to disable Quick Access and Windows 10 history
The File Explorer in Windows 10 handles a quick access with which we can go to just one click to both the files and the most recent folders. This at a certain point (if there are too many elements) can have a negative impact on the performance of this.
Step 1
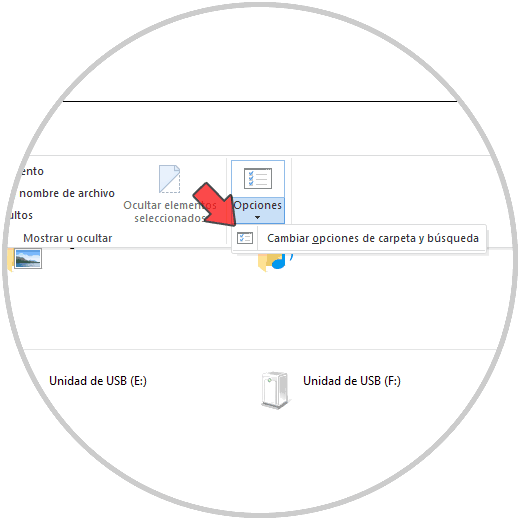
To do this we will disable this function, in the Explorer we will go to the Options menu and there we select the option “Change folder and search optionsâ€:
Step 2
In the pop-up window we will go to the General tab and click on the "Delete" button located in the "Privacy" section:
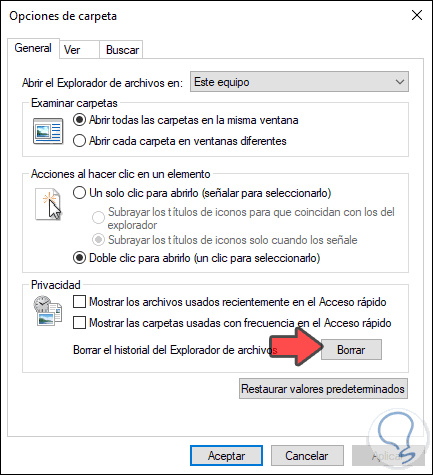
This will clear the history of the Explorer and we recommend that the “Show recently used files in Quick Access†and “Show recently used folders in Quick Access†boxes are disabled, click on Apply and Accept to save the changes..
2. How to configure the indexing options of Windows 10 Explorer
Step 1
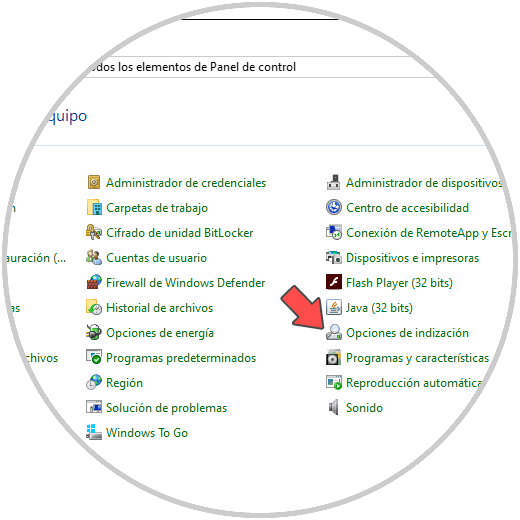
Indexing is the search mechanism of Windows 10 which is optimized for better results, for its configuration we will go to the following route:
Step 2
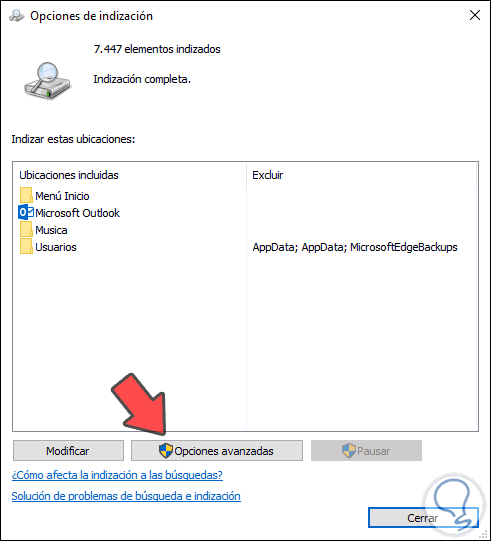
There we click on the “Indexing Options†line and the following will be displayed. There we click on the “Advanced options†button
Step 3
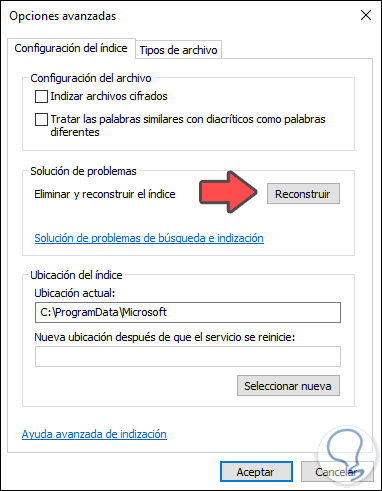
We will click on the “Rebuild†button so that the entire internal search structure is restructured again. After this click on Accept to complete the process.
3. Run SFC in Windows 10
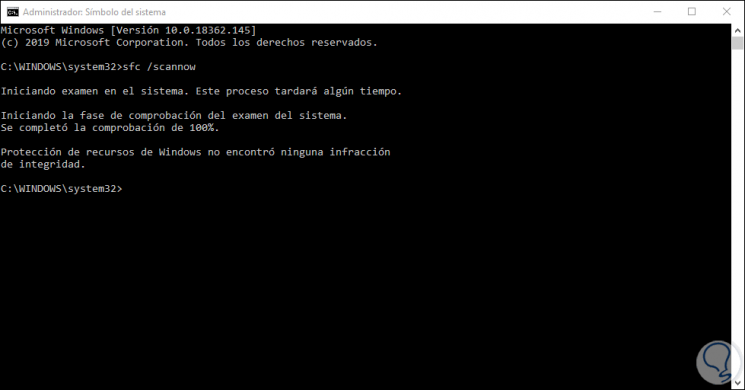
SFC (System File Checker) is a command that has the task of analyzing the Windows 10 NTFS file system for errors and if it detects them it will request a system restart to apply the corrections, to use this command we access the command prompt as administrators and we execute the following:
sfc / scannow
4. How to restart Windows 10 File Explorer
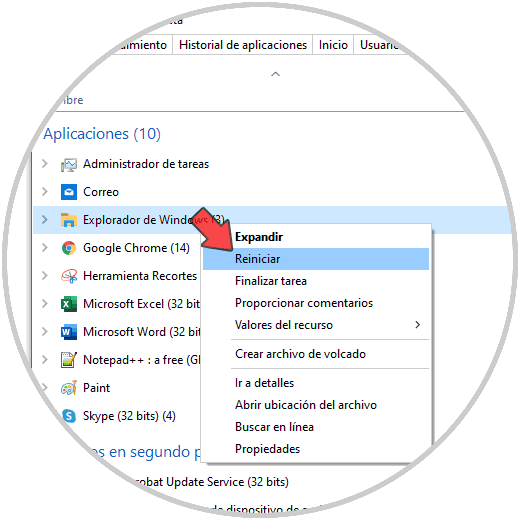
This task allows the Explorer and all its associated processes to be restarted by refreshing its use, for this we access the Task Manager and in the “Processes†tab we locate the Explorer and can restart it in two ways that are:
- By right clicking on it and selecting “Restartâ€
- Select the Explorer and click on the "Restart" button at the bottom
5. How to disable Cortana from the Windows 10 registry editor
The use of the Cortana voice assistant can have an impact on the overall performance of the Windows 10 File Explorer, so if we do not use it or its operation is low, we can disable it.
Step 1
For this we will use the Windows + R keys and execute the “regedit†command, then we will go to the following route:
HKEY_LOCAL_MACHINE \ SOFTWARE \ Policies \ Microsoft \ Windows \ Windows Search
Note
If the Windows Search key is not available, we can create it by right clicking on Windows and selecting New / Password.
Step 2
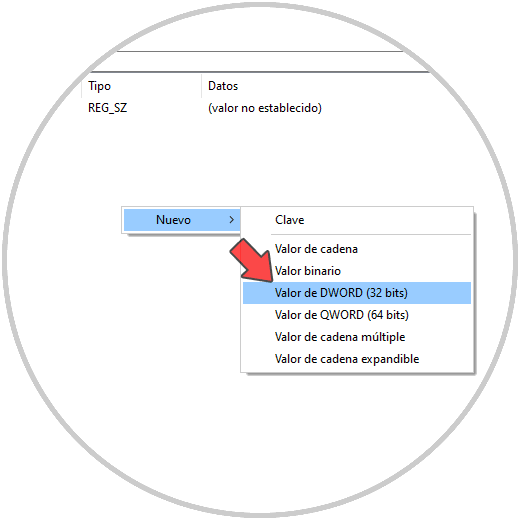
Now we will right click somewhere free and select New / DWORD Value (32 bits):
Step 3
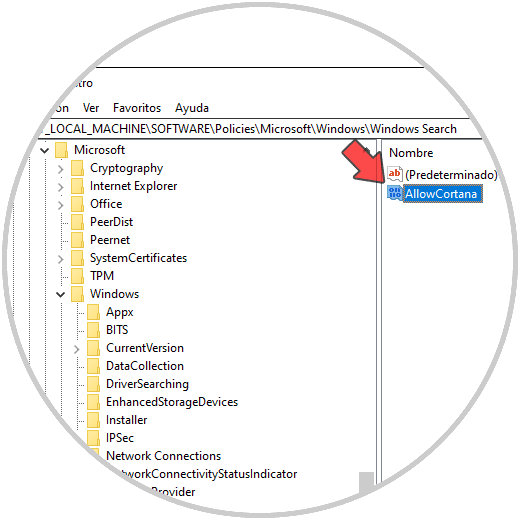
This new value will be called "AllowCortana":
Step 4
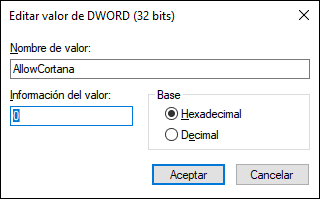
We double click on this value and in the field "Value information" enter the number 0. We click on OK to save the changes and we can exit the registry editor.
6. How to disable Cortana from the local policy editor
This is an option that is available on Windows 10 Pro and Enterprise operating systems.
Step 1
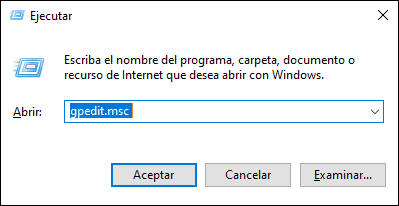
To do this, we combine the Windows + R keys and execute the “gpedit.msc†command.
+ R
Step 2
In the displayed window we will go to the following route:
In the policies in the central panel we will place a call “Allow the use of Cortanaâ€:
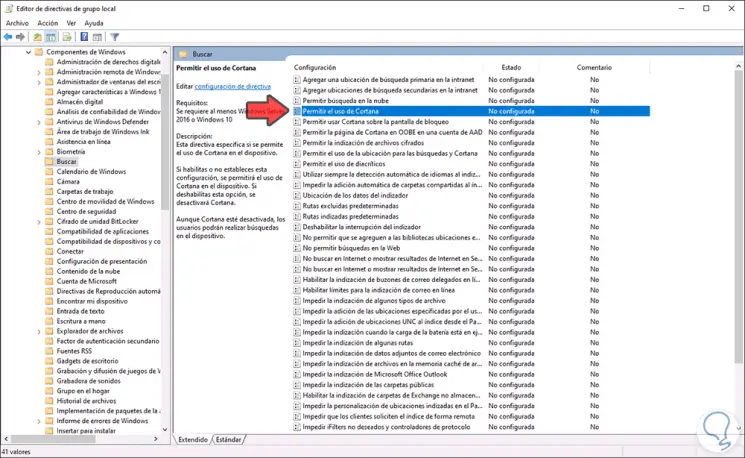
Step 3
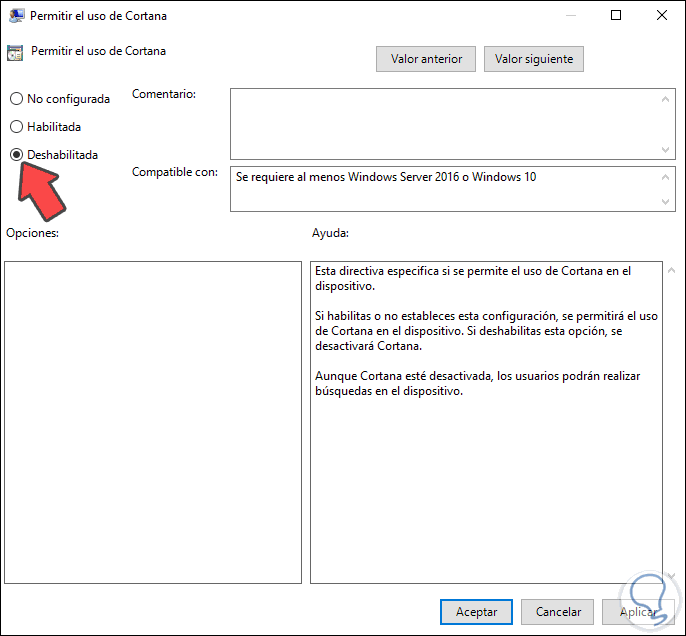
Double click on it and in the new window we activate the “Disabled†box. We click Apply and Accept to save the changes.
7. How to edit the optimization of Windows 10 folders
This is a mechanism used in Windows 10 which seeks to make access and search processes in folders and other items as complete as possible. The problem is that if we have large folders this can affect the performance of the Explorer since it works in the background.
For editing, we right click on the folder to be edited and select Properties. In the new window we go to the "Customize" tab and in the "Optimize this folder for" field, select "General elements" and check the "Apply this template to all subfolders" box:
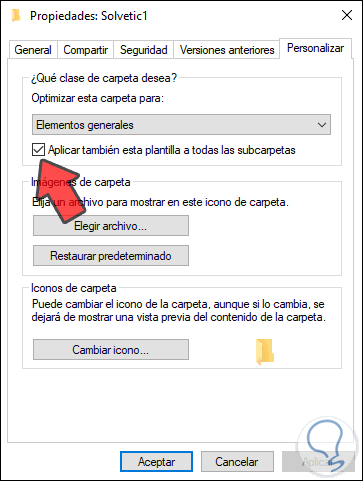
We click Apply and Accept to save the changes.
8. How to manage Windows 10 Quick Access
It is normal that many of us anchor various elements to Quick Access to go to them in a much more agile way. If we have several elements this will have negative consequences on its performance.
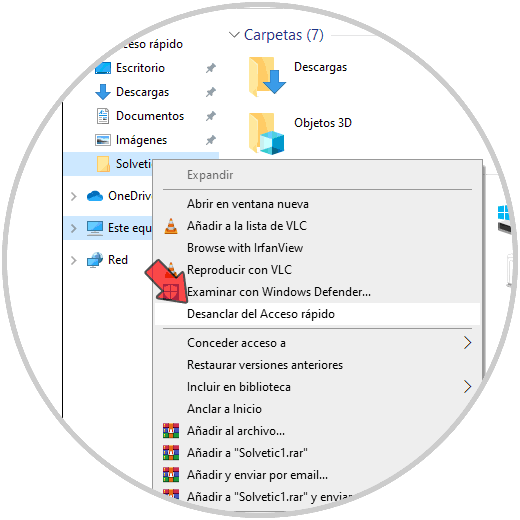
That is why if any of these objects is not necessary, just right click on it and select "Unpin from Quick Access":
9. How to reset Windows 10 File Explorer to default
We all like to personalize things and Windows 10 allows us this in a simple way. However, if the browser has received many changes, it is possible that some of them cause slow use. Therefore, resetting the default values ​​is a good idea.
For this we go to the Explorer and from the View menu we select Folder Options and in the View tab we will click on the “Reset folders†button:
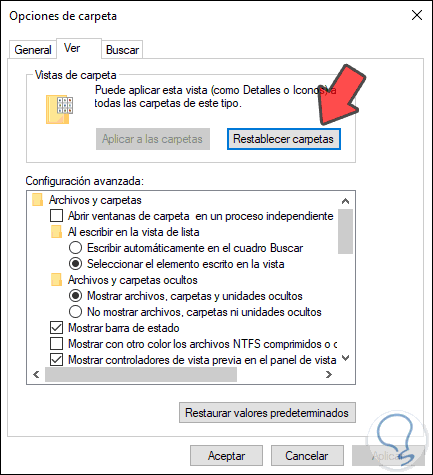
Once we click there, click on Apply and Accept to save the changes..
10 . How to optimize Windows 10 File Explorer settings
There are some small things that we can edit in the Explorer configuration focused on improving its performance. To do this we must access the folder options again and there do the following:
Step 1
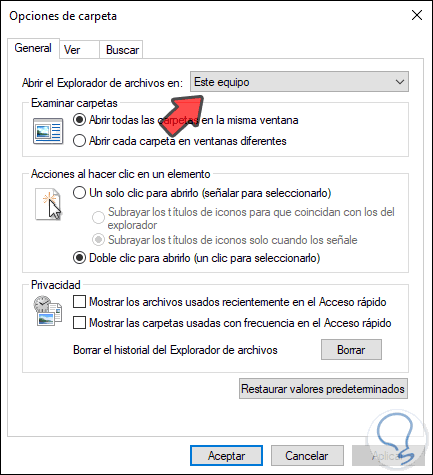
On the General tab in the "Open File Explorer in" field select "This computer" instead of Quick Access:
Step 2
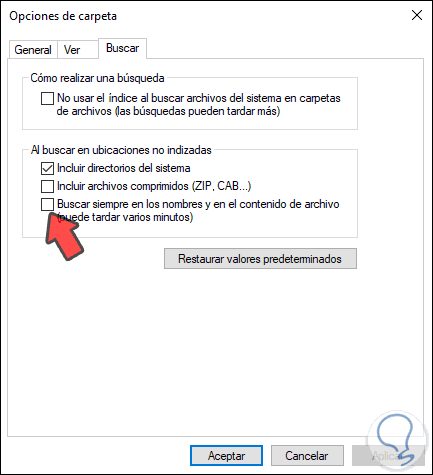
In the "Search" tab, uncheck the "Always search names and file contents" box. Click on Apply and this will help improve the speed and use of the Explorer.
11. How to create a shortcut to Windows 10 Explorer
Having a shortcut is always an ideal method to go to Windows 10 applications or libraries soon.
Step 1
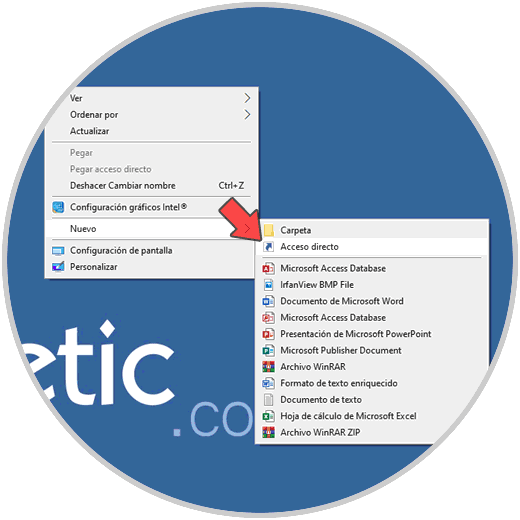
For this we right click somewhere free on the desktop and there we select New / Shortcut:
Step 2
In the pop-up window we enter the following route:
C: \ Windows \ explorer.exe
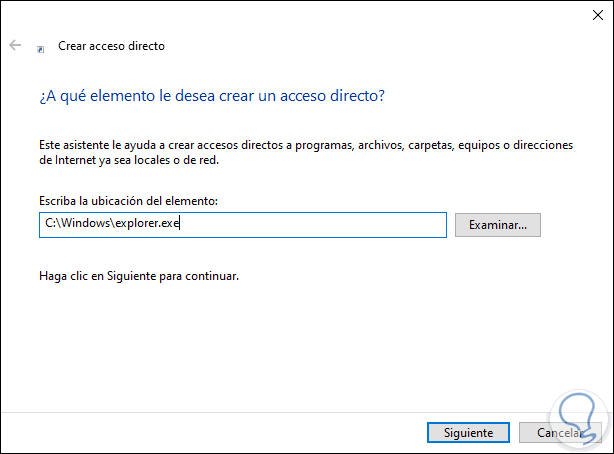
Step 3
We click Next and assign the desired name:
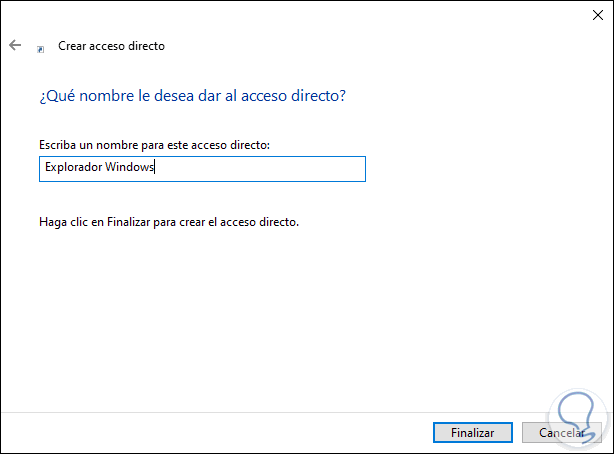
Step 4
With this we will have the shortcut created on the Windows 10 desktop:
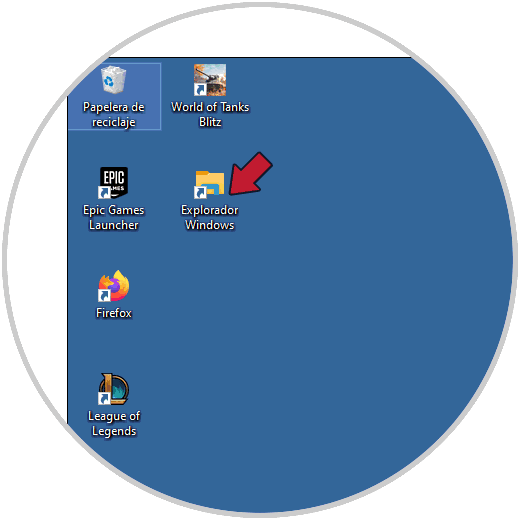
Step 5
After that we right click on the shortcut and select Properties. In the displayed window we go to the “Destination†line and at the end of the route we enter / n:
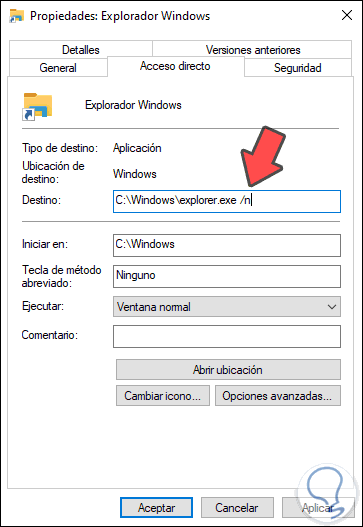
This allows File Explorer to open a new window with the location specified in the access. We click on Apply and Accept to finish.
12. How to make use of the Windows 10 event viewer
Each action we perform in Windows 10 is recorded as an event in the system which is integrated with an ID and is a good option for administrators to see what happened to Explorer.
Step 1
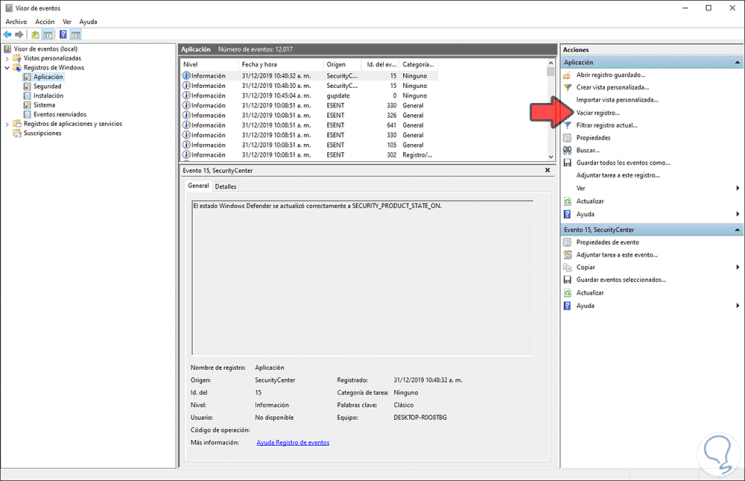
To access this we combine the Windows + R keys and execute the eventvwr command. Next, we will go to the “Windows / Application Records†section and in the right side panel select “Empty Registrationâ€:
Step 2
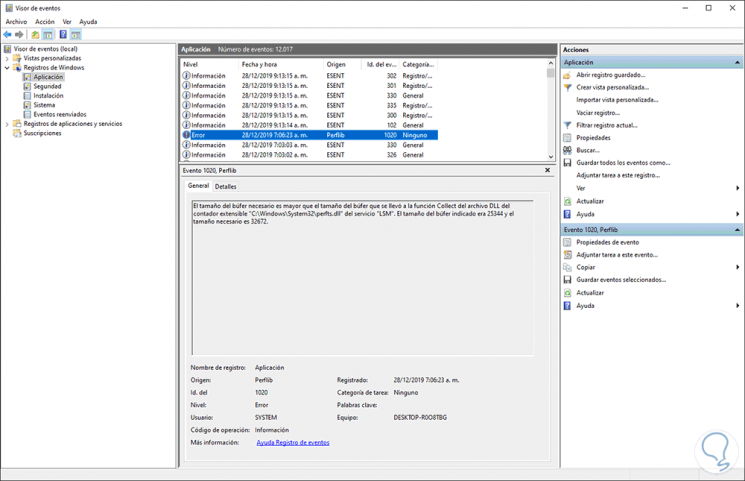
Once this is done, when an error is generated in the Explorer we can detect it with the legend Error, we click on it to access more precise details of it:
13. How to disable the TDM Windows 10 service
TDM (Trusted Drive Manager) is a service that allows you to encrypt system drives but can sometimes cause negative effects on Explorer performance.
For this we access the Windows services with the "services.msc" command and locate the service called "Encryption Services". We double click on it and in the Startup type field we set Disabled:
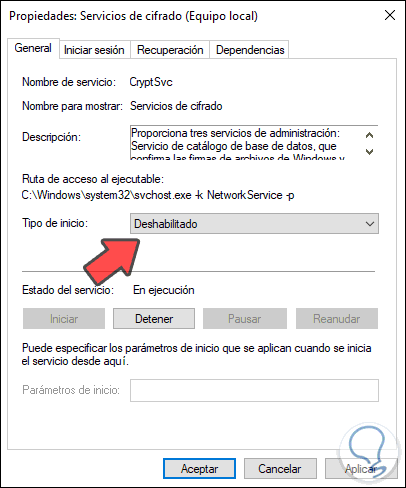
Click on Apply and Accept to complete the process.
14. How to run netsh winsock reset Windows 10
This is a command that is responsible for restarting the network sockets allowing to optimize that various system actions improve including the Explorer.
For this we must access the command prompt as administrators and there execute:
netsh winsock reset
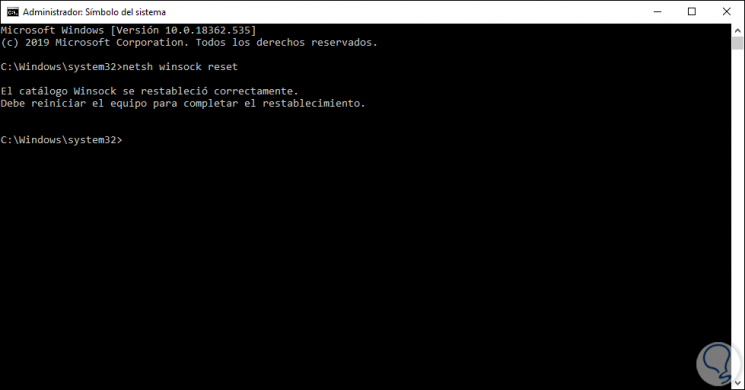
We restart the computer to complete the changes.
15. How to check the LAN settings Windows 10
This is a rare option but it can affect the performance of the Explorer if it is incorrectly configured.
Step 1
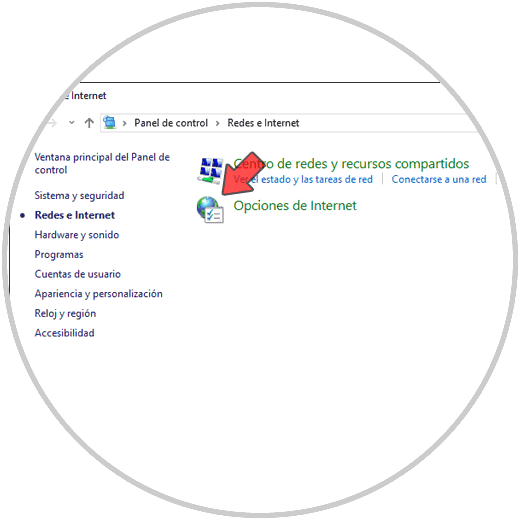
We review this process on the route:
We click on the “Internet Options†line
Step 2
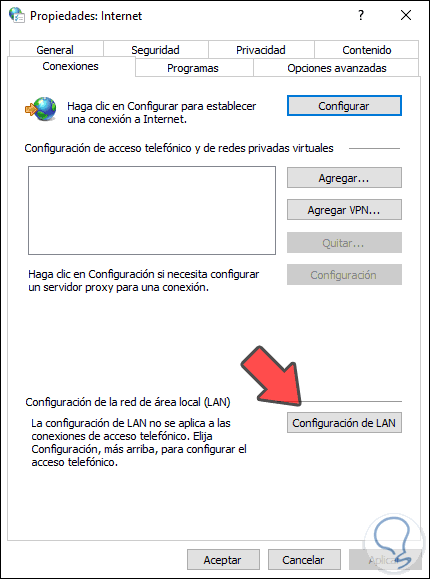
In the displayed window we will go to the Connections tab where we will see the following. There we click on the "LAN Configuration" button
Step 3
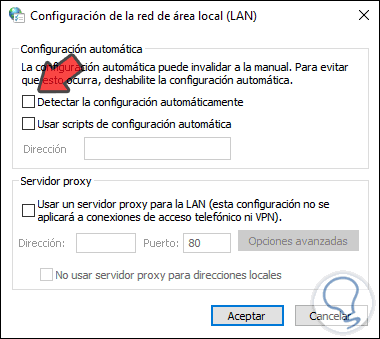
In the next window, we uncheck the box “Detect the configuration automaticallyâ€. Click on OK to complete the process.
16. How to modify the indexing options Windows 10
As we mentioned earlier, indexing in Windows 10 allows you to optimize all search criteria. However, a wrong configuration will cause Explorer not to work as it is.
Step 1
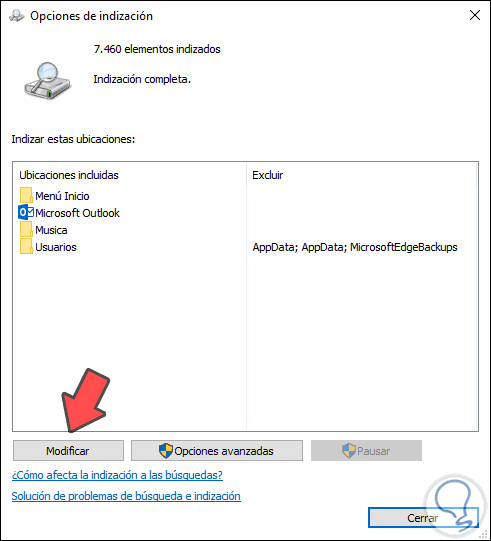
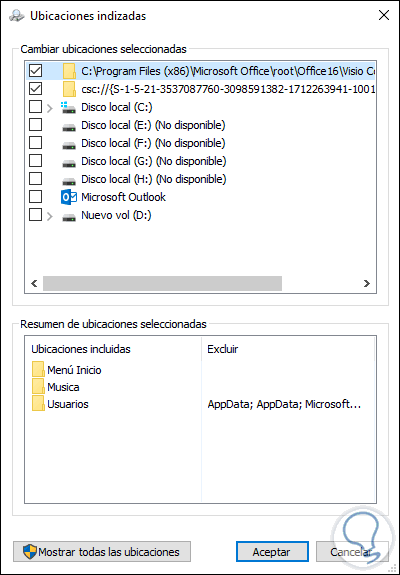
To verify this we go back to the indexing options and click on the "Modify" button:
Step 3
In the pop-up window we deactivate the box of the folder or folders with errors. Click on OK to save the changes.
17. How to edit the folder opening in Windows 10 Explorer
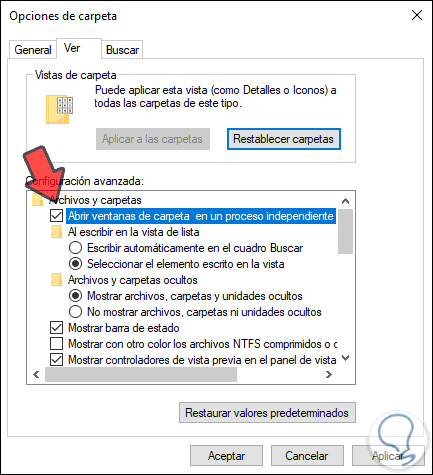
This is a process that allows windows to be opened in separate processes. This allows local resources to be better distributed.
For this we go back to the folder options from the Explorer and in the "View" tab we activate the "Open folder windows in a separate process" box. We click Apply and Accept to save the changes.
18. How to disable indexing on Windows 10 drives
A large unit where indexing is activated may slowly affect the use of the Explorer.
Step 1
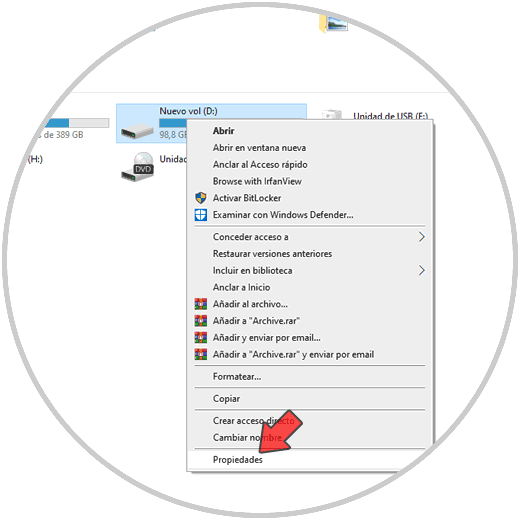
To disable it, we right click on the desired unit and select Properties:
Step 2
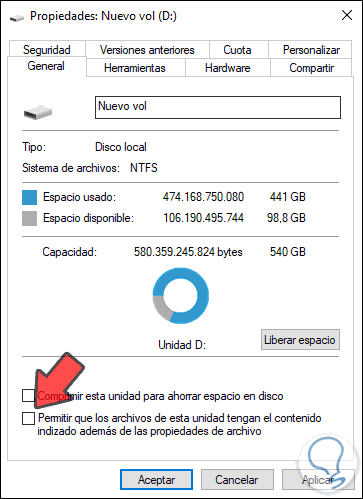
In the new window we will go to the “General†tab and there we deactivate the “Allow files from this unit to have indexed content in addition to file properties†box:
Step 3
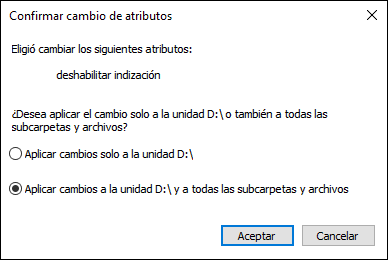
Click on Apply / Accept to save the changes and we will see the following. There we define if this change affects all folders.
19. How to create a new Windows 10 user account
It is possible that the user's profile is with errors so creating a new account can help correct the error.
Step 1
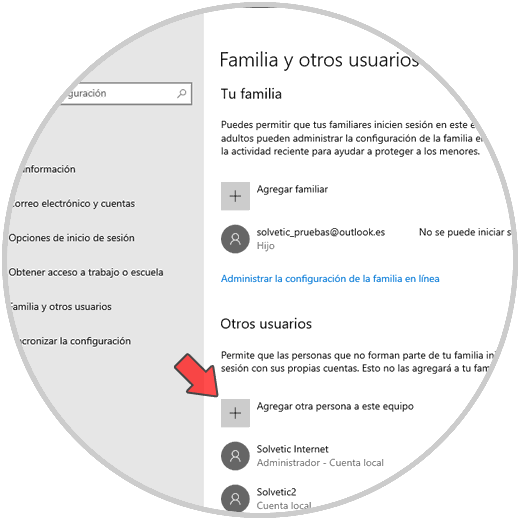
For that we will go to Start / Settings / Accounts and in the "Family and other users" section we select the option "Add another person to this team":
Step 2
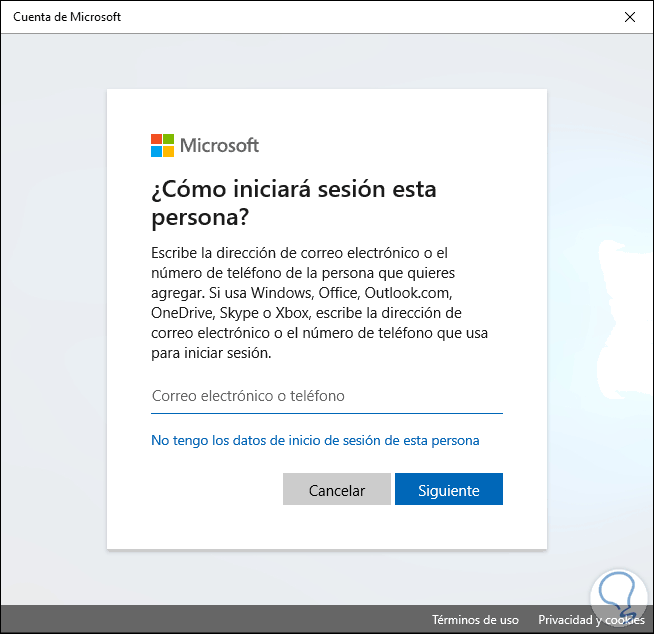
We will see the following:
Step 3
We click on the line “I do not have the login data of this person†and the following will be displayed:
Step 4
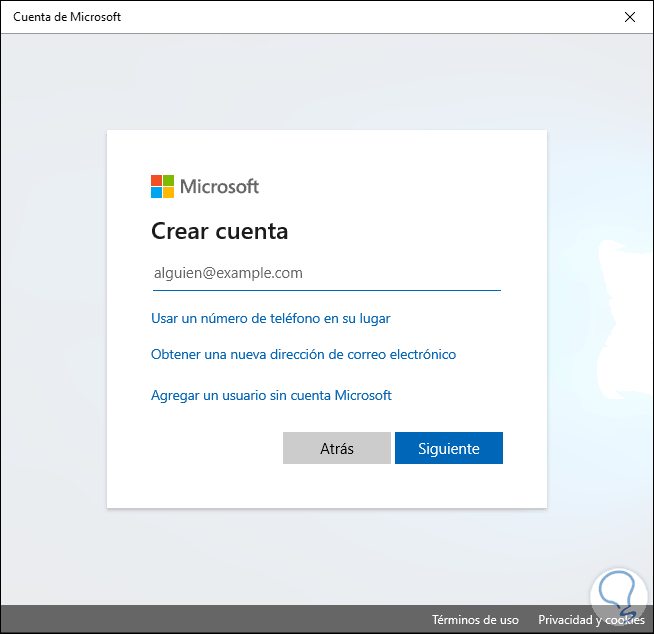
There we select “Add a user without a Microsoft account†and in the following window we complete the required data:
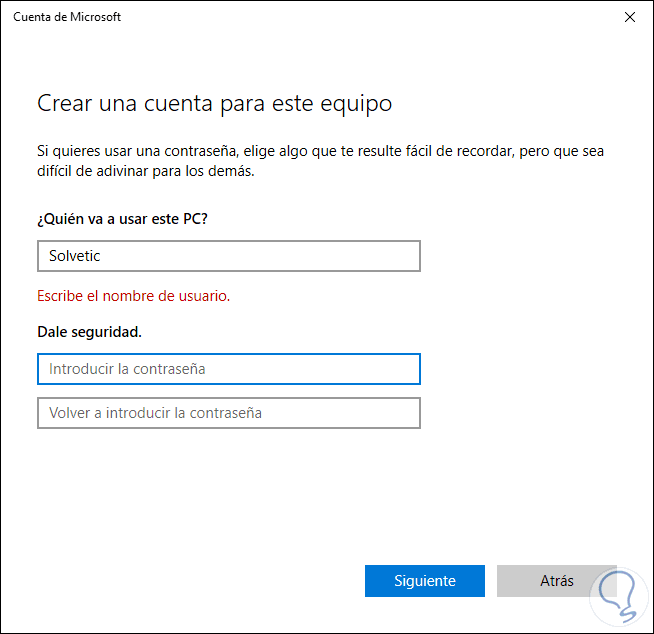
After this we close session and access with the new account to validate the performance of the Explorer.
20. How to delete files associated with Windows 10 Explorer
Some Explorer files may be flawed, so we can delete them and after this the system itself will create them again, we go to the path:
C: \ Users \ solve \ AppData \ Local \ Tile \ Data \ Layer \ Database
There we delete all created files:
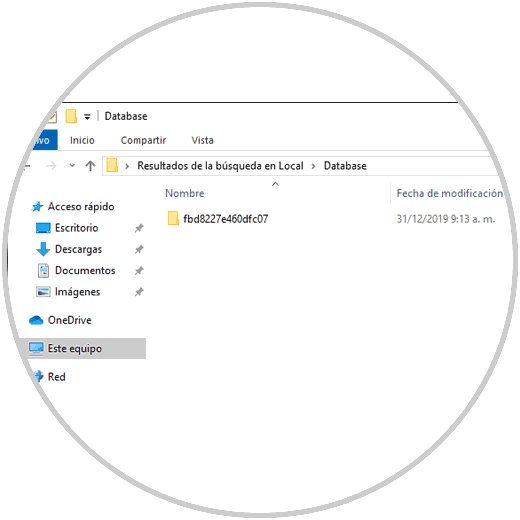
Then we restart the system so that Explorer creates the files again.
21. How to make use of the Windows 10 memory diagnostic utility
It is a utility integrated in Windows 10 with which a memory analysis will be carried out which, if it fails, affects the entire system in general.
For this we access the application from the Start menu and we will see the following:
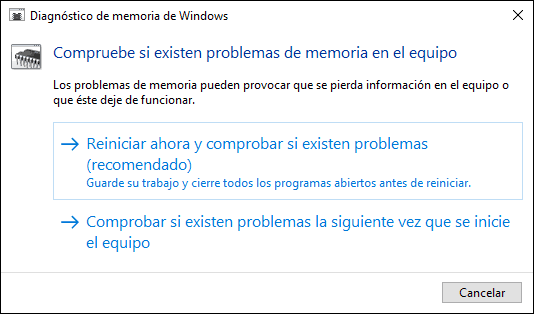
There we can restart the computer now or later to run the analysis.
22. How to disable the status bar view in Windows 10 Explorer
These are small add-ons for better use of the Explorer but in the end they can affect its performance.
If we want to disable it, we will go to the folder options and in the “View†tab we will uncheck the “Show status bar†box:
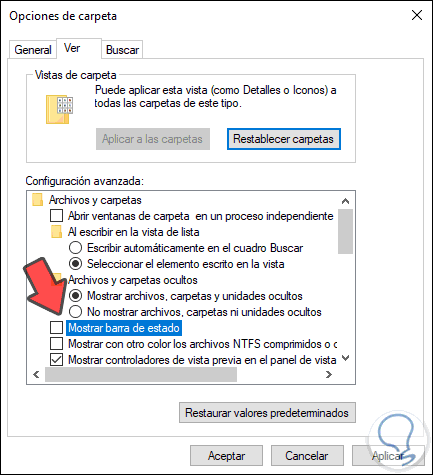
Click Apply and Accept to confirm the changes.
23. How to update Windows 10
Finally, there are some system updates that allow us to improve the performance either global or specific to some system apps, to look for new updates we will go to the Start / Settings / Update and security path and in the Windows Update section click on “Check for updates :
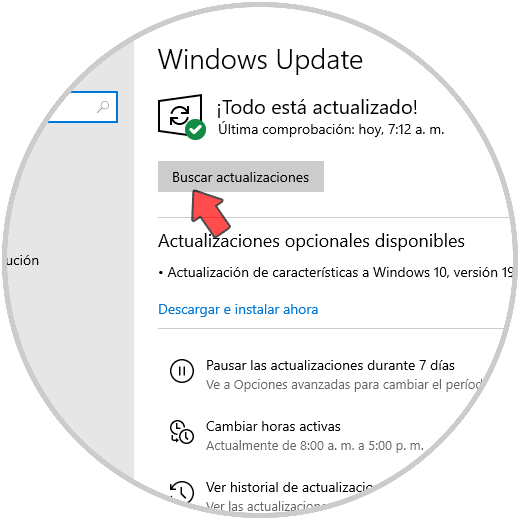
We wait if there are new updates to be downloaded and installed.
There are different options, all useful, to improve the performance of File Explorer in Windows 10.