Microsoft develops in parallel to its main applications (as operating systems) a series of add-ons whose purpose is to facilitate the execution, compatibility or performance of the operating system itself and other parameters of it.
One of the best known add-ons at the Windows 10 level is the .NET Framework which is currently in version 4.7 but one of the most used is version 3.5 and the main function of .NET Framework 3.5 is to allow the execution of an application in Windows 10
.Net Framework 3.5 is available for download at the following link:
.Net Framework 3.5
Novedades .NET Framework
Among the novelties of this version of .NET Framework we find:
- Performance improvements in Windows Presentation Foundation integrating a better start time to be faster and better performance bitmap effects.
- Integration of ASP.NET Dynamic Data which provides a framework that can be implemented with the scaffolding technique which in turn facilitates rapid development controlled by data without the need for code execution and this can be integrated into ASP. NET AJAX
- Global improvements in Common Language Runtime
- LINQ to SQL now includes support for the new date and sequence functions of the SQL Server files.
- New compatibilities with the file sequence functions and scattered columns of SQL Server.
Now, many developers base their applications to be executed using the .NET Framework and in some cases we can find the error 0X800f081f which has a main root along with other codes such as 0x800F0906, 0x800F0907 and 0x800F0922 which prevent .NET Framework is executed comprehensively in Windows 10.
Common error reasons
Basically this error is due to a Microsoft .NET Framework 3.5 incompatibility issue and its origin occurs when we have enabled it from any of the following options:
- Through the installation wizard.
- Using the Implementation Image Management and Maintenance (DISM) tool.
- Through the Windows PowerShell commands.
.NET Framework is a feature that is not enabled by default in Windows 10 operating systems, Windows Server 2016, Windows Server version 1709, Windows 8.1, Windows Server 2012 R2, Windows 8 and Windows Server 2012, so we must enable it from the features of Windows:

When this process is carried out, Windows 10 will take the .NET binaries and other files that play a vital role for its performance and if the equipment does not have the necessary characteristics, this error can be allowed.
Common mistakes
The traditional .NET Framework errors are:
- 0x800F081F: This error means that Windows 10 can not find the .NET source files for the installation to run its course.
- 0x800F0906: With this error, Windows 10 could not download the .NET source files, could not establish an Internet connection, or was unable to install a function or .NET function service.
- 0x800F0907: For this error, the DISM tool generated an error or the configuration of the local network policy prevented Windows from connecting to the network
- 0x800F0922: There is a bug in the processing of advanced .NET installers or generic commands.
Now TechnoWikis will explain how we can correct this error and thus be able to use the .NET Framework as expected.
1. Enable the .NET Framework using the DISM utility in Windows 10
The utility of Administration and maintenance of image of implementation DISM is a tool to be used in the line of commandos thanks to which we can execute the maintenance and the preparation of the images of Windows, being compatible the images of Windows PE, Environment of recovery Windows (Windows RE) and Windows Settings.
Step 1
For this process we must have an ISO image of Windows 10 which can be downloaded at the following official link:
ISO Windows 10
Step 2
Once downloaded, we can record it on a DVD or USB boot and after that we must mount it on the computer, for this we right click on the image and select the option "Mount":

Step 3
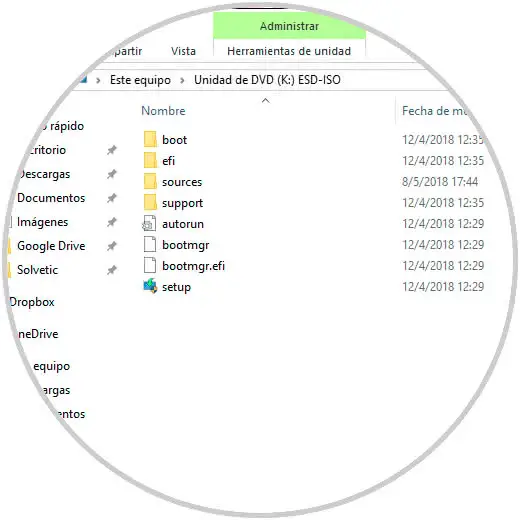
This will create a virtual drive with the Windows 10 image, in this case note that the letter K has been assigned:
Step 4
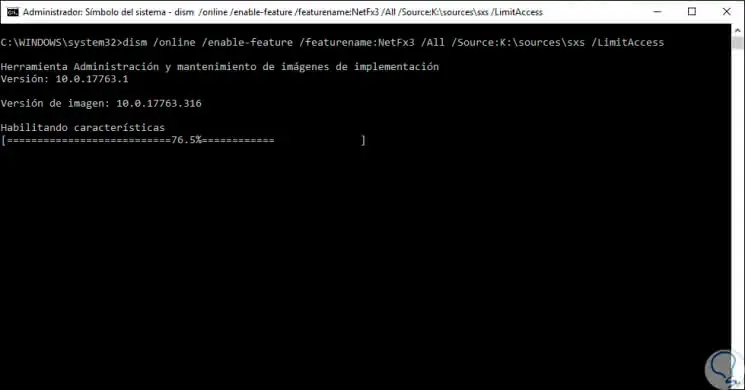
Now we will go to the command prompt as administrators and there we execute the following syntax:
dism / online / enable-feature / featurename: NetFx3 / All / Source: [Unit]: \ sources \ sxs / LimitAccess
Note
we must replace the Unit line with the letter that Windows 10 assigned to the virtual unit
Step 5
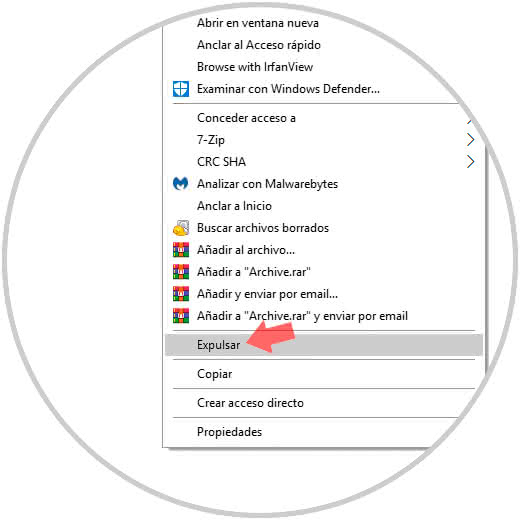
We can see that the process of installing .Net Framework features will automatically start. Once this process is completed we can eject the virtual unit by right clicking on it and selecting "Eject":
2. Edit the group policies of Windows 10 to repair framework
As we have mentioned, some policies may be directly affecting the behavior of the system when executing the .NET Framework, for this option we will use the group policy editor which is available for Windows 10 Pro, Enterprise and Education editions.
Step 1
To access it we will use the following key combination and execute the command gpedit.msc
+ R
gpedit.msc
Step 2
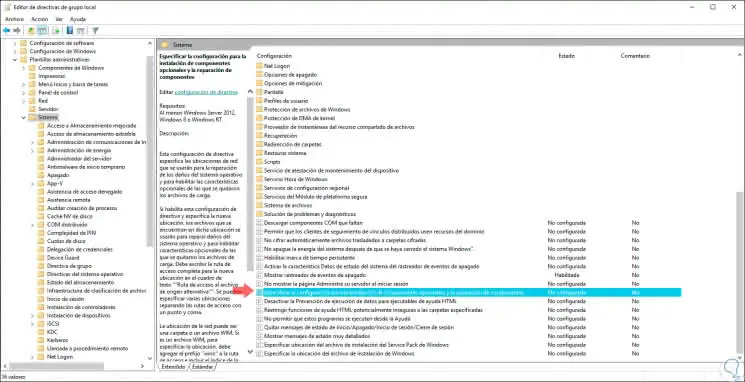
In the displayed window we will go to the following route:
Step 3
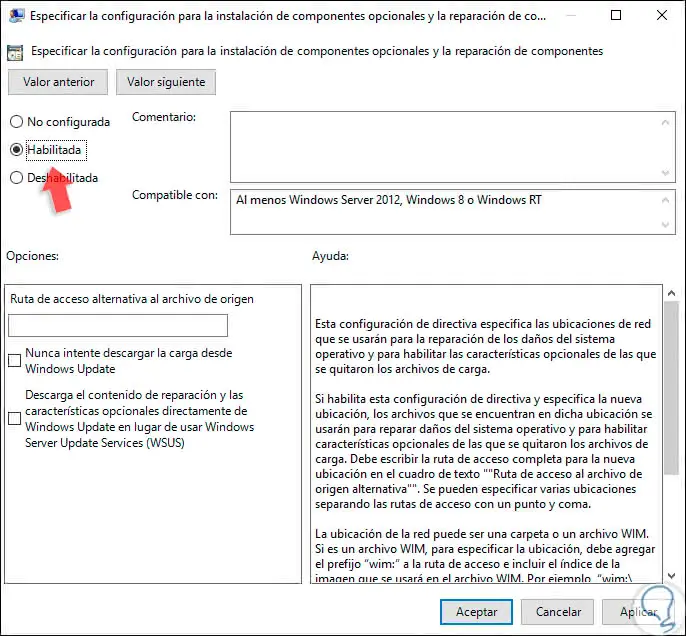
There, in the central panel we will locate the policy called "Specify the configuration for the installation of optional components and the repair of components":
Step 4
We double-click on it and in the pop-up window we will activate the "Enabled" box. Click on the "Apply" button and then "Accept" to save the changes.
3. Reinstall Microsoft .NET Framework Windows 10 to repair framework
As we have mentioned, the .NET Framework feature is disabled by default and once enabled and the error 0x800f081f is generated we can choose to reinstall this feature.
Step 1
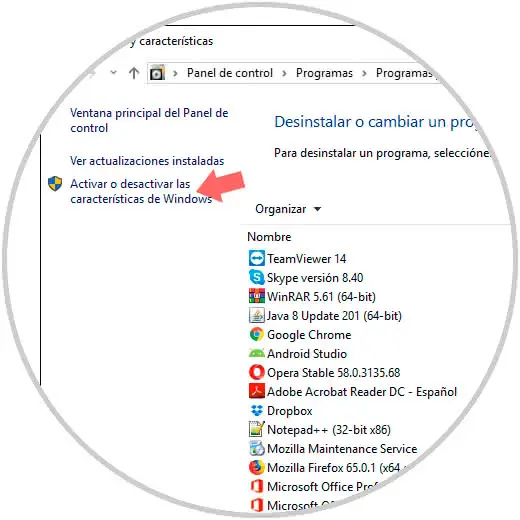
For this we will go to the following route:
- Programs and characteristics
Step 2
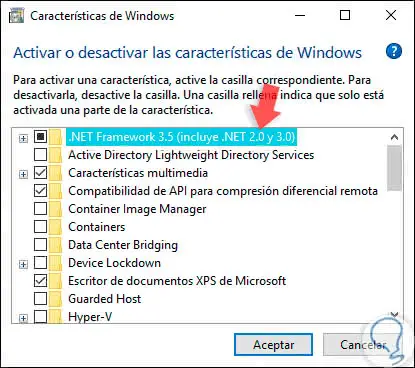
There we click on the line "Activate or deactivate the features of Windows" located on the side and in the expanded window we locate the line ".NET Framework 3.5". There we must deactivate your box and click on OK to have it uninstalled and then repeat the process by activating the box again to enable it.
4. Run the offline .Net installer to repair framework
In some situations, some of the .NET update installation files are damaged or have some kind of error when communicating with Microsoft servers, a good practice is to download the offline .Net Framework installer and run the installation from there.
Step 1
This installer is available at the following official Microsoft link. This installer is a local update compatible with all versions of .NET and its most frequent use is when we do not have an Internet connection.
.NEt Framework Offline
Step 2
Once downloaded, we proceed with the .NET Framework installation process:

5. Install updates manually to repair framework
One of the common errors with the error in .NET is by connection issues to the update servers so that trying to execute this process manually is a viable option to allow the optimal status of the .NET Framework update in Windows 10 .
Step 1
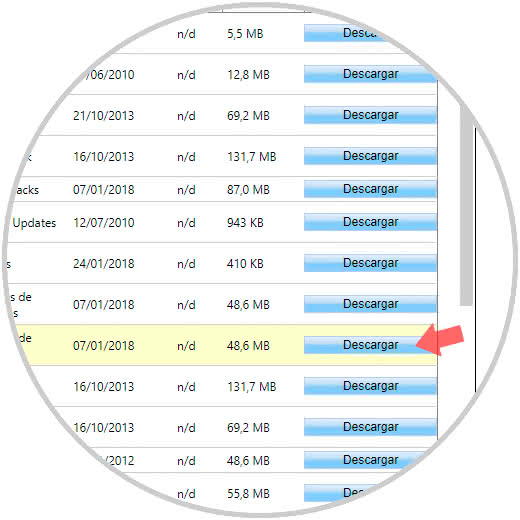
For this process we must go to the following Microsoft link called Global Catalog:
Catalog updates
Step 2
There we will look for .NET and in the list we downloaded, we downloaded the most recent update for its later installation:
6. Execute the SFC command in Windows 10 to repair framework
SFC (System File Checker) is a command utility thanks to which we have the possibility to execute a detailed analysis of the file system in order to detect failures.
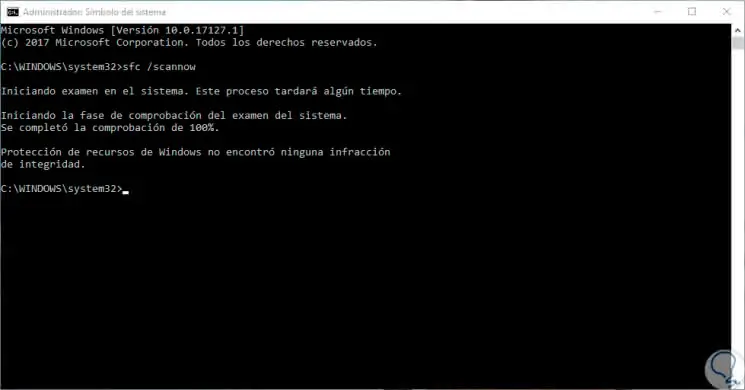
Step 1
For this, we access as administrators the symbol of the system and there we execute the following line:
sfc / scannow
Step 2
It will also be possible to execute the following line. This will be responsible for monitoring the Windows 10 image.
DISM.exe / Online / Cleanup-image / Restorehealth
7. Restart Windows Update components in Windows 10 to repair framework
Another available option is to restart all update components of Windows Update to rule out any errors of this type. To do this, we access the system symbol as administrators and there we execute each of the following lines. After this we can restart the system and check the status of .NET.
- Ren% systemroot% SoftwareDistribution SoftwareDistribution.bak
- Ren% systemroot% system32catroot2 catroot2.bak
8. Use the Windows Update Troubleshooter in Windows 10 to repair framework
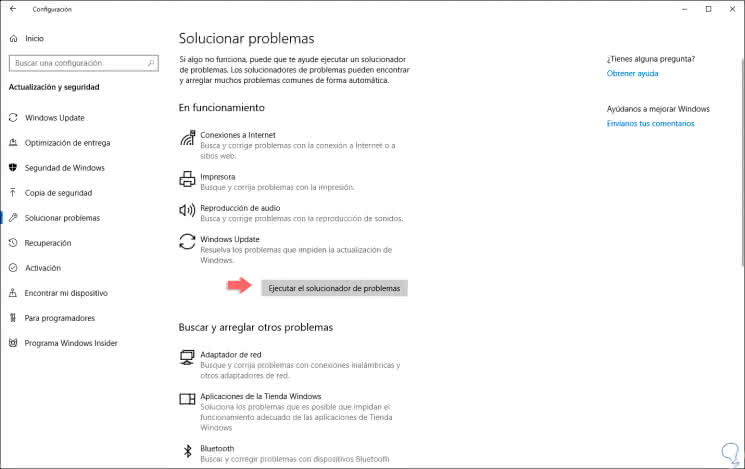
Windows 10 integrates a utility which is responsible for monitoring to monitor each system parameter specifically to detect errors and is the tool of the problem solver.
Step 1
To access it, we go to the following route:
Step 2
There we locate the line "Windows Update" and when clicking on it the "Execute the problem solver" button will be displayed:
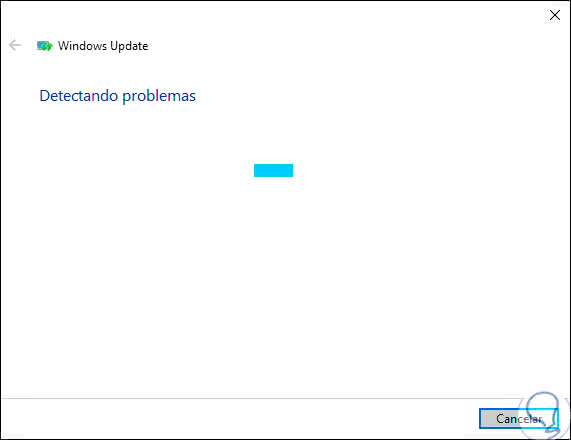
Step 3
We click on it and it will give way to the process of analysis of errors in Windows Update. This will determine any anomaly that is present in Update and that could generate the mentioned error.
As we can see, the options to give an integral solution to the error 0x800f081f are varied and it is up to us to select the one that best adapts to our situation.