Ubuntu is one of the most popular Linux distributions for all it stands for the end user , not only for its long-term support (Long-term support -LTS), but for its broad portfolio of features and performance, compatibility features. and development..
The latest version of Ubuntu is version 20.04 which is available for both graphical environments (Desktop) as well as corporate environments (Server). TechnoWikis will explain in detail how to install Ubuntu 20.04 Server and thus have a powerful system for many administrative tasks.
Ubuntu 20.04 Server can be downloaded at the following link:
Ubuntu 20.04
What's new in Ubuntu 20.04 Server
Ubuntu 20.04 Server (FocalFossa), has as main novelties the support for automated installations, as well as the option to install the bootloader on multiple disks, this guarantees that the system is more robust and available.
characteristics
For a global view of the importance of Ubuntu 20.04 Server, these will be its main features:
- Compatible with Canonical until 2025 and ESM coverage until 2030
- The bootloader has been integrated with enhancements that seek to make it more resilient as it can tolerate disk failure.
- Ubuntu 20.04 Server can be run on x86-64, ARM v7, ARM64, POWER8, POWER9, IBM s390x (LinuxONE) architectures as well as initial support for RISC-V has now been integrated
- Integration of AppArmor3 for greater safety of work in the system.
- It has IPv6 support in Microsoft Azure.
- It has Ubuntu Pro cloud images for AWS and Azure, which add extra system performance features.
- Support for the latest Amazon Web Services (AWS) instance metadata service (IMDSv2)
- Updates in QEMU (v4.2), libvirt (v6.0), PHP (v7.4), Ruby (v2.7), GCC (V9.3), Python (v3.8), MySQL (v8.0) , NGINX (v1.17)
- The Ubuntu Server Live installer can now be updated when connected to the Internet in order to access new features and bug fixes.
- Initial support for automated installations.
- It has the Linux 5.4 long-term kernel which gets the latest hardware updates and global security.
- SSH protocol now supports two-factor authentication
How to install Ubuntu 20.04 Server
Step 1
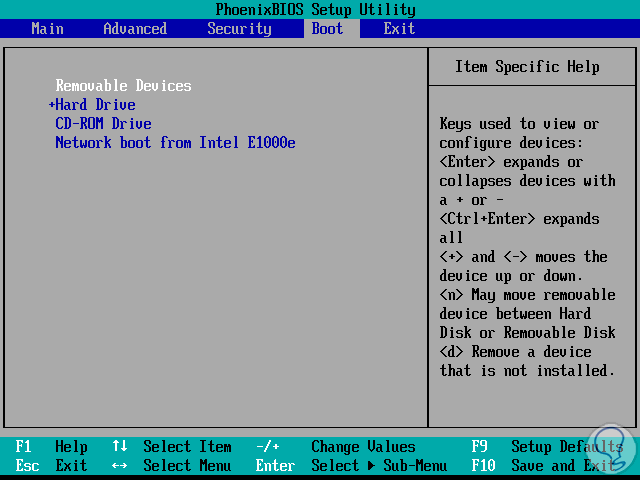
The first step will be to download the ISO image of Ubuntu 20.04 Server from the mentioned link and after this burn it to a DVD or a bootable USB and connect it to the computer where it is to be installed. Next we access the BIOS or UEFI and there configure the boot order either from the DVD or USB:
Step 2
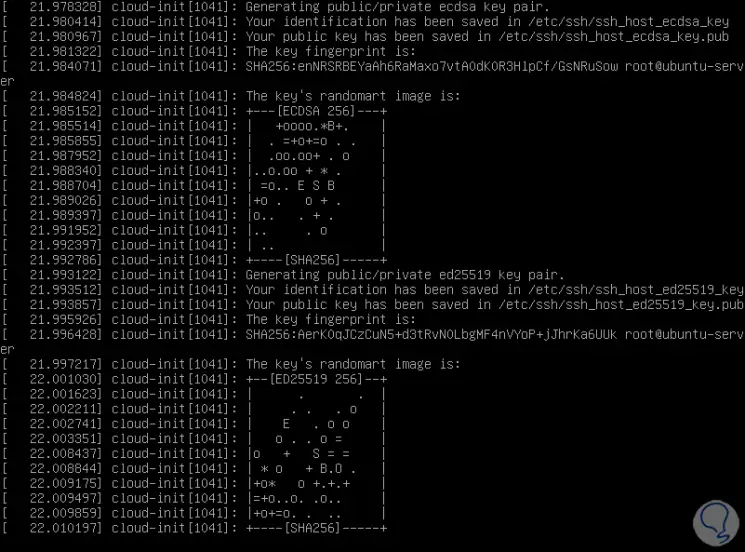
We start the system and we will see the following:
Step 3
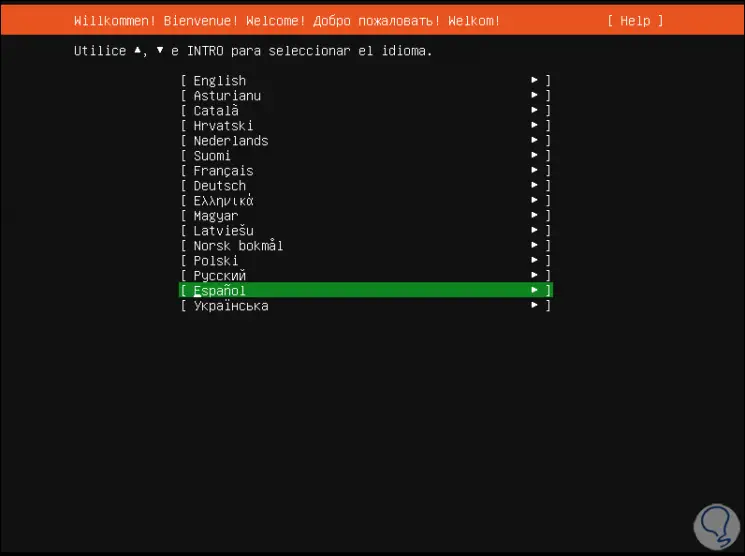
There a series of security parameters are loaded and after that we will define the installation language of Ubuntu Server 20.04:
Step 4
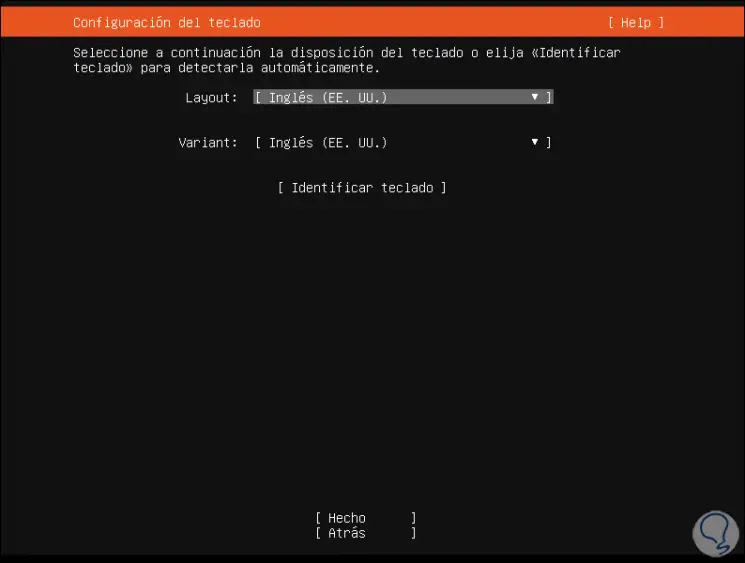
We select the language and in the following window we find the keyboard options:
Step 5
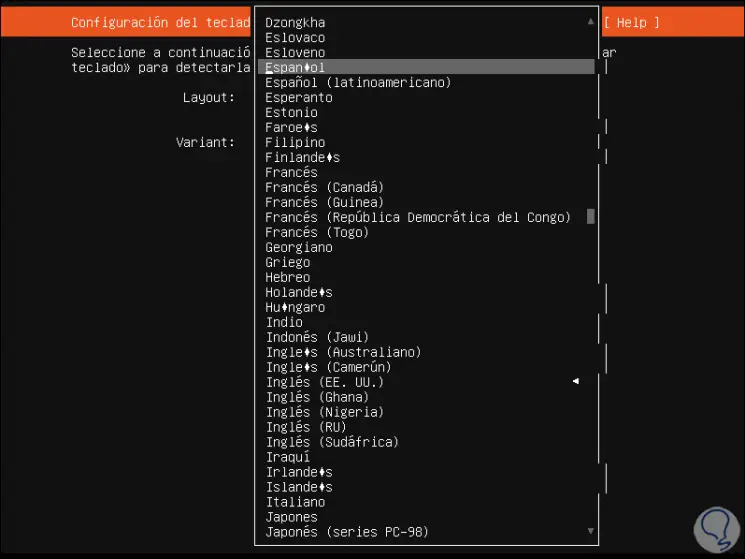
With the arrow keys on our keyboard and to choose the appropriate language, press Enter and choose it from the displayed list:
Step 6
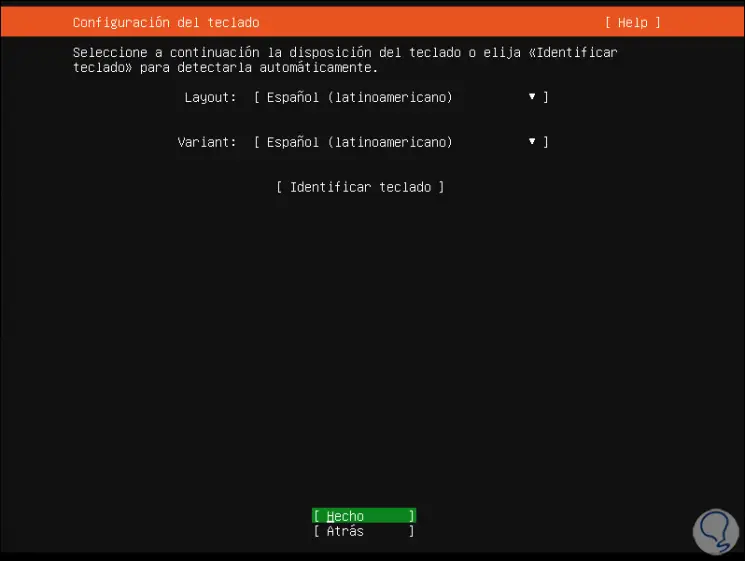
After this we confirm the changes by selecting "Done":
Step 7
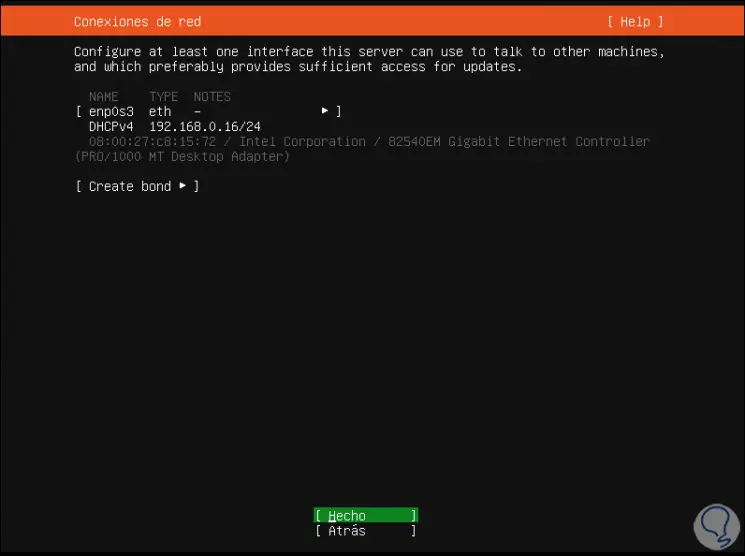
Press Enter and we will be redirected to the network section where the system will detect the adapter name and details such as:
Step 8
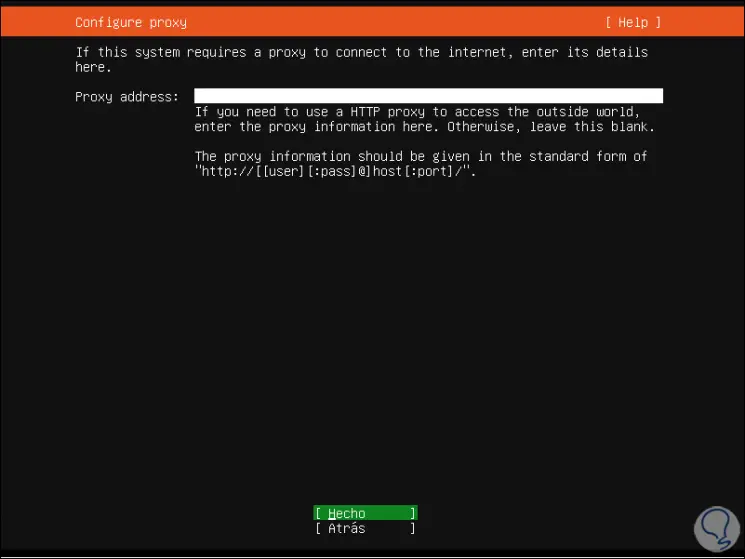
If everything is correct we select "Done" and in the next window we can enter the proxy if we use it. This is an optional value which we can leave blank.
Step 9
In the following window we select the Ubuntu mirror which serves as support for various system tasks:
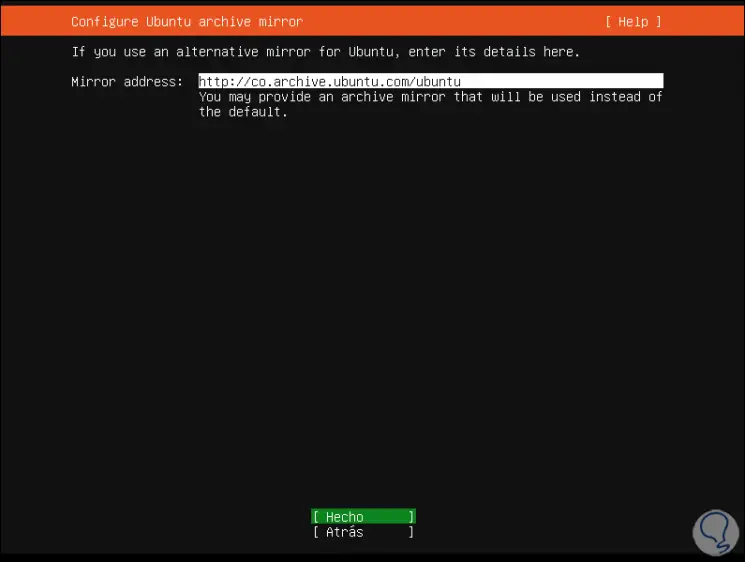
We click on "Done" and we get to the system storage section:
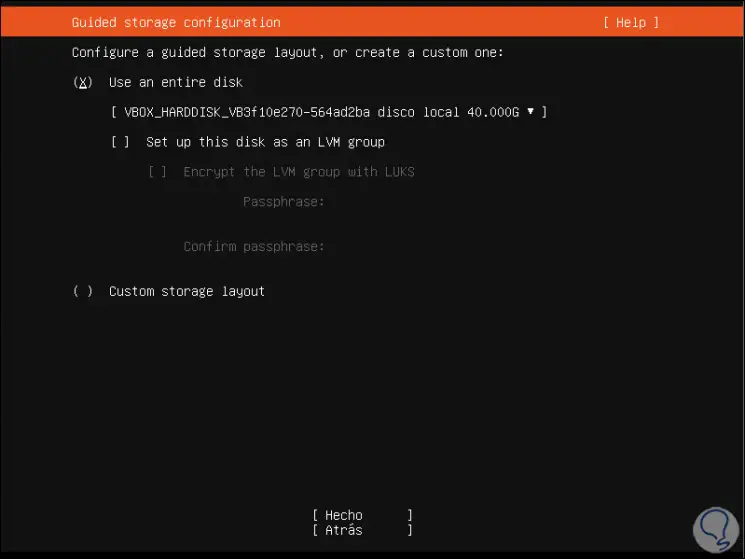
Step 10
There we find the details of the disk, we can select, with the space key, the method to use:
- Configure the disk in an LVM (layered security) environment
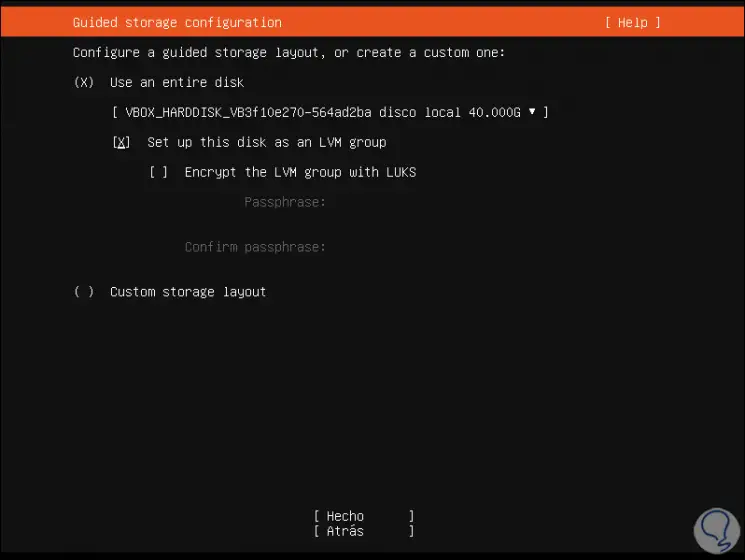
Step 11
Select "Done" and we will see the structure of the disc:
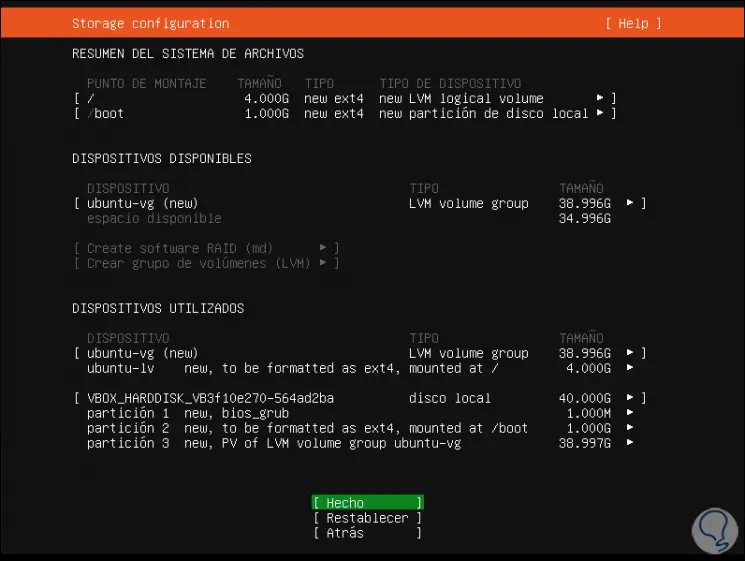
Step 12
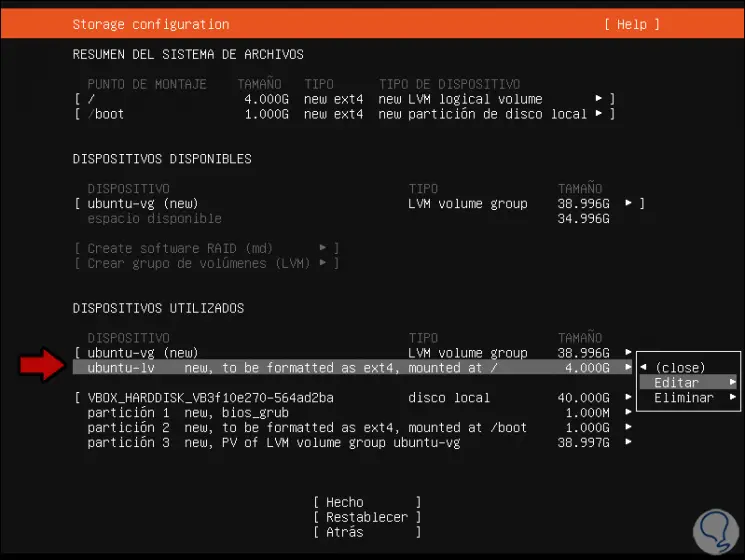
There we can create or edit partitions as necessary, for the root partition, for this we will go to the section "Used Devices" and select the lines "ubuntu-lv", give Enter on it and the following will be displayed:
Step 13
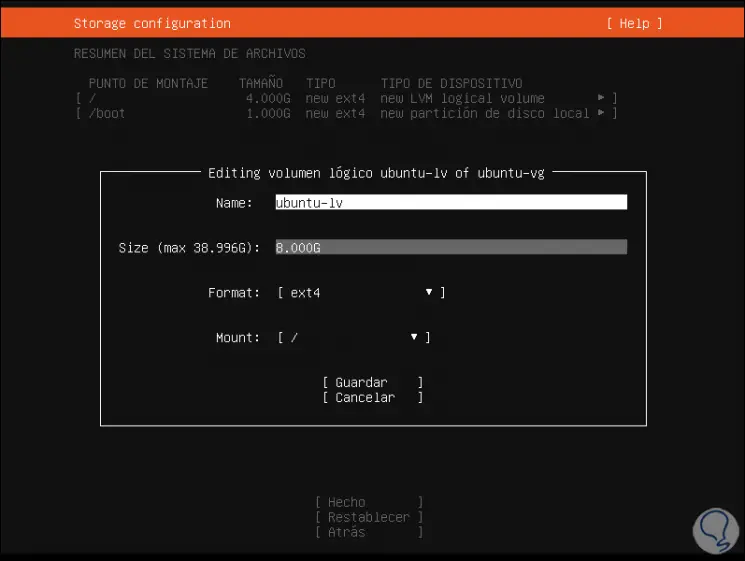
Press Enter and in the next window we assign the amount in gigabytes for said partition:
Step 14
We select "Save" to apply the changes, it is the root partition since in the "Mount" field is assigned /.
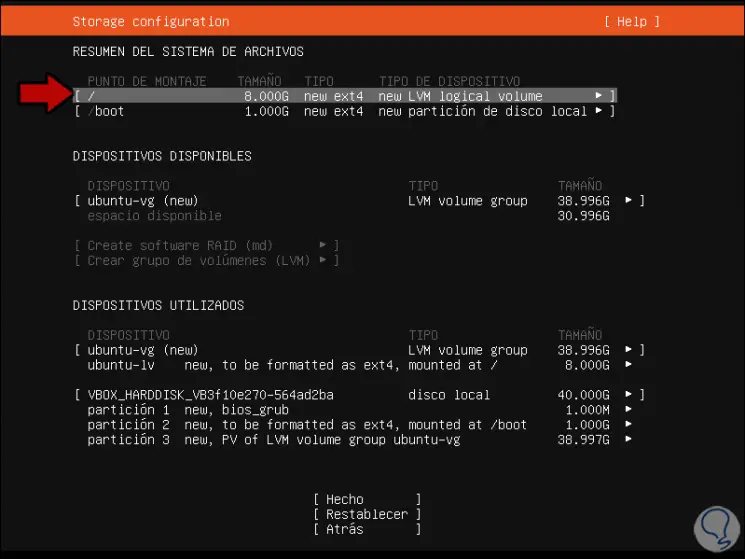
We can see the partition created at the top of the console:
Step 15
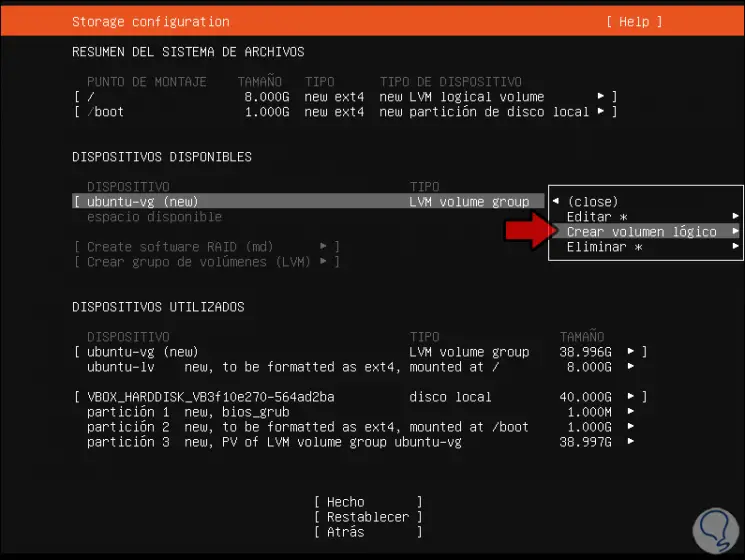
Now we are going to create the Home partition (/ home) for this we go again to the section “Available Devices” and give Enter on the line “ubuntu-vg” and select “Create logical volume”:
Step 16
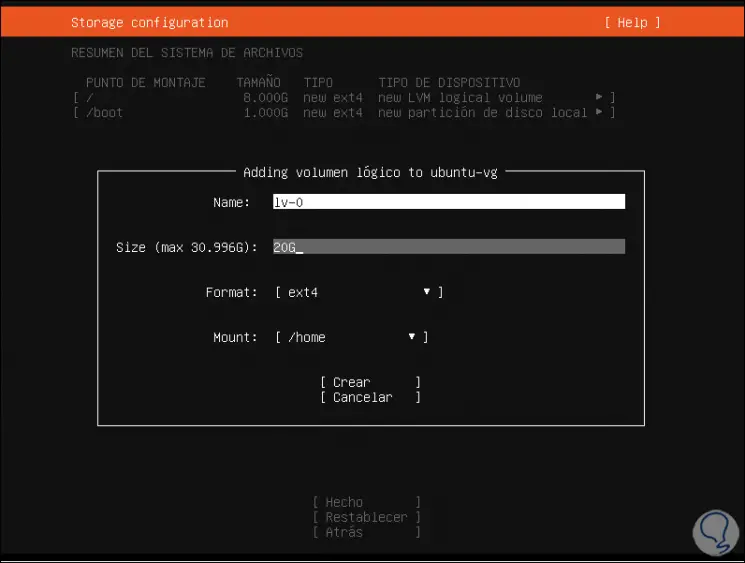
In the next window we enter the partition value with the #G syntax and validate the following:
- In the Format line we select ext4
- In the Mount line we select / home
Step 17
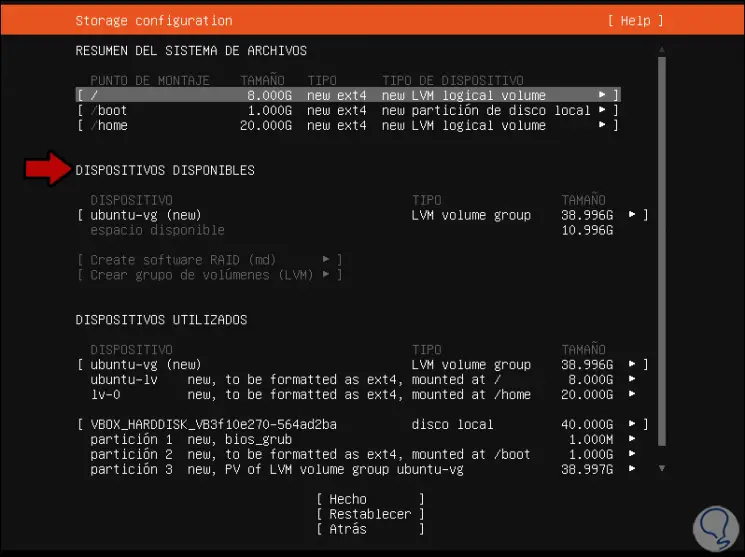
Select "Create" to apply the changes and we will see the new partition created:
Step 18
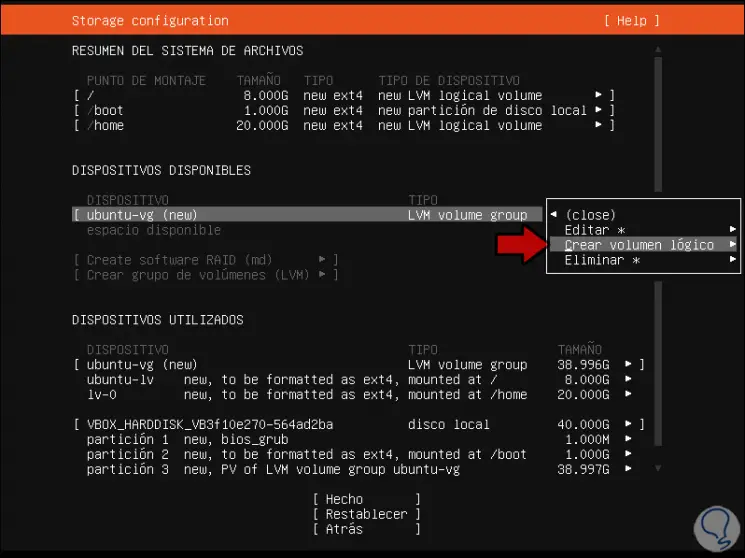
After this we can create the swap partition, for this we go to the section "Available devices" and select "Ubuntu-vg", press Enter and select "Create logical volume":
Step 19
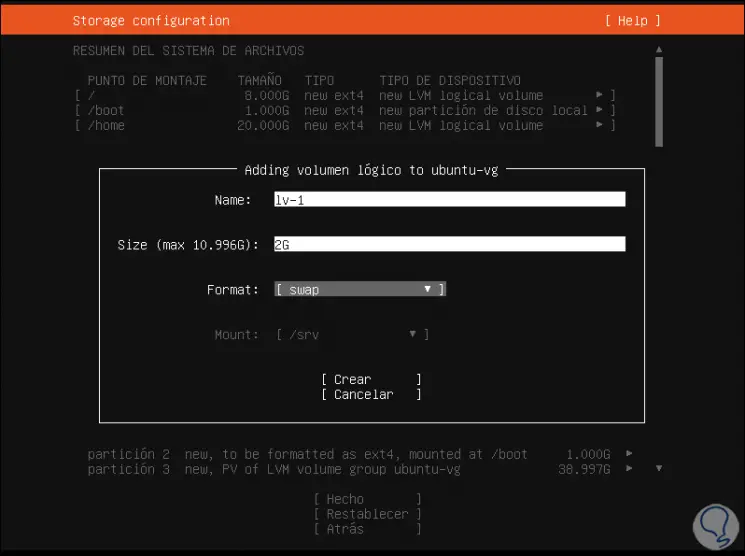
In the following window we enter the size and in the "Format" field we select "swap":
Step 20
We select "Create" to save the changes and see the whole new structure:
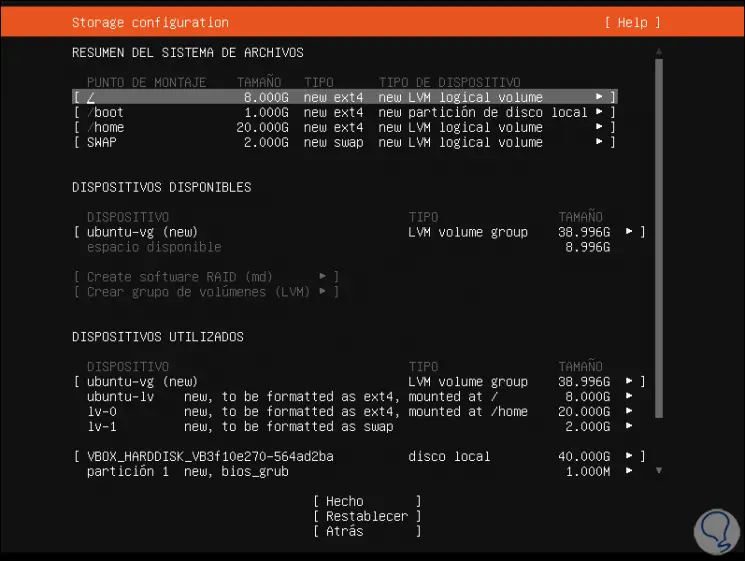
Step 21
Select the "Done" button and in the next window select "Continue" to accept the changes:
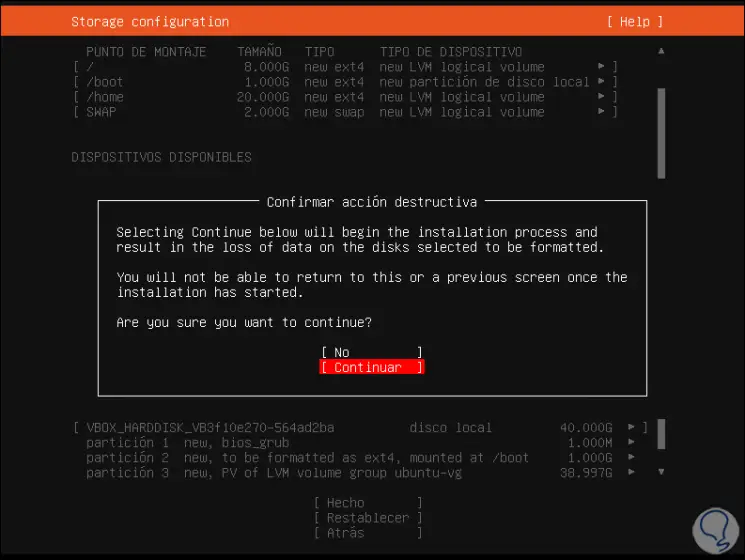
Step 22
In the following window we assign the username and password:
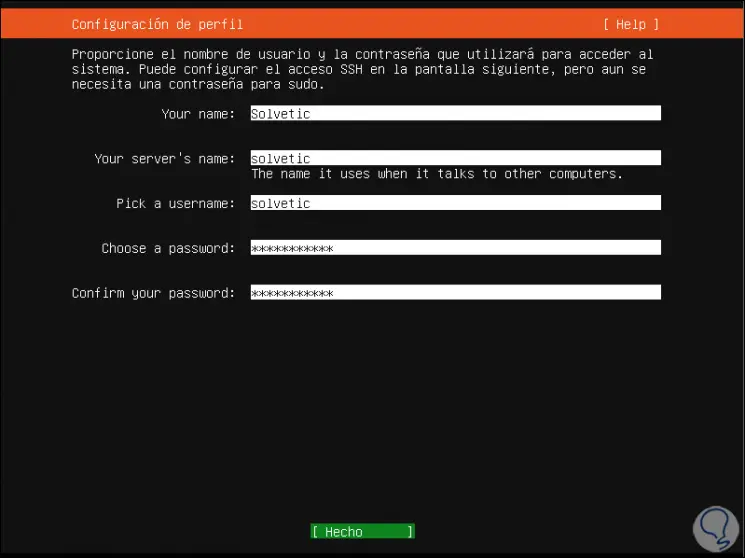
Step 23
We select "Done" and now we can select the option to activate the OpenSSH server:
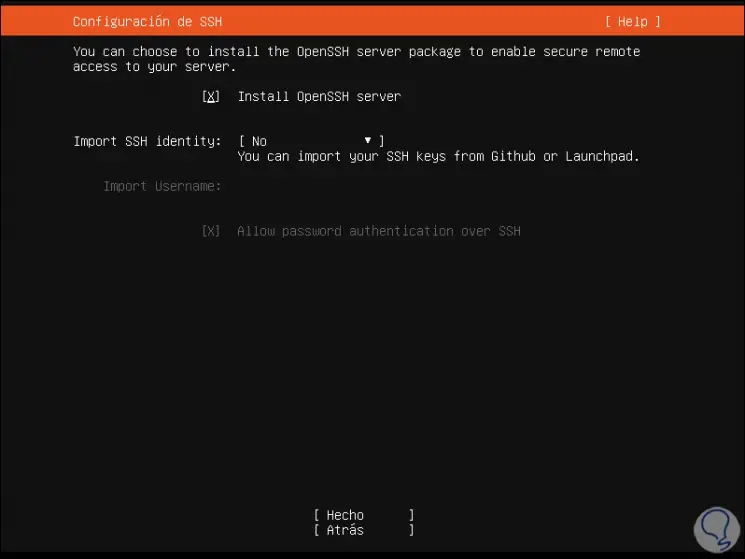
Step 24
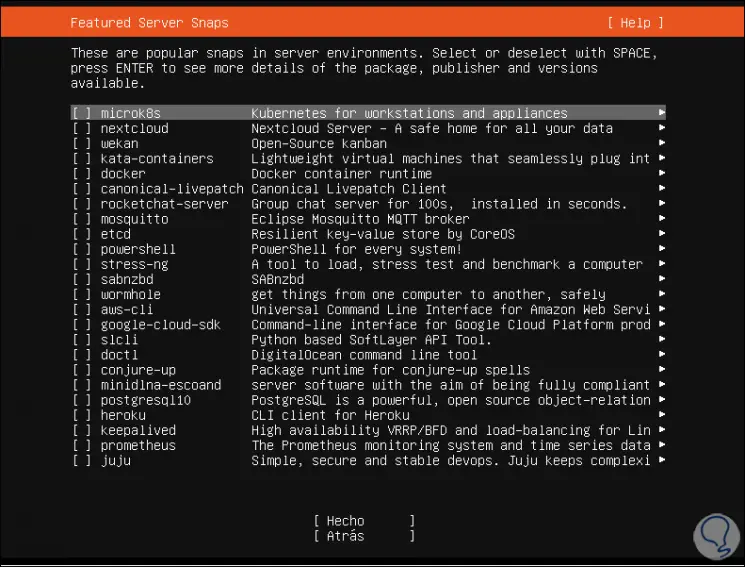
Select "Done" and then we can select which functions we will install with the Ubuntu 20.04 server:
Step 25
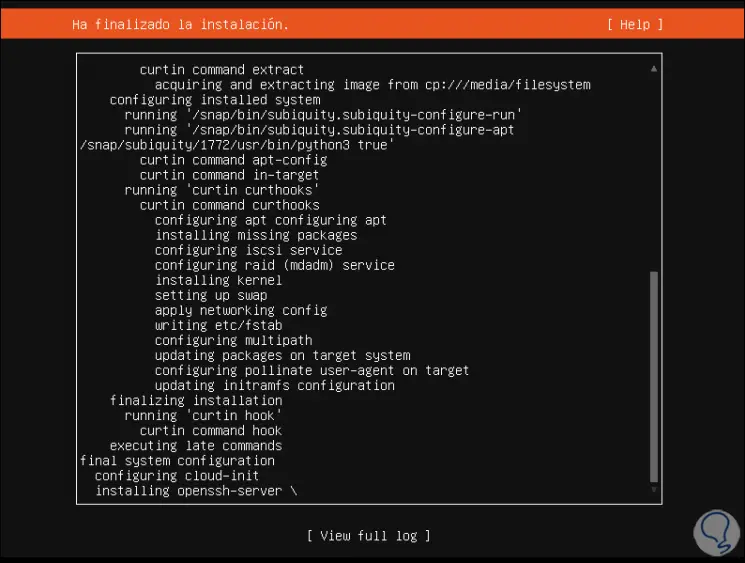
We select these with the space bar, select "Done" and the installation process for Ubuntu 20.04 Server will take place:
Step 26
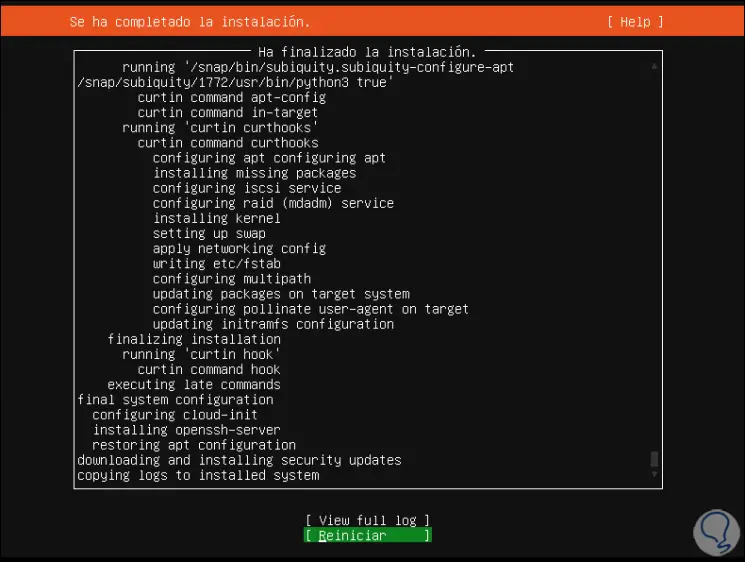
When the process reaches its end we will see the following:
Step 27
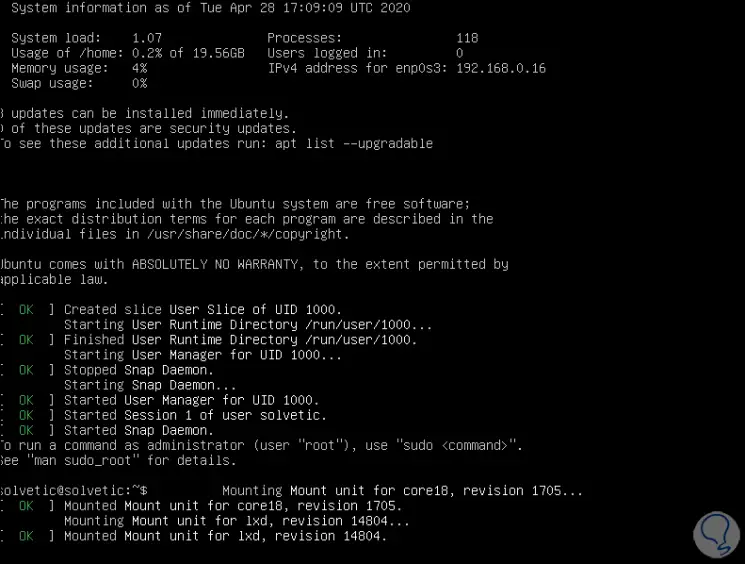
We select "Restart" to access the Ubuntu 20.04 Server system:
Step 28
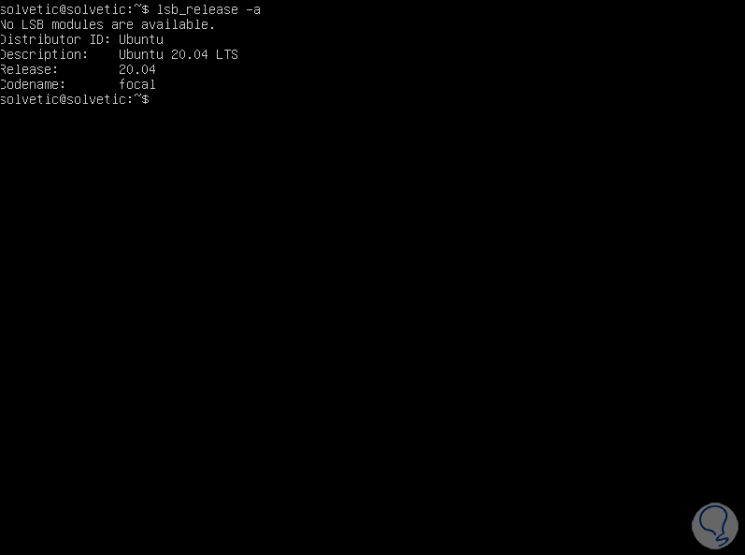
We check the installed version of Ubuntu with the command "lsb_release -a":
With TechnoWikis you have learned everything we will find in this new system and how you can install it to extract the potential of each of its functions..