Since 2004, when bootable USB memories were created, created by IBM, we have a powerful tool at hand that allows us to start our Operating Systems from the USB memory without having to install the DVD or CD. A USB boot is the one that allows us to boot an Operating System as if we did it from our own disk or from an installation DVD. This means that in very little space we have an OS with which to start a computer. Imagine that your Windows or Mac fails or that you have an older version, with a USB Boot you can boot from Windows 10..
Just as we named the Microsoft Software, we must mention that this is possible for the rest of the Operating Systems, such as Linux or Mac , that is, I can have iOS in a simple pen drive and execute it in another computer. We can also include systems like Chrome OS mode USB Boot that although little known will get us out of trouble because it consumes very little.
If we rename Windows 10 we will say that, if we usually need the ISO of the software to create the USB , Microsoft makes it easy for you and lets you create a USB boot without the need for ISO and with its own program in simple Steps..
There are many advantages to having so many different Operating Systems at hand, for example, to be able to create a combined start in our computer, that is, with different Operating Systems installed. For example, we can have Windows and Ubuntu on the same computer and the same would happen with any other.
The multi-system boot or Boot helps us not to have to be dependent on independent physical units for each system, with the chaos that could lead to having both USB or CD out there. The simple thing is to have a single USB that when starting allows us to select which system we want to execute. If we also have virtual machines, there is no problem, since from them we can also run a multi-system USB without problems, helping us with an optional pluri boot..
Alomejor still has not been very clear that of, why use a USB ?, The reason is simple, sometimes we do not have the means of installation as DVDs or CDs, or they may be damaged, corrupt, etc. Besides being a good option against it, they have the following advantages.
Advantages of the USB Boot
When we have decided to implement an operating system using a USB memory we have a tool that offers us the following benefits:
- Portability: Due to its easy use we can take a USB stick anywhere without taking up a lot of space.
- Multisystems: Thanks to the installation of an operating system using a USB, we can install Windows, Linux or Mac OS systems.
- Ease of use: Implementing a boot from USB memory is an easy process that does not require great knowledge for its implementation.
- Backup: Having a bootable USB memory allows us to always have on hand, as long as we take it with us, a valuable utility in case any Operating System where we find some kind of failure.
When we work in the support area of ​​the company or user level, within our functions is to manage various Operating Systems. One of the most effective and useful tools we can have at hand is a USB drive that allows us to install various operating systems from it, which is known as USB Booteable, because thanks to its portability it becomes a great ally for this type of tasks.
Remember that years ago we had to carry numerous CDs, DVDs, which was sometimes complicated for mobility but today thanks to this type of USBs the entire installation process of Operating Systems. Here you can find the best programs to create a USB MultiBoot for different Systems.
1. WinsetupfromUSB: What is it?
What is WinsetupfromUSB?
The WinsetupfromUSB tool will help us in the process of being able to implement various operating systems using our USB flash drives in a simple, fast and efficient way. The tool can be downloaded for free from the following link.
Download WinsetupfromUSB
Features WinsetupfromUSB?
Among the main features of WinsetupfromUSB that we can find we have:
- It is a very light tool since it only weighs 20 MB.
- Support multiple Operating Systems (Linux, Microsoft Windows both desktop and server level, etc.
- Supports 32 and 64 bit architectures.
- We can generate the boot from the BIOS or from the UEFI (depends on the model you have).
- The Antivirus Rescue utility is included for the Linux versions.
- We can mount different images as long as they are compatible with the grub4dos boot mode.
The requirements that we must take into account are very simple and are summarized in the following.
Requirements of WinsetupfromUSB
- Computer that supports the boot from USB.
- USB memory of minimum 8 GB (The more capacity more options of ISOs we can add)
- One or several ISO images of compatible operating systems.
- Have the WinsetupfromUSB tool downloaded.
As we see the requirements are very simple to comply. Then, we also leave the links to download some of the different ISO images with which this program is compatible. As you will see later, there are more versions that we can add with this program.
ISO Windows 7
ISO Windows 8 / 8.1
ISO Windows 10
ISO Ubuntu
ISO Debian
If you do not have ISO, but you have DVDs, CDs, or want to make your own Windows ISO here you have it.
2. WinsetupfromUSB: Installation process
Step 1
The first thing we will do is download the application from its official website.
Download WinsetupfromUSB
Step 2
Once we have downloaded the utility from the official website we will extract the file in the location we want. Once it is decompressed we will see the following.
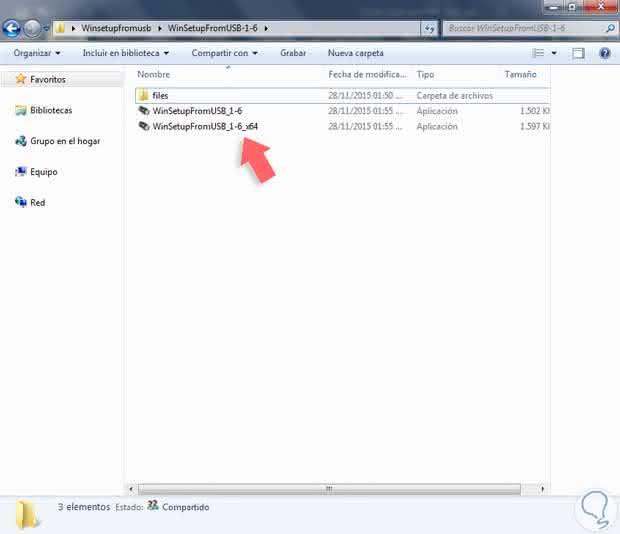
Step 3
As we can see, we can run two different versions, 32 and 64 bits, this depends on the machine where we are going to perform the USB configuration process. In this case we are in a 32 bit computer so we will select that option by double clicking on it and we will see the following.
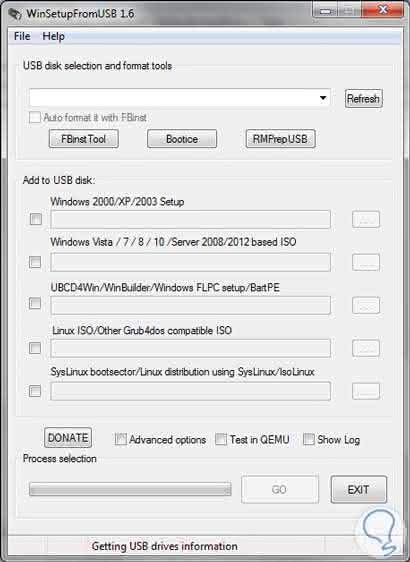
Step 4
As we see the tool is composed of sections which are:
Windows 2000 / XP / 2003 Setup
From this tab we can add ISOs of these versions of Windows, the truth is already very little used.
Windows Vista / 7/8/10 / Server 2008/2012 based ISO
Using this alternative we can implement ISOs of the mentioned systems which are the most demanded worldwide and will be the one we will use for the respective study.
UBCD4WIn / WinBuilder / Windows FLCP setup / BartPE
Using this option we can implement tools such as Windows Embeded POSReady 2009 and Windows Fundamentals for Legacy PCs ("WinFLP") which are thin clients of the Operating System.
Linux ISO / Other grub4dos ISO compatible
Through this option we can mount Linux ISOs and other operating systems compatible with grub4dos such as Avast Rescue Disk, Comodo Rescue Disk, Windows Defender Offline, etc.
SysLinux bootsector / Linux distribution using SysLinux / Iso Linux
With this alternative we can add tools such as HDD Regenerator, Paragon, Acronis, etc.
3. WinsetupfromUSB: Mount ISO in USB
Step 1
Once we connect the USB memory to the computer, we can refresh the tool using the Refresh button and we will see that our device appears.

Step 2
Then select the Advanced options box and the following will be displayed. As we see we have different alternatives for the configuration of ISOs, but we will select the box "Custom menu names for Vista / 7/8 / Server Source" which will allow us to display the names of the respective systems when starting the boot through the tool.

Step 3
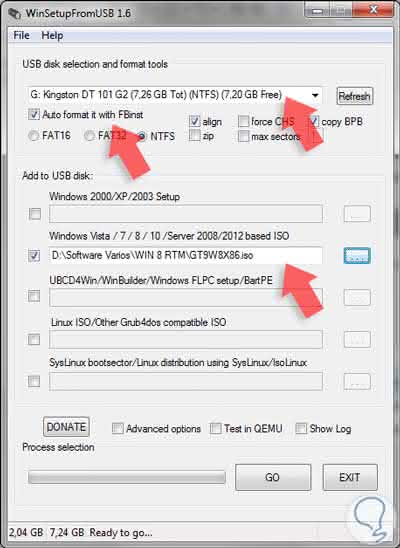
Next we will mark the box "Auto format it with FBinst" which will allow the tool to format the memory with the correct type of system for the boot. When selecting the aforementioned option, "Auto format it with FBinst", we will see that the options with which the device is to be formatted will automatically be displayed, if we know that the computer to use WinsetupfromUSB has UEFI enabled, we will use FAT32 otherwise We will use NTFS.
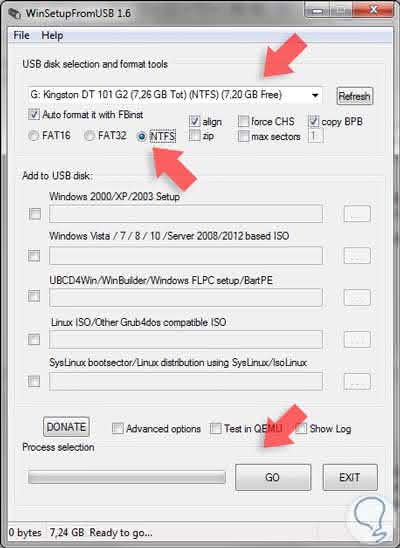
Note
We must add each ISO individually.
4. WinsetupfromUSB: Add ISO images
Once these parameters are configured, we will begin to add the ISOs of the respective Operating Systems.
Step 1
For this we will select the box "Windows Vista / 7/8/10 / Server 200 / / 2012 based ISO" and click on the icon for more options. We will see that the following informative window is displayed.
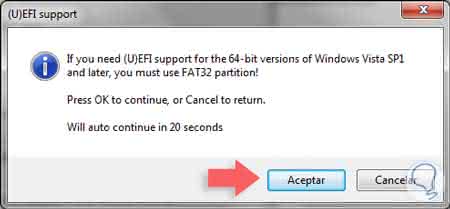
Step 2
As in this case we will not use UEFI, click OK and we must locate the ISO image that we will add to our team.
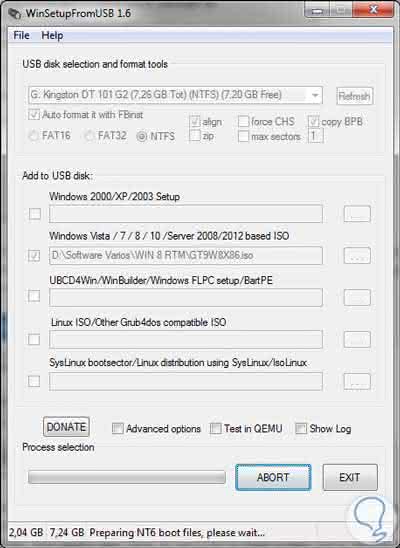
Step 3
In case the file is too large we will see a message indicating that the file will be divided into X parts. Then press the GO button to start the process of mounting the ISO image. We will see the following.
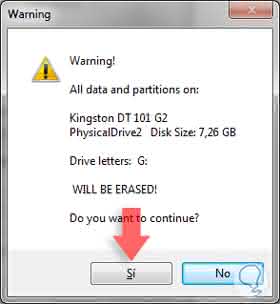
Step 4
In this case the tool tells us that the memory has to be formatted and all the data we have there will be erased, press Yes to start the process. The following will be displayed.
Step 5
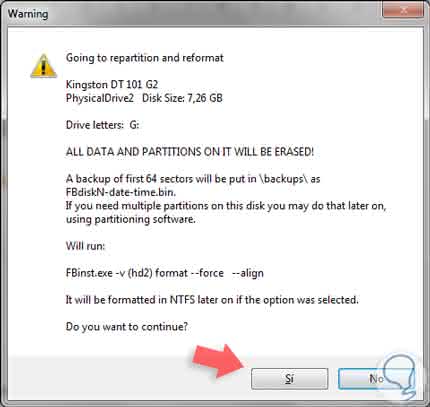
We see that a message is displayed again indicating that the FBinst.exe format will be executed, press Yes and we will see the following.
Step 6
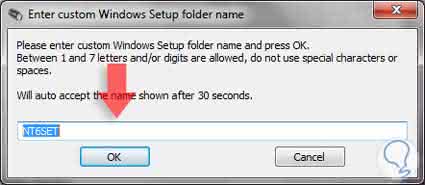
There we can assign the desired name and press OK. The following window will be displayed.
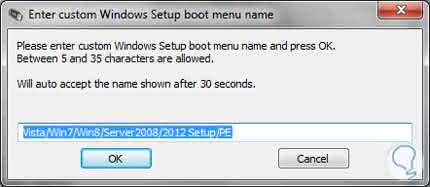
Step 7
We assign the appropriate name and press OK. We will see that the process of formatting and installing the ISO image begins.
Step 8
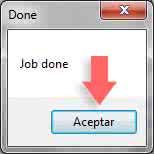
We will see that the process of assembling the ISO in the USB memory has finished.
Step 9
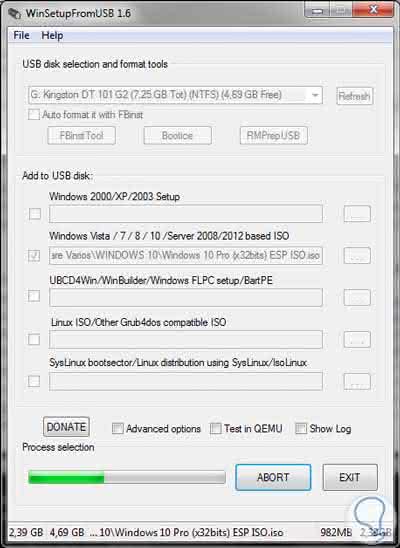
In this way we have added an ISO image of Windows 8. Now we can repeat this process to add more ISO images (depending on the size of the USB memory), but we must bear in mind the following aspects:
- Go back to Advanced options and check the Custom menu names for Vista / 7/8 / Server Source.
- Uncheck the option Auto format it with FBinst since this is only necessary the first time we use the tool.
Step 10
We can see that we add the Windows 10 ISO.
Step 11
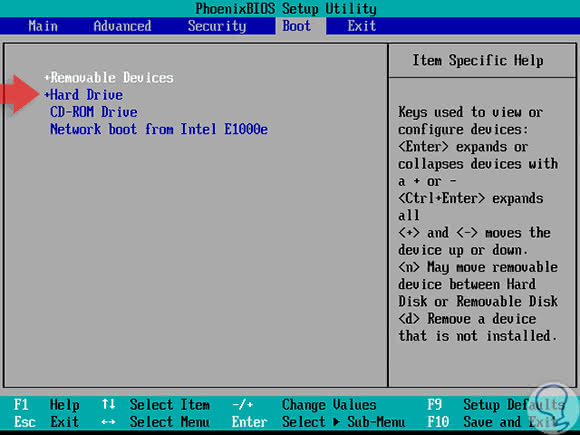
Now we can start the computer from the USB memory, for this we can enter the setup and from the Boot tab choose the option Removable Devices.
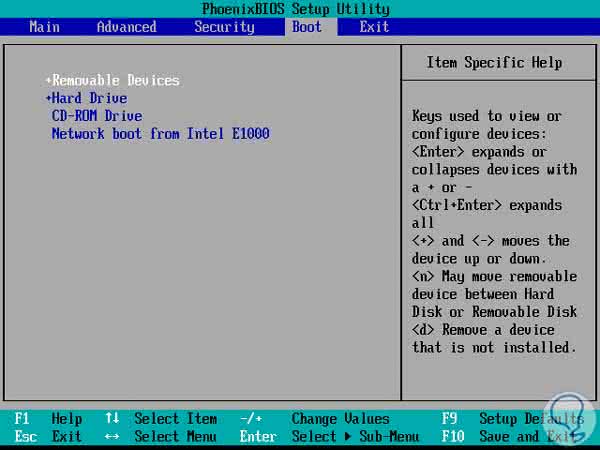
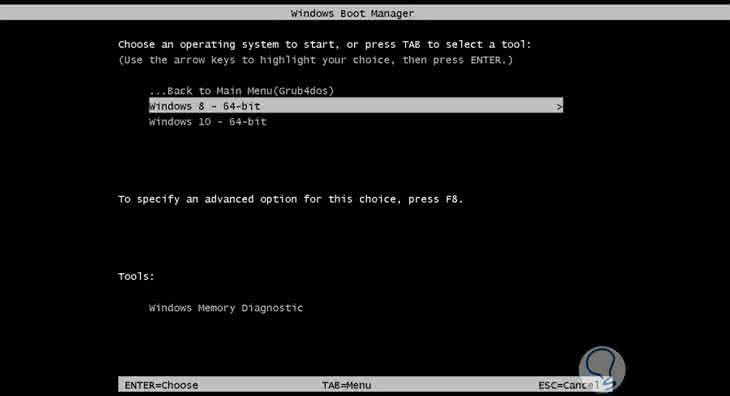
Step 12
We save the changes by pressing F10 and once we restart the system we will see the following options. From this point we can choose which option to boot the system, remember that we can select Windows, Linux or various tools for system management.
5. WinToHDD: What is it?
What is WinToHDD?
WinToHDD is a simple tool that will give us the possibility to install different Operating Systems through a USB memory or also to reinstall an existing system. This tool can be downloaded from the following link:
WinToHDD
WinToHDD features
The most outstanding features of WinToHDD are the following:
- Possibility of reinstalling any Windows Operating System without using CDs or DVDs.
- Clone Windows Operating Systems to a new hard drive.
- Install Windows operating systems easily.
- Compatible with UEFI starts.
- Compatible with Windows 7, 8, 10 and Windows Server operating systems.
As we see we have available a simple tool, but with great work capabilities.
6. WinToHDD: Installation process
Step 1
The first thing is to download the latest version of WinToHDD is 2.3 and then we proceed to execute the downloaded file and follow the steps of the wizard for its installation:
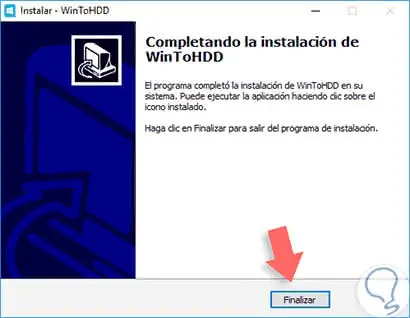
Step 2
Once we complete the installation we will be ready for use. When we run the WinToHDD tool we will see the following work environment:
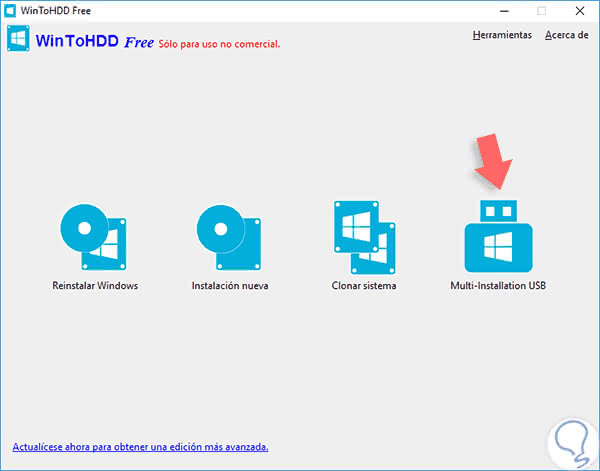
Step 3
From this point we have the various tasks that can be executed with the tool:
Reinstall Windows
Thanks to this option we can reinstall any Windows Operating System (From Windows 7) without the need to use CDs, DVDs, etc in a simple and totally practical way.
New installation
With this option we can install Windows in a simple way on any disk other than where we have the current Operating System.
Clone System
This option allows us to execute a cloning of the Operating System on the fly to any hard disk with the certainty of an exact copy of the current system.
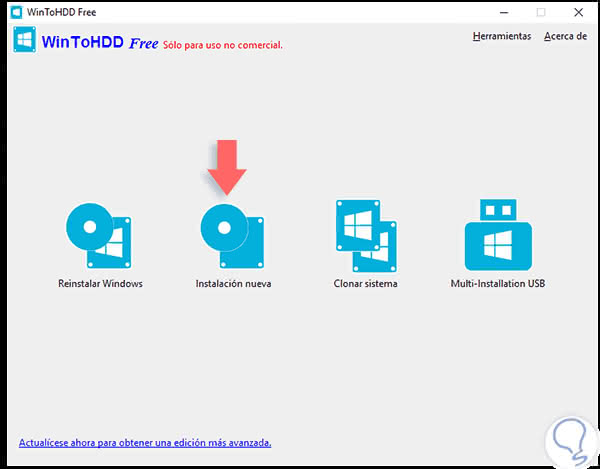
Multi-installation USB
Thanks to this option we have the ability to create a multi-system USB which will allow us to install any version of Windows, both 32-bit and 64-bit, on computers that have BIOS or UEFI boot.
In this tutorial we will focus on the last option, Multi-Installation USB.
7. WinToHDD: Create USB Boot and add ISO images
Step 1
Click on the option mentioned, Multi-Installation USB, and we will see that the following window is displayed where we must choose the USB memory:
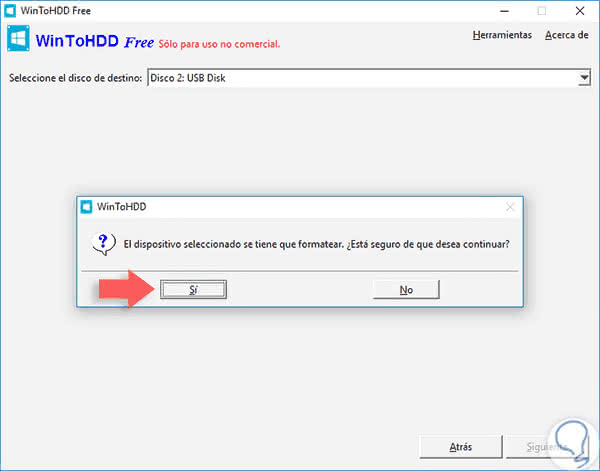
Step 2
There we must accept that the tool makes the format to the USB memory to proceed with the configuration. Press Yes and we will see that the USB formatting process starts:
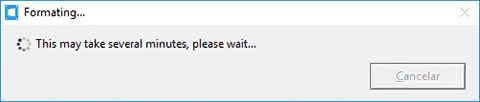
Step 3
Once the formatting process concludes we will see the following window:
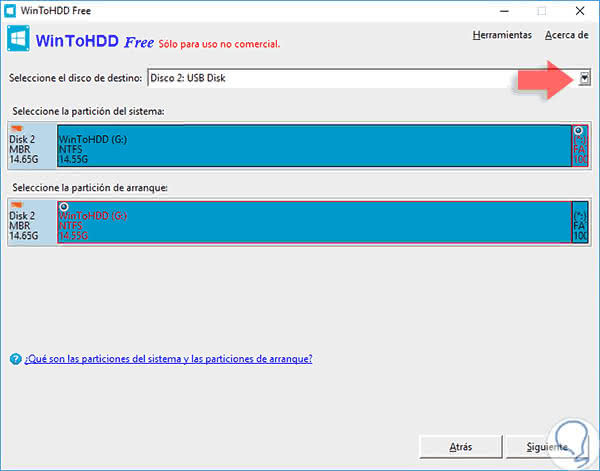
Step 4
In this window we will select the boot and partition of the system, we leave the option by default, we check that the file system is the indicated one and click on the Next button and we will see this:
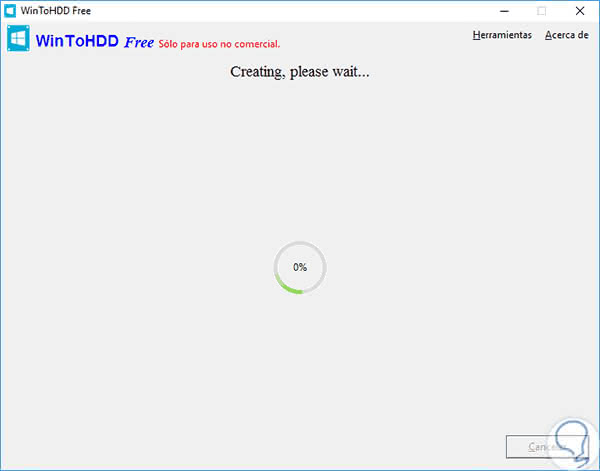
Step 5
We are seeing that the WinToHDD tool is in the process of creating the bootable medium. This process takes around 10 minutes. Once this process is complete we will see the following:
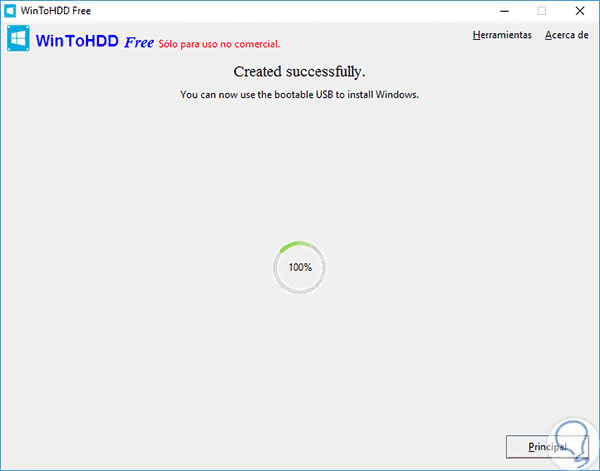
Step 6
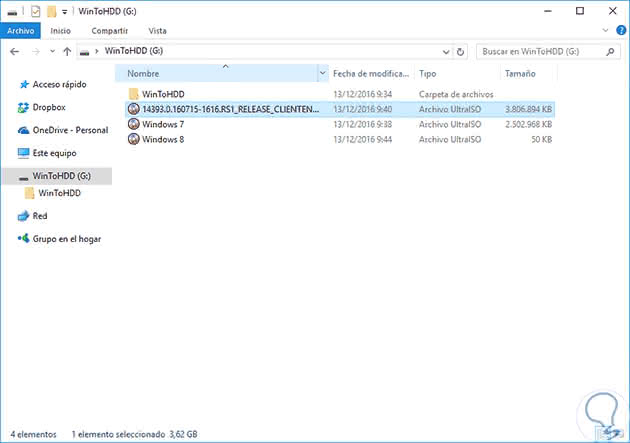
At this moment the bootable USB has been created correctly. The next step is to copy the necessary ISO images to the root of the USB stick from the file browser:
8. WinToHDD: Enable booting from USB
Step 1
The next step, after having the ISO images in memory, is to configure the boot of the computer from the USB memory and for this as soon as we turn on the computer we must press, usually, the Delete key or F2 to enter the configuration of BIOS or UEFI and there we go to the Boot tab and select the Removable Devices option so that the boot is from the USB that we created with WinToHDD.
Step 2
Now when we start the machine we will see the following window:
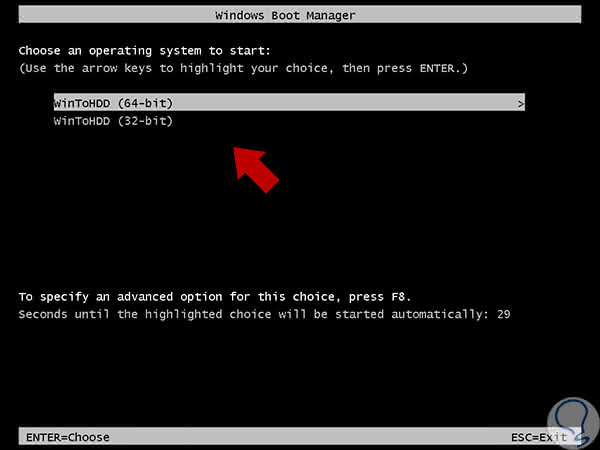
Step 3
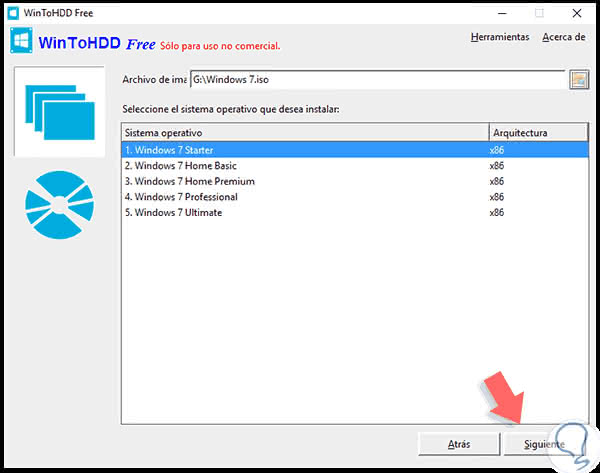
There we select the version of the Operating System and finally we will see the following window:
Step 4
There we must select the option New installation and follow all the steps of the wizard.
9. MultiBoot USB: Create multi-system USB
MultiBoot is a software developed under a General Public License that allows anyone to make changes or contributions to the code and even share it. It is based on open source and its source code is always available to be consulted.
The good thing about this software among its multiple properties is that it is free, also certify this character forever. The code of this software is written in the programming language of Python, a language that we can see in other applications such as Dropbox.
It has the capacity to support different operating systems and does not include a file of presets installed in the MultiBootUSB. While we perform the installation, the files are adapted and modified according to the user.
To start a USB device with MultiBoot software we will have Syslinux as USB boot loader due to its great compatibility with many distributions, during installation a specific version of Syslinux is selected to increase compatibility.
We can download the MultiBoot USB program at the following link:
MultiBoot
Once installed, we can choose the portable disk where to install our ISO image and select it from its location.
10. Xboot: Create USB multiBoot
XBoot is a software that allows us to create USB MultiBoot through the loading of ISO images of operating systems. From many Live CDs or ISO images, we can have a single device that includes different possibilities of starting the system.
The only negative aspect of this software is that we can only load the ISO images that are displayed in the list of options of the program itself. But do not worry because this software is in expansion and are increasingly added to the list it contains.
You can download the XBoot software for free on its official link:
XBoot
When you open the XBoot file and install it, you will be able to see the program in its entirety. Here you will find the option to load the ISO image creating a USB although it also gives you the possibility to make it on a DVD disc. Drag the ISO image to load it and then click on "Create USB".

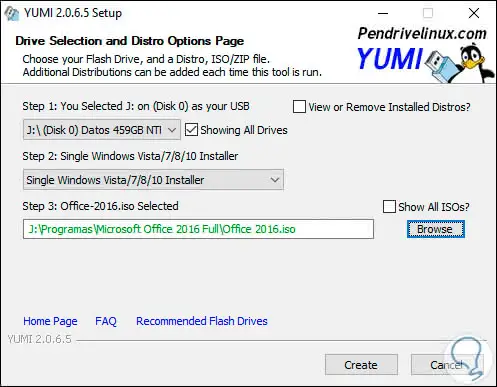
11. Yumi: Create USB multiBoot
Yumi is a multi-system universal boot installer that will allow us to create bootable USB drives with different Operating Systems assembled at the same time. Yumi does not use the grub system as a boot but uses syslinux to start directly ISO that we have stored in the USB.
In addition to some distros, the files are stored inside the multiboot folder which allows it to be an organized multiboot USB that leaves space to be able to use it at the same time as normal USB storage.
You can download this complete program for free from the following link:
Yumi
Once the program is installed, open it and you will see its different configuration options. You can choose the system you want to add and its corresponding ISO image. By clicking on Create you can start the process.
As we have seen, we have these interesting alternatives, which allow us to start the system using different operating systems and thus have alternatives when starting the computer. Remember to use these tools responsibly and carefully so as not to affect the main system.
If you want to know more about the USB Boot here you can see a complete manual on how to create a USB Boot for any Operating System. Always have your USB multiboot on hand and you will avoid problems.