Does the computer start very slow? Are loading times unbearable when opening an application? Do you open internet pages and others appear without having requested it? then this is your Tutorial. Below, we show simple and practical steps to improve that performance ..
Windows 10 is a dynamic system that offers us a series of functions and features focused on the optimal performance of applications and other elements to attract more and more users, but unfortunately many times we see how the operating system does not respond in the desired way and this It occurs in some cases because of the system itself, but in others because of us as a user.
Regardless of the hardware configuration, although this has a lot to do, we can perform some actions on Windows 10 to improve its performance and today in TechnoWikis we bring some tips focused on making our Windows 10 a reliable and fast system..
1. Check the startup applications in Windows 10
Currently, many of the applications and programs that we install in Windows 10 are configured by default to be executed at the start of the system, which slows down the optimal start of the session since the system must load the services and processes for themselves, and if this is the case we add the load of applications without doubt will affect the fast start of Windows 10.
Step 1
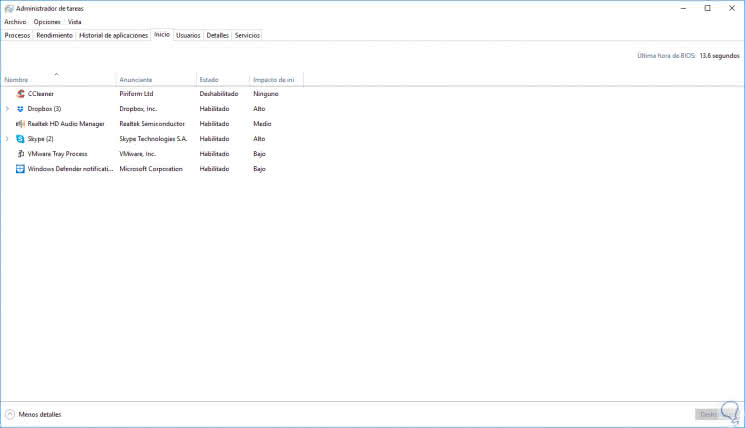
To check which applications are enabled with this type of boot we must go to the task manager using any of the following options:
Task Manager
Step 2
In the Task Manager displayed, we go to the Home section and we can see all the applications that are available there:
Step 3
There we see the current status of each of them and the impact it has on the Windows 10 boot. If we want to disable any of them, we have two options:
- Right click on the application and select the option "Disable"
- Select the application and click on the "Disable" button located on the bottom right

2. Disable effects and animations in Windows 10
One of the actions that has a high impact at the level of performance in Windows 10 are the animations that, although they are dynamic and modern, affect the speed of execution especially if the hardware resources are not the best.
Step 1
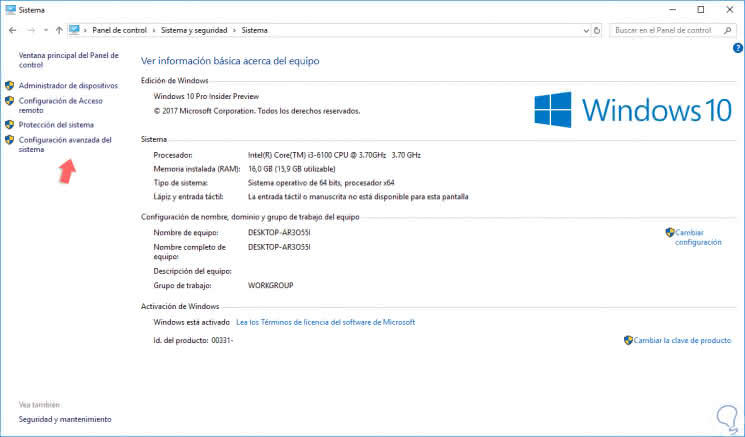
To disable these effects, we go to the next route.
Step 2
There we click on the line "Advanced system configuration" located on the left side and the following window will be displayed:
Step 3
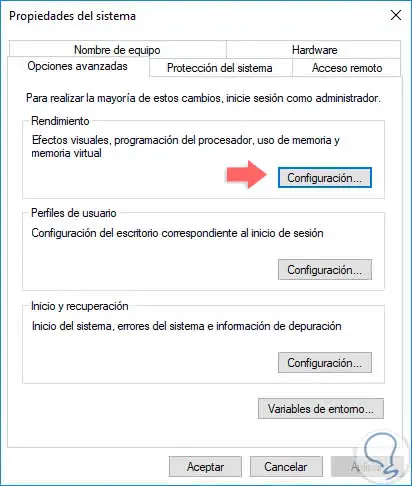
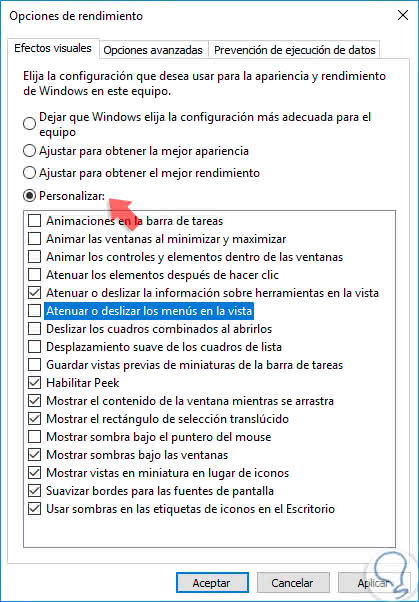
Click on the "Settings" button located in the "Performance" section and in the new window, activate the "Customize" box and uncheck the boxes that we consider necessary. Click on Apply and Accept to save the changes.
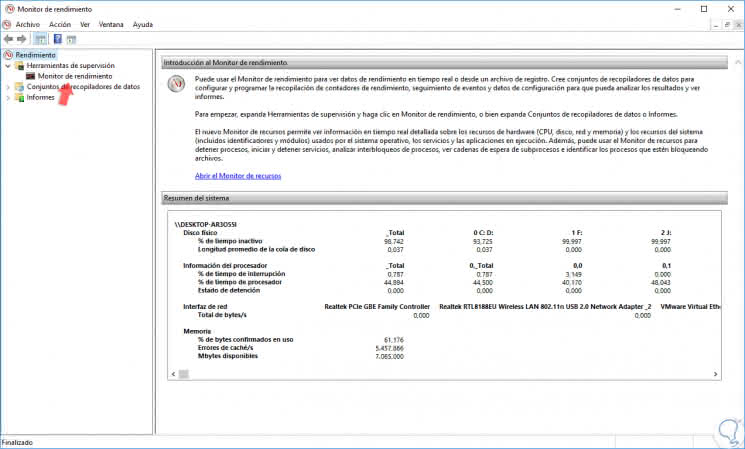
3. Monitor performance in Windows 10
This utility, integrated in Windows 10, is a practical tool for monitoring the performance of various system values ​​in real time, where we will obtain detailed information on system and hardware resources, performance problems and services, and best of all, is that it gives suggestions and solutions for the problems found there.
To access it, enter in the search box of Windows 10 the term monitor and select the option "Performance Monitor" and the following will be displayed.
From there it will be possible to verify in real time the status of all system components and take the necessary measures in case of errors.
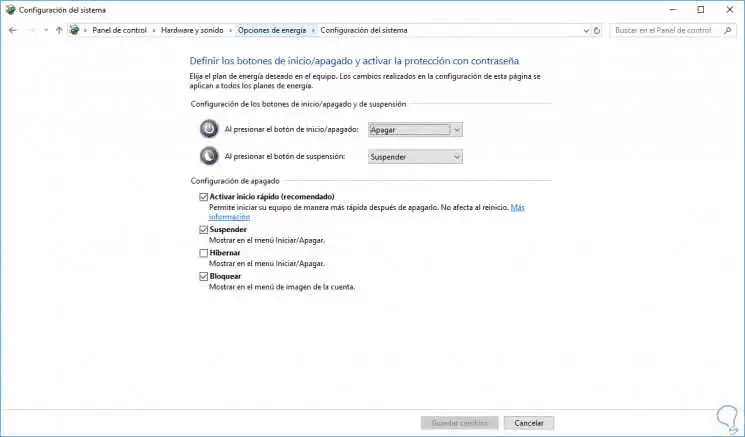
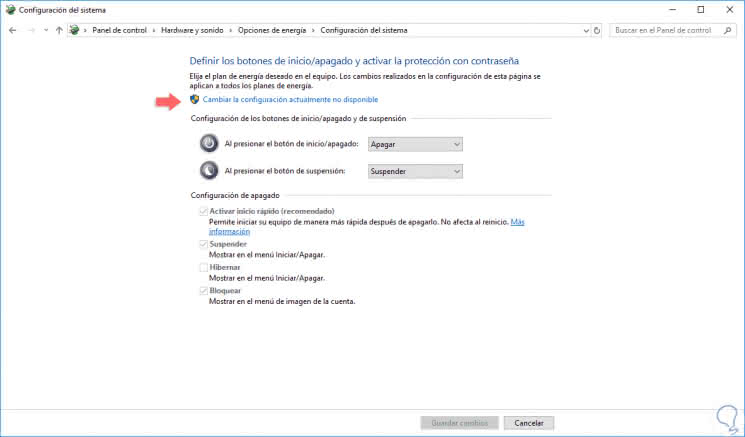
4. Enable hibernation mode in Windows 10
Hibernation in Windows 10 allows us to turn off the hard drive after a period of inactivity, but when you press any key, the system is reactivated by opening everything again as it was, hibernation helps improve Windows 10 in the sense of energy saving and improper use of the hard disk because, if it is still active and we are not there, little by little it will affect the optimal state of the system in general.
Step 1
To configure this option, we will go to the next route.
Step 2
There we click on the line "Choose the behavior of the start / stop buttons" and we will be redirected to the next window. There we can activate the "Hibernate" box and click on the Save Changes button.
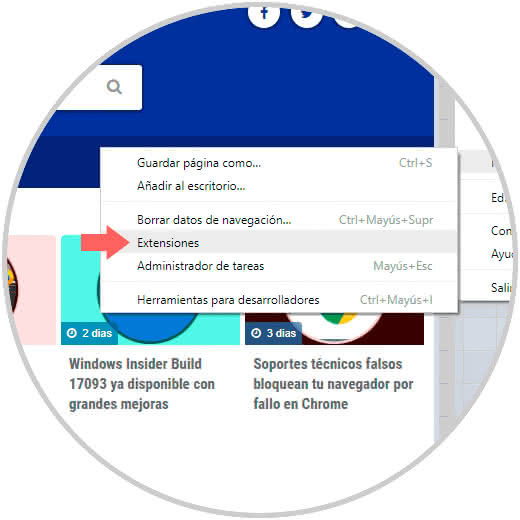
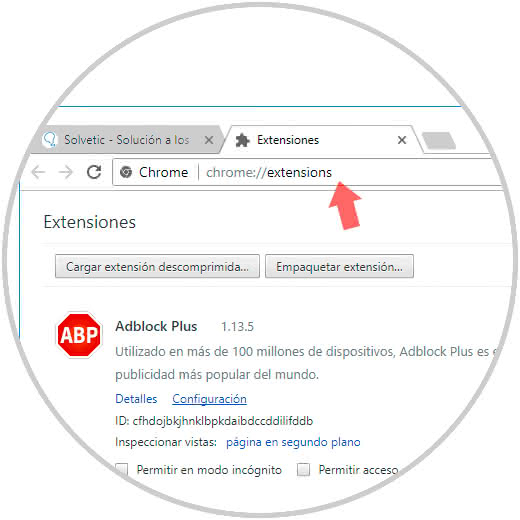
5. Minimize the impact of browser loading in Windows 10
The current browsers have the possibility of adding hundreds of extensions that allow us to extend the browser capabilities thanks to its dynamism, but these extensions can affect the normal operating speed of the operating system.
In this case it is ideal to disable certain extensions that are not used for any reason..
Step 1
In the case of Google Chrome we will go to the option "Customize and control Google Chrome" and go to the "More Tools / Extensions" route:
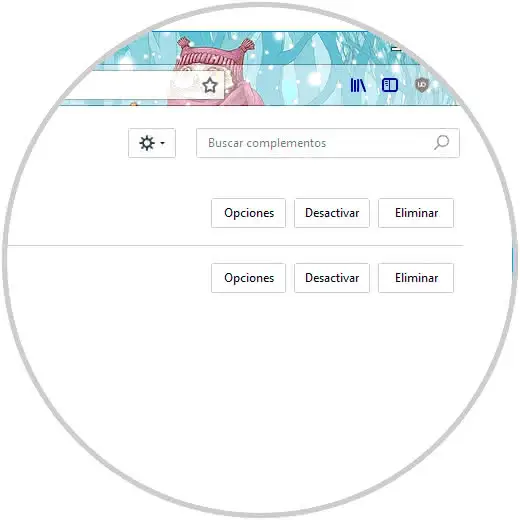
Step 2
In the expanded window we can disable the desired extensions. In the case of Mozilla Firefox we can enter the following in the address bar:
about: addons
Step 3
In the expanded window we can disable or delete the desired extensions:
6. Minimize the loading impact of the browser in Windows 10
Search indexing in Windows 10, has been designed to improve the search tool's responses and accelerates the entire search process in the system, but this definitely affects the performance, because it is executed in the background and makes use of of a lot of resources that can be useful for other things.
Step 1
To access this option, we will right click on the Start menu and select the option "Computer Management" and in the expanded window we will go to the section "Services and Applications / Services", there we will place a service called "Windows Search":
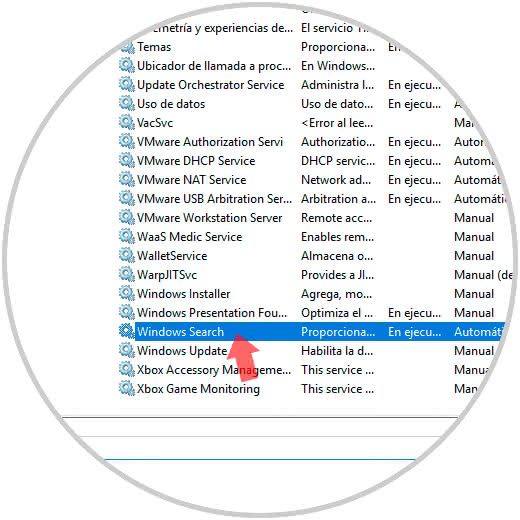
Step 2
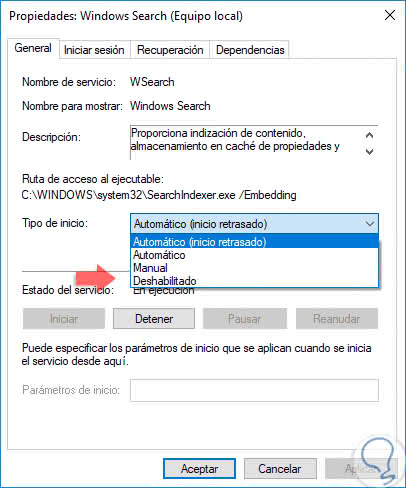
We will double click on this service and in the field Start type we select Manual or Disabled. Once this has been defined, we will click on Apply and Accept to save the changes.
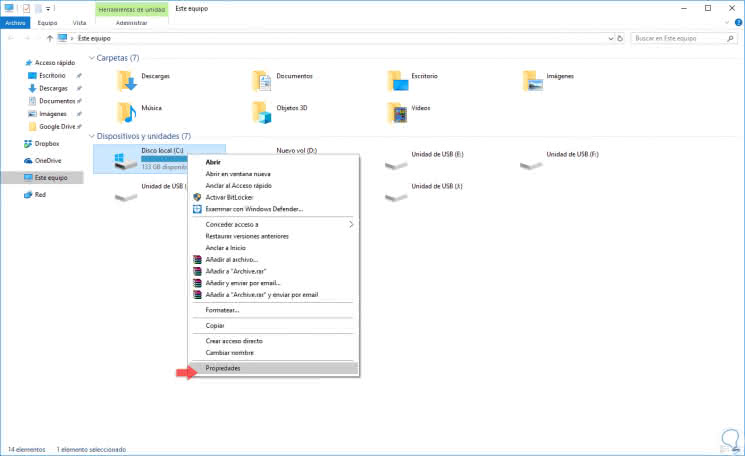
7. Clean the hard drive in Windows 10
As we download and install new applications and create new files in Windows 10, it is normal that the hard disk is gradually filling up with information that is no longer necessary but that is occupying space affecting the performance of the system such is the case of the downloads, previous versions of Windows and others.
Step 1
Windows 10 includes a utility to execute a cleanup task on the hard drive to which we can access by right clicking on the unit and selecting the Properties option
: 
Step 2
The following window will be displayed:
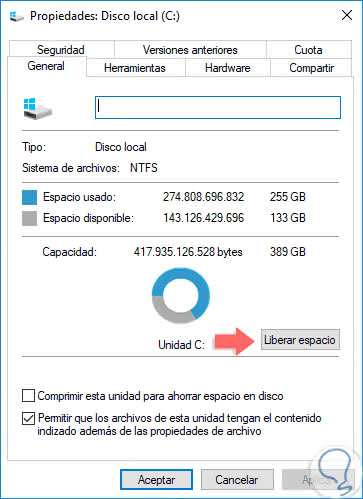
Step 3
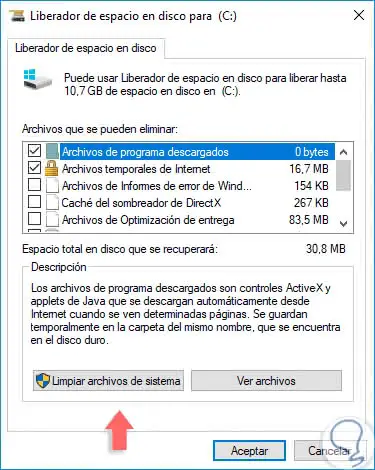
There we click on the button "Free space" and after the analysis we will see what elements can be eliminated and the space they occupy in the disk. There we click on OK once we have selected the desired elements.
We can also use the Ccleaner utility:
Clean disk with Ccleaner
CCleaner is a great utility that, among many other functions, has several cleaning and performance improvements. It is a free tool but very complete and brings various functions with which to manage the space and the operation of our machine. We have from a cleaner, registry configuration or browser management. An outstanding option to search for errors in the registry (it is recommended to make a backup of the registry you will skip the option before doing it.) With this you can look for errors in the registry of the system and repair them.
In the following link you have a complete tutorial to be able to clean your Windows 10.
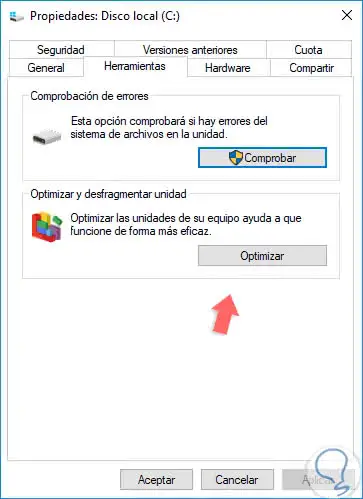
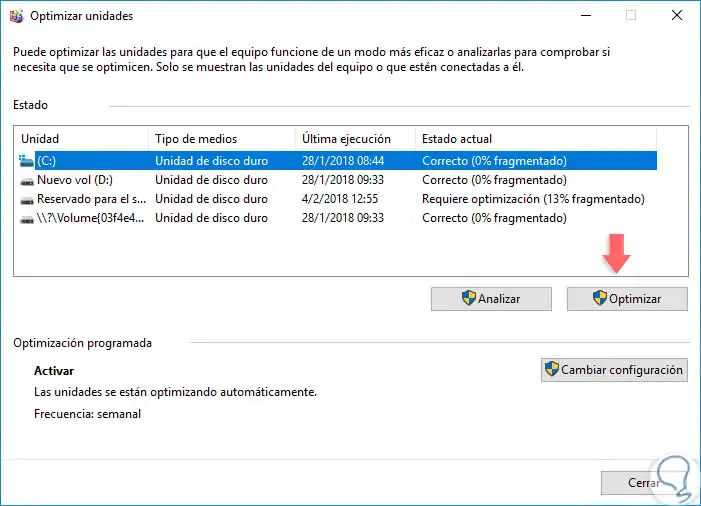
8. Defragment the hard drive in Windows 10
Defragmentation is a Windows process through which all files are placed on the hard disk so that they do not generate fragments of each one of them in the entire disk, thus affecting the ability to write and read, this is a process that eventually happens on all hard drives.
Step 1
To optimize our hard drive with this process, we go back to the properties of the disk and this time we go to the "Tools" tab where we select the option "Optimize" located in the section "Optimize and defragment drive":
Step 2
There we will see the following. Select the disk to work and click on the "Optimize" button to defrag it.
9. Activate the quick start in Windows 10
Windows 10 has an option called Quick Start which reduces the system boot time because it uses the caching of the necessary resources in a single file on the hard disk and thus the startup speed is affected.
Step 1
To activate this mode we will go to the next route.
Step 2
There we click on the line "Change the configuration currently not available" and we can activate the "Quick start" box located at the bottom if it is not already.
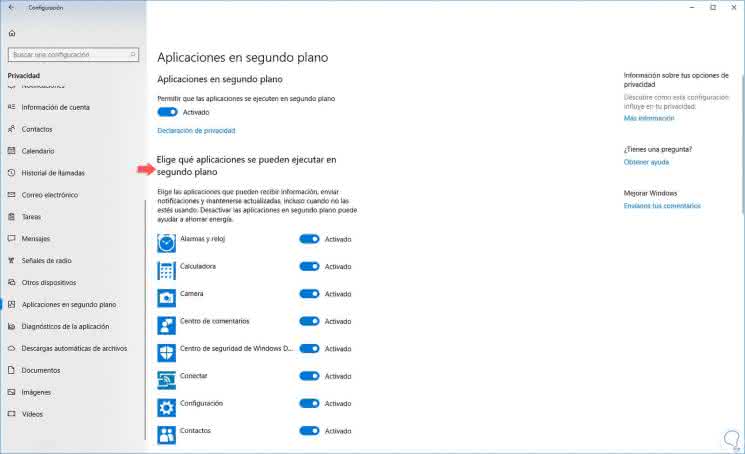
10. Disable applications in the background in Windows 10
Many of the applications that we install in Windows 10 run in the background consuming resources such as RAM, disk, etc., which directly affects the correct stability and performance of the operating system.
When being executed in the background, as users we can not detect them with simplicity.
Step 1
To verify this, go to the Start / Settings menu:
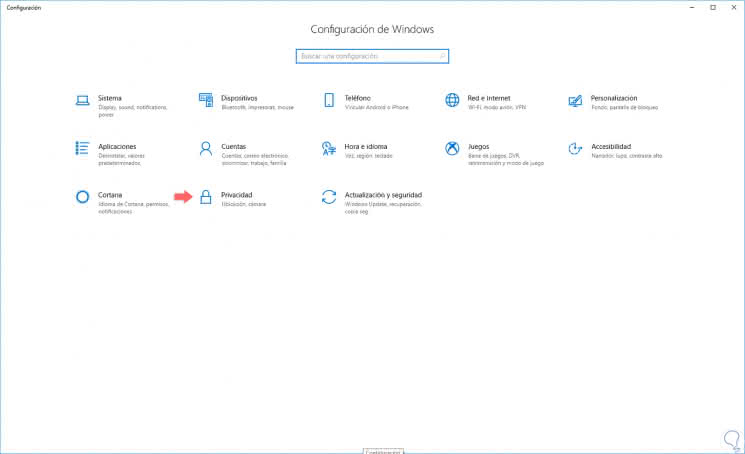
Step 2
There we click on the Privacy section and go to the section "Applications in the background". There we can disable applications in the background by clicking on their switch.
11. Optimize virtual memory in Windows 10
Windows operating systems have a help for the physical RAM of the computer and is the implementation of virtual memory, as the name implies, this is not physical and is created with the aim of improving the responsiveness of applications and programs.
By default, the operating system is responsible for its administration, but we can activate the manual option since in many cases Windows devotes a lot of space to this virtual memory, affecting other processes.
Step 1
To configure this virtual memory we will go to the next route.
Step 2
There we will click on the line "Advanced system configuration" and we will see the following:
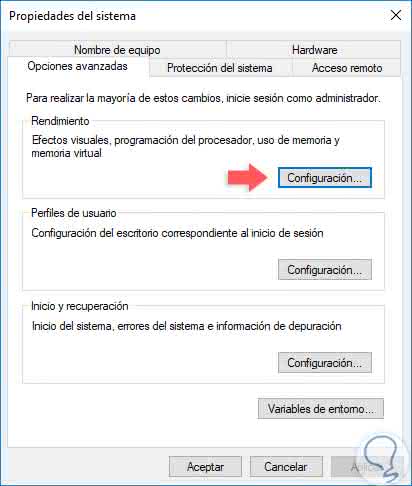
Step 3
We will click on the "Settings" button located in the "Performance" field and in the new window we will go to the "Advanced options" tab:
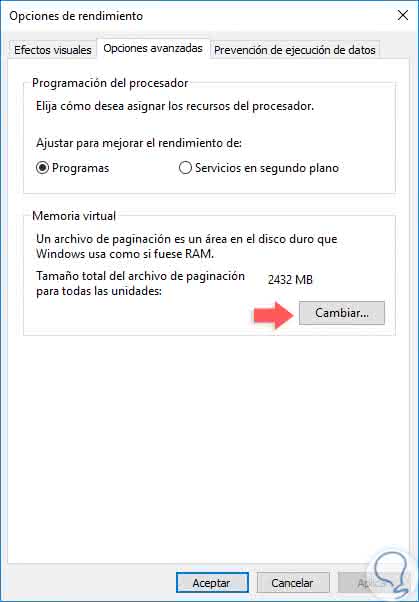
Step 4
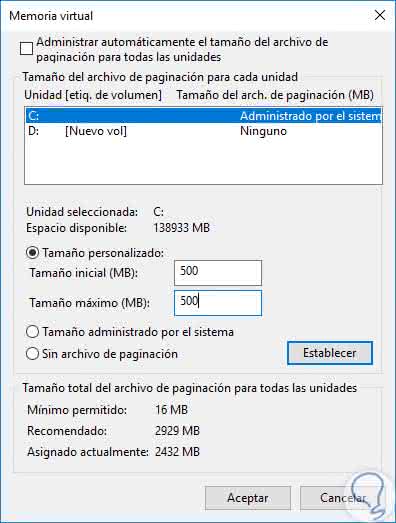
There we click on the "Change" button located in the "Virtual memory" section and in the new window we activate the "Custom size" box and we will define the new value. Click OK to apply the changes.
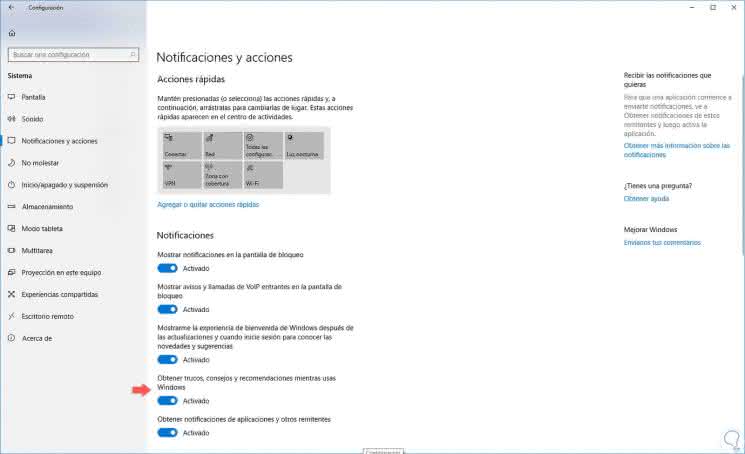
12. Turn off Microsoft advice in Windows 10
This is a function that is aimed at new users so that Windows 10 will constantly be giving advice and suggestions on how to use the operating system, but this implies use of resources in most of the time without just cause.
Step 1
To deactivate this, we go to the menu
- Notifications and actions
Step 2
There we must deactivate the "Get tricks, tips and recommendations while using Windows" switch.
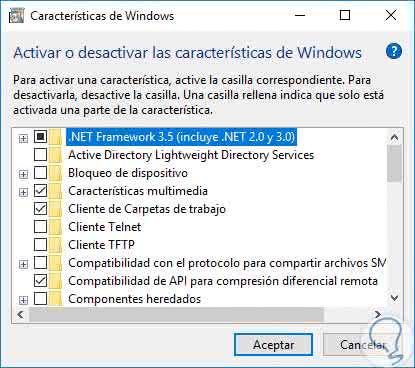
13. Disable Windows 10 features
By default, Windows 10 has a series of hidden features that can be useful at any time but, when enabled, can use hardware resources and in reality its use is minimal, in this case it is best to remove them and Avoid this unnecessary use.
Step 1
For this we will go to the following route:
- Programs and characteristics
Step 2
There we will click on the option "Activate or deactivate Windows features" in the left panel and the following window will be displayed where we will select the feature to be removed and we will uncheck it. Click OK to apply the changes.
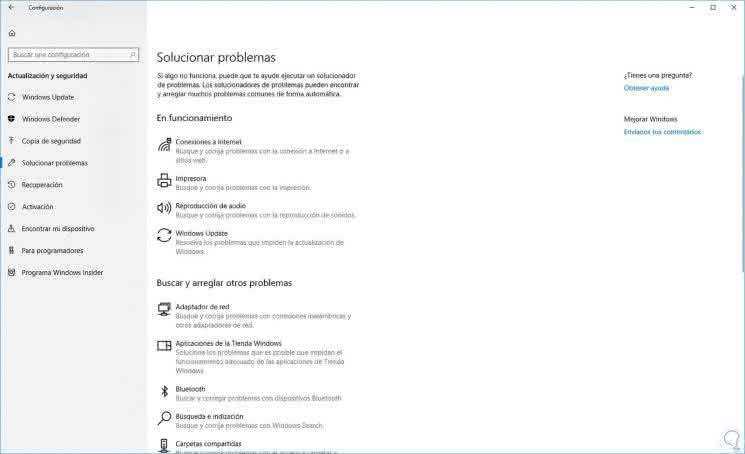
14. Use the Windows 10 problem solver
Windows 10 has a built-in tool that allows us to solve many technical problems with parameters such as network, sound, etc.
This is useful because after performing the analysis, the utility offers certain solutions to correct the problem or automatically solves them.
Step 1
To access this utility, we will go to the menu
: Step 2
There we will click on the component with problems and the utility will take care of the rest.
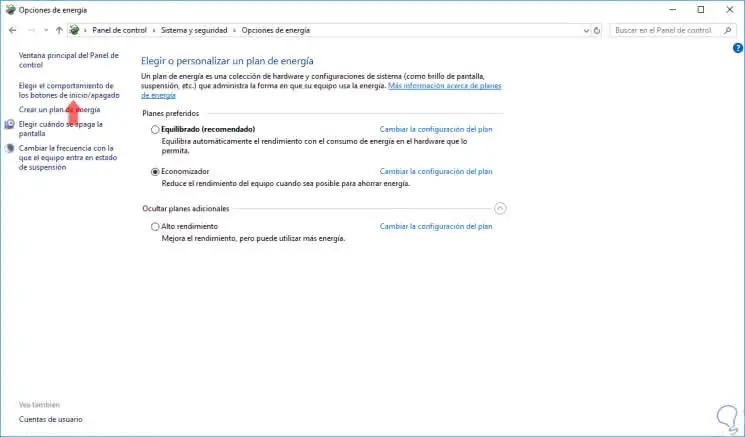
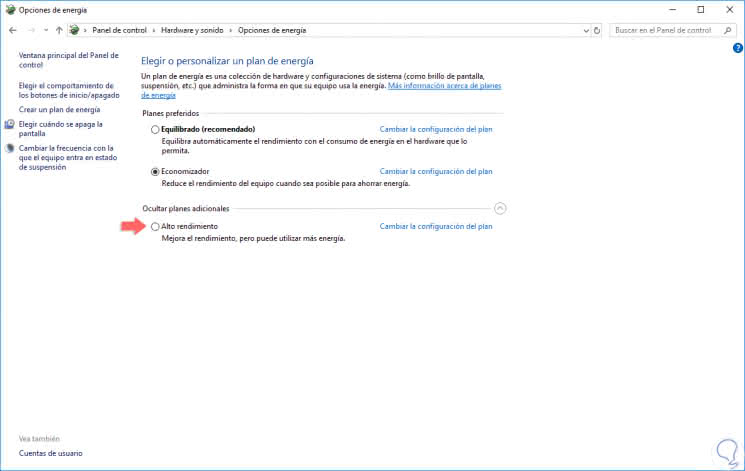
15. Use the High Performance option in Windows 10
This High Performance option is designed especially for portable equipment where the battery is a constant cause of shutdowns or shutdowns due to the use of various high consumption items.
Step 1
To access or enable this plan we must go to the following route:
Step 2
There we can activate the "High performance" box and in this way this will be the new Windows 10 power plan.
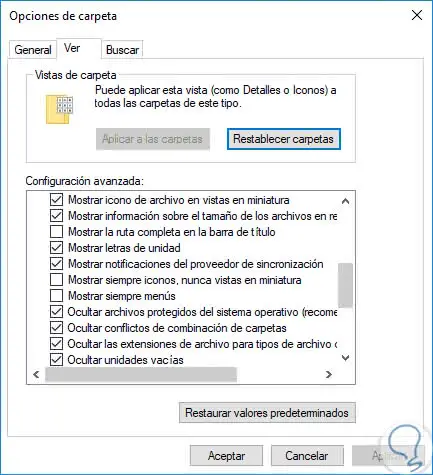
16. Configure the File Explorer options in Windows 10
File Explorer in Windows 10 has been designed with a series of options focused on increasing the overall user experience improvement but paying the price of performance. By deactivating some options that are not required we can contribute to improving the overall performance of Windows 10.
Step 1
For this we can access the file browser, go to the "File" menu and there select the box "Change folder and search options":

Step 2
There we go to the Vista tab and we can disable options like:
- Always show icons, never thumbnails
- Show file icon in thumbnails
- Show information about the size of the files in folder tips
- Display encrypted or compressed NTFS files in color
- Show pop-up description for folder and desktop items
- Show preview drivers in the preview pane
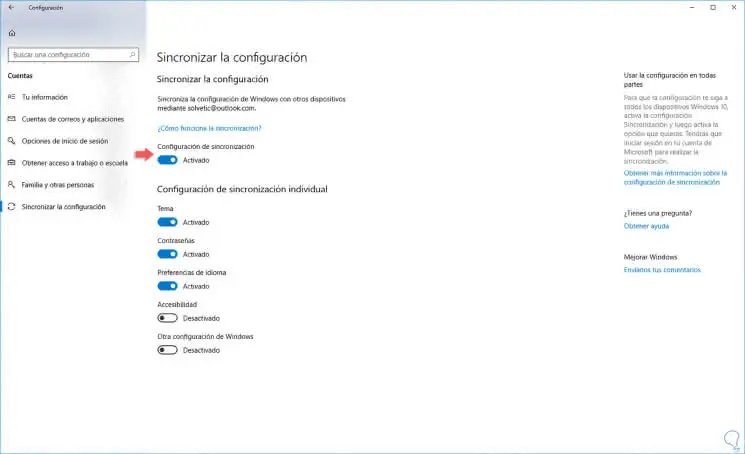
17. Disable synchronization in Windows 10
By default, Windows 10 synchronizes many elements such as passwords, browser settings, system preferences and many others with our Microsoft account.
Although this is useful, this feature consumes system resources and bandwidth of the web connection which can affect performance and a good practice is to disable it if it is not widely used.
Step 1
To disable this function we will go to the menu
- Synchronize the configuration
Step 2
There we must click on the "Synchronization Configuration" switch so that its status becomes disabled.
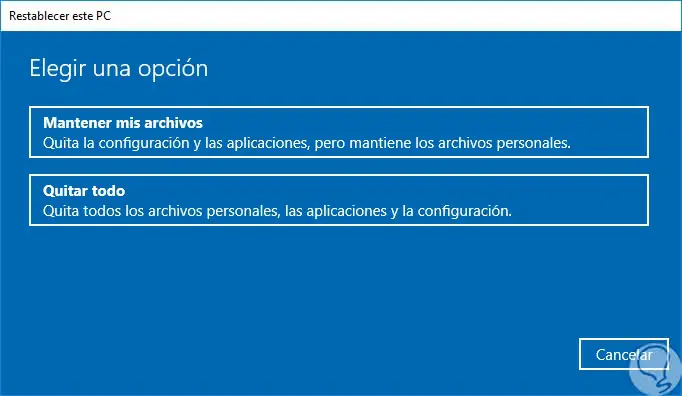
18. Reset the computer in Windows 10
If none of the previous options does not give us an ideal solution to optimize the equipment, finally we can reestablish the equipment, method with which the operating system is reinstalled and we can define if we keep the files or not.
Step 1
For this we are going to
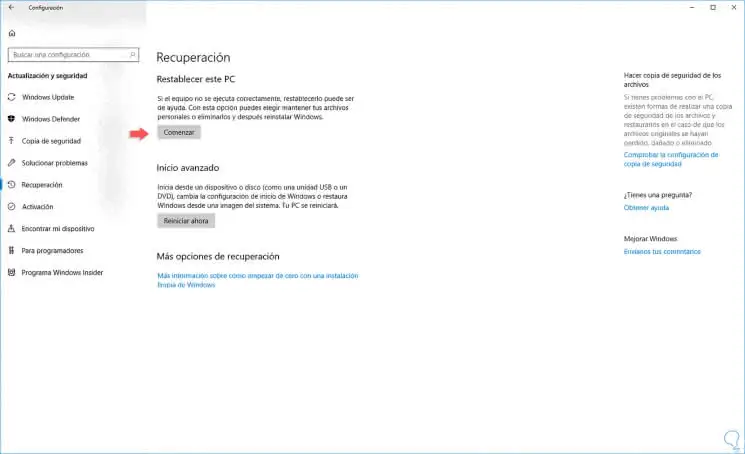
Step 2
There we click on the "Start" button located in the "Restore this PC" section and the following will be displayed. There we can define whether or not we keep the files and follow the steps of the assistant.
19. Remove programs that we do not use
The first thing we must do is eliminate the programs that we do not use, it is the first step and the golden rule to keep the computer as clean as possible. In this way having controlled what we have installed we will quickly realize which programs have been installed and not used.
If we find any program and it appears with the name "toolbar" it is best to eliminate them, delay the use of browsers and nowadays the Google navigation bar or the search engine that we want without extra software is included.
Of course remove software that we do not use and that we know it is. To avoid unwanted installations, I recommend that when you install any program you always use the "Custom installation" option, because when we install programs, especially those that are free or trial, if we do not click on the customized option, we will include unwanted toolbars, change our home page or any other third-party software.
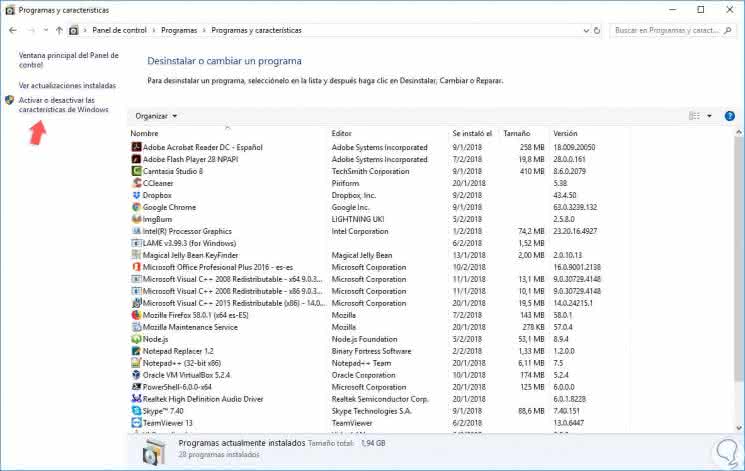
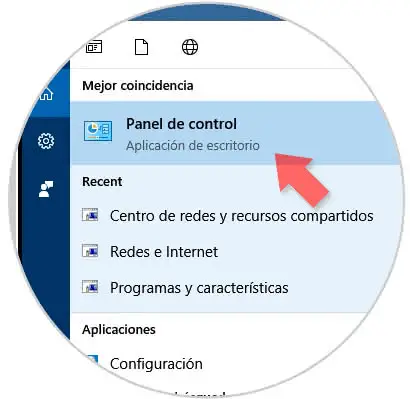
Step 1
To see the programs we have and be able to uninstall them in Windows 10, click on the search engine and type the word Panel Control, then click on it.
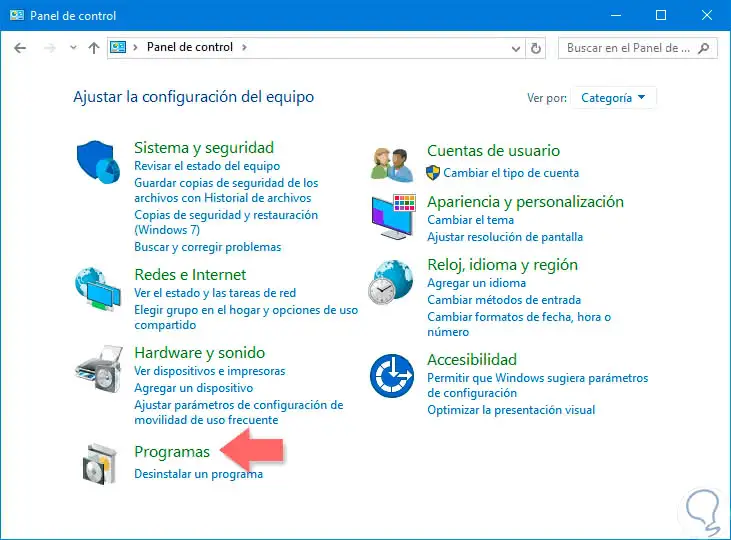
Step 2
Now enter the category of Programs and click on Uninstall a program.
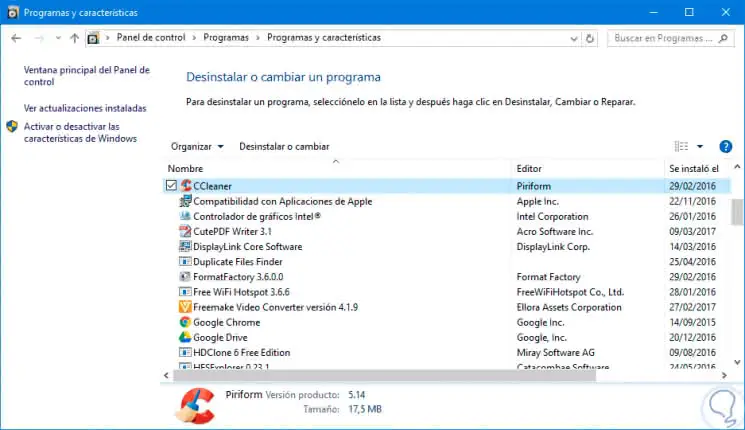
Step 3
Here you can select any program and the options will appear above:
- Uninstall: To completely remove the program.
- Change: To remove some feature of the program but not all.
- Repair: Reinstall the program to repair it from a malfunction (may require additional CD or files).
If you do not know exactly if a program is important or not, you can search it in Google or directly ask it in TechnoWikis in the questions area and we will help you to identify if they are important or not in which you doubt. You can get an idea of ​​its use by looking at the date that appears.
20. Have updated Antivirus, Antispyware and Firewall tools in Windows 10
Have an updated antivirus
It is necessary and essential to have an antivirus installed on the machine, there are many and very good, the most recognized are Mcafee, Karspersky, Panda, Norton, but these are paid, but if you do not have or want to spend money there are very good free antivirus that they fulfill their mission and can be updated perfectly, choose yours from this article compilation for Windows 10.
One very important thing to keep in mind is that it is not necessary to have more than one antivirus installed on the computer, in fact it is not advisable to have more than one, as they can interfere with each other and stop being effective even giving errors. Having one and always updated that is the key. If we are going to put another one, we will first uninstall the old one and then we will put the new one.
Have the Firewall activated
Having activated at least the Windows Firewall at the domestic level is very important since we avoid having all ports and connections open both incoming and outgoing and we will have them controlled at all times. To know how we can configure our Firewall as well as activate and deactivate it, we leave you the following tutorial.
Have anti-spyware and anti-malware tools
Having an Antispyware and anti-malware is also necessary, there are many, later we will make a comparative article but we can use ad-aware or Malwarebytes to install the free version, update them and pass them from time to time.
Finally in this regard, remember that a very good practice that you should keep in mind is this: if you notice that you have been infected by a virus or spyware or a program that has installed improper things, immediately use the remedy to restore the system to one or several days ago and you will solve the problem in one fell swoop! You can see here how to use this option.
We have seen several options to optimize and improve the performance of Windows 10 with tools included in the system itself. As you can see, we have different options for improving the performance of our Windows 10 equipment, including our browsers. If you do not want your PC to continue acting abnormally or slowed down, follow our advice. In addition, we also propose you how to optimize free windows 10, 8 and 7 with VMware Optimization.