One of the most important issues today is the security and privacy of our data on the network, since the amount of both personal and professional information we host in this medium is increasing. However, we do not always have all the necessary care for this and we make mistakes that can have consequences both for privacy and for the availability and integrity of the information..
To increase security and prevent any type of attacks, antivirus software developers constantly launch new improved applications to further protect possible attacks against their users. If we look back, malware has been scaling significantly every year. For example, in 2008 there was an average of 8.4 million known malware, while in 2019 (until July) we found 903 million. In addition every day continues to grow with attacks of all kinds such as Trojans, directory attacks, ransomware ...
Now, over the years we know that antivirus is one of the most ideal options to prevent any of these threats from knocking on our door, but we must be aware that each antivirus has its own characteristics and therefore TechnoWikis advises you that when you will acquire an antivirus take into account factors such as:
Aspects to consider when choosing an antivirus
- Prices (many are free but limited in protection)
- Ability to analyze in real time.
- Know if it protects both locally and in the cloud.
- Access options (mobile, PC, etc)
Perhaps we have heard that malware and other attacks are exclusive to Windows operating systems but wait !, did you know that if you use macOS the attacks have tripled in recent months since it has a percentage of 0.15% of the global total? Although a priori it seems that a 0.15 is not much, you really have to take into account the number of global threats that are significant, since it is estimated around 93,000 in macOS..
This is not to alarm you, much less, but so that you take into account certain security measures that will help you improve the security of your Mac. That is why we will now analyze the Mac Internet Security x9 antivirus , which is a great option to protect macOS.
What is Mac Internet Security x9
It is an antivirus software that has been developed by Intego, which is a leading company in the protection and security industry since 1997.
We can know all its features thanks to the free version offered by the company for 30 days. This small suite integrates two of the most versatile applications for analysis and protection such as:
TechnoWikis will explain in detail each of these utilities..
What is VirusBarrier X9
Based on the threats of malware, Trojans and others are increasingly latent and growing, we find a utility like VirusBarrier X9, which is integrated to optimize the security of both the network and malicious software. This utility has been in the market for more than 10 years providing security solutions.
By using VirusBarries we can detect and eliminate threats such as:
- Viruses of operating systems known as Linux, Windows and macOS.
- Protects against threats such as Trojans, ransomware, keyloggers, spyware, adware, scareware, cryptojackers, RAT, hacking tools, bookmarks and other potentially unwanted applications (PUA / PUP).
- It allows you to scan and remove all types of malware hosted in the document folders of both mobile and desktop devices such as iPhone, iPad or iPod touch, this is achieved by connecting the device to the Mac computer and then scanning the device with the VirusBarrier application.
- Fast scan function using a low impact on system resources.
- Real-time protection 24/7.
- Optional scheduled scans.
- Windows and Linux malware detection so that the Mac computer is not a carrier.
- On-demand scans, both complete and partial.
- Execution of scanning in assembly of external drives and disk images.
- Sending optional email notifications when threats are found on the computer and thus always be aware.
What is NetBarrier X9
NetBarrier X9 has been developed as the Firewall solution for macOS systems integrated in the Internet Security suite. Recall that the function of the Firewall is to analyze and manage all incoming and outgoing packets and services of both the local and external networks.
macOS integrates its own Firewall but presents certain limitations regarding the use environment since it is not the same to use a home network to a corporate network. Hence the importance of each of the features of NetBarrier X9.
When using NetBarrier X9, we are using a utility that integrates different threat detection techniques as well as improved detection methods, new detection protocols, functions focused on the defense of the system and dynamic analysis of network behavior, something that the MacOS Firewall does not offer you.
You can see that macOS restricts the use of non-AppStore applications but this does not guarantee 100% that they are safe, and therefore NetBarrier comes into play which acts as a bidirectional Firewall, that is, it protects us not only from threats incoming, but also those applications not authorized to cover the maximum security.
Within the features of NetBarrier we find:
- It allows to define the network communications that will be autoriazdas in the equipment.
- It offers various levels of security and protection based on the environment (House, Work or Public Networks)
- You have access to the Firewall rules in order to determine which programs, applications or services can send and receive information.
- It has a list of active applications from where we can follow in real time details such as the bandwidth used, data sent and more details of each.
- It will be possible to simply block or authorize connections for local devices.
- We can configure network channels.
- Analyze unreliable applications to avoid installing spyware on the computer.
- It has automatic notifications to be aware of the activity.
Both VirusBarrier X9 and NetBarrier X9 are available in five languages ​​that are English, French, German, Japanese and Spanish.
Intego has material so that we are up to date with the new latent threats, and this can be consulted in the following link:
Mac security blog
Now we will learn to install and use this tools in macOS.
1. How to download and install Mac Internet Security X9
Step 1
The first thing to do is go to the following link to download
Mac Internet Security X9
There you have to download the free version for 30 days, or offer the following purchase options:
- 2 years for € | $ 74.99
For you TechnoWikis users, you have a very interesting offer, where you can get it cheaper with 60% and up to 63% discount on these antivirus licenses:
- Mac Internet Security X9 Antivirus
- Mac Premium Bundle X9 Antivirus
It is worth it if you want to feel calm while using your Mac computer.
OFFER 60% DISCOUNT! Mac Internet Security X9 Antivirus License
Exclusive offer for TechnoWikis users, where you can buy Mac Internet Security X9 antivirus license at an unbeatable price that will last only a while. Do not miss it!
OFFER 63% DISCOUNT! Mac Premium Bundle X9 Antivirus License
Exclusive offer for TechnoWikis users, where you can buy a Mac Premium Bundle X9 antivirus license with some more features at an unbeatable price that will last only a while. Do not miss it!
Requirements
To use this suite you must have the following requirements:
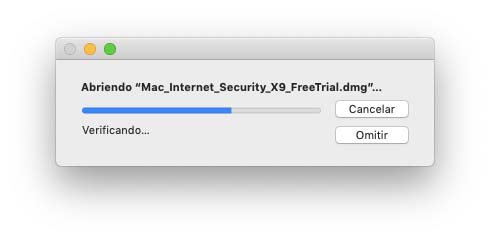
Step 2
Once we download the .dmg file, double click on it and proceed with the analysis of it:
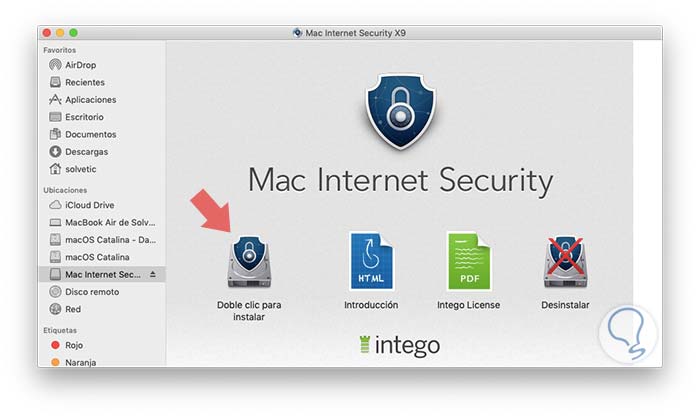
Step 3
Once this process is finished we will see the following. There we can open the HTML file in any browser to learn more, or double click on “Double click to installâ€
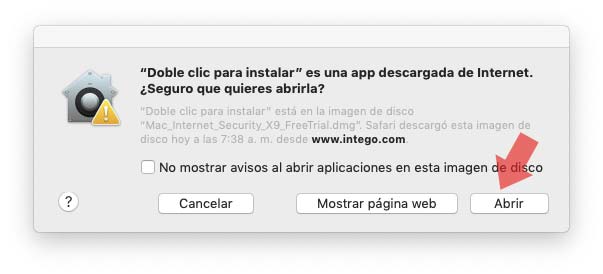
Step 4
In doing this we will see the following. We click "Open" to deploy the tools installation wizard.
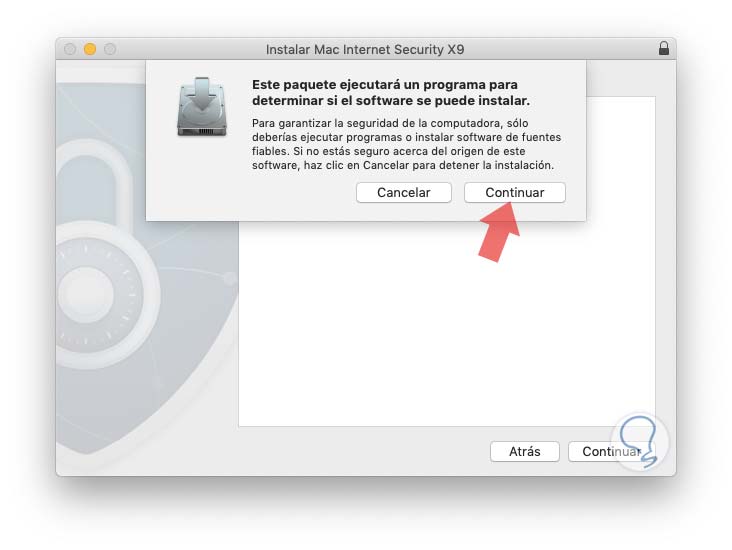
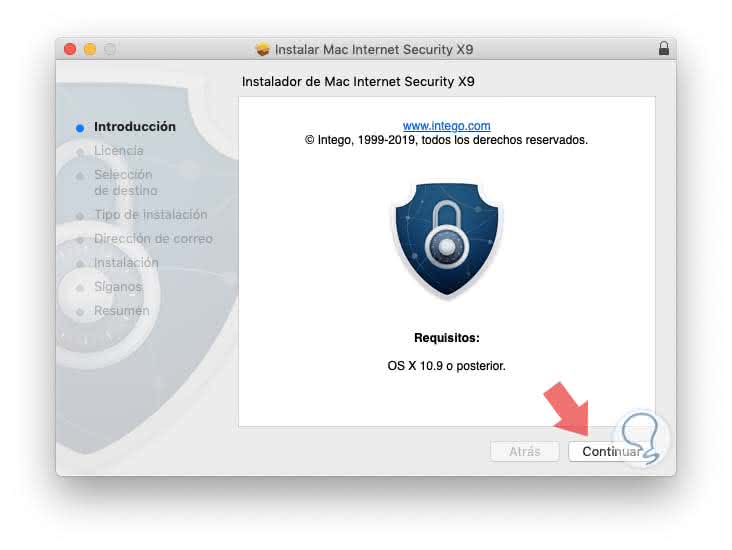
Step 5
We click on Continue and we will see the following.
Step 6
Again we click on Continue.
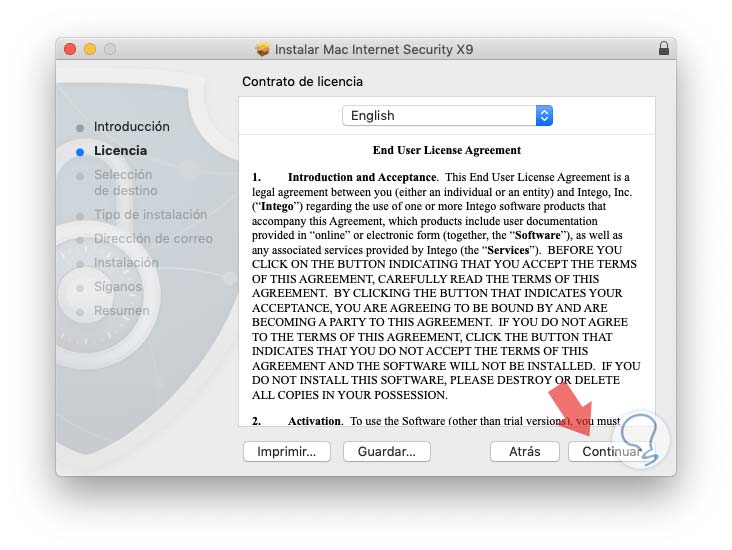
Step 7
We will accept the terms of the license.
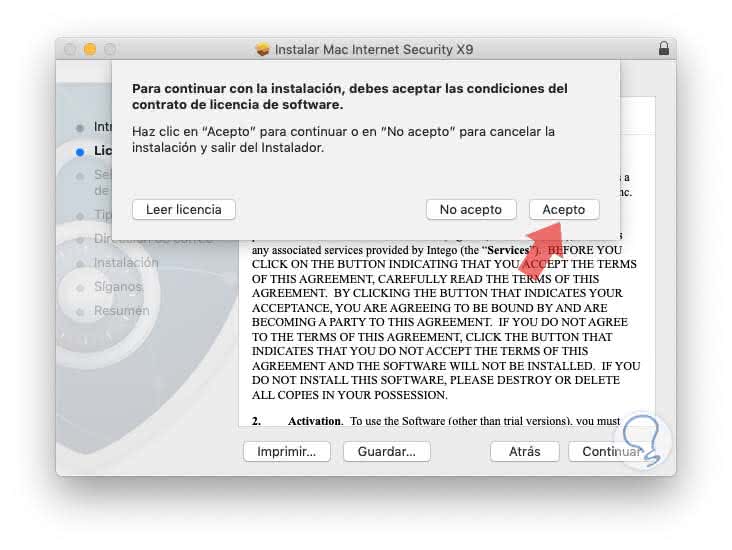
Step 8
Clicking Continue will display the following window where we confirm acceptance:
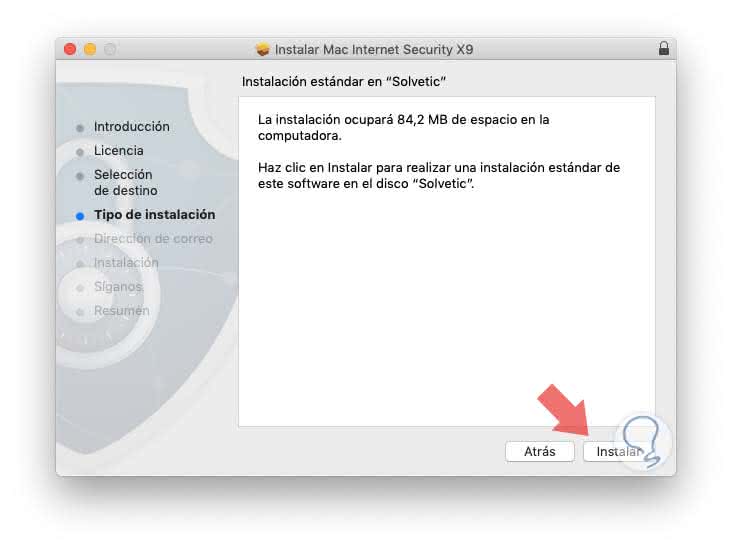
Step 9
Next we will see this window. There we click on Install.
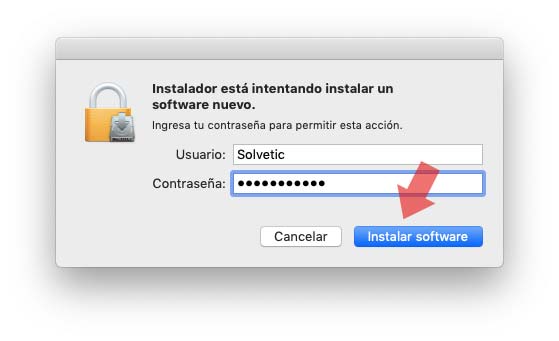
Step 10
You will need to enter the administrator password. We click on “Install software†to proceed with the installation.
Step 11
Before we will see the following message:
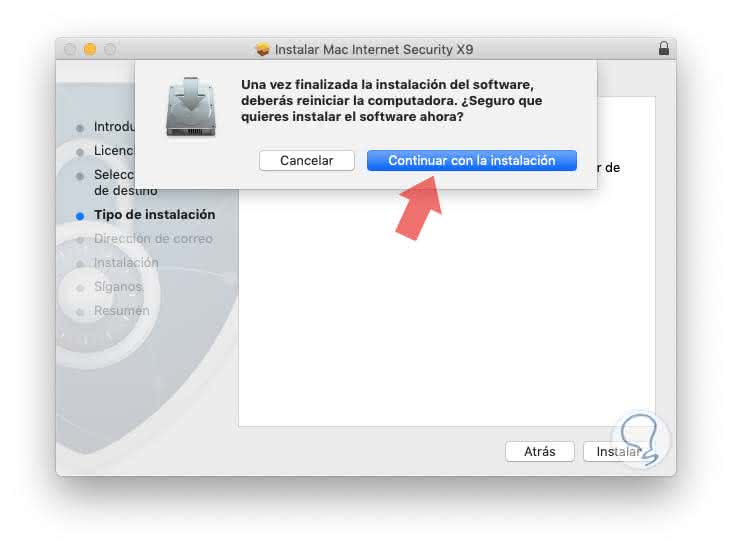
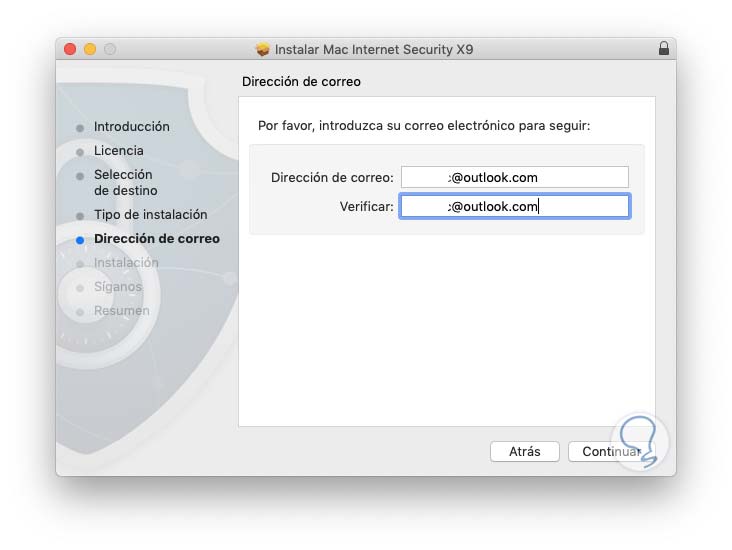
Step 12
We click on “Continue with the installation†and it will be necessary to register an email:
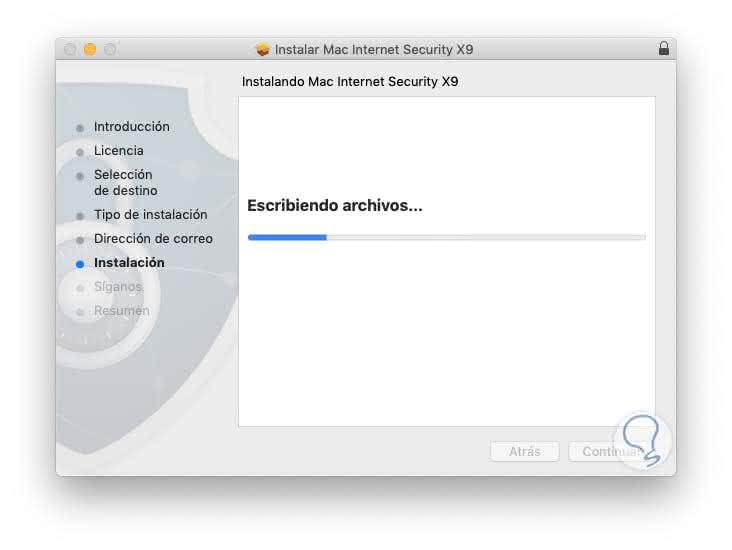
Step 13
We click on "Continue" to continue with the installation:
So we have installed Mac Internet Security X9 on macOS.
2. How to use Mac Internet Security X9 utilities
Step 1
When we have installed the application, at the top of the desktop we will see an access to the installed utilities:
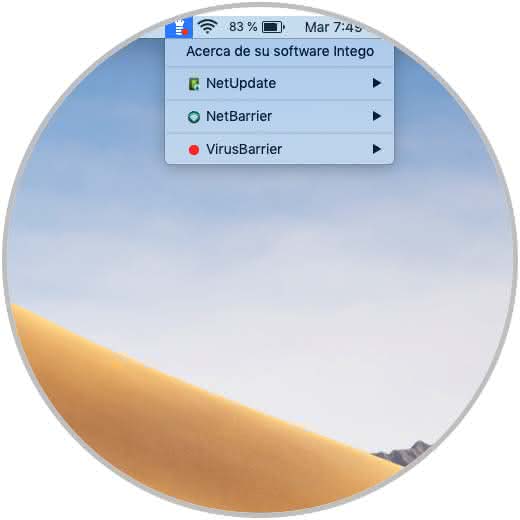
Step 2
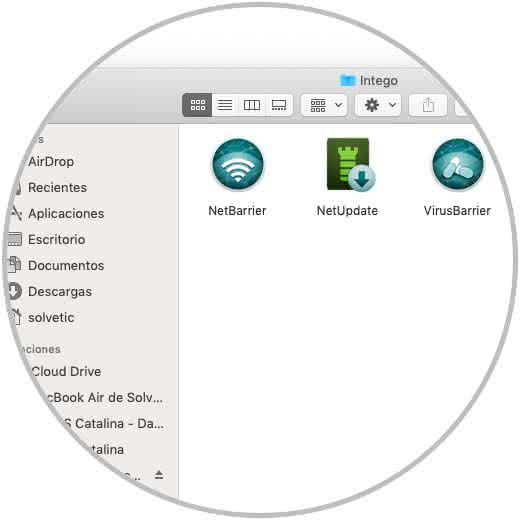
An Intego folder will be automatically created in macOS Applications:
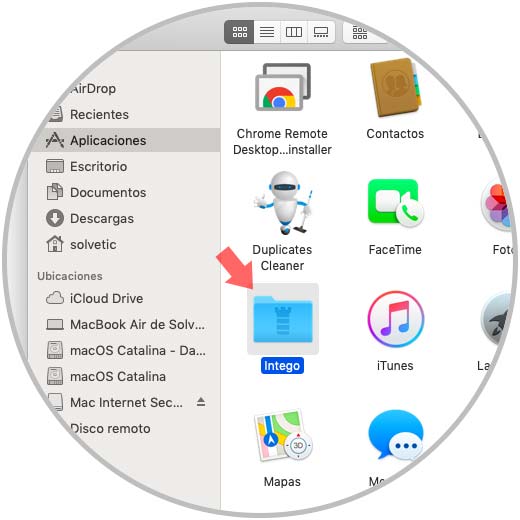
Step 3
When accessing it we will see what applications have been installed. We will see VirusBarrier and NetBarrier:
3. How to use NetUpdate on Mac Internet Security X9
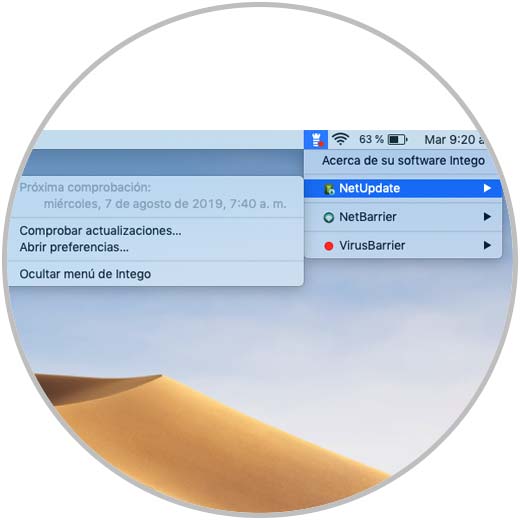
NetUpdate, as its name suspects, is the utility to update Mac Internet Security , it is possible to define how the updates will be searched
Step 1
By clicking there we will see the following. We can check the updates immediately, hide the Intego pop-up menu or access the preferences.
Step 2
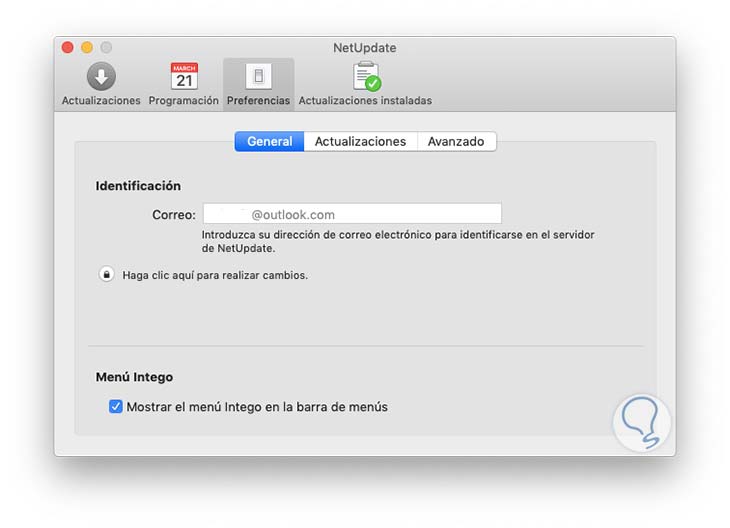
In the General tab we can edit the associated email as well as see the menu.
Step 3
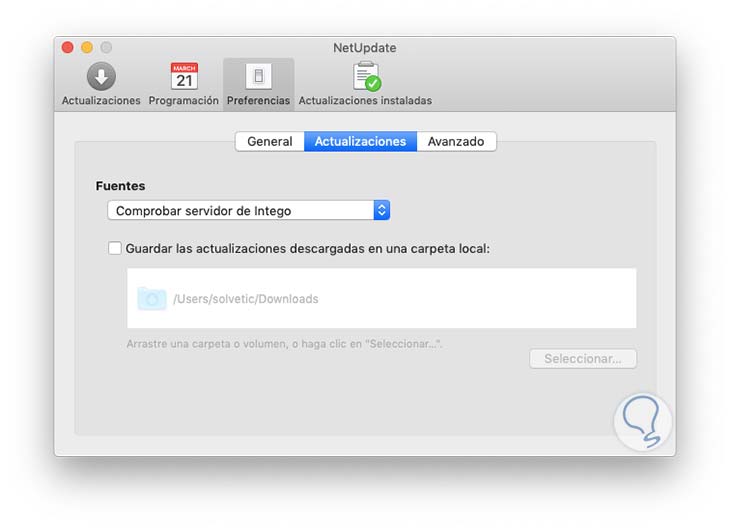
In the Updates tab we can check the sources as well as define where the downloads made will be hosted:
Step 4
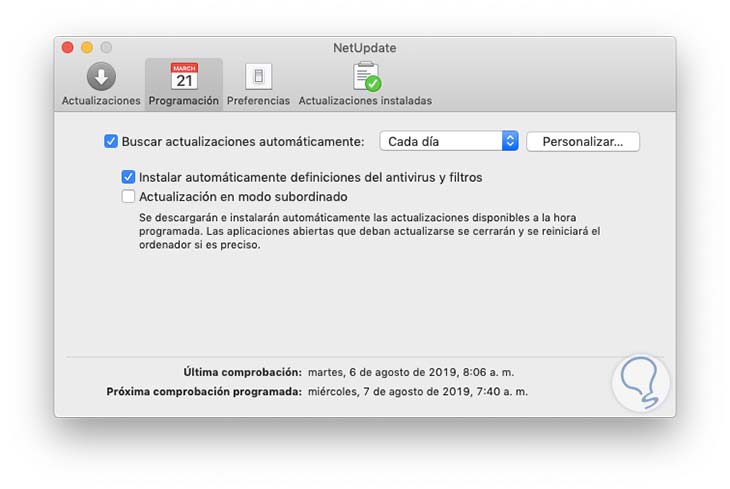
In the "Advanced" tab we can activate the notifications. In the Programming tab it will be possible to define the frequency with which the updates will be searched as well as to apply the updates automatically:
In the tab “Updates installed†we will see which ones have been installed.
4. How to use NetBarrier on macOS
The time has come to know in depth how to use NetBarrier in macOS.
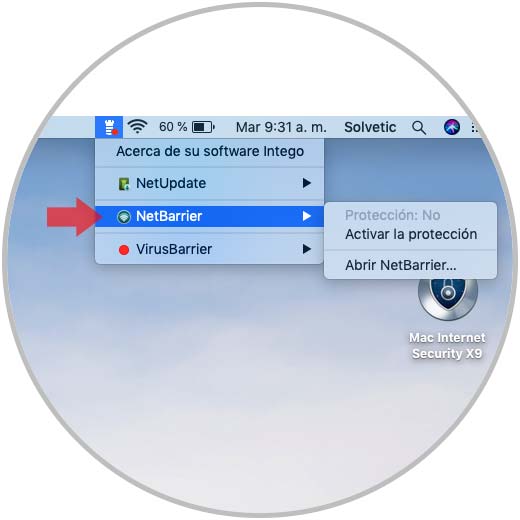
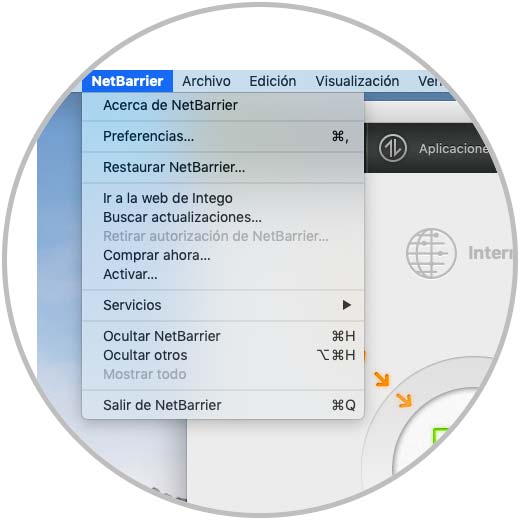
Step 1
To do this we click on this option and see the following. We click on the “Open NetBarrier†line to define the profile.
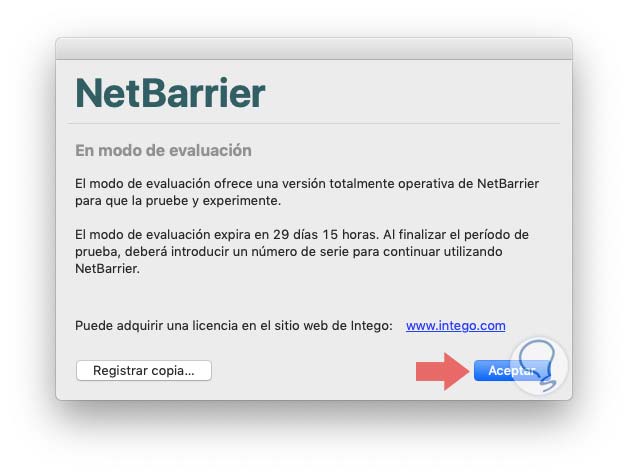
Step 2
Before this we will see the following message. There it is indicated that we can use the copy version or register it. For this case we click on Accept.
Step 3
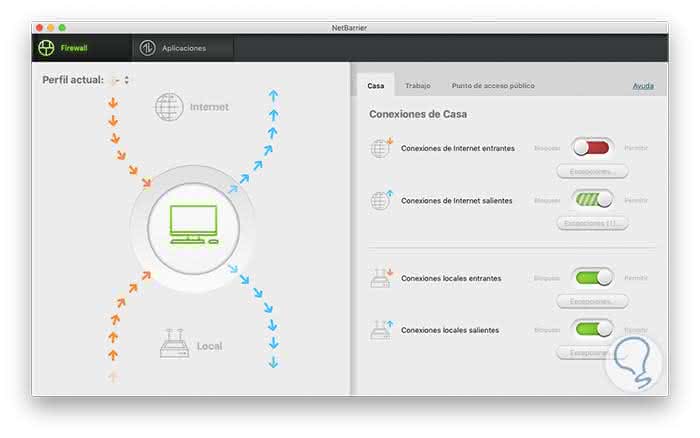
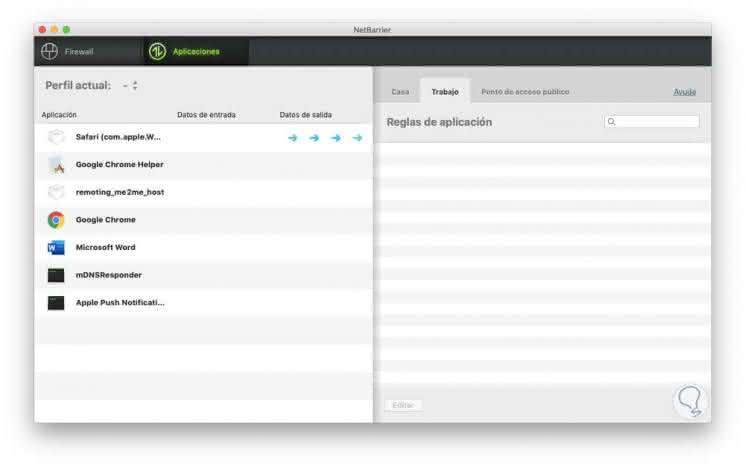
We will be redirected to the NetBarrier environment. As we see on the right side, we find the different profiles to use (Home, Work or Public Access Door).
We can see the way, in this case with the Home profile, the workflow of each active application (incoming and outgoing) and as you can see we are located in the Firewall tab, there we have two categories on the right side that are:
- Internet connections (external)
- Local connections (Internal)
Step 4
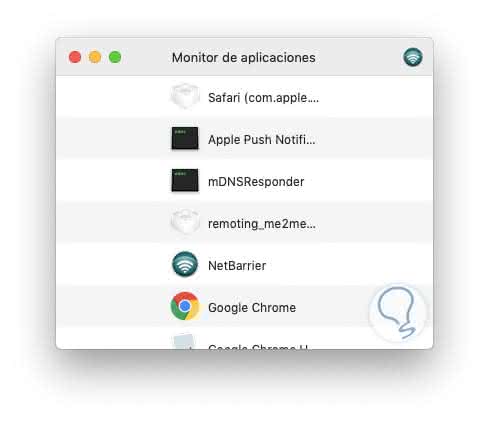
A pop-up window called “Application Monitor†will automatically open where we see each of the active apps in real time:
Step 5
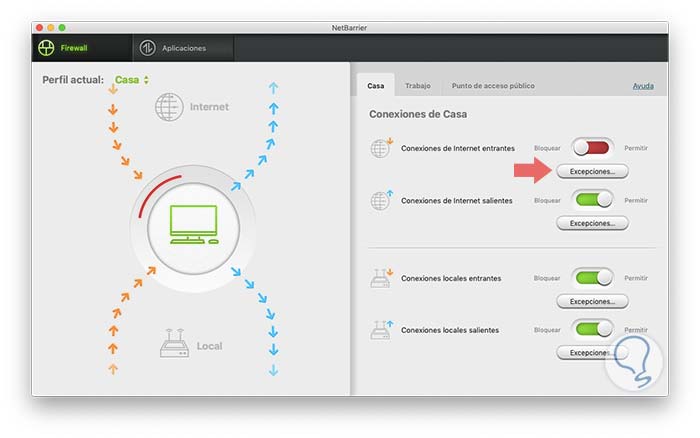
Back on the NetBarrier board we can see that there is an opportunity to create exceptions for the programs:
Step 6
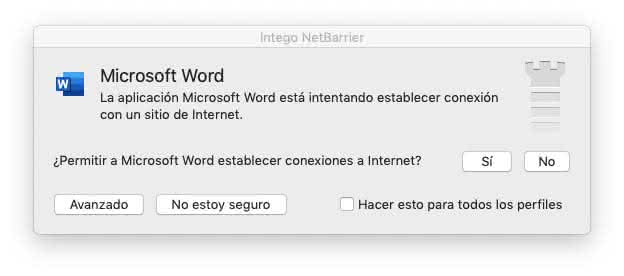
When activating NetBarrierX9 protection, when we open a new application we will be notified about whether or not we authorize access to the network of this:
Step 7
We define the respective permissions, but as mentioned, it is possible to add exceptions. For this we click on the Exceptions button according to the desired profile, the following will be displayed:
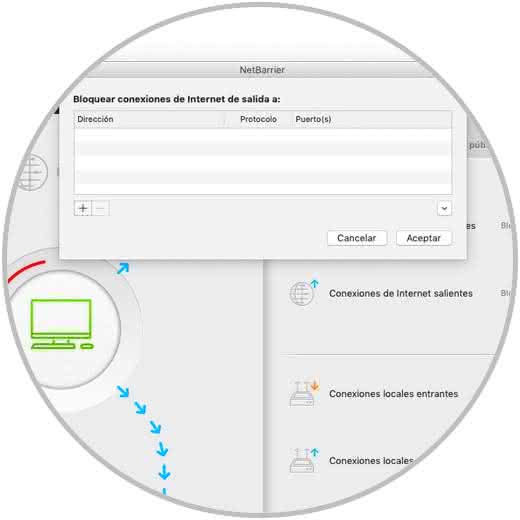
Step 8
There we click on the + sign and specify the URL or domain to create:
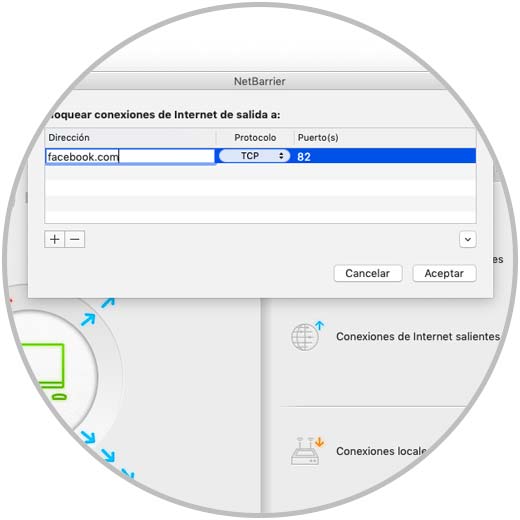
Step 9
The ausar port and protocol is automatically activated, we click on Accept and on the Exceptions button we will see the number of sites added in number:

Step 10
In the "Applications" tab we will see the active applications and programs with details of the use of bandwidth and transmitted data:
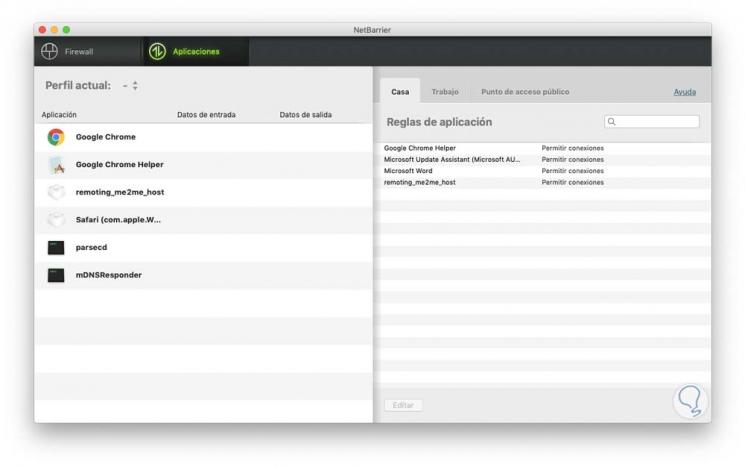
Step 11
This allows us to manage direct control over each application. In each profile we can see the type of action executed (input or output):
Step 12
From the NetBarrier menu it will be possible to perform actions such as:
- See details of the application.
5. How to use Virus Barrier X9 in macOS
VirusBarrier X9 is one of the most used and reliable utilities to have a secure environment in macOS.
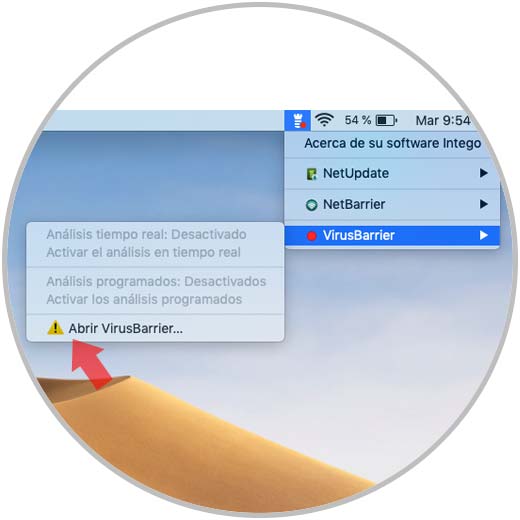
Step 1
To use it, click on this option and select "Open VirusBarrier":
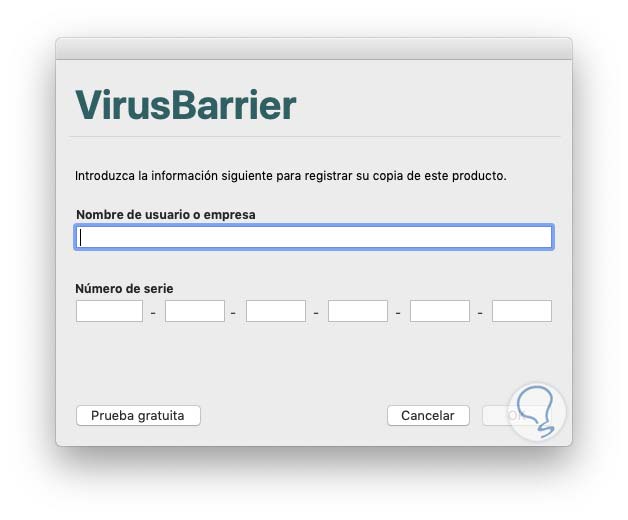
Step 2
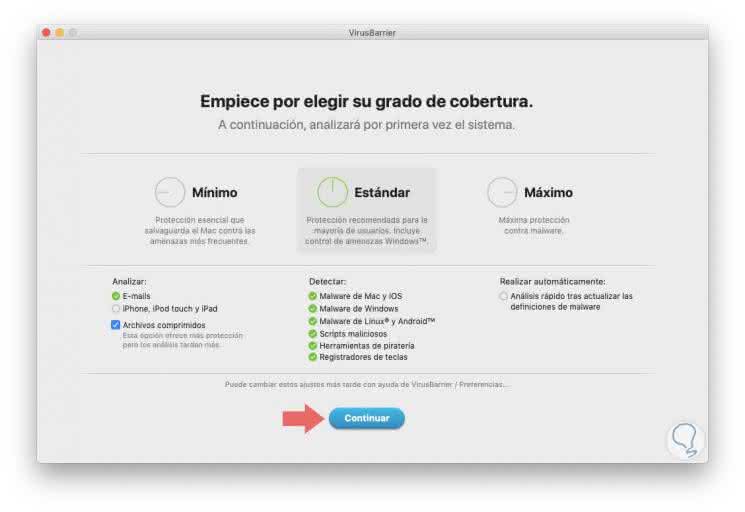
By clicking there we will see the following. We can register the copy or use the free trial. We click on Accept and now we will define the level of coverage to be used for protection:
Step 3
As we see each level offers multiple types of protection. By default the selected level is “Standardâ€, we click on Continue
Step 4
We will see a brief explanation of the board:
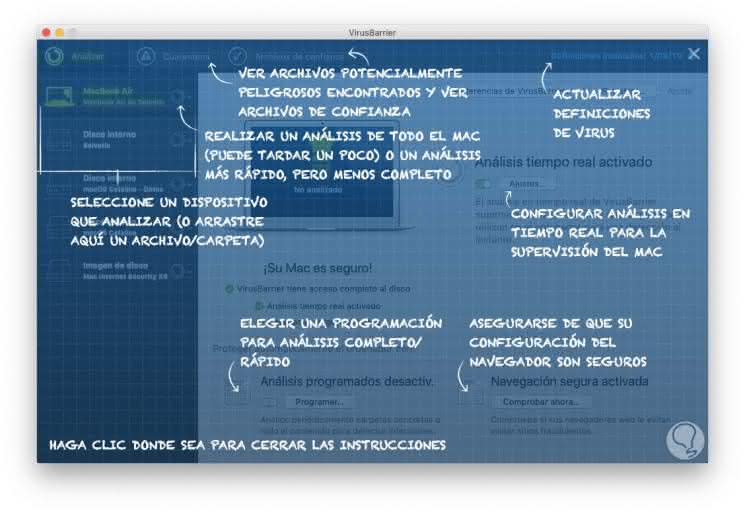
Step 5
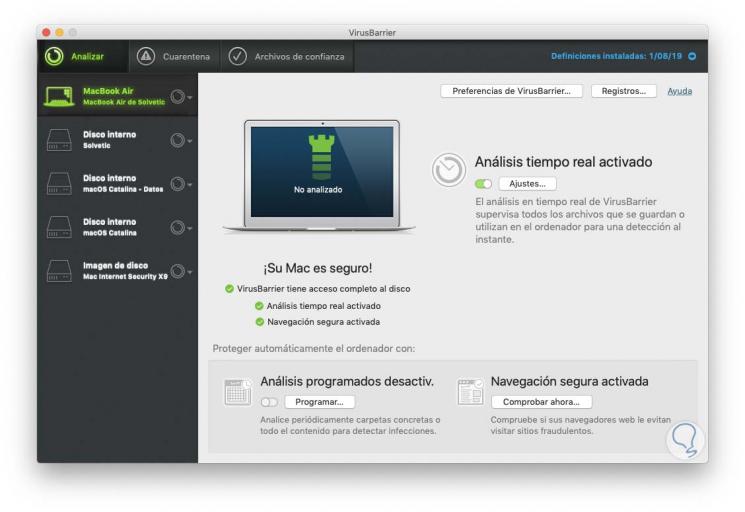
We close the wizard window and this will be the administration board of VirusBarrier X9:
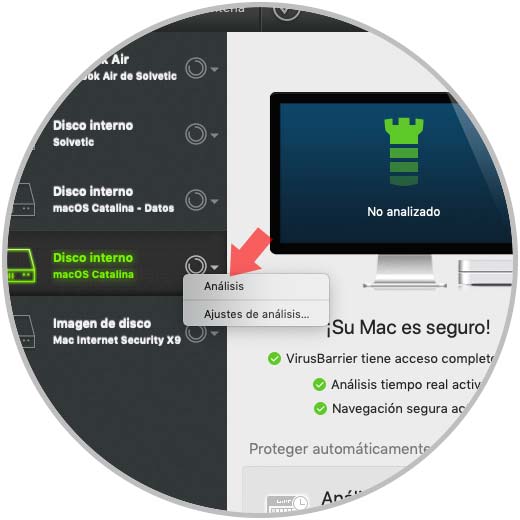
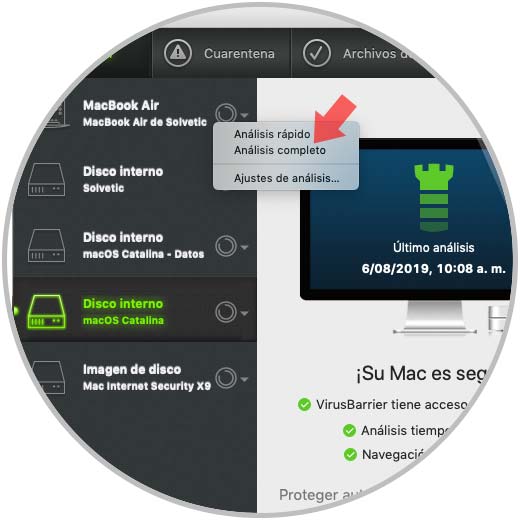
Step 6
On the left lateral side we find all the units and partitions of the equipment and on the right side we see the options of use, to execute the analysis we select the disk and click on the lateral icon to select the “Analysis†option:
Step 7
Clicking will proceed to the analysis of the selected unit:
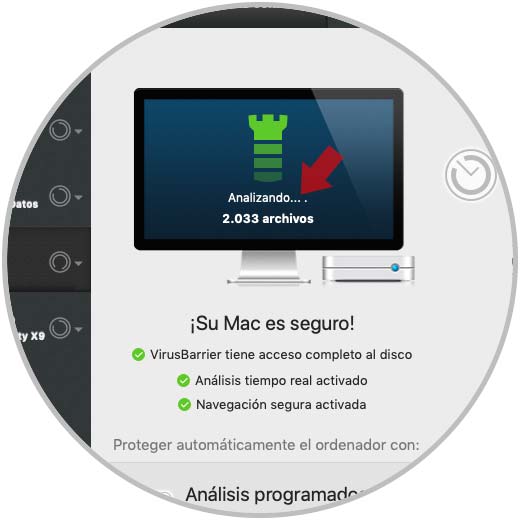
Step 8
Once the analysis process is finished we will see the following:
Step 9
To take into account, when we select an independent unit, only the “Analysis†option will be active but if we select the entire disk we can use either the full analysis or the quick analysis:
Step 10
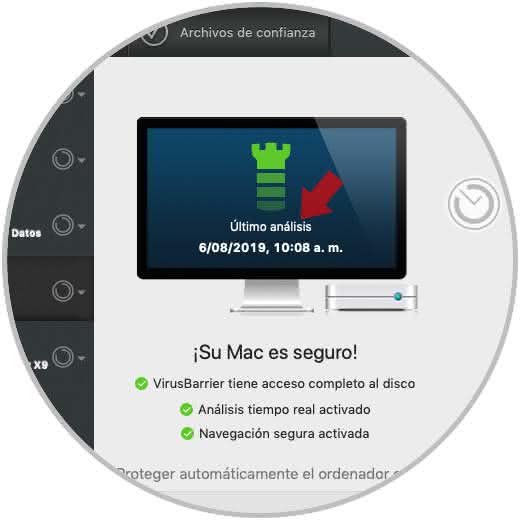
Once the analysis concludes we will see the status of the equipment whether it is safe or not safe. From the central panel we have the following options:
- Analysis in real time, there we can activate the switch so that the analysis is executed constantly.
- In the Programmed Analysis section we can configure a specific day to execute the analysis.
- Safe browsing allows us to protect web browsers
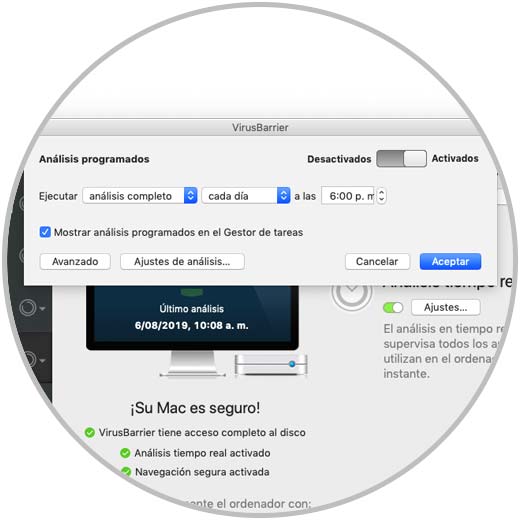
If we choose to use the "Scheduled Analysis" option we will see the following where we must activate the switch and define values ​​as
- Type of analysis to execute.
- Keep a record of the analysis.
Step 11
If we use the "Safe Browsing" option, we must define in which browser (if we use several) the analysis should be performed:
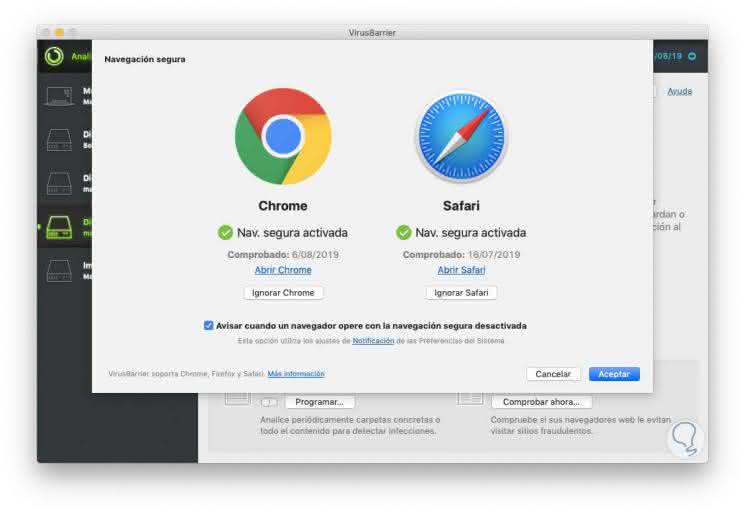
There we can click on the "Ignore xxxx" button to discard that special browser, then click on OK to run the analysis in the background.
Step 12
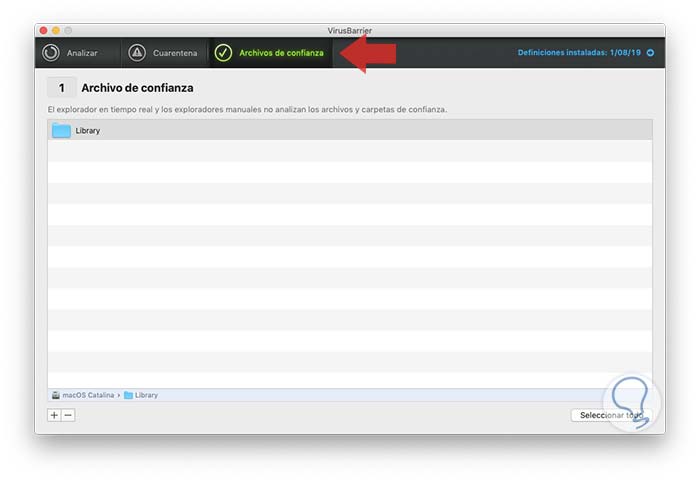
In the "Quarantine" tab we can see the files that have been detected and in the "Trusted files" tab we can add the files or folders that will be omitted from the analysis:
Step 13
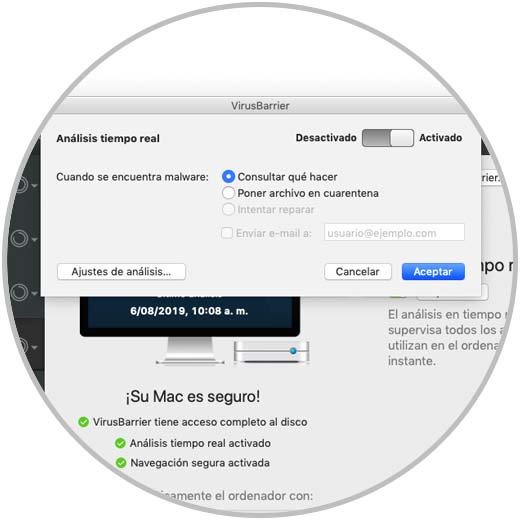
In the "Real time analysis" section we find an option called "Settings" which, when opened, offers the following. There are offered what to do when a threat is detected, the options are:
- Consult what to do: this option applies at the time of virus analysis with the "attended" method, with this option, if we do not respond to the alert message in the range of one minute, VirusBarrier X9 will host that infected file in the quarantine area .
- Quarantine file: this option is responsible for preventing the file from being able to open or read.
- Try to repair: this option causes VirusBarrier to remove the malware, but if this is not possible, the file will be sent to quarantine.
At the bottom we find the option "Send e-mail to" which allows us to receive a notification when a threat is detected.
Step 14
From the VirusBarrier menu we find the Preferences option where we have three tabs that are:
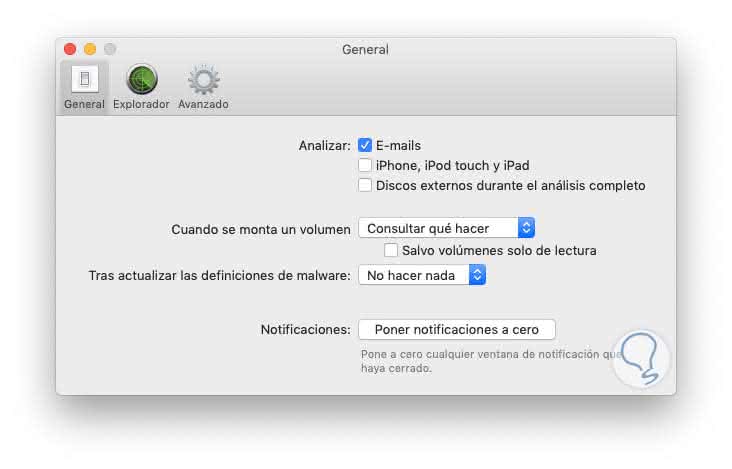
General, there we can determine which coverage area will be analyzed such as emails, mobile devices, disks, etc.
Define the action to take when setting up an undiad, define what to do after an update and more:
Step 15
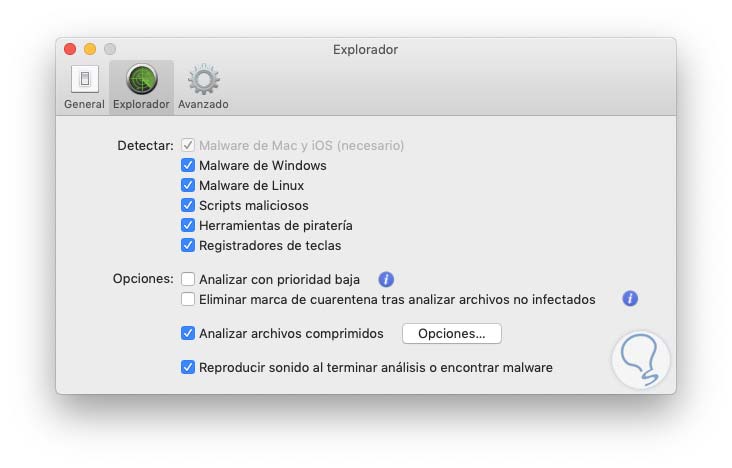
In the Explorer tab we will define what type of threats will be analyzed by the utility as well as the type of files:
Step 16
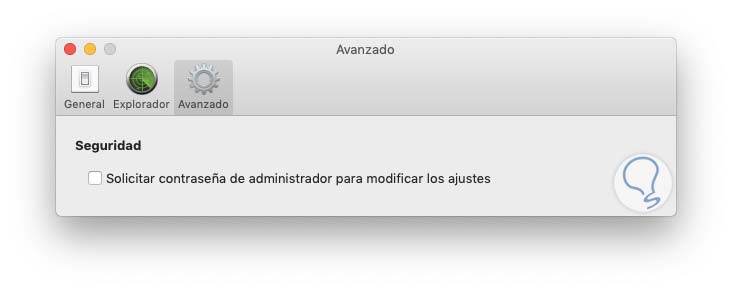
In the Advanced tab we can activate the use of password for any adjustment to be made:
TechnoWikis has explained in detail how to install and use Mac Internet Security X9 on macOS and without a doubt you will have a more secure and reliable system.
OFFER 60% DISCOUNT! Mac Internet Security X9 Antivirus License
Exclusive offer for TechnoWikis users, where you can buy Mac Internet Security X9 antivirus license at an unbeatable price that will last only a while. Do not miss it!
OFFER 63% DISCOUNT! Mac Premium Bundle X9 Antivirus License
Exclusive offer for TechnoWikis users, where you can buy a Mac Premium Bundle X9 antivirus license with some more features at an unbeatable price that will last only a while. Do not miss it!