All of us, or at least a high percentage, have a computer in front of us every day . We use these devices to work with them or to perform other types of activities important to us. However, many times we do not understand what exists behind each system. It is true, we know that it is integrated by processes but there is a special parameter that makes each device unique and is the file system..
The file system is available on all operating systems used today, is part of the hard drive and its task is to manage and manage the memory of the drives available on the computer. Within this task we have the allocation of the necessary space for each file, execute the order of the same and authorize that the access to them is correct. In addition, the file system allows you to control the free space in the storage units.
A file system, like everything in the IT world, has advantages and limitations based on the operating system used but today in TechnoWikis we will talk about one in particular that is being integrated into the new macOS systems and is the APFS file system..
What is the APFS file system
APFS (Apple File System) is available as of macOS 10.13 edition (Mojave) and has been developed in such a way that the work and control of the units will be a task not only simpler but also safer since APFS has been integrated with a strong encryption system, new snapshot management, improvements in space distribution, new options for editing the current directory size and many more functions.
Advantage
Some of the advantages of using this file system in macOS are:
- Improvements in hard disk partition management.
- Latency reduction to access data.
- High processing speed capacity since APFS is able to work with up to 9 trillion data simultaneously.
- APFS is designed for solid state memories.
- Compatible with full disk encryption as well as individual files and metadata.
We have mentioned that APFS is designed for SSD solid state drives but this does not mean that we cannot implement it in traditional HDD hard drives. Obviously some of its characteristics will be affected but it is not something that makes us lose our minds.
Let's explain a little how APFS works. The first thing to understand is that APFS is responsible for allocating a space directly on the hard disk but does so in a container that requires it. This allows that space that is free can be used for the other volumes marked as individual in the container if they require access, this optimizes the speed of reading and writing the data on the disk..
Available options
APFS has the following options in macOS:
- APFS: this parameter makes use of the default APFS format.
- APFS (encrypted): if we apply this option, the APFS format will be used while the selected volume is encrypted.
- APFS (uppercase / lowercase): with this option we use the Mac format but this will differentiate uppercase and lowercase in the names of files and folders.
- APFS (uppercase / lowercase, encrypted): Like the previous one, this parameter uses the APFS format, it is case sensitive for both files and folders, but it will additionally encrypt the volume we have selected.
Now you will learn how to create an APFS volume in macOS.
1. How to create an APFS container in macOS
Step 1
Access to Disk Utility. For this process we have the following alternatives:
- First, go to the Go / Utilities / Disk Utility menu
- Use the key combination Shift + Command + U and then select the utility
Step 2
To create our container, we select the hard disk in the Disk Utility and click on the + sign located on the “Volume†line at the top of the utility:
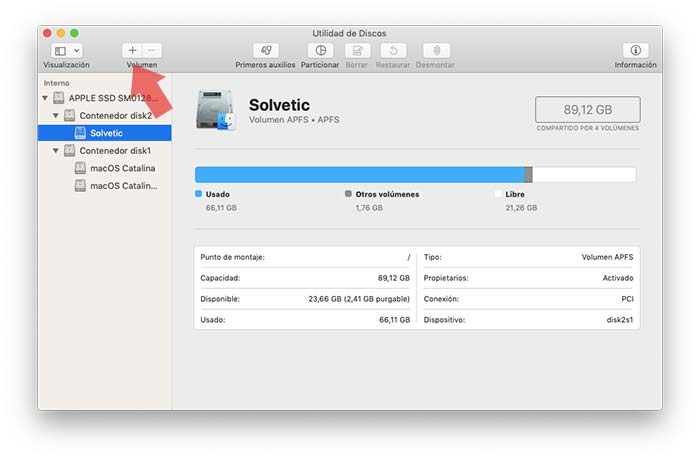
Clicking there will display the following window where we define:
- Format to use, there logically we select APFS
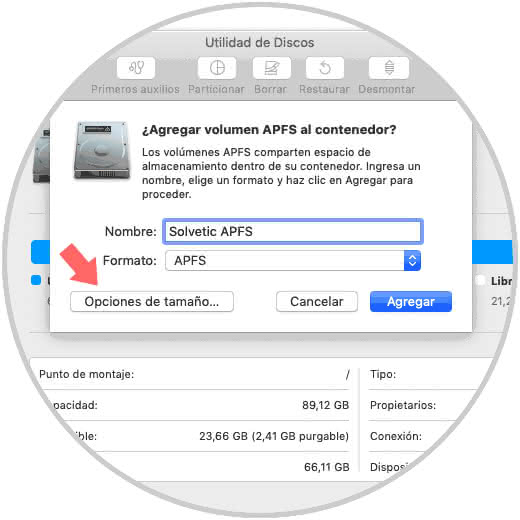
Step 3
In the "Size options" field it will be possible to set a custom size for both the disk reservation and the current user quota
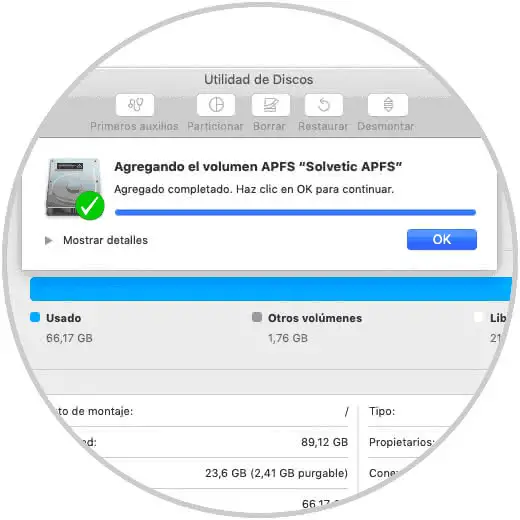
Step 4
We click on the Add button for macOS to carry out the process of creating the new APFS volume:
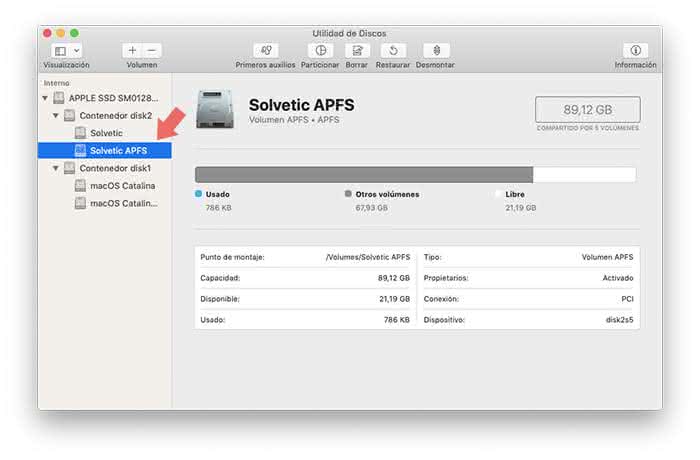
Step 5
Click OK to exit the wizard and now this new APFS volume will be available in the system disk utility:
2. How to create a macros APFS partition
We have seen how to create an APFS volume in macOS but now it is time to learn how to create a partition in that volume, this will help us to better manage the space for each requirement.
Step 1
To create an APFS partition, we first select the volume on which that partition will be created. At the top we find the option “Partitionâ€
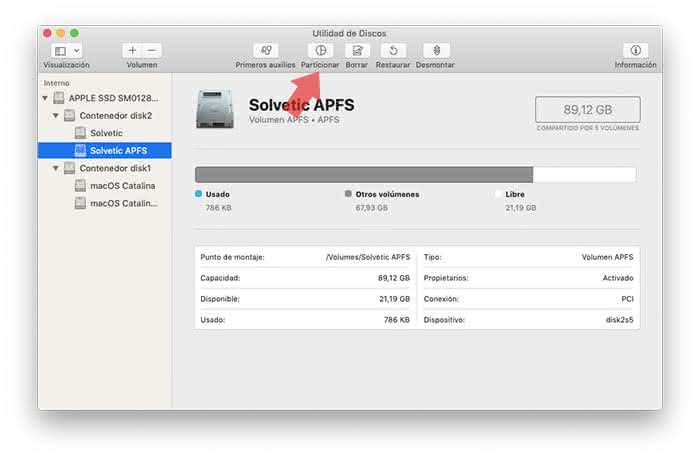
Step 2
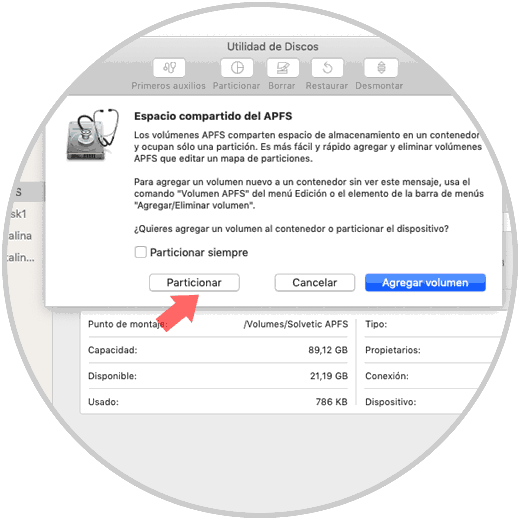
At the moment of pressing it we will see the following. There it is recommended to create a volume for the management that APFS makes of the spaces but we will still create our partition, click on the “Partition†button
Step 3
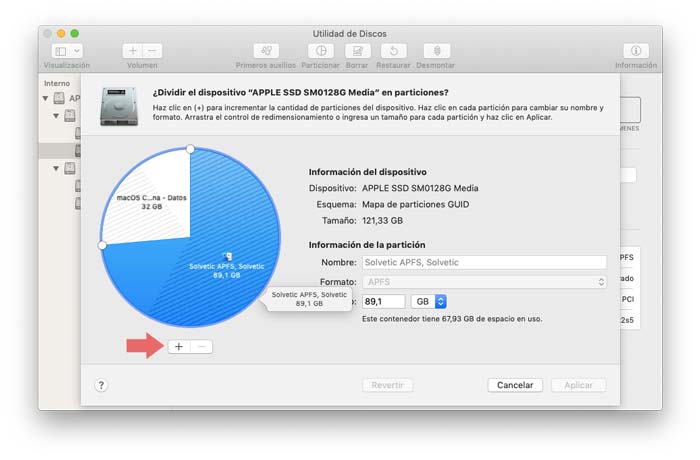
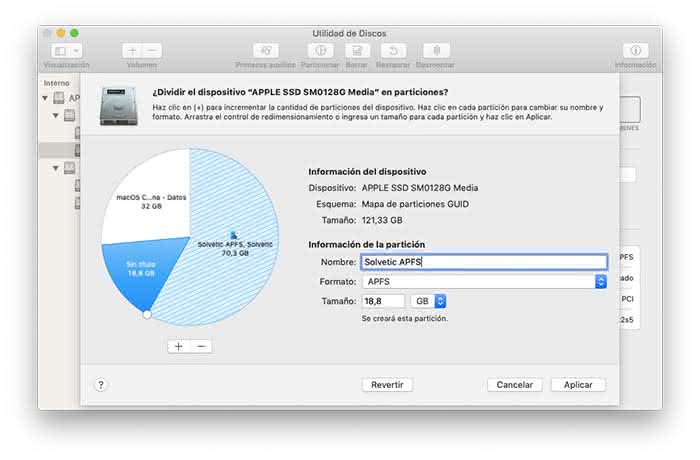
The following will be displayed. To create our partition, we click on the + sign and then assign the name for the partition as well as its size.
Step 4
Logically we select APFS as a file system. Once we define this we click on “Applyâ€
Note
The size can be assigned by entering it directly in the Size field or by using the slider bar.
Step 4
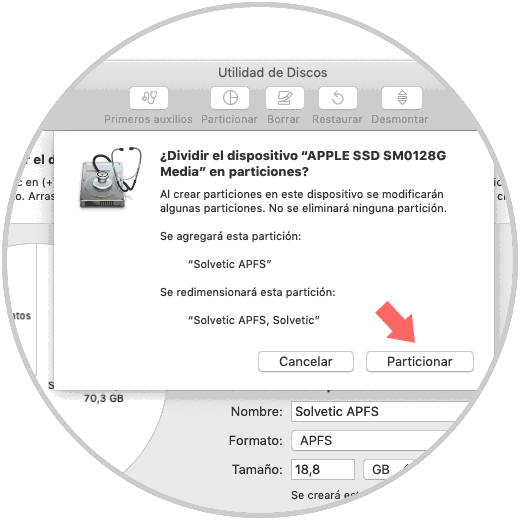
The following message will be displayed. There we confirm the task by clicking on “Partitionâ€
Step 5
We will see the following warning:
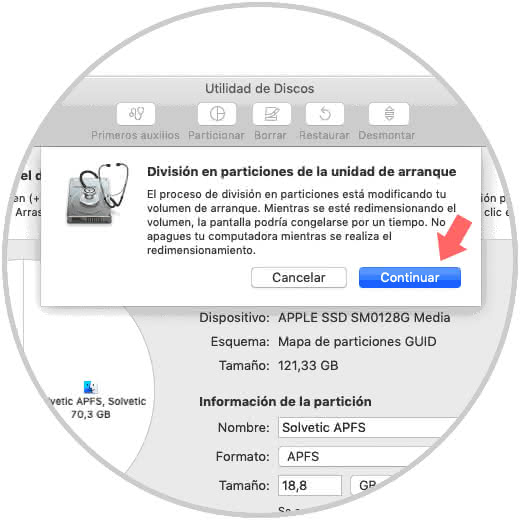
Step 6
This is because the partition influences the boot of the disk, we confirm by clicking Continue and macOS will be responsible for creating the partition based on the requirements we have defined:
Step 7
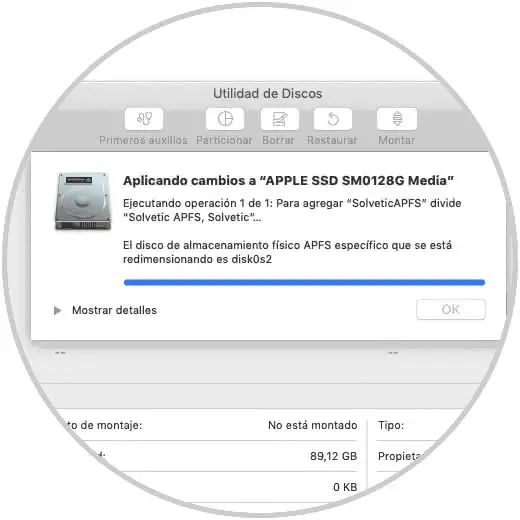
When this process ends we will see the following:
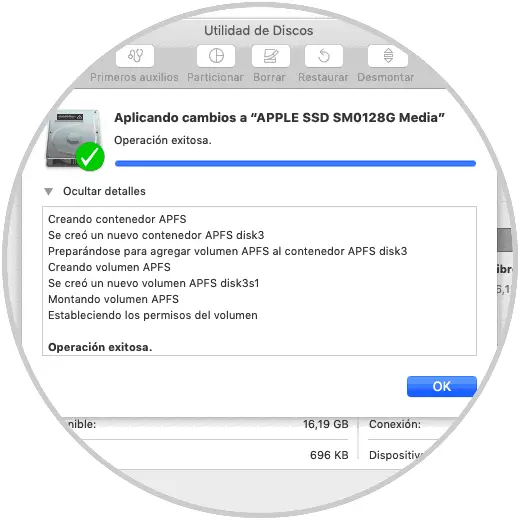
Step 8
We click OK to exit the wizard and verify that our partition has been created correctly:
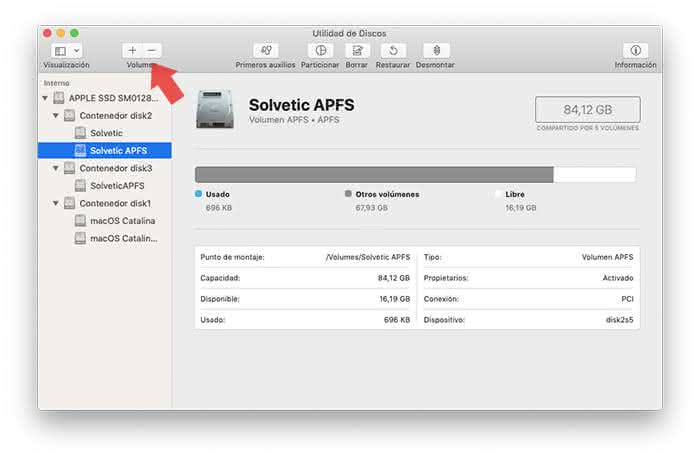
3. How to delete an APFS volume in macOS
Step 1
To delete an APFS volume in macOS is very simple, for this we go to Disk Utility and there we select the APFS volume to be deleted. Now we click on the sign - located in the Volume section.
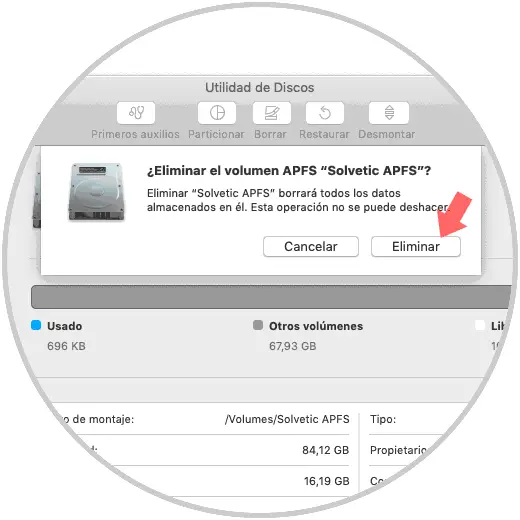
Step 2
The following message will be displayed. There we confirm the action and as we can see all the data hosted there will be deleted
Step 3
Confirming will result in the removal process of the selected APFS volume:
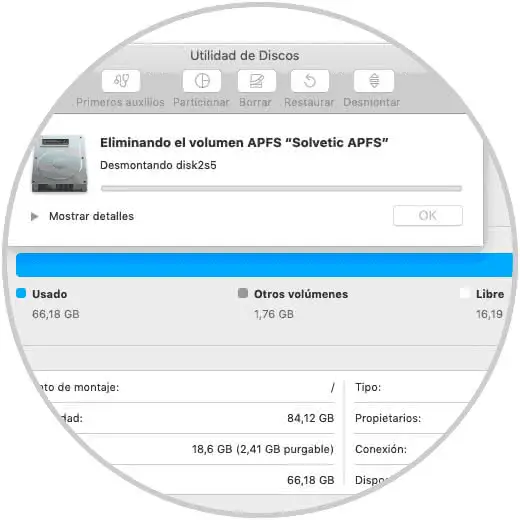
Step 4
When this action concludes we will see the following message:
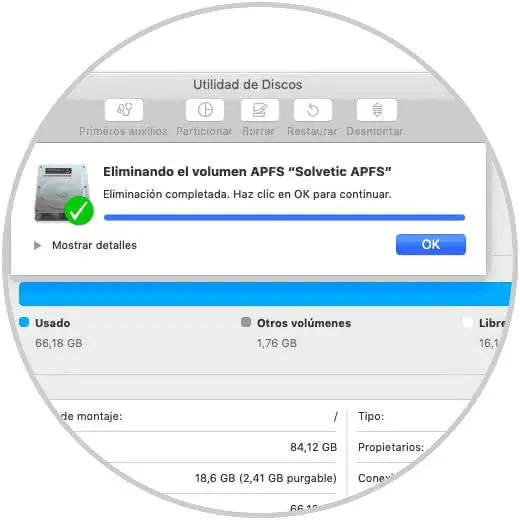
Click on Ok and thus we have eliminated the APFS volume in macOS.
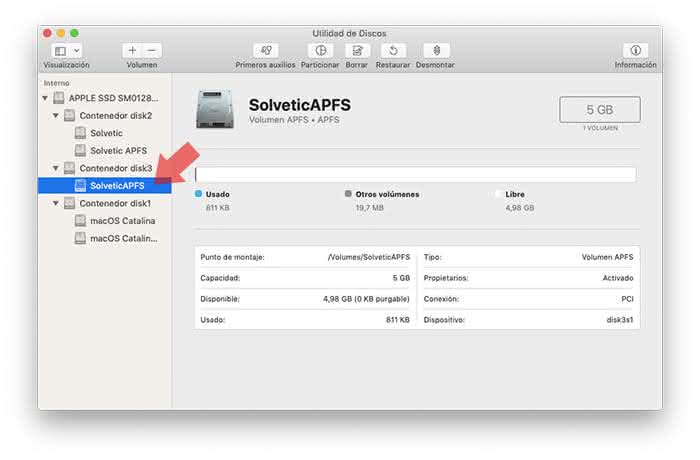
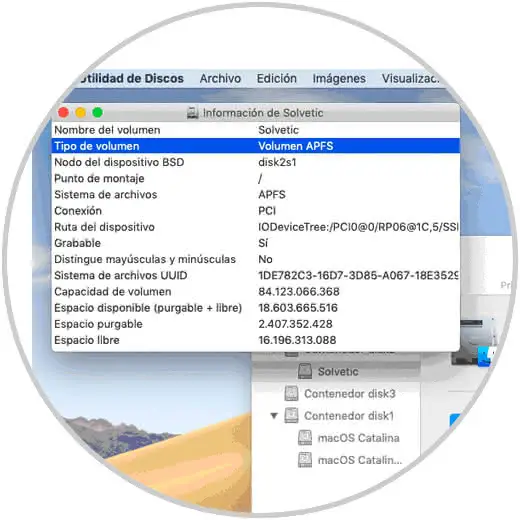
How to check if my volume is APFS
If you want to be sure if you are with the APFS file system you can do it in two simple ways:
- From the Disk Utility select the volume and at the bottom of it you will find the file system used.
- Selecting the volume and clicking on the “Information†icon located in the upper right corner of the utility and then see the “Volume type†or “File system†line
We have learned what APFS is and how to create or delete a volume or partition with that file system.