With the release of iOS 4.2.1 a few days ago, we found a small unpleasant surprise; For the first time in our case, a 'normal' iTunes update, on a factory-free iPhone 4, was failing , leaving the iPhone in recovery mode; Any attempt to restore from iTunes always gave the same unknown error 1013. Without a doubt, iTunes is the weakest link in the entire iOS and iPhone ecosystem ... not because it fails a lot (which it does) but because there is a total and absolute lack of documentation that borders on Apple's lack of respect towards your customers. "Unknown error" and a number is the most common iTunes error. Very few times have we seen an iTunes error that was known - but this is not the case of this entry, but how to get around the problem of the error that you see below and that unfortunately has become very popular with the arrival of this latest version of iOS.

In all the experience we already have with the iPhone, we have never found a case in which a restoration did not work; If something goes wrong, and the iPhone is in recovery mode - it should always be possible to restore . This is the golden rule, beyond that later it cannot be activated if we do not have a SIM card of the operator for which it is blocked, or beyond that a Jailbreak cannot be done. Any iPhone must be able to be restored. But in this case it was not so; After the update failed, the message above appears that there has been an unexpected error 1013. The more information button leads to an Apple website in which they recommend a series of actions to restore the terminal, but all restorations end with the same result: error 1013. The result is a factory-free iPhone 4 with the iTunes logo that is unable to boot. We tried everything ... install the latest version of iTunes again, download the iOS firmware file separately to install it manually ... and nothing. It never came out of error 1013. Something, honestly, unacceptable to the heights we are now. As it has happened to many people, we publish here how we solve it, and what other ways are there to solve this problem.
In our case, we had another Mac on hand; Since it was a failed update that happened to be a restoration, all the content of music and apps, messages etc. from the system was deleted. So we decided to connect it to another iTunes on another Mac, and let it restore iPhone 4 by downloading the new iOS itself. He did it and this time ... it worked . The iPhone came to life, albeit empty; We disconnected it from there to connect it again to the iTunes where we synchronized it, and after two hours copying all the music, apps, settings etc that we had stored, everything worked again, with the latest version of iOS installed. The end result was an update that took us 4 hours and a lot of nerves.
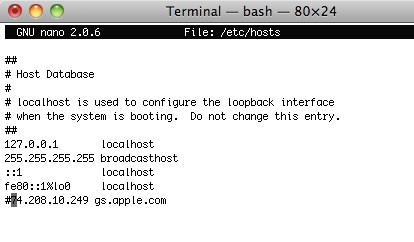
After doing some research on the matter, we saw that this bug has caused quite a lot of complaints on the Apple support forums , and we also found a solution that requires a bit of Terminal in the recipe. The cause: We had configured a redirection of the domain that iTunes uses to verify that a firmware is legitimate to a Saurik server, something that is done when you need iTunes to allow a downgrade (although it no longer works). The solution ... edit that file and comment on that line so there are no problems.
1. Open Terminal (looking at the magnifying glass icon at the top right of the screen).
2. We type the following;
SUDO NANO / ETC / HOSTS
It asks for the administrator password. We type it and press enter - it is normal that it does not appear on the screen (it is done this way for security reasons). This will open the text editor with the administration user, and permissions to modify the hosts file, which is the cause of this problem.
3. Using the keyboard arrows, go down to the line where it says gs.apple.com and place the cursor in the first position. There, we type # so that it looks like the image below;

4. We press Ctrl + O (not a zero, but an O) and Nano will ask us if we want to save / etc / hosts - we press enter and we return to the editor. Then we press Ctrl + X to exit it.
5. Close Terminal, go to iTunes and click on the restore button again. Now, it should no longer give error 1013 and the iPhone should be restored (although empty) - iTunes asks then if we want to copy everything that we had before on the iPhone - we choose the name from the list and give it the green light. In a few hours (depending on how full your iPhone is) you will have the iPhone restored and like new.