Many times you will have noticed that you need to send several files at the same time or use them on other computers but you do not want to copy all the elements since this could be a visual disorder or the size of these is not within the ranges established by the program..
For this, you should not worry because there is a solution for several decades and it is nothing more and nothing less than using ZIP compression for this. It is true that compression helps to reduce the original size of the files but we can go much further than this and establish security measures such as passwords, exclude files and more tasks that can be very useful in your daily work.
The files that carry the .zip extension refer to files that contain different objects within them in order to maximize their size and mobility. Its operation basically consists of reducing the total number of bits and bytes of a file and thus facilitating the sending of it through slow Internet connections or taking up less space on the hard disk..
However , in Linux environments it is natural to use compressed files with the extensions .tar.gz and tar.bz2 but since we work with more people, they can send us some .zip file to work together and therefore it is more than necessary to learn to manage and use this type of files in Linux. This way we will always be one step ahead of the problems that can be generated.
By default in UNIX-based operating systems, such as Linux, we find the zip (compression) and unzip (decompression) functions integrated for these tasks. But to add more possibilities, we have other functions such as zipcloak, zipdetails, zipsplit and zipinfo which we will see later and understand what role they play in Linux..
Distribution facilities
The zip functions are by default in distributions such as Ubuntu 19.04, 18.10 and 18.04 but if you use Fedora 29 you must install them with the following command:
sudo dnf install perl-IO-Compress
If you use CentOS 7 you must run:
sudo yum install perl-IO-Compress
Ready, we have talked enough about compression and now it is time to see in action how to use these tools in Linux, for this case we will use Ubuntu 19.04.
To keep up, remember to subscribe to our YouTube channel! SUBSCRIBE
1. How to create a zip file in Linux
This is the main task to be performed.
Step 1
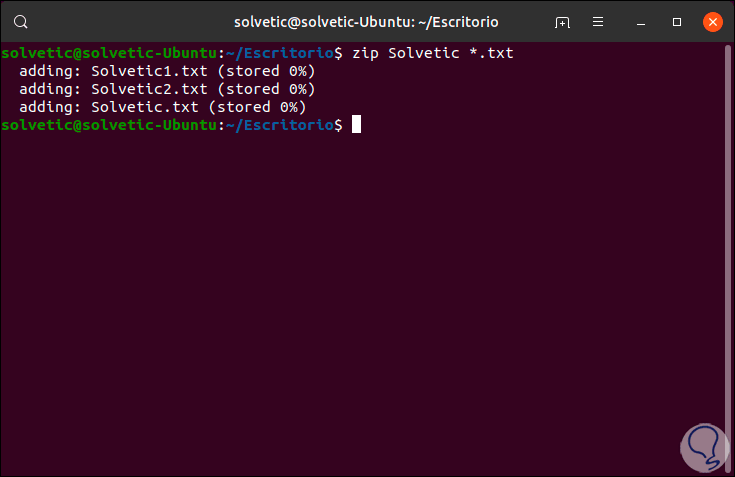
For this case we must assign the name of the file to be compressed (it is not necessary to add the extension .zip) and the files that will be compressed, for this we will go to the desired directory, in this example Desktop, and we will execute the following:
zip TechnoWikis * .txt
Step 2
In this example the TechnoWikis compressed file will be created with all the text files on the desktop, we can add the other extensions of the available elements, for example:
zip TechnoWikis * .txt * .docx
Step 3
There we will visualize the files that have been added to the compressed file and this will be created in the same directory:

Step 4
One point to keep in mind is that if we work with multiple files of different sizes, this command will display the name of the file as well as the amount of compression associated in each file:
Step 5
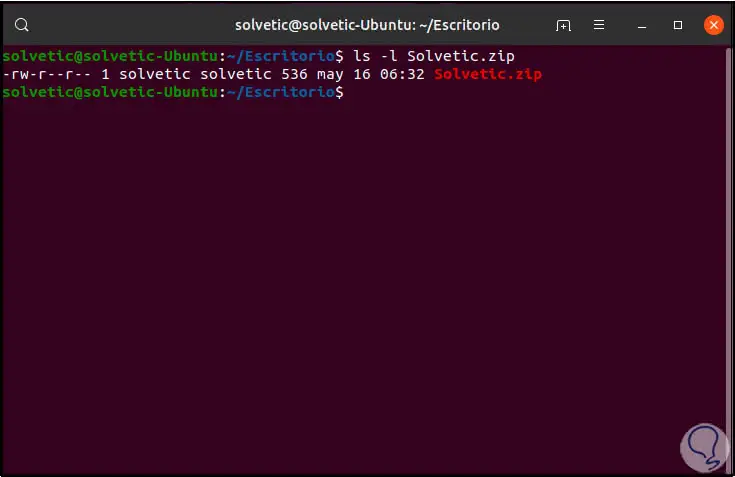
To view the details of the archive created we execute:
ls -l TechnoWikis.zip
Step 6
There we find details like:
- User who created the file
- Homework date and time and more
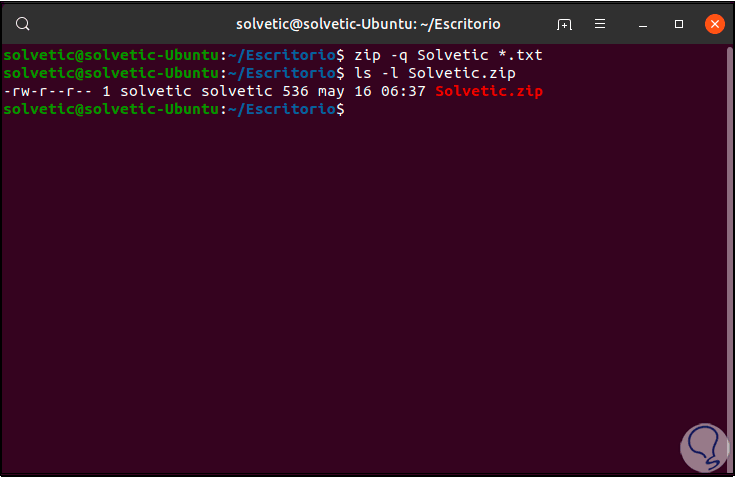
Step 7
Some users will wish not to see the output with the files that were added to the tablet, this because they can be too many, to omit the output with the results, we will add the -q (quiet) parameter like this:
zip -q TechnoWikis * .txt
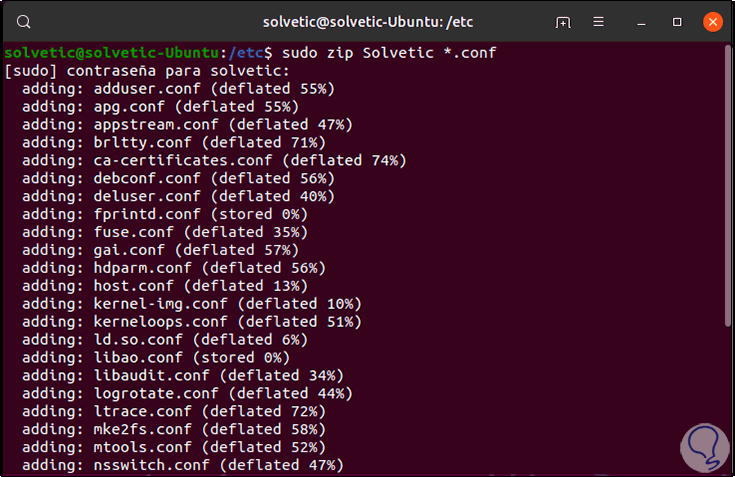
2. How to add directories or subdirectories in a compressed file in Linux
It is normal that when we work in a directory it contains many more subdirectories that we want to add, but the goal is not always to add them all.
Step 1
The zip command allows us to include subdirectories in the file created using the -r (recursive) option and indicate the name of the subdirectory, for this case we will go to the / etc directory and add all files whose extension is .conf but additional to it we will add the subdirectory pm, for this we execute the following in the terminal.
zip -r -q TechnoWikis pm / * .conf
Step 2
We see that the .conf files and the indicated subdirectory were added.

3. How to set the compression level of a file in Linux
When creating a compressed file its base is just that, the compression, in Linux we can use a range from 0 to 9, where the value 0 refers to that no compression will be used and 9 obviously the greatest compression, you must understand that the greater the compression the process of creating the zip file will be more delayed, so if your virtue is not patience use a low value.
By default in Linux the set compression value is 6.
Step 1
For example, if we want to create a file without compression, we will execute:
zip -0 -r -q TechnoWikis * .txt

Step 2
In case of wishing to implement the maximum compression we will use the following.
It is important to specify the compression range to use in the previous command.
The difference between not using compression (level 0) and the default compression (level 6) is 400K while the difference between the default compression and the highest level of compression is 4K.
zip -9 -r -q TechnoWikis * .txt

4. How to add a password to a compressed file in Linux
We arrive at one of the most sensitive points since the security of the files that will be compressed comes into play, we talk about the possibility of adding a password to the zip files in Linux.
Step 1
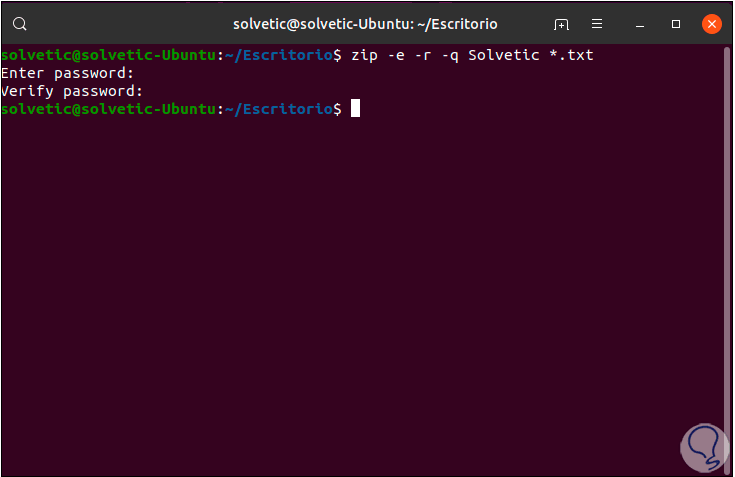
For this, simply add the -e (encrypt) parameter to the line in the terminal as follows:
zip -e -r -q TechnoWikis * .txt
Step 2
Pressing Enter we must enter and confirm the password:
Step 3
Once assigned, at the moment we want to extract the contents of the zip file we will see the following. If we do not have the correct password it will be complex to access the information of the compressed file.

5. How to extract a compressed file in Linux
Step 1
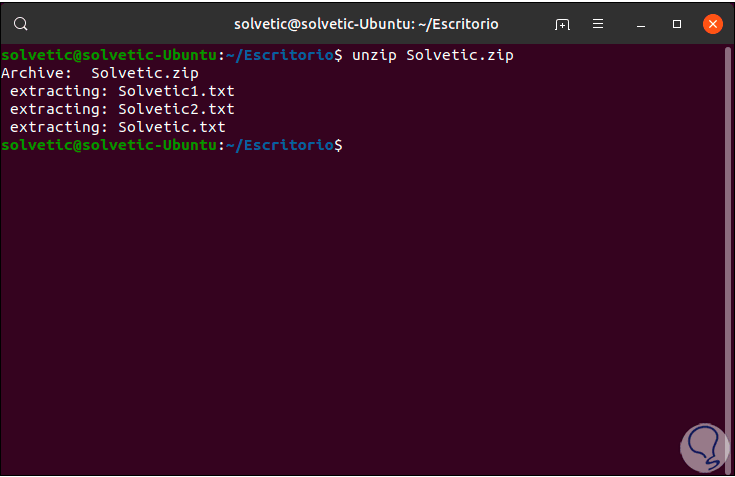
Another of the natural tasks in this type of tasks is to extract the files that have been compressed, for this we must use the unzip command with the name of the compressed file as well. There we can see what files have been extracted and it is important to clarify that the ZIP files do not display details about the ownership of the file, by default all the files we extract are assigned with the configured owner who is executing the extraction task.
unzip TechnoWikis.zip
Step 2
If we do not want to see the files that are decompressed we can use the -q (quiet) option:
unzip -q TechnoWikis.zip
6. How to extract the files in a directory in Linux
Step 1
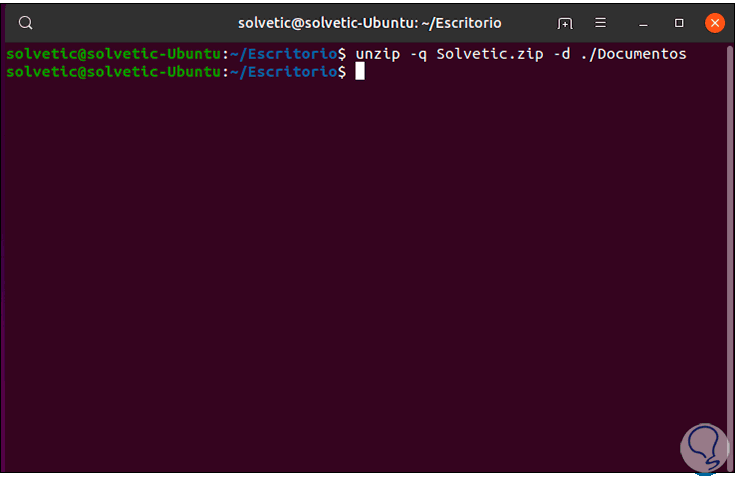
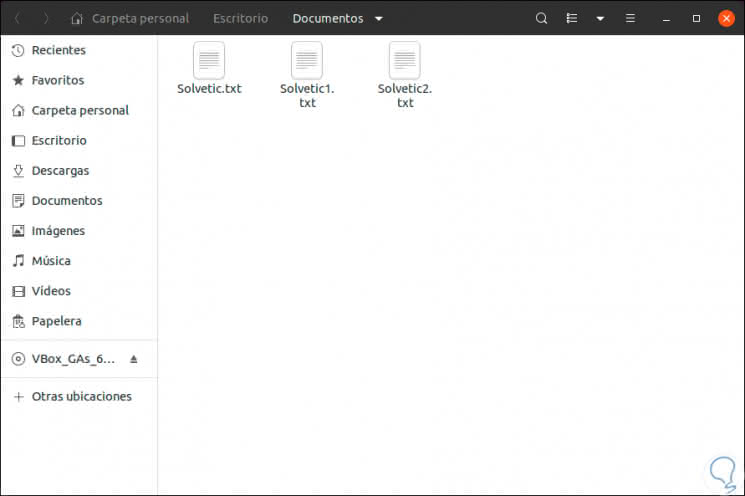
One of the useful options of compression and decompression in Linux is that we can redirect the compressed files to a new directory, this will help to have an order and a better visual presentation of these, for this we will use the -d (directory) parameter, in In this case we will create a new folder called Documents where the files will be extracted:
unzip -q TechnoWikis.zip -d ./Documents
Step 2
As a result of this action we will see the files that have been decompressed in this new folder created automatically:
7. How to extract the password from a compressed file in Linux
Step 1
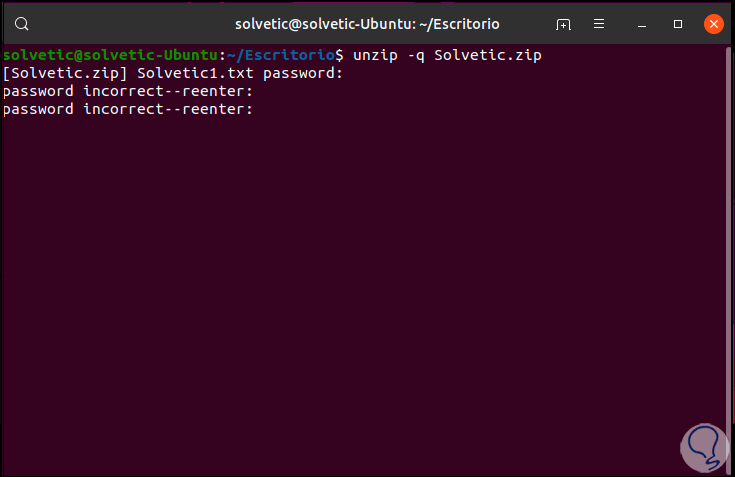
When a password-protected file has been created, when using the unzip command together with the -q parameter, we must enter the assigned password, if this is incorrect we will see the following:
Step 2
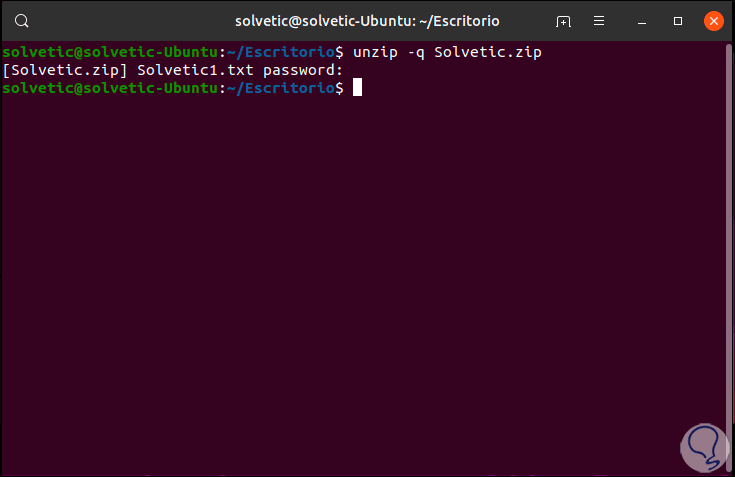
But if we enter the correct password the result will be the following:
Note
If we are in a secure environment where others can see the password or ourselves in case we forget it, we can store it in the system using the -P parameter as follows:
unzip -P “password†-q TechnoWikis.zip
8. How to exclude files from decompression in Linux
Many times when we compress a file using zip in Linux we can host multimedia files such as images, music, etc., system files or office files such as docx, odt, etc., but in the decompression process it is possible to exclude certain extensions and release only the desired ones
Step 1
For example in this case we have .txt and .docx files:

Step 2
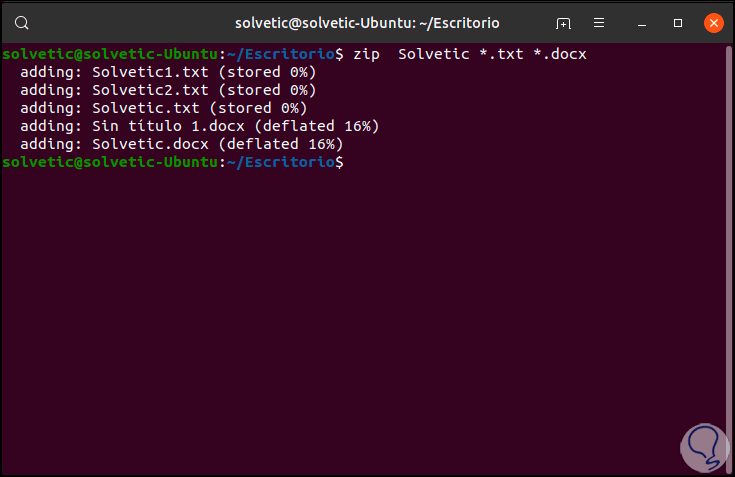
First we will add all these files in one tablet:
zip TechnoWikis * .txt * .docx
Step 3
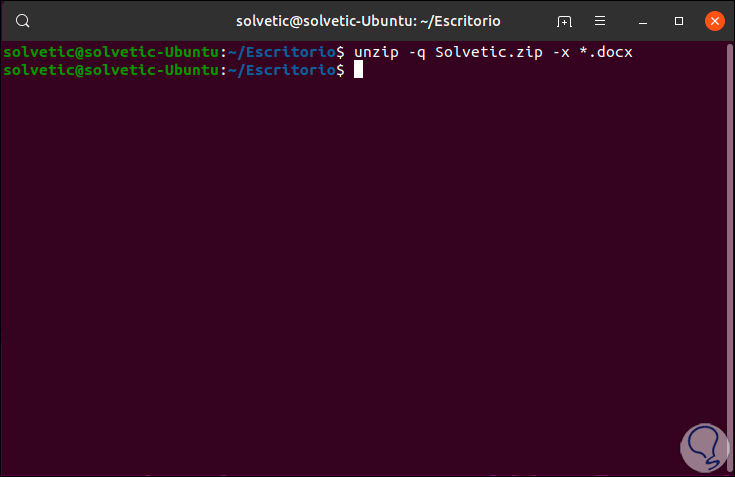
Now we are going to extract the text files (.txt) only, for this we execute:
unzip -q TechnoWikis.zip -x * .docx
Step 4
As a result we will see that only the text files have been extracted:

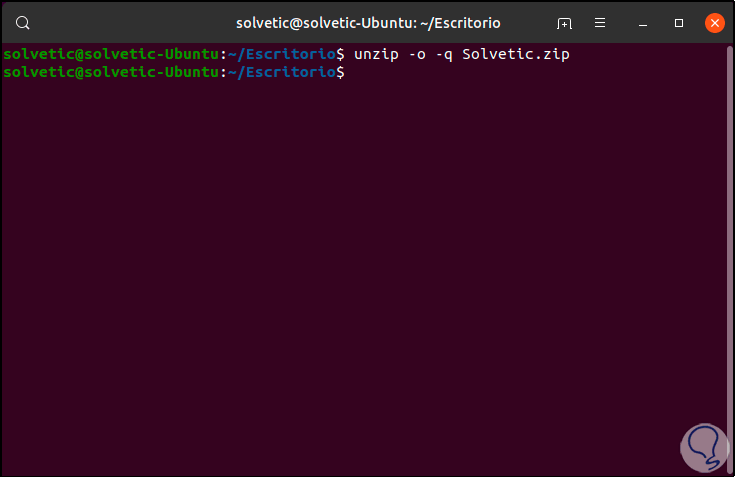
9. How to overwrite files in Linux
Step 1
When we extract a compressed file in Linux, if any of the files came into existence, we will see the following message:
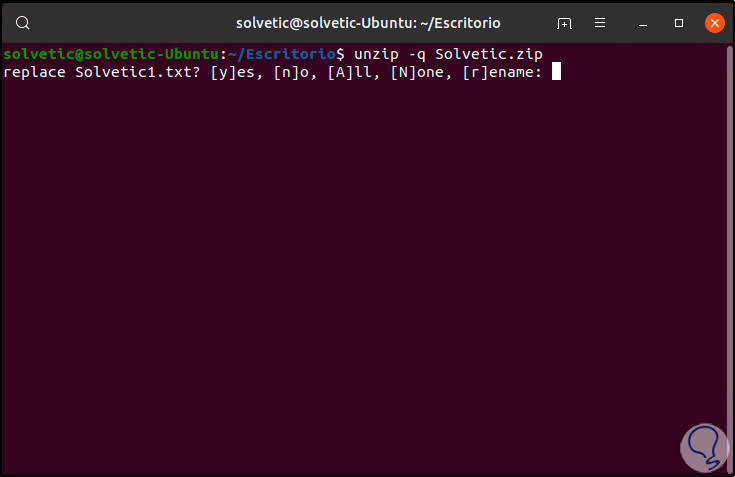
Step 2
The options are:
And it is
Allows you to overwrite the file
y: Yes
Do not
Overwrite the file leaving the original
no no
TO
Overwrite all files
A: All
None
Does not overwrite any of the available files
N: None
Rename
This option extracts the file but it will be necessary to assign a new name
r: Rename
Step 2
If we want to force all files to be overwritten, we will use the -o parameter like this:
unzip -o -q TechnoWikis.zip
10. How to search for text within a compressed file in Linux
Step 1
This option will give us the opportunity to search for a certain file or text within the compressed file, for this we will use the line -l (list archive) as follows:
unzip -l TechnoWikis.zip | them
Step 2
We will see the following:
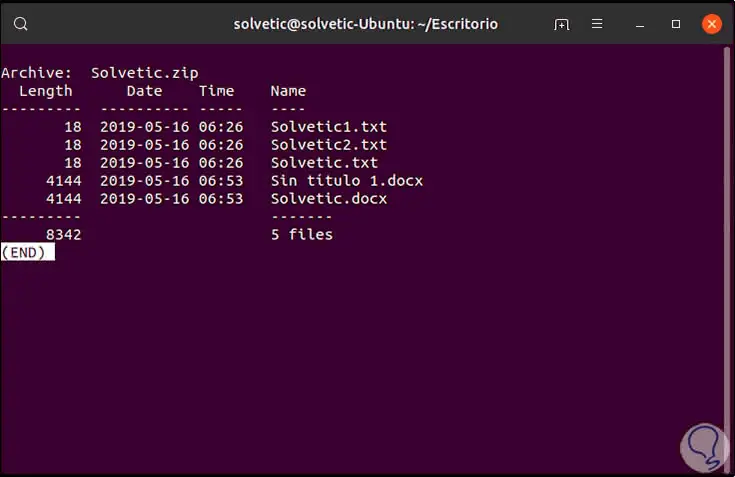
Step 3
There we find details like:
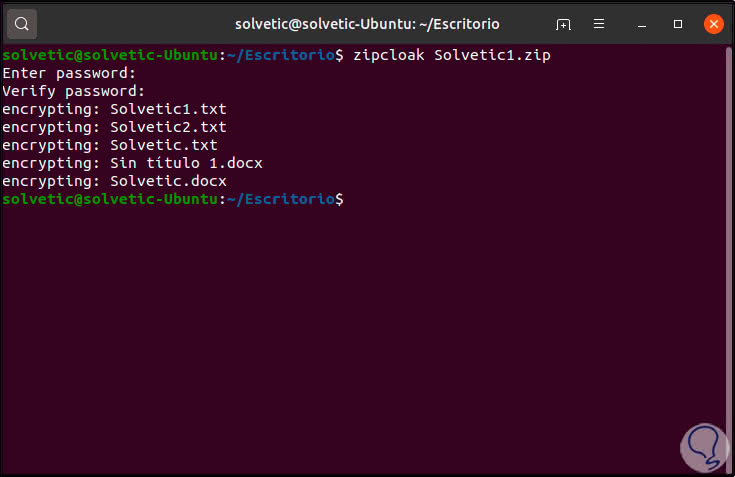
11. How to add a password to a compressed file in Linux
Step 1
It is very useful, believe us, since it applies when for some reason we have forgotten the password of the zip file in Linux, in this type of situations the zipcloak command comes into play, for this we will execute the following:
Zipcloak TechnoWikis1.zip
Step 2
This command will request that we enter and confirm a new password for the selected file:
12. How to view the details of a compressed file in Linux
Step 1
Another of the functions integrated in Linux for the use of compressed files is zipdetails which, as the name implies, will give us specific details of the content, we will use the following line:
zipdetails TechnoWikis.zip | them
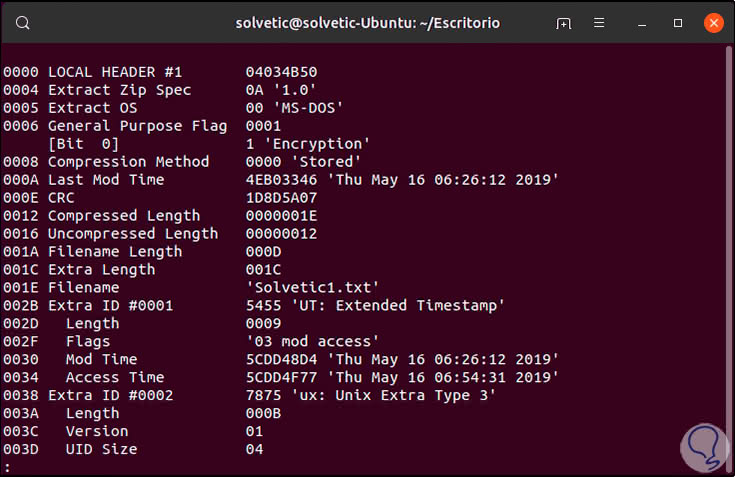
Step 2
The information displayed implies:
- Long compression and much more information
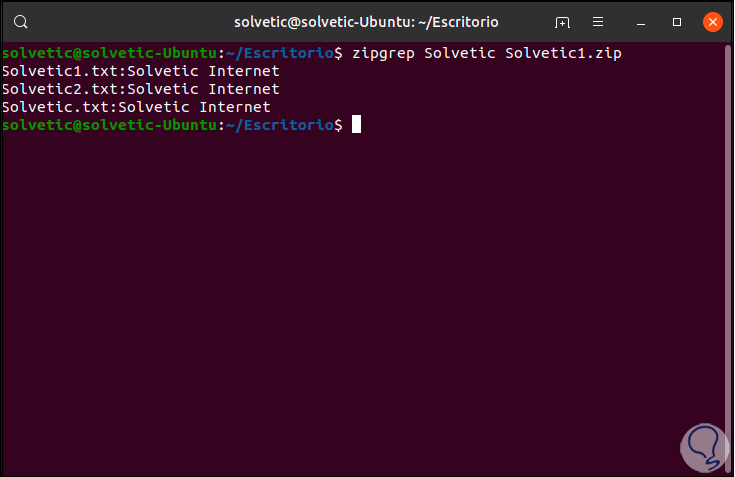
13. How to search for content in a zip file on Linux
Another useful function is the search for a term within a compressed file, for this we will use the zipgrep function. There we found the files and the text associated with the search.
zipgrep TechnoWikis TechnoWikis.zip
14. How to access the zip file information in Linux
Step 1
It is practical when we want to see detailed information of the compressed file, in this case we must use the zipinfo command:
zipinfo TechnoWikis.zip | them
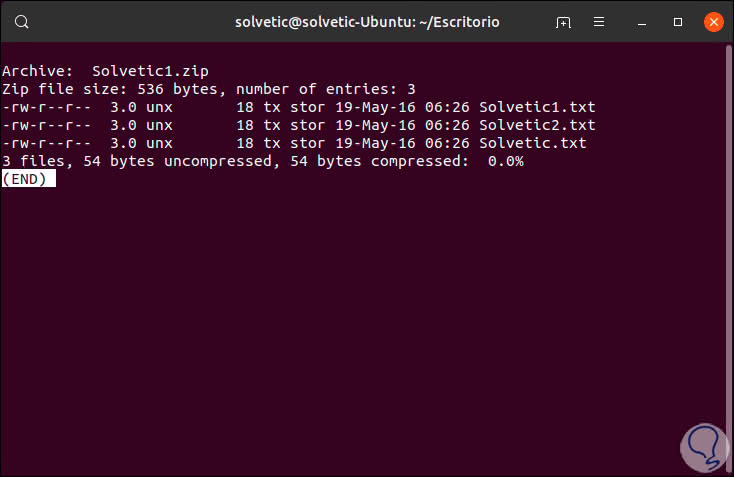
Step 2
We find details like:
- The version of the tool used to create the ZIP file.
- Name of the objects inside the tablet and more
Step 3
The file descriptor is composed of two characters that are:
- The first character can be a "t" or a "b" which indicates if it is a text or binary file, if it is an uppercase letter, it means that the file is encrypted.
- The second character represents the type of metadata included for the file, the options are none, an extended local header, an "additional field" or both.
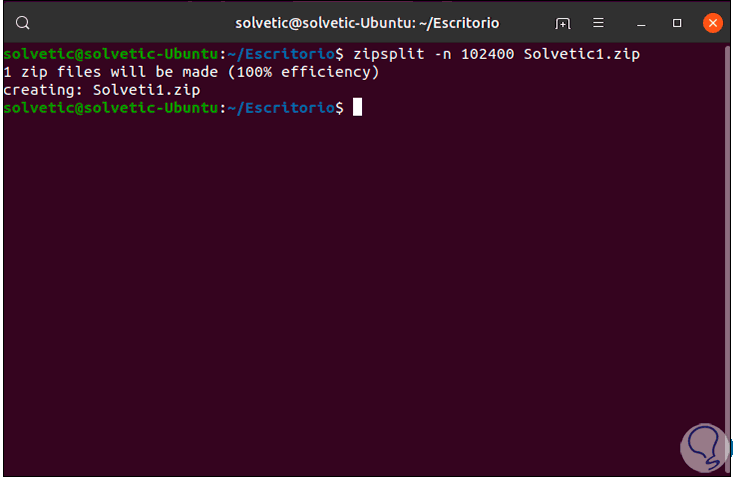
15. How to split a compressed file in Linux on Linux
It is ideal when we need to modify the size of the created file, remember that there are certain size limitations when sending a file, to reduce or set a new size we will use the -n (size) option thanks to which it will be possible to define a maximum size for ZIP files whether new or existing.
We can execute the following. With this order, we have defined the size in maximum 100 KB.
zipsplit -n 102400 TechnoWikis1.zip
Thanks to the zip and unzip commands (adding their various functionalities), the work to compress and decompress the files in Linux will be a really simple, functional, safe and best of all effective task.